In 2019, Marcus Taormina told us about his work on Bird Box. He then took care of the visual effects for The Tax Collector. Today, he explains in detail about his collaboration with Zack Synder and his work on Army of the Dead.
How did you get involved on this show?
I was just coming off a 10 week R&D phase for another Netflix project, and they mentioned AOTD as another upcoming project and asked if I was interested in meeting Zack and Co for consideration as VFX Supervisor on the project. We hit it off in my interview, and I was hired the next week.
What was your feeling to work with Director Zack Snyder?
It was an amazing experience and Zack created such a pleasant work environment for all departments to thrive in. Zack truly is an artist, and being able to work beside him for almost two years was such a great learning experience, one that I will cherish for years to come.
What was his approach and expectations about the visual effects?
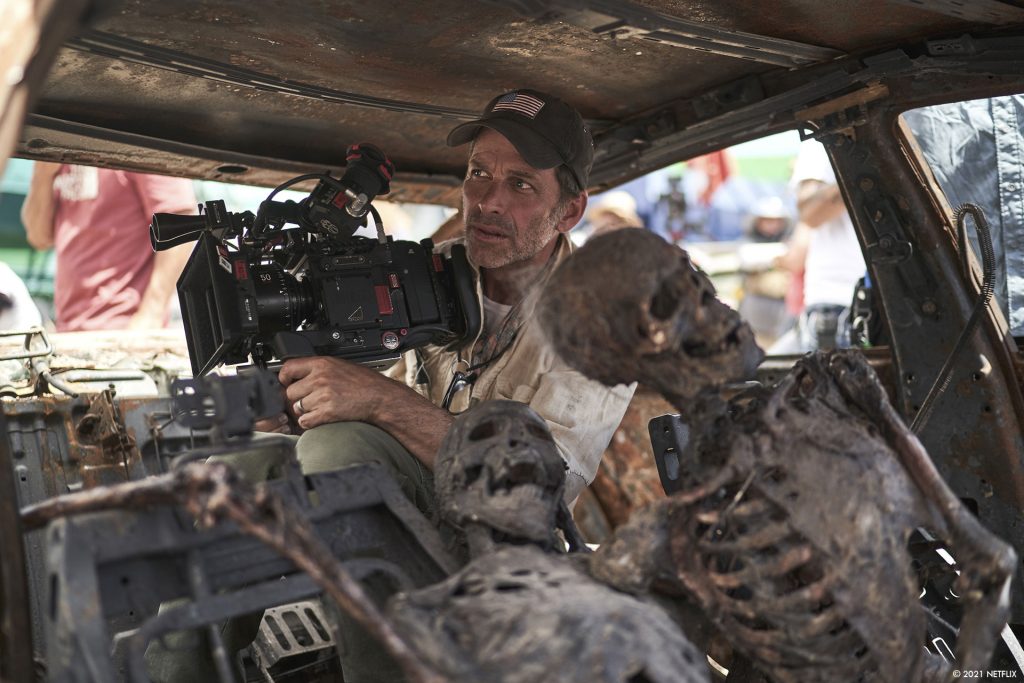
In our early discussions, Zack established that he wanted to utilize effects when we needed to showcase our “scope and scale” shots and for the latter, we both went about it in a rather pragmatic, filmmaking 101 approach. It was a really fun process and, because of the way he was going to film on these vintage lenses (a double edged sword), we were able to do some super low-rent camera trickery and went back to basics for what we could have easily shot as overly complex, VFX shots. In a lot of ways, it felt like we were shooting a student film on a massive budget.
Obviously being a Zack Snyder film, I knew that there would be a montage sequence and some off-speed material, so that’s where he really leaned into our department. I think with the years of experience Zack had with rather heavy, VFX driven features, he had amassed a great understanding and sensibility as to when to utilize visual effects as a storytelling medium. Knowing his past films and the high level of detail in VFX, I knew we would need to set the bar high, and make sure our work was absolutely polished before presenting to him.
How did you organize the work with your VFX Producer?
I have worked with David Robinson, my VFX producer for many shows now, so we definitely have an approach that works. In pre-production we usually divide and conquer as we build the breakdown, and we have a lot of back and forth discussions about the budget and where the work would best align facility-wise. David also keeps the day-to-day running, making sure our boots on the ground set team has the right coverage based on my discussions in prep. In post, he is 100% invested in the financials while still supporting the creative perspective. He will let me know if our sequences are coming over or under, which sometimes means I need to re-think our approaches to our visual effects to help distribute the wealth where it is needed the most in the film. There really hasn’t been a point yet where we end up running into issues because he is so tight with his tracking. It’s truly a team effort and I appreciate him always having my back so I don’t ever have to say no to a really cool shot or idea that needs more exploration.
What was your approach for the devastated Las Vegas and did you receive specific influences and references for Las Vegas?
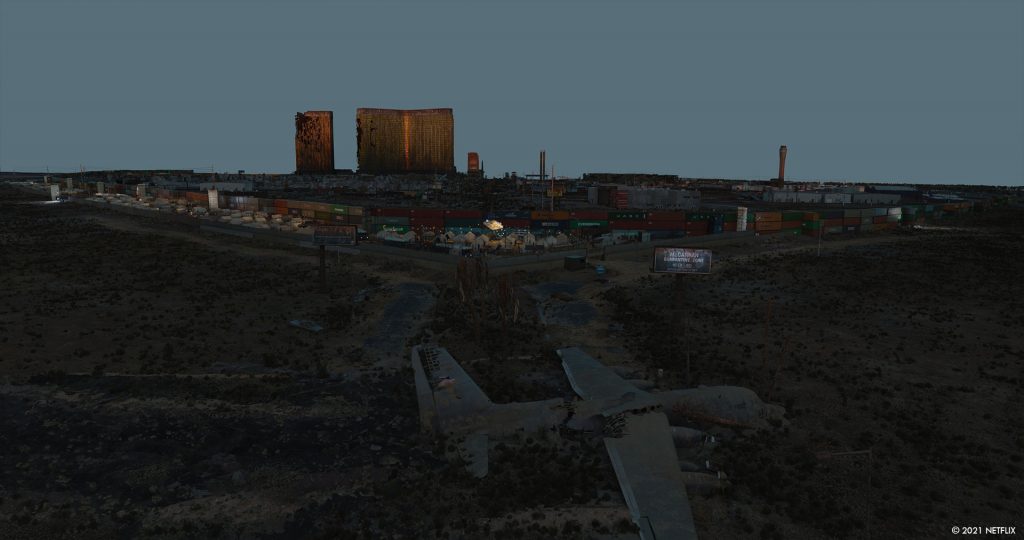
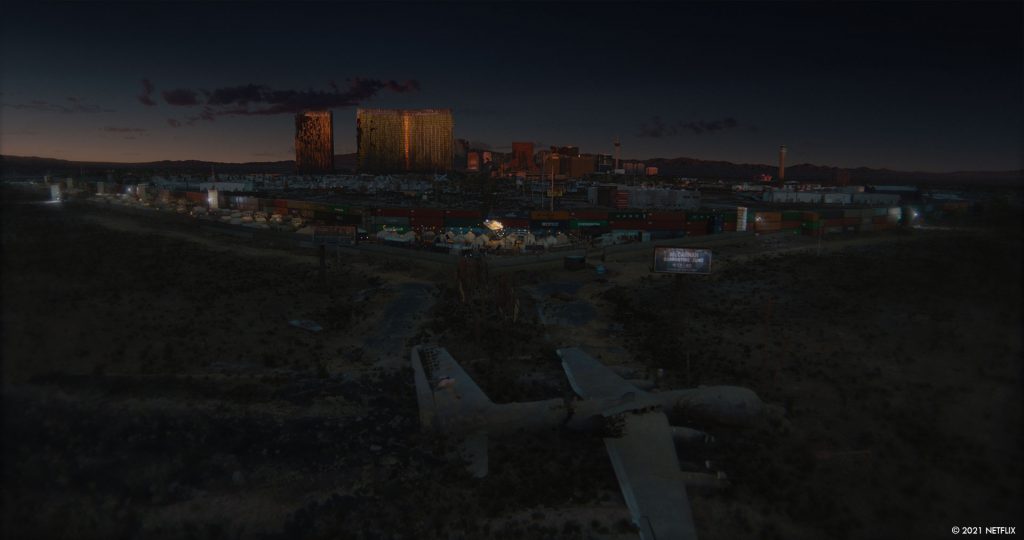
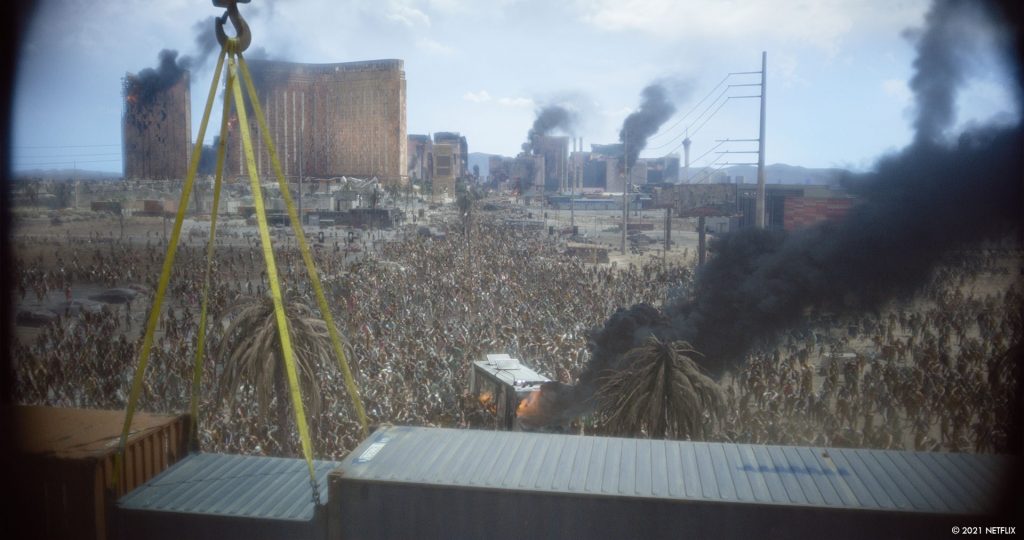
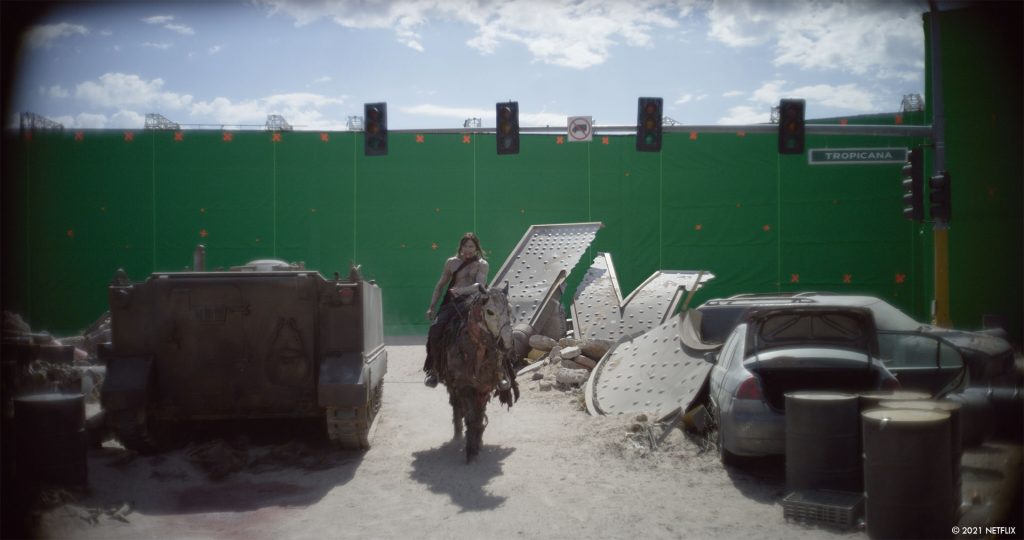
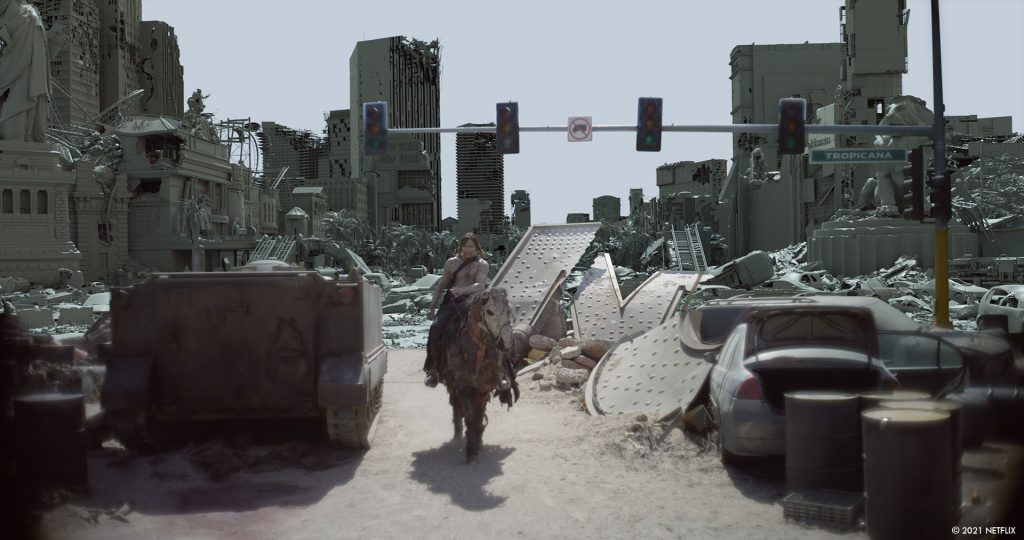
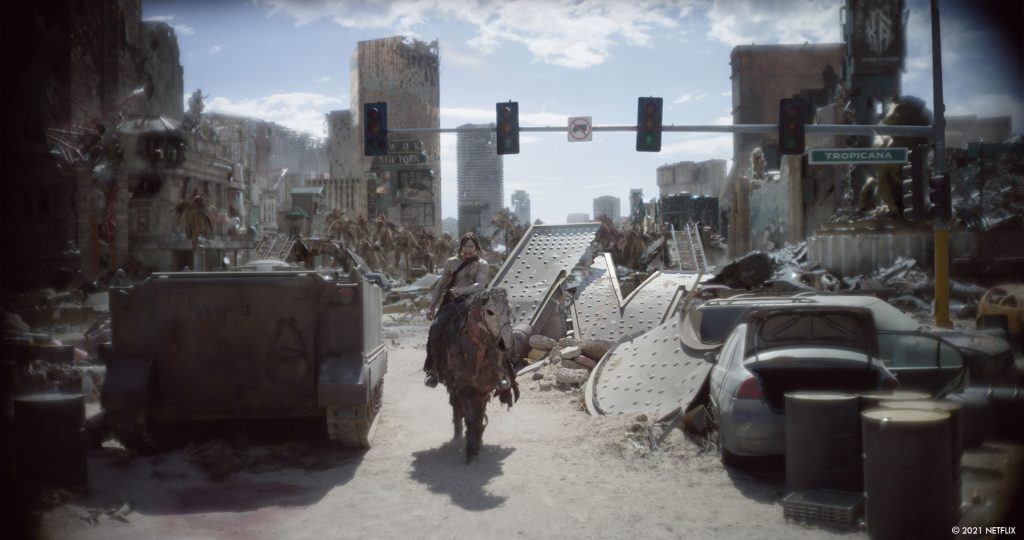
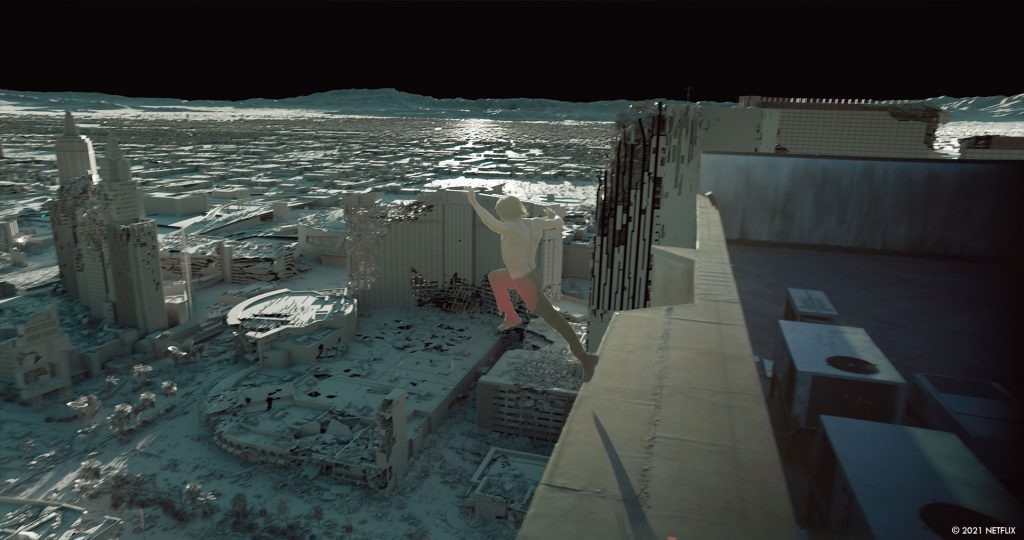
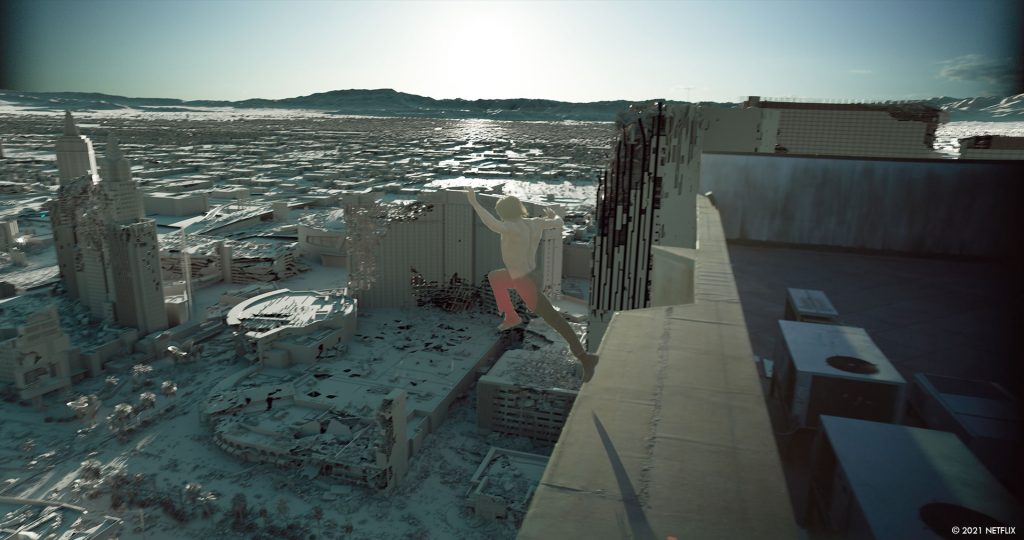
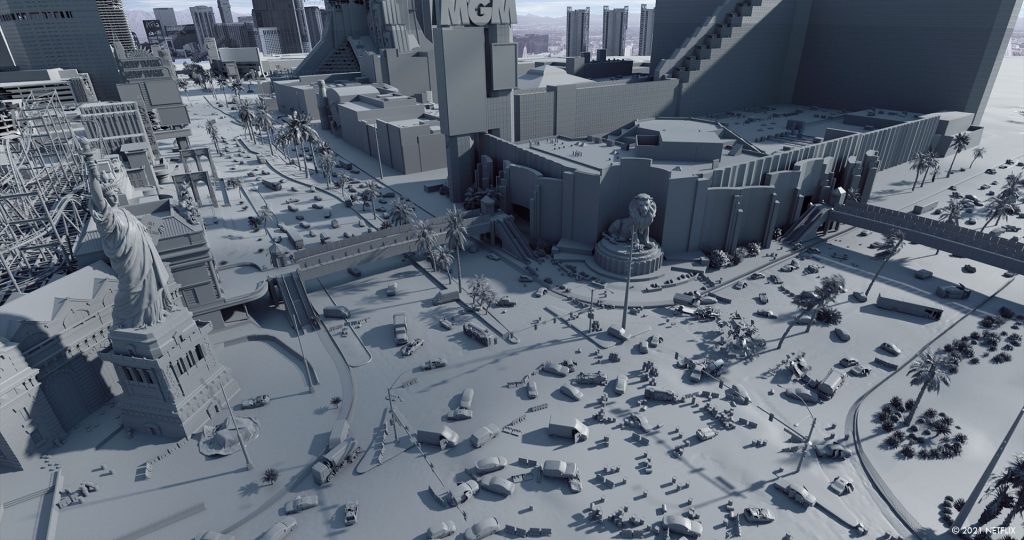
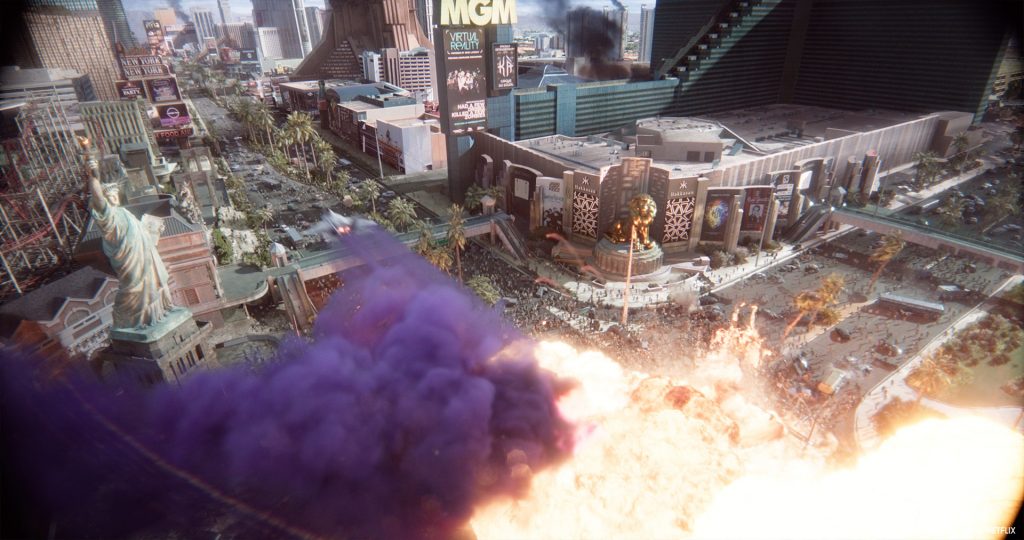
Other than a handful of key-art from our production designer and concept team, we really built most of Las Vegas, Olympus and Bly’s hotel from scratch. We looked at many destroyed and dilapidated cityscapes in real world situations which, unfortunately usually comes from images of war-torn countries, weapons of mass destruction, and natural disasters like earthquakes, tornados and hurricanes. We had many conversations when building our CG Las Vegas specific to our digital set dressing that we felt needed to be added based on the real-world influences that were informed by our 12 day capture in Las Vegas. Lastly, we knew we wanted to leave the iconic pieces of Vegas that our audience can relate to relatively in-tact for our movie. This included our New York New York roller coaster in the Tropicana intersection, the Luxor obelisk, and the iconic gold façade of the Mandalay Bay resort to name a few.
What was the real size of the sets for the exteriors of Las Vegas?
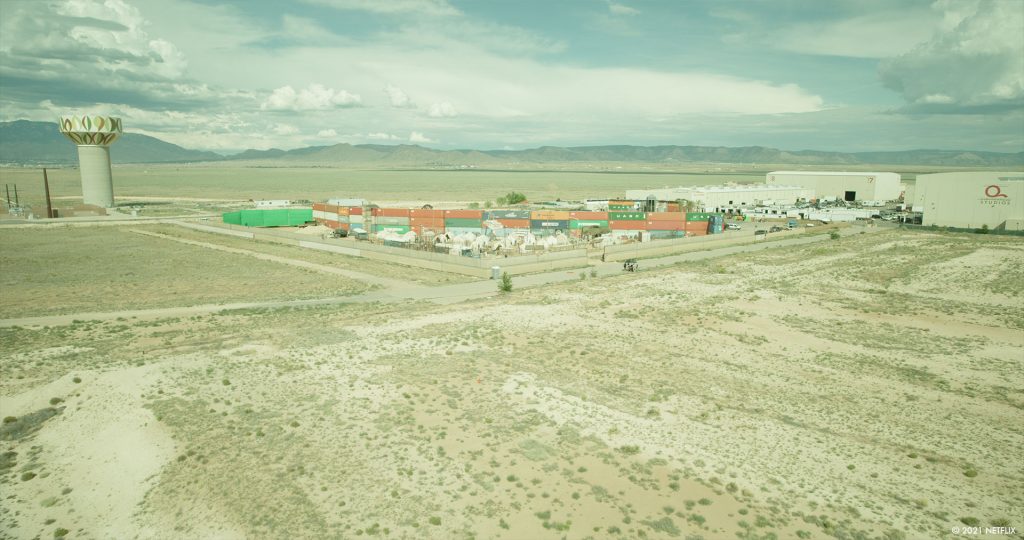
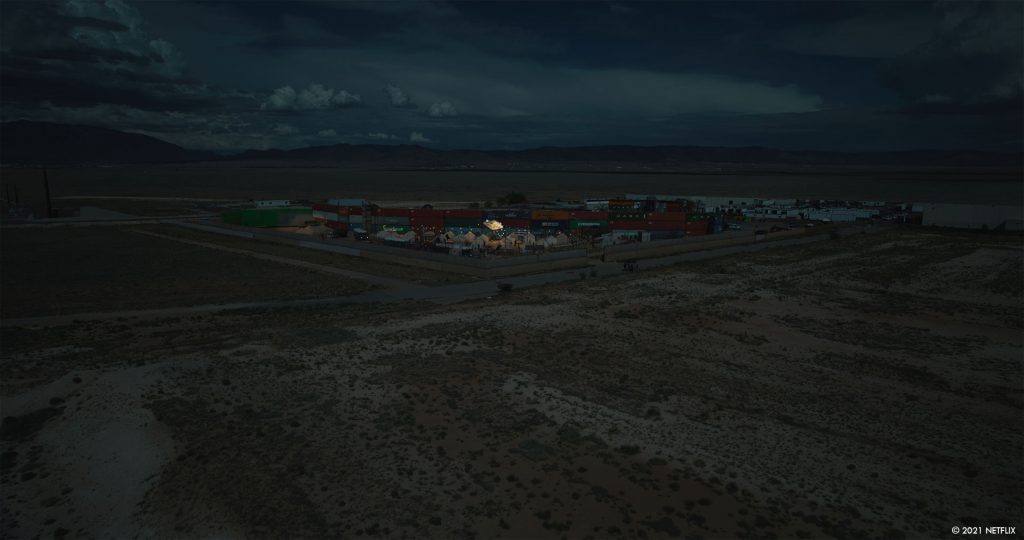
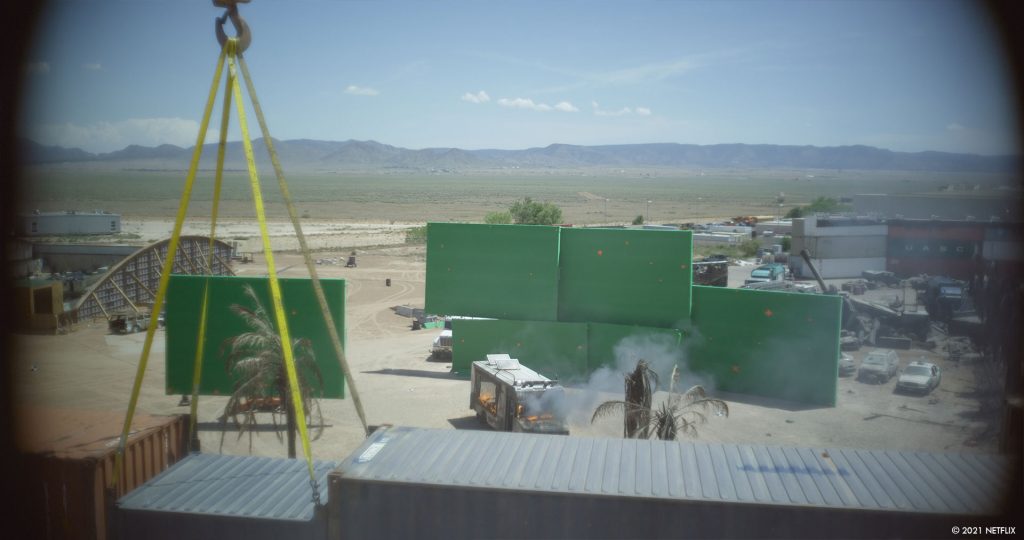
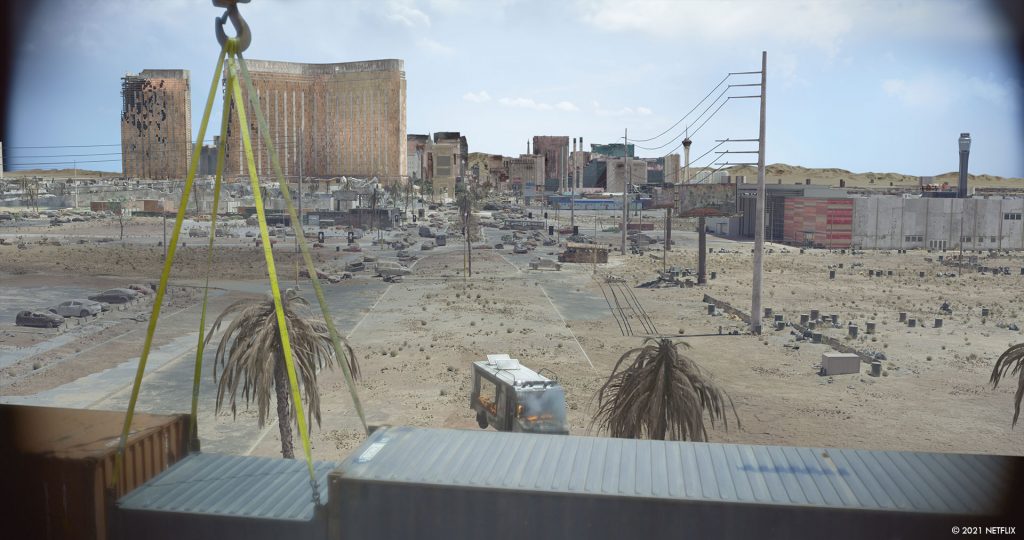
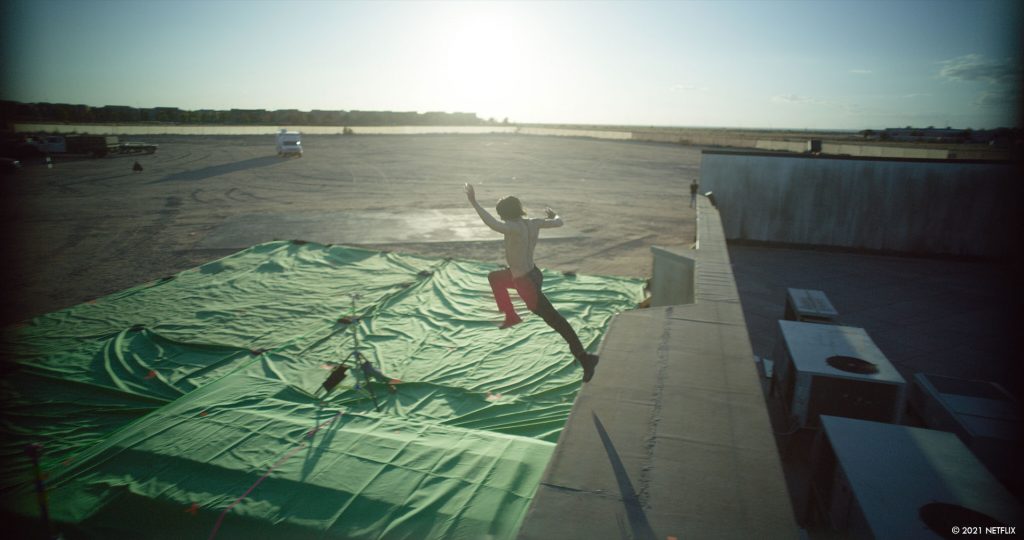
When we are in the Tropicana intersection of Las Vegas where the majority of our action takes place, the set spanned 350 feet wide by 250 feet long. Inside of that space included the collapsed pedestrian bridge, burned out tank, the Tropicana light post, the broken MGM sign, a plethora of various automobiles and 55 gallon barrels and concrete barriers. When we land at Bly’s hotel in the northernmost section of the strip, that exterior wasteland of rubble and rebar was approximately 300 feet wide by 200 feet deep. The rest of the pieces in the montage were shot in the same location in front of a 120 feet wide by 40 foot tall green-screen and, aside from a handful of automobiles, palm trees and concrete barriers, all of the surrounding set dressing and environments were digital.
Can you explain in detail about this massive environment work?
This work was the brunt of the heavy lifting both from asset creation and shot utilization standpoint. Our digital post-apocalyptic Las Vegas is a near 1:1 match to the layout of the Las Vegas strip and surrounding neighborhoods as captured in September 2020 sans the addition of our two fictitious hotels and digital set dressing. The Las Vegas build was a daunting task both from a capture and digital build standpoint just because of the sheer amount of data, from acquisition in the front-end and creation in the back-end.
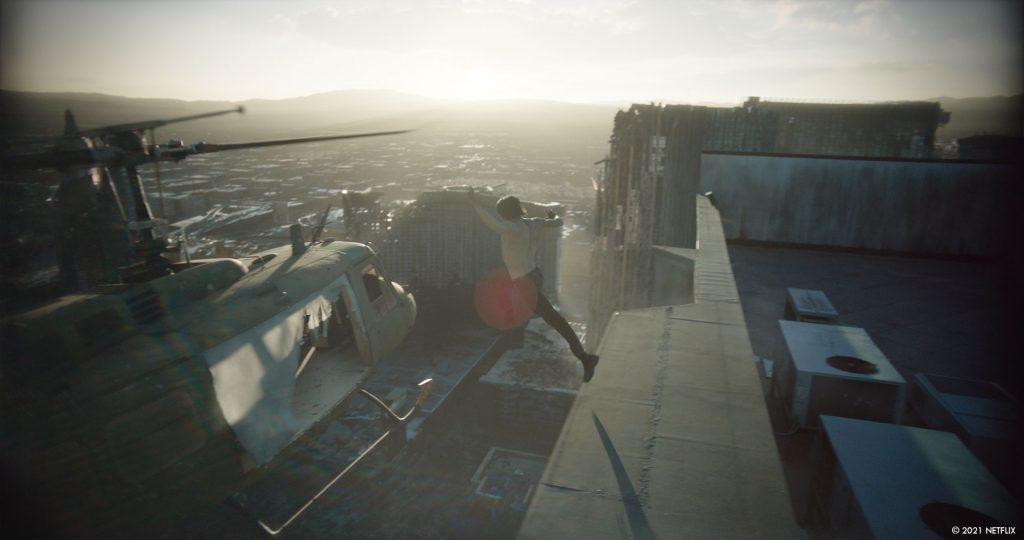
For our capture, we first had to understand where the action took place, so I created a large map with multiple layers of microfiche paper over a Las Vegas tourist map and plotted out all of the characters journeys as scripted to give us a visual. Then, I reviewed this interactive map with Zack and determined the intersections that we would need to focus most resources on both from a capture and digital build standpoint. With this information in mind, plus the final creative briefs, we purchased a low-poly 3D model of the Las Vegas strip that we used as our layout model for shot design, digital scouting, CG camera placement, capture plotting and verification of scale. This model also drove our techvis that we created for the helicopter escape that laid the groundwork for our shooting methodology and gave a visual representation of the action occurring outside the helicopter to our principal cast. Next, I plotted a rough capture plan based on a methodology that utilized terrestrial and rooftop photography and lidar, a tried and true method for environment capture. Framestore then took that rough capture plan and built upon it, honing in on some specific rooftops with correct viewpoints and fields of view to maximize capture (based on the techvis and utilization of the aforementioned layout model). This gave us our best-case shooting plan to present to the city of Las Vegas and the casinos. To my surprise, this plan was rejected from almost every angle.
We went back to the drawing board as a team and realized that, if we were unable to access these vantage points by foot, perhaps we needed to rethink our plan, and the method of capture. The good news that came to light in phase two of our planning was that we would be able to capture along the median and pedestrian walkways with the use of condors and scissor lifts over our allotted 12 days. This meant we would have decent vantage points down the strip at a similar height at which our helicopter would be flying, and where we would need our CG environment to match. This took care of both the terrestrial lidar and photography from ground level to about 70’.
The next puzzle to solve was how to access 70’ and above, and more importantly what we could not see: the rooftops and subsets of the casinos that consisted of the adjoining buildings, pools and golf courses. In early pre-production, I saw a demo of a 150 megapixel camera called the phase one that is often utilized in the AEC world. I thought this would be a great tool to use for capturing our Vegas world, but because of the scarce availability at the time, I glanced over it. Knowing the capabilities, I sent our scanning crew on a mission to find one of these to mount to a drone in hopes that we would be able to use this as a capture method for the 70-200’ that we were not able to “see” in our lift capture. The second piece to this puzzle was accomplished by flying a lidar scanner on a helicopter to capture a point cloud from the lowest altitude we could legally fly, and melding that together, in the computer, with our terrestrial point cloud data. At the same time we captured this data from above, we also fired multiple DSLR cameras simultaneously to capture the view from multiple angles. We rounded out our helicopter pass with a rooftop facing capture on a motion picture camera at a high frame-rate to capture as much visual data as we could for modeling reference and re-projection purposes. The entire helicopter grid was plotted out in Google Earth and then verified against our layout model to ensure a consistent path in which the multiple capture passes were acquired. Once verified, this grid was loaded into the onboard GPS guidance system for our aerial team.
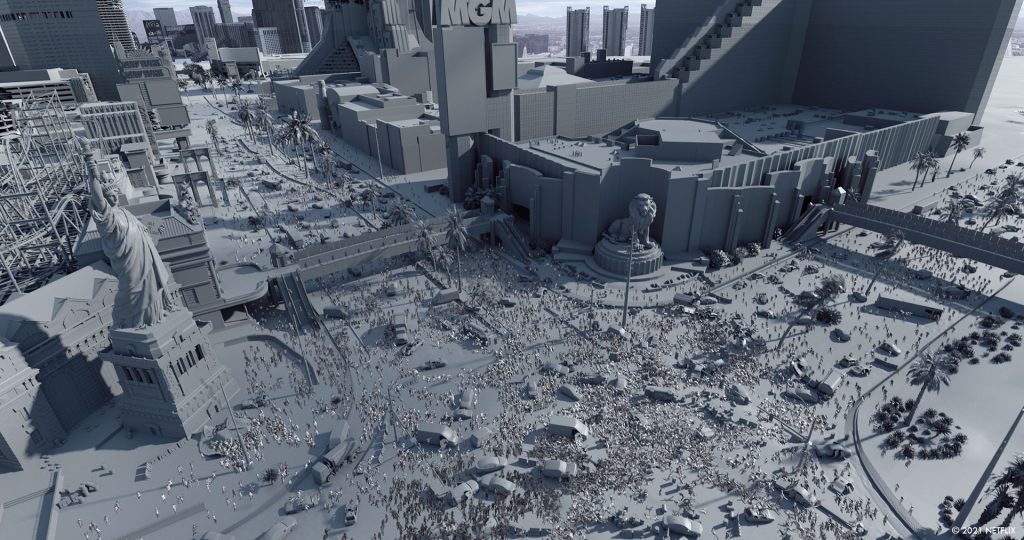
In post-production, once our data was categorized and the crunching was complete, we had to then start our modeling and look development based on the initial concept art and our knowledge of our hero intersections. We decided that we would split the strip into 8 zones for capture, and we would carry those same zones into post to sectionalize the build. As each intersection and zone was completed, we would review together in various stages; most of the time it was smaller section subsets of each zone due to the sheer amount of data each frame would carry in its final stage. All in, we covered just over 5 miles of digital build for our 8 zones of the Las Vegas strip, and around 8 square miles when we included the surrounding terrain and neighborhoods. The dense Las Vegas build included 65 building assets with subsets of connected buildings, since many of these assets were sprawling resorts. There were just over 7,218,200 instances in the Las Vegas build that was digitally populated with over 33,000 trees and over 62,000 vehicles in various states of destruction and dilapidation, some of which were modeled and laid out to match our practical set builds in Albuquerque and Atlantic City. The final build took over 7 months to finalize, and I have to praise the entire team at Framestore Montréal for optimizing the build in a modular fashion to give us as much flexibility in post to add our world-building, scope and scale shots later in post. There was surprisingly never a time in which we had to sacrifice a shot due to the complexity of the build and render time, even with the new cityscape shots in the additional photography.
How did you populate the streets with the zombie crowd?
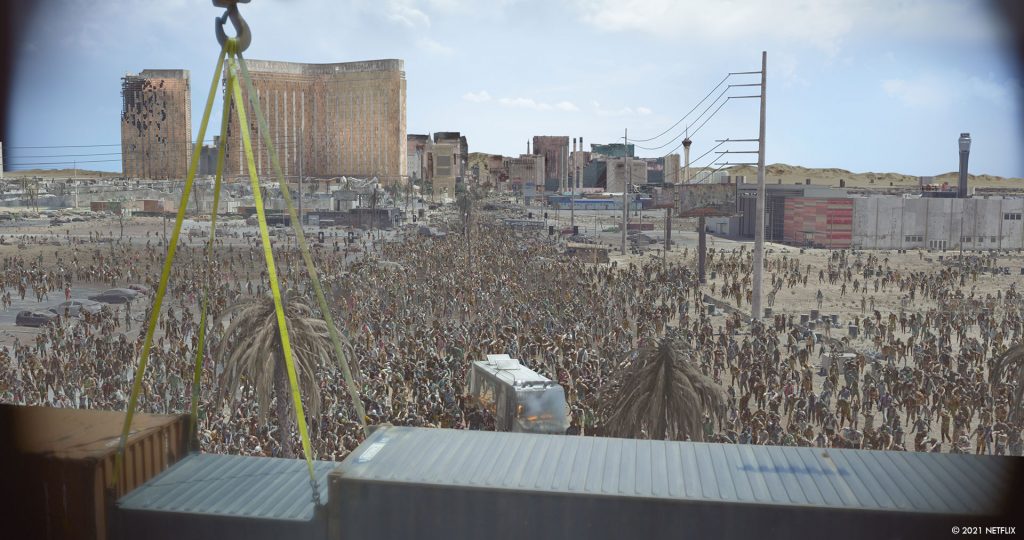
From a look standpoint we had terabytes of data that our on-set team captured consisting of photographic elements of the hero zombie wardrobe, makeup and hair across all body shapes and denominations. We created a 360 degree capture system that relied on a handful of DSLR cameras that we were able to fire simultaneously as the rig was rotated around our stationary characters. This helped us to capture hundreds of looks in a cost-effective manner. On our heavy Alpha and zombie production days, we also captured a library of 10-15 looks in a more robust, high fidelity capture system that we would extract our 3D models from. We also filmed range-of-motion videos of these 10-15 performers for our animation, crowd and look dev teams to have for reference that followed a predefined list of actions. This would prove useful when building the digital versions of these characters and their various counterparts.
From an animation and crowd simulation standpoint, we had initially planned for a more traditional motion capture session once our principle photography completed. It wasn’t until we got some additional script pages late in the production that I started to consider the use of some newer inertial capture technology I had seen in action at a production showcase. The idea that these xsens suits could be used in just about any environment was extremely appealing as you could capture scene specific performances within spatially accurate sets. Even though the scene’s creative brief changed on the day, and the capture suits were no longer needed for that specific beat, the mobility and relatively low footprint of these suits and the capture team made it easy to move everything inside into a soundstage. Because we had planned ahead and discussed the needs for both our crowd and animation teams, and our stunt team was well versed in the various stages of movement for the Shambler and Alpha zombies, we were up and running within an hour of moving. With an animation supervisor, five stunt performers, one xsens operator, one TD and a handful of witness cameras and operators, we were able to capture our entire library needed for all our digital zombie hordes in one day!
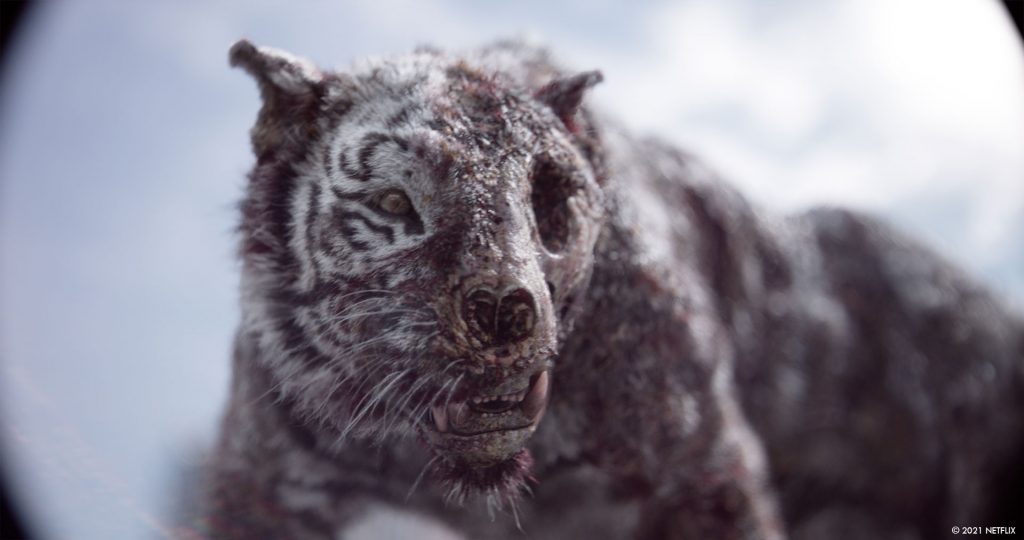
One of the stars of the movie is Valentine, the zombie tiger. Can you elaborate about her design and creation?
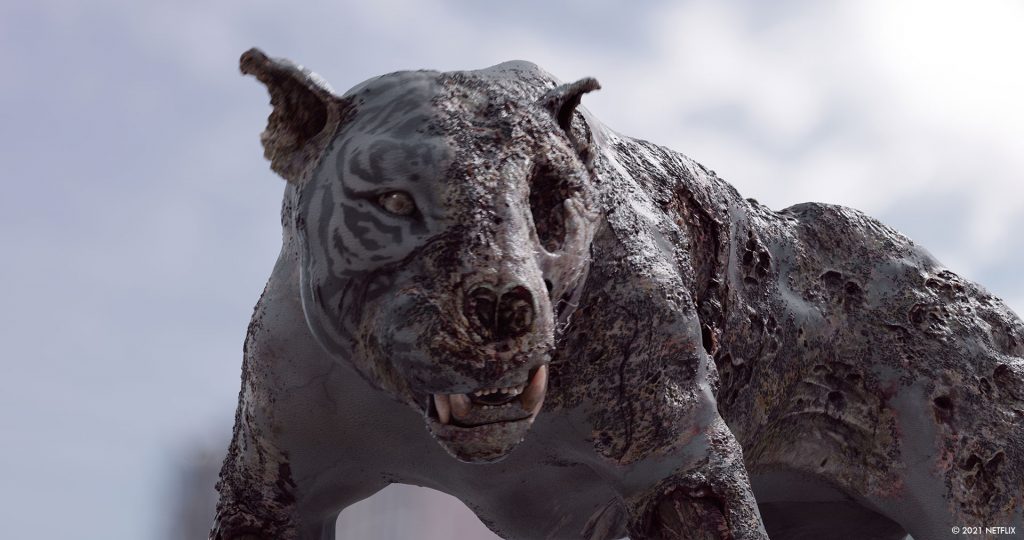
Valentine, the CG tiger in Army of the Dead, was a very fun, albeit far-reaching adventure in creature development. In my initial interview with Zack, I asked him his major concerns from a visual effects standpoint. The first concern was the extent to which we needed to utilize our digital Las Vegas build. His second concern was creating and executing a believable digital zombie tiger for the Valentine scenes, one of which included an extensive mauling scene with a key cast member.
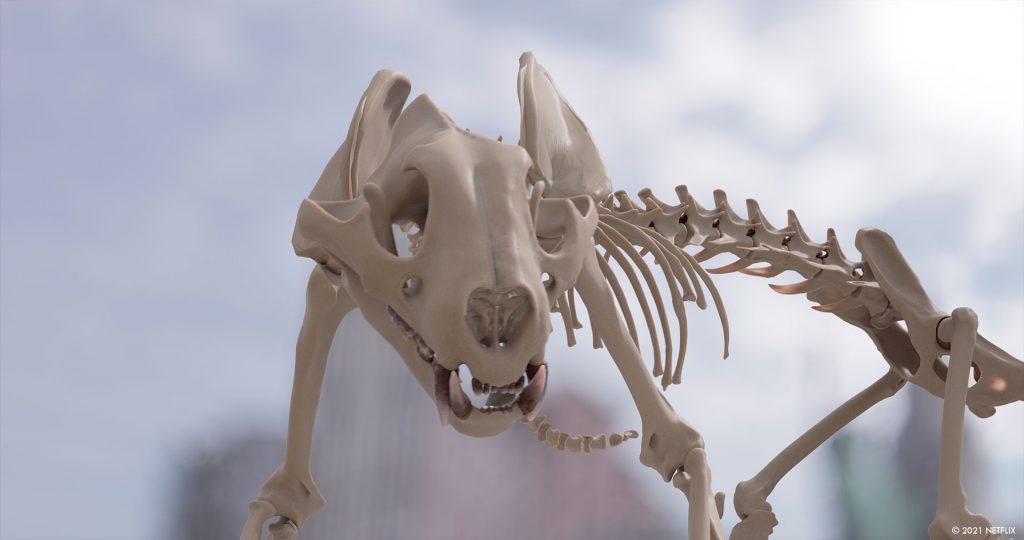
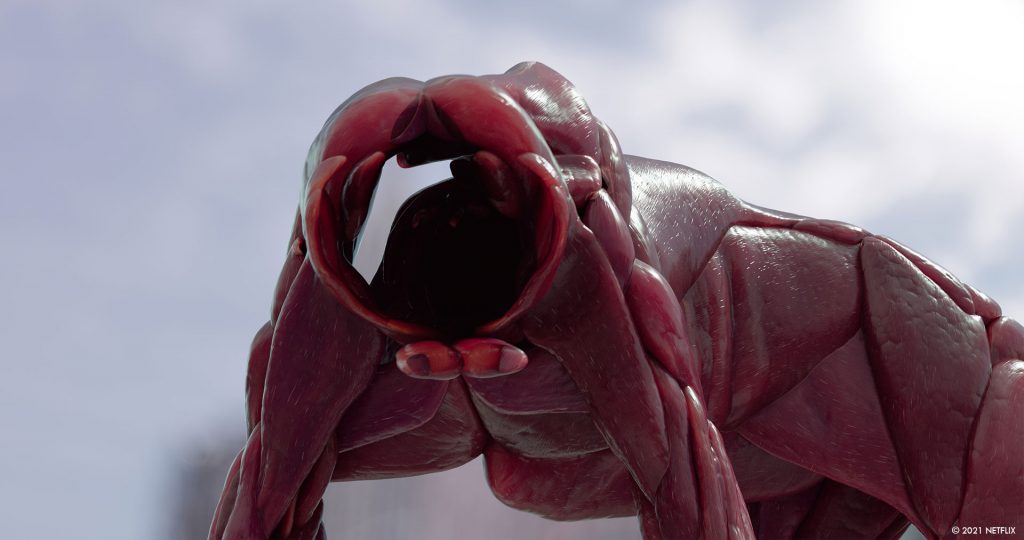
Early on in pre-production, we started doing some R&D for the look of Valentine based on some Zack-approved brushstroke concept art designed by Jared Purrington. During that design phase, we explored the shape and build of Valentine, including the amount of mass we thought a full grown female zombie tiger that had been scavenging for six years would have; primary, secondary and tertiary layers of battle damage and weathering on her fur coat all the way through the underlying tendons, muscle and bone; lastly, the coloration of both her fur groom and zombie eyes. We studied copious amounts of real world decay that included graphic decomposed and emaciated animal photos and videos for reference. Once we understood the rules and had a look book of sorts, we discussed the next challenge: how are we going to build this tiger, and what do we base it on? As the pieces fell into place and we confirmed Framestore Montréal as our main facility, I challenged them to come up with a convincing reel of some of the photo-real animals they had been compiling over the years. I had heard of the amazing work that the team had just accomplished on Timmy Failure with the polar bear “Total” so I asked if they could include that in the reel both as a final sale point, and also as an assurance to Zack and Co that we could indeed make (in Zack terminology) a “Bulletproof Zombie Tiger”.
After we sold Zack with the reel and awarded the work, Robert Winter and I started brainstorming the best way to capture the spirit of a white tiger without ever actually having it step onto set (even though that was discussed). What had worked really successfully for all departments on Timmy Failure was finding a real Polar Bear and capturing its movement and actions that were direct matches to the performance needed in the film. Using this reference as a guide, the departments could always have something to lean back on and view as we were crafting the character of Valentine.
After an extensive search and what seemed like a hundred phone calls to tiger rescues across the states by both the Montréal producing team and myself, we finally found a company to agree to let us film their white Tiger, Sapphire, who lived in Tampa, FL at Big Cat Rescue. We shot our reference video on 3 motion picture cameras from as many angles as we could, as close as safety would allow in the presence of the owner, Carole Baskin, who walked us through the process of keeping and caring for so many big cats, their daily habits and feeding routines. We also captured extensive lighting references and, when Sapphire was safely in her holding cell, we were granted access to the inside of her cage to lidar scan so we could accurately verify her scale against our CG counterpart when viewing the hundreds of hours of footage we amassed. This footage included important actions like pouncing, jumping, walking, roaring and eating. Armed with this footage, we could now start the process of modeling Valentine, and eventually set her in motion with the creature effects and animation team.
Can you tell us more about her skin and fur creation?
Obviously Valentine’s performance was crucial to the character, but the look was equally as important as without a proper CG groom and realistic look, the believability would fall apart. We had a lot of discussions about the layers of caked-in matter that she would have been carrying over time as we see her years after her escape from the Mirage. As we created a backstory for Valentine, we realized she would have spent a lot of her time roaming the expanse and lying on dirty, grimy surfaces. We knew her external wounds would have been dried, resulting in a darker crimson or even black color in sections. We felt that her skin and her hair would have also gotten caught, and grazed against a lot of the ridged, rusty scrapyard of dilapidated cars on the main drag. Understanding the backstory of a creature you are creating from scratch is just as important as a story that is written in a script. It’s usually this thought process that also leads to finer details that bring digital creations to a whole other level, especially when everyone involved in the process is 100% invested. Our much-loved Valentine’s asset consisted of 1,751,240 hairs and within that groom we had 220,800 droplets of blood, 53,350 dirt specks and 676,680 grains of sand (not that anyone was counting).
Can you elaborate about the Valentine animations?
Once we had our asset established and our proper rigging in place, the animation team led by Hennadii Prykhodko began matching the CG animation cycles against the practically filmed Sapphire footage to start the process. When we got into shot specific, bespoke animations we started to discover that we needed to add an extra layer of secondary animation to break away from the standard, white tiger movement and really create the character of Valentine. In some scenes, we decided to over emphasize the use of the tail, keying into the playfulness as seen in their domesticated counterparts – the house cat. We also strived to channel some of that same attitude in specific beats throughout; pulling Valentine’s attention away from the moment by an off-screen distraction, skittish movements and ticks from a far away noises as seen in the subtle ear, cheek and eye movements, or even a large yawn of boredom as she flops down into her favorite resting spot. This secondary and tertiary detail added by the animation team in the final shots really helps take Valentine’s performance to another level of authenticity.
How does her “zombie” aspect affect the animation work?
Because of Valentine’s facial design and lack of normal features we would usually expect from a white tiger, we knew we would need to sell some of the facial animation a bit harder than usual, and we tried to amplify some of the real life movements within her body to help bridge that gap. At some point in the design phase, Robert and I discussed adding a remnant of an optic nerve for Valentine’s left eye that we would then animate with the movement one would expect if an eyeball was in the socket, but we ultimately scrapped that idea as it became too busy and felt over-designed and too complex. Some of the other aspects of the design that impacted the animation & creature dev teams included the various levels of Val’s decay that revealed multiple layers of fascia, muscle and bone underneath. All of these layers needed to resolve in a realistic looking way based on how Valentine was designed, which was challenging because “under the hood” Valentine was sculpted and inspired by Sapphire, a real life tiger that had anatomically correct fatty tissue, muscle mass and skeletal features. Some of the normalises, like a proper fatty jiggle from a paw hitting the ground for instance, proved to be a challenge when the fat layer was removed. Once we were out of the design phase and into shot creation, we crafted our shots around these considerations, but never deviated from showing these areas as we knew it was important to the character development of Valentine. The entire team at Framestore did a great job of rectifying any one of these small “issues” when they presented themselves for the better of the film.
In one sequence, Valentine is “playing” with one of the characters. How was this intense scene created?
This sequence is an excellent example of how collaboration between departments is so important and can lead to amazing visuals to support the storytelling. In prep, we discussed this sequence as scripted and had a lot of conversations about each of the beats and how we could achieve as much of it practically as possible. We knew we would need to rely on both extensive wirework and a proxy stand-in that represented our CG Valentine to sell the interaction.
At the time we shot the sequence, Albert “Spider” Valladares, our amazing stunt performer that had already portrayed Val in the other scenes, had a really great understanding of the character we were crafting, which was a huge advantage. When he stepped into the green suit to act as Valentine, he truly became the character which led to some amazing performances between our CG tiger and Garret Dillahunt in the final picture.
For the front end of the sequence, Garret did all of his own stunt-work, which really adds to the believability. A stunt performer stepped in for the more violent parts throughout. To ultimately make this successful, we also had support from our makeup effects team for the claw gnashes on Martin’s face and Valentine’s puppet head and the stunt team for the complex wirework, rigging and choreography.
In post-production we had to look at the footage with a fine tooth comb and discuss the subtle changes that were needed to help get that extra 10% authenticity including, but not limited to, partial digital leg replacements for better blending with Valentine’s jaw interaction, 2.5D face replacements, gore and gash enhancements that included 3D blood simulations and the addition of a CG gun and baseball cap.
For the crescendo of the sequence, we created a photo-real digital head, modeled inside and out, that would need to be merged through a takeover and crushed like a watermelon. Some of the real-life footage of Sapphire eating game-hens proved useful to our sharp-eyed animation team that were able to key into some of the subtle micro-adjustments of her jaw as she crushed her prey. The final piece, supported by the FX team and rounded out by the compositors is our homage to some of the comedian Gallagher’s finest work!
There is another special zombie, the horse. Can you elaborate about him?
We really just helped support Gabe Bartalos and the MUFX team with some minor paint fixes and cleanup atop their amazing work. For contingency sake, we knew we wanted to capture the application just in case we needed to re-create the horse for any digital shots. Gabe and Co allowed us access to the prosthetic pieces in his shop in LA where we scanned and photographed them on a stationary horse statue which gave us very similar proportions to the horse photographed in principle photography. Later in the process, as expected, we were asked to build a CG zombie horse to use in some of our scope and scale shots we designed in post production. Luckily, at that time, we had already finished our Valentine build and animation, and learned so much from her along the process of creation that we could apply or consider when building our CG horse. We had also already shot all of the live action footage of the horse in multiple scenes for our animation, lighting and look dev team to lean into and learn from, so the process of creating the digital zombie horse was easier than anticipated.
How did you work with the SFX and stunt teams?
Both teams were amazing to work beside and each team brought their own unique perspectives and knowledge from the field. From a special effects standpoint, anything that we could accomplish practically within the shooting timeframe we explored. Michael Gaspar and his crew gave us a great base to build upon, whether it was our blood elements and body parts, smoke grenades, helicopter gimbals, or dust explosions to bury our CG helicopter within. Our stunt team, led by Damon Caro, was always pushing the boundaries in terms of performance but was always considerate of the visual effects process and would work hand-in-hand with us to bridge the gap between any takeovers or handoffs between practical and digital.
Which stunt was the most complicated to enhance and why?
Surprisingly one of the more complex stunts to enhance was when the Shamblers jump onto the car in the montage, and explode into bits. The stunt action, at the core, was super simple but the complexities that made up the shot were complicated. The shot consisted of a multi-element composite that included our stunt performers jumping onto the car hood and holding a pose. To do this the special effects team hollowed out a pair of life-sized foam core mannequins and filled them with gallons of blood bags. These mannequins were then triggered and exploded as a second element that would need to be blended into the performance pass and then composited into another pass of the Shambler zombies in the background, another pass of bullet holes and car hits, another pass of a car on fire in the background, and finally, an element of Shamblers to fill out the negative space on the screen left side.
Once these elements were completed, the practical exploding body parts needed to be rotoscoped out of that pass when a chroma key was not possible due to the fine particulate that clouded the air. This process took months of rotoscoping and paintwork to preserve the great pieces of the practical effects. These extracted practical exploding body parts were then enhanced with multiple layers of digital gore and body parts that then spill onto, and off of the hood of the car; resulting in a perfect harmony between stunts, practical and visual effects.
The movie is really gory. How did you enhance this aspect?
Zack had mentioned to me that he wanted to do as much of the gore as possible in post-production to enable him to shoot fast and multiple takes without waiting for cleanup. As a VFX supervisor, that means that we would need to have an extensive library and determine a look to those various stages of zombie blood. As our conversations continued in prep, we honed in on the rules of the blood as it related to the various stages of decay in the Shambler zombies, as established by our makeup effects team. We also discussed Alpha blood and how it had to have a slightly different look from the Shamblers. Once we established this roadmap, I had extensive discussions with production and our special effects team about shooting some blood elements that we could use in both compositing and look development for FX. We also talked about utilizing practical effects gore for certain sequences where we needed interaction among cast members (Zeus biting the soldiers on the neck, Vanderhoe’s gore saw in the montage sequence, Shamblers being blown to bits by Cruz’s 50 caliber gun and Chambers being bitten by the horde of zombies in the hallway are just a few of these beats). We knew that SPFX would establish a great look and language to the blood in these sequences, giving us a base to build upon, often blending in our additional CG gore to offer a seamless integration and handoff between both departments. When it came to headshots, we utilized all of the tool sets at our fingertips, as we wanted each headshot to be unique. Throughout the movie we would earmark certain beats of sequences for full, volumetric 3D renders of gore in Houdini, while others would either utilize 2D elements or 2.5D gore rendered in nuke.
Can you explain in detail about the creation of the various explosions and how did you handle the slow-motion aspects of them?
In the montage sequence, we had to create a lot of over-cranked explosions, destruction and mayhem, most of which was created in the computer by an army of talent. We approached the explosions in a similar fashion to the gore and once again enlisted our special effects team to help us shoot elements to model our digital explosions after. We ended up shooting the elements of various sizes and perspectives with 3-4 motion picture cameras covering multiple angles for each take, giving us almost 270 degrees of coverage for each explosion ranging from 48fps to 60fps per camera. This library in combination with archival video of nuclear explosions, napalm strike tests, and real world explosions and concussive blasts gave us a base for the FX team to lean into when creating the CG counterparts as seen in the final film.
Which sequence or shot was the most challenging?
Believe it or not, one of the most challenging sequences was when the container transporting Zeus gets ejected from the military vehicle. This sequence ended up frying some cameras and in passing fried the media in said cameras. From an editorial standpoint, we only had one take with only three camera angles to select from, so editing the action proved to be a challenge. Because of the limited selection, we were forced to animate our container within the confines of the edit, but we had to craft the container reveal and conceal in a way that felt grounded in reality. The animation team did a fantastic job in finally nailing it within these strict parameters. They did however, very graciously, reveal to me during wrap that not a single Valentine shot took as many iterations of animation for approval.
Did you want to reveal any invisible effects?
Something that the viewing audience may not notice is that every ammunition round aside from the 50 caliber shell casings are computer generated. Being a Zack Snyder film, even the simplest of things like muzzle flashes and shell casings had to be stylized, so we did exactly that. It took our in-house team, aptly named AREA 51, some finessing early on in the temp process to nail down the muzzle flash look and later the 2.5D and 3D shell casing ejection scripts. We provided these scripts to all facilities on the show along with a visual style guide to follow.
How did you choose the various vendors and split the work amongst the vendors?
Once we have an initial pass of the script breakdown, I usually pool together a list of facilities that I feel would complement the creative and technical aspects of the feature. For AOTD, I knew we’d need brilliant teams skilled in environment, creative dev, and animation.
I had always appreciated the visual aesthetics of the work done at Framestore over the years, and decided they would be the best fit as our main facility. The remaining bulk of shots outside of the Framestore work varied in complexities from 3D gore, multi-element composites, 2D composites and paint fixes ranging from wire & rig removals to character paint out & background reconstructions.
For some of the 3D gore, we worked with the great team at Crafty Apes in Atlanta. They also helped add some details to help us tie to Las Vegas in the opening sequence, as well as some enhancements to our practical special effects & makeup effects in the casino fight.
Mammal Studios, a constant collaborative partner, helped in some early layout & techvis for our Las Vegas environment and some shot design blocking for the helicopter escape and some fully digital shots in the third-act. That same team also helped design and setup a modular muzzle-flash and shell casing script that was shared among facilities. Their final work included muzzle flashes and shell casings, complex paint-outs, multi-element composites and 2D/3D gore depending on the sequence.
Instinctual provided paint fixes, off-speed retimes, and the majority of the makeup effects cleanup and fixes for the Shamblers, Alphas, Zeus and Queen shots.
How was the collaboration with their VFX Supervisors?
I always try to create a collaborative work environment in which each facility supervisor and their teams feel as though they have a voice in the final product. The best work comes from the amalgamation of ideas that you discover together along the way. For this film in particular I was fortunate to have had such an amazing experience with each and every team from the five facilities we enlisted to craft the work you see on screen. Robert Winter and Joao Sita at Framestore Montréal were amazing leaders to a team of highly skilled artists and we really bonded along the way, especially during our WFH dress-up Fridays. The teams at Mammal Studios, Crafty Apes and Instinctual did fantastic work with amazing leadership as well.
Is there something specific that gives you some really short nights?
Some of the heavier FX components in the montage sequence, primary animation passes in some of the Valentine scenes and, of course, the more complex lighting and camera scenarios involved in the Tig Notaro additions.
What is your favorite shot or sequence?
It’s hard to choose only one! I think two of my favorite shots are the Eiffel Tower crushing Elvis (za0540) and when Martin meets his demise (mm0350). My favorite sequences are the opening montage and the helicopter escape in the third act; some of the most complex technically, but also the most rewarding.
What is your best memory on this show?
Working with some really amazing and talented crew members that really appreciated the craft as whole, but also were proud of their roles as part of the larger picture. That, and working alongside an amazing leader that made each day at work more enjoyable than the last.
How long have you worked on this show?
Start to finish it was just under 2 years.
What’s the VFX shots count?
Approximately 1,136 visual effects shots of varying complexities.
If it’s not a secret, are you already busy on a new show?
Currently enjoying time with the family and hoping another exciting show materializes soon!
A big thanks for your time.
// Army of the Dead – VFX Reel
WANT TO KNOW MORE?
Framestore: Dedicated page about Army of the Dead on Framestore website.
Netflix: You can now watch Army of the Dead on Netflix.
Netflix: You can now watch Creating an Army of the Dead on Netflix.
© Vincent Frei – The Art of VFX – 2021


