After telling us about his work on GREEN ZONE, Charlie Noble returns to the Art of VFX with his team of Double Negative to explain in detail his work on CAPTAIN AMERICA.
How did you get involved on this project?
Following on from our work on IRON MAN 2 (the vintage F1 Monaco Grand Prix sequence) we were approached mid-2010 to bid on 700 or so shots for CAPTAIN AMERICA. The work was divided between London and our Singapore studio with the bulk staying in London. It was also good to work with Joe Johnston again after THE WOLFMAN last year.
How was the collaboration with director Joe Johnston and Production VFX supervisor Christopher Townsend?
We actually had relatively little direct contact with Joe. Everything came through Chris and after the UK shoot we were in constant contact via Cinesync most evenings. I can’t praise Chris enough; he was so helpful and gave great notes. He’s done an amazing job on this show. Joe did manage to pop in to Double Negative whilst in London working on the score and as someone with such a wealth of experience he clearly knows his visual effects. It’s been a pleasure working with him again.
What sequences have you made on this show?
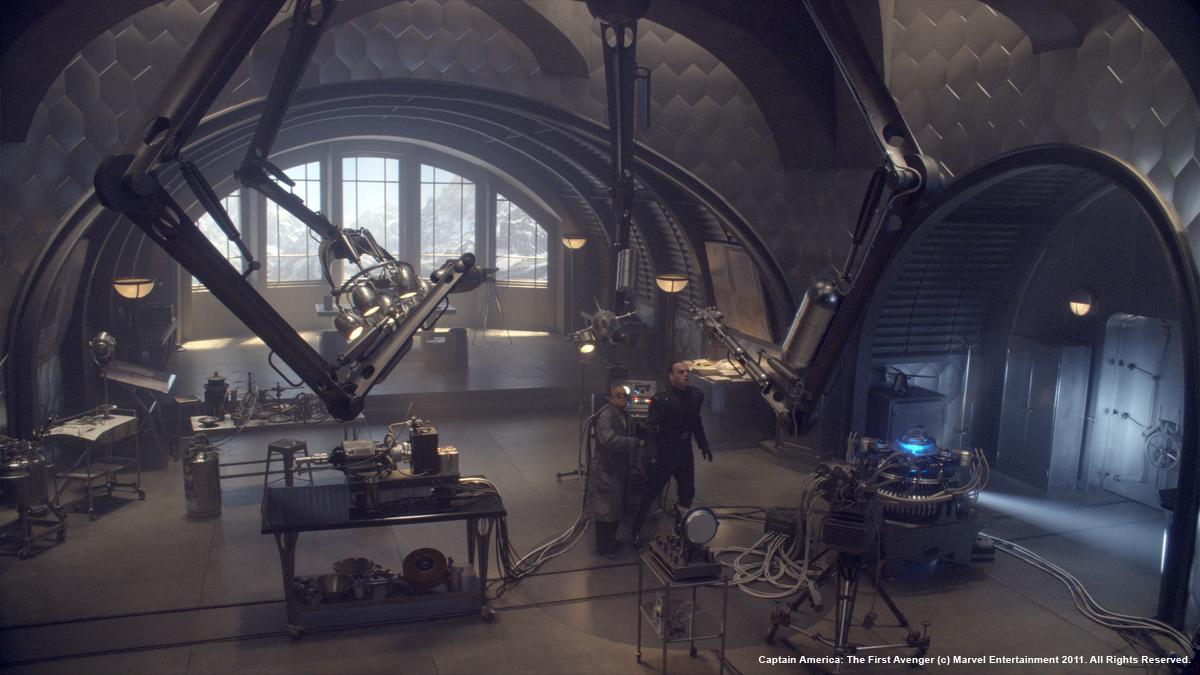
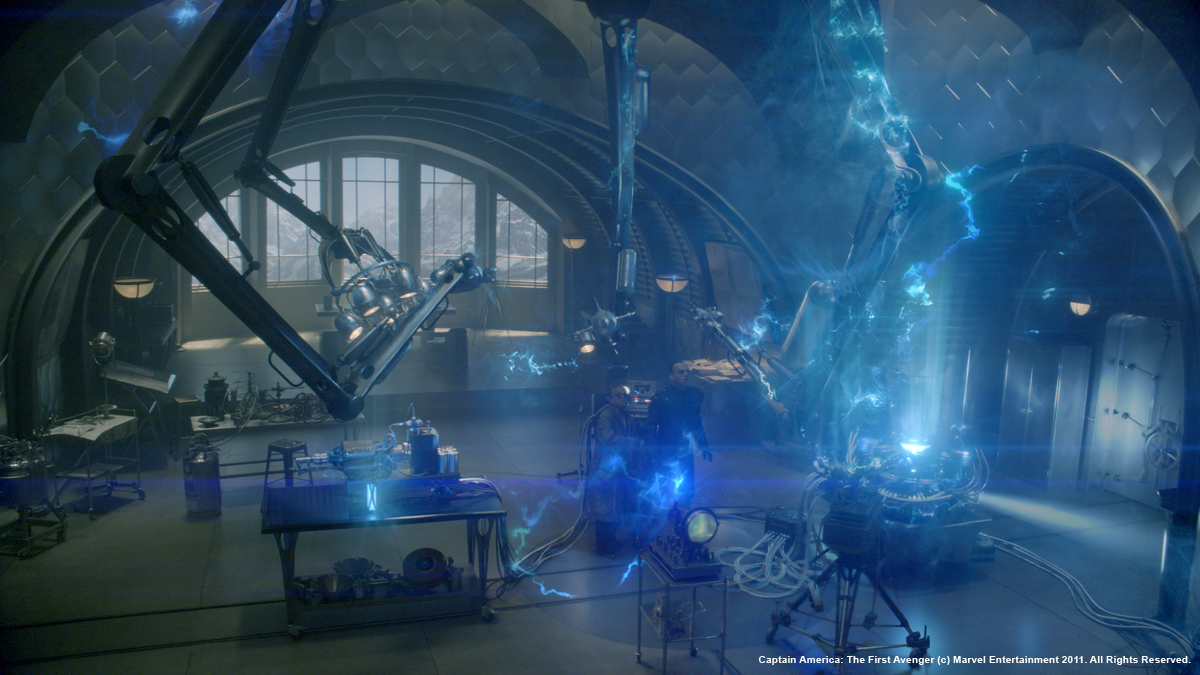
The Crypt (Schmidt finds the cube), Schmidt’s office (testing the cube, gun-firing, Nazi deaths), Hydra factory interior and exterior, the train, commandos attack Schmidt’s office, Hangar and Runway, bomber and podfighter aerials (exterior and interior), the Arctic crash and the shots where the cube goes nova.
 |
 |
How was the collaboration with the art department?
Everything was built from supplied art dept models with the exception of Schmidt’s 6 wheeled car which we lidar scanned. The bomber was modeled by James Guy and John Capleton with LookDev by the supremely talented Alexandre Millet. We visited a few aircraft museums, principally Duxford, where we took a load of reference stills for detail and texture. Whilst there we also hired a couple of tanks for the day to provide motion studies for our Landkreuser. Pete Bebb (CG Supervisor at DNeg) was up extra early that day. It’s a tough job sometimes! For the tank, CG lead Phil Johnson was faced with the same issue of scale and he spent some time modeling extra detail into the model that was supplied from Art Dept, along with some modifications to the functionality of the main turret.
Pete Bebb explains the approach:
“This vehicle is immense and the scale of the tank is at least three to four times that of the biggest tank we see these days. Standing at over 20ft high the vehicle has a massive diesel engine and 6 separate tracks. The research for this vehicle was key as we were posed with trying to sell the scale of this to the audience. The rigging and motion of this vehicle was key and we thought it best to study up close a real tank. Whilst we were at Duxford shooting the material for the bomber we had a second unit covering the material required for the tank. Luckily we were able to rent a Chieftain tank from the 1950’s – the era specific to the Hydra technology. We had a succession of planned tasks we wanted from the tanks motion and we shot these on 3 HD cameras some running at 50fps to better judge the motion of the track mechanism and weight of the tank. This was then studied and used as the main resource for the motion of our tank. We also took masses of texture reference photographs as well to assist John Seru with the texturing process and LookDev work from David Mucci.
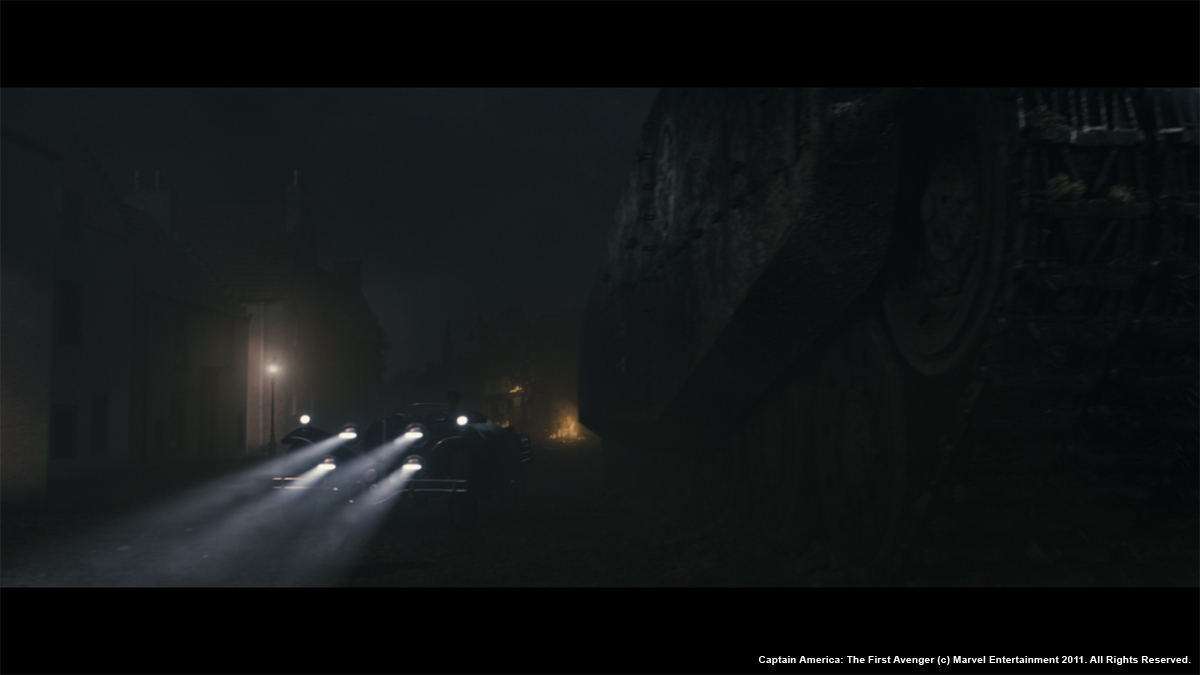
For the car, SFX supervisor Paul Corbould had built from scratch a beautiful 6-wheeled coupe for Schmidt which we scanned and extensively photographed out at Shepperton. Whilst the real car was used predominantly, there were times when a CG version would be called for and would be seen very close up.
CG lead Maxx Leong placed the real car in a nice open area with enough room to subsequently place our CG version beside it so he could refine the shader to perfectly match the real thing as we compared the two side by side. The bodywork was very reflective with multiple layers of paint and lacquer with subtle variations in displacement between the different panels. As with all other vehicles, it was lit with an HDRI with additional reflection and bounce cards as and when required per shot.
 |
 |
What was the real size of the sets?
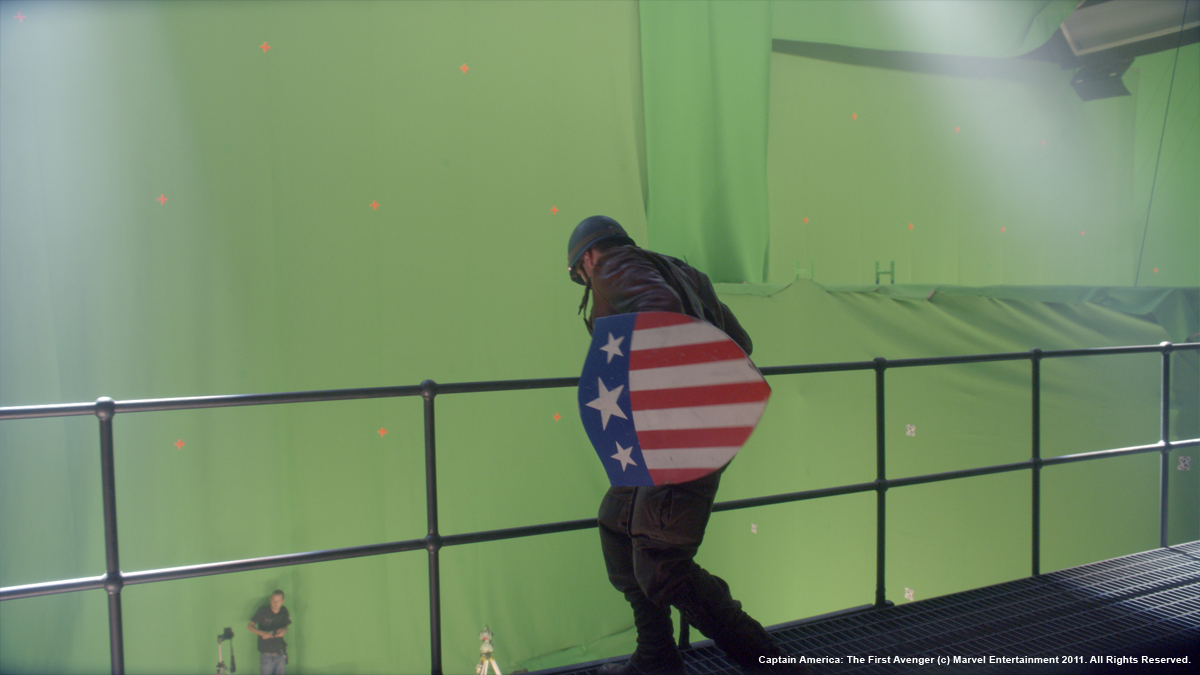
They varied from sequence to sequence. The Factory set took up the whole of Shepperton’s H-stage, the bomber cockpit interior was on a very impressive multi-axis motion base, the train sequence had just a small rocky set to start the sequence with a roof section of one train carriage for the zipliners to land on and the Hangar sequence was all greenscreen (barring the real car, landing gear and some foreground dressing for some shots).
How did you create so huge environments like the Hydra factory and hangar?
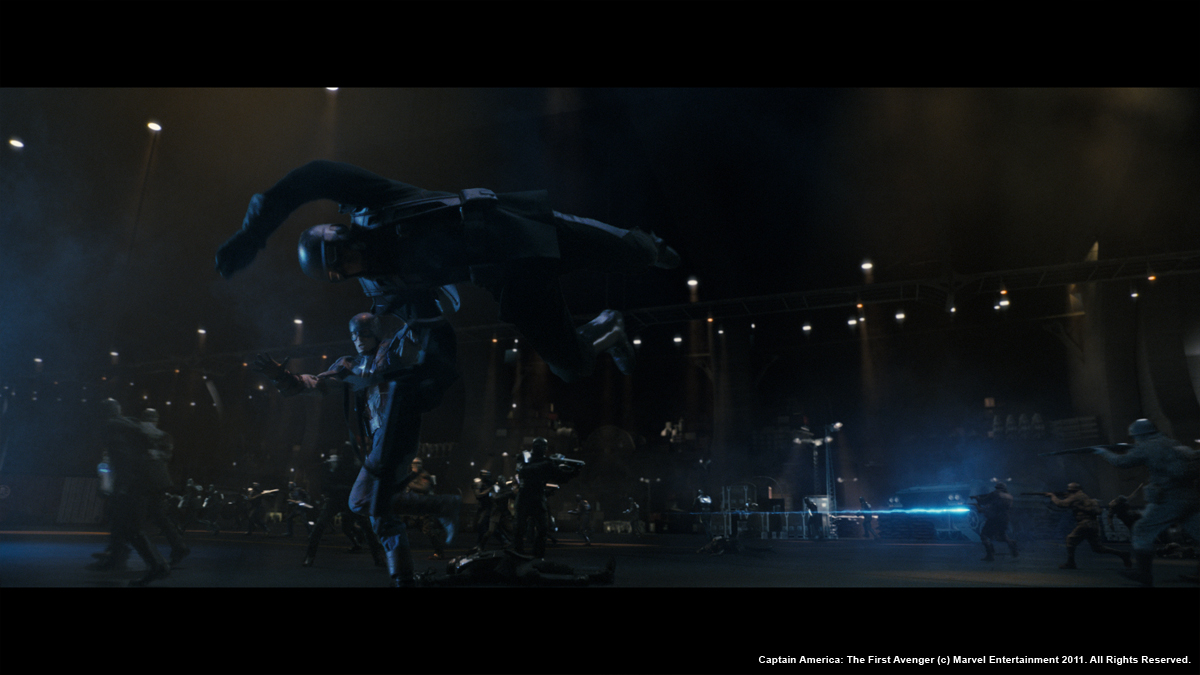
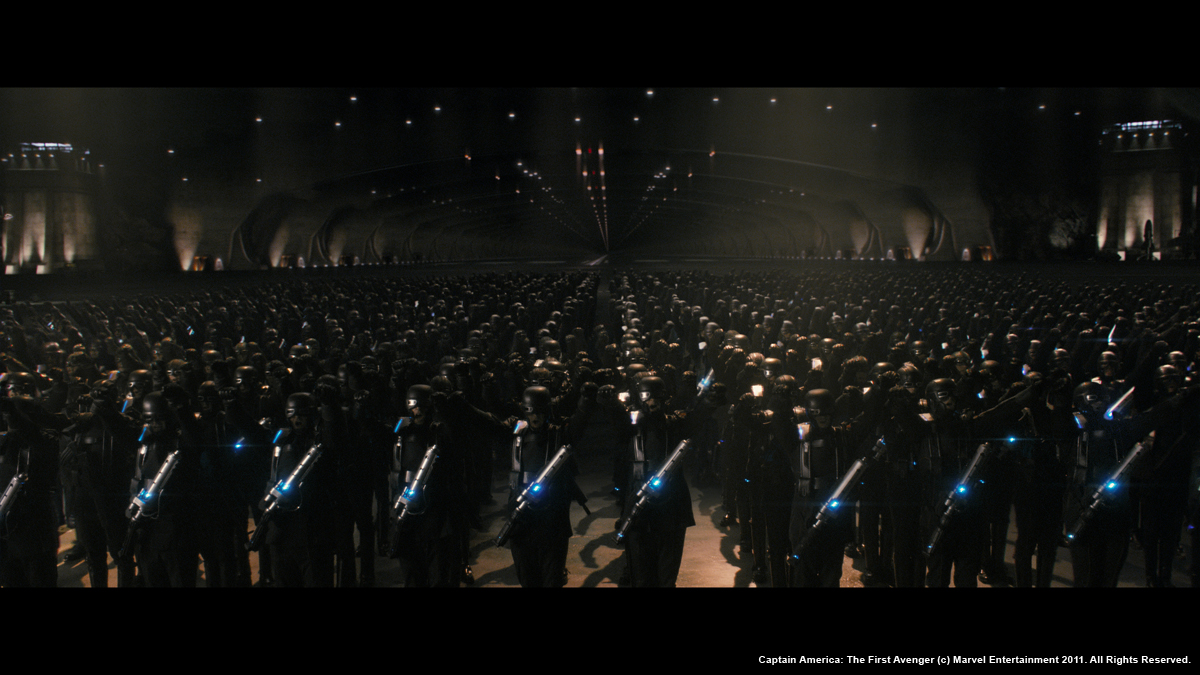
The Hangar was a pretty hefty logistical challenge comprising a 1500ft wide by 160ft high cavern 5 miles deep inside an Alpine mountain.
CG leads Alison Wortman and Jordan Kirk explain:
“Basically we modelled the hangar using proxy rock geometry to start with, while the client refined the layout of the hangar during a bit of back-and-forth between the client, Art Dept and Simon Gustafsson, our concept artist. It took some time for us to get our heads around just how enormous the space was and when the time came to upres all the rock geo, it became a huge challenge to model enough detail into the rock so that it would hold up, but without showing obvious repetition. We found that highly detailed rock aliased horribly or had a nasty aesthetic affect as you pulled the camera away, but lower res rock was shown to be nowhere near detailed enough if the camera got close – it was tough to find a balance. The process of modelling the rock was difficult and time consuming, as there was such a vast quantity to be done – we used ‘3D Coat’ for this as it made the task of sculpting a rock surface a little easier than it would have been to manipulate a poly mesh in Maya. We also used this method to generate the displacement maps, which were stored out as pointclouds and read in a render time. This helped the maya scenes hugely as none of the displacement data needed to be loaded onto the mesh, but did make it a bit harder when set dressing and texturing the concrete supports, as you could only see the point where the rock surface met the concrete by doing a render. One other side effect of this approach was that the pointclouds were reliant on the topology of the rock meshes – so once the pointclouds were generated, any tweaks to the meshes needed to be done with basic warps. Any further issues were taken care of with preprojected patches.
The concrete supports were a texture challenge due to their sheer scale – again, it was tough to get textures that were detailed enough to have adequate scale, with no repeating patterns, yet which didn’t alias or look streaky as the camera pulled away. We ended up using a few different textures, but then overlaying different texture maps to create variations, as there were far too many supports to create bespoke textures for each one.
The hangar HQ was textured as a matte paint projection to start with, but as the sequence developed and we needed additional angles on the building, we converted the projection into a UV-based texture and upres’d the details. The huge panels of windows were a challenge, the interior space was left fairly vague so we had a bit of a test-and-develop phase of looking at potential interior designs, mainly drawing on stills from Berlin’s Templehof airport. As with the rest of the hangar structure, the challenge was to be able to read enough detail to get the impression of interior structure, but to have something generic enough that the shapes could be read and understood from a distance.
Filling the hangar space with assets and vehicles was another huge challenge, because of the sheer amount of space to be filled! A lot of the assets we used (from the factory) were metallic, which meant we couldn’t bake in their lighting, so we had to come up with ways to ease the render time caused by inter-object reflection calculation. The lighting itself was also a challenge as we found the best way to achieve a sense of vast scale was to use small light sources, but with such a huge space we had hundreds and hundreds of light sources, so we had to find a way to organise these to make them manageable for the shot lighters, and to work around streamlining them for render efficiency.
 |
 |
The runway caused us a few headaches too. At 5 miles long, it was too long for Maya – we experienced errors with our cameras due to Maya’s precision with objects too far from the origin, so the later stages of the runway chase had to be artificially moved closer to the origin to compensate. We had problems with perspective – or rather, our perception of perspective – which meant that the runway never felt long enough due to foreshortening, despite the incredible length. The sheer scale of the bomber, and the size of the runway to accommodate it, also meant that the sense of length was compromised, because the runway was also so wide and so tall!
The perception of perspective was an issue right into shots, with several shots being ‘cheated’ to achieve a more pleasing aesthetic result as opposed to remaining true to the environment.
The scale of the environment caused problems with the perception of speed too, which was heavily dependent on camera angle. The speed of the shots varies by at least 25% in an effort to maintain the effect of consistent speed. We had to use careful pruning of elements and assets not crucial to the camera angle in order to be able to get renders through, as 5 miles is a hell of a lot to push through Alfred!
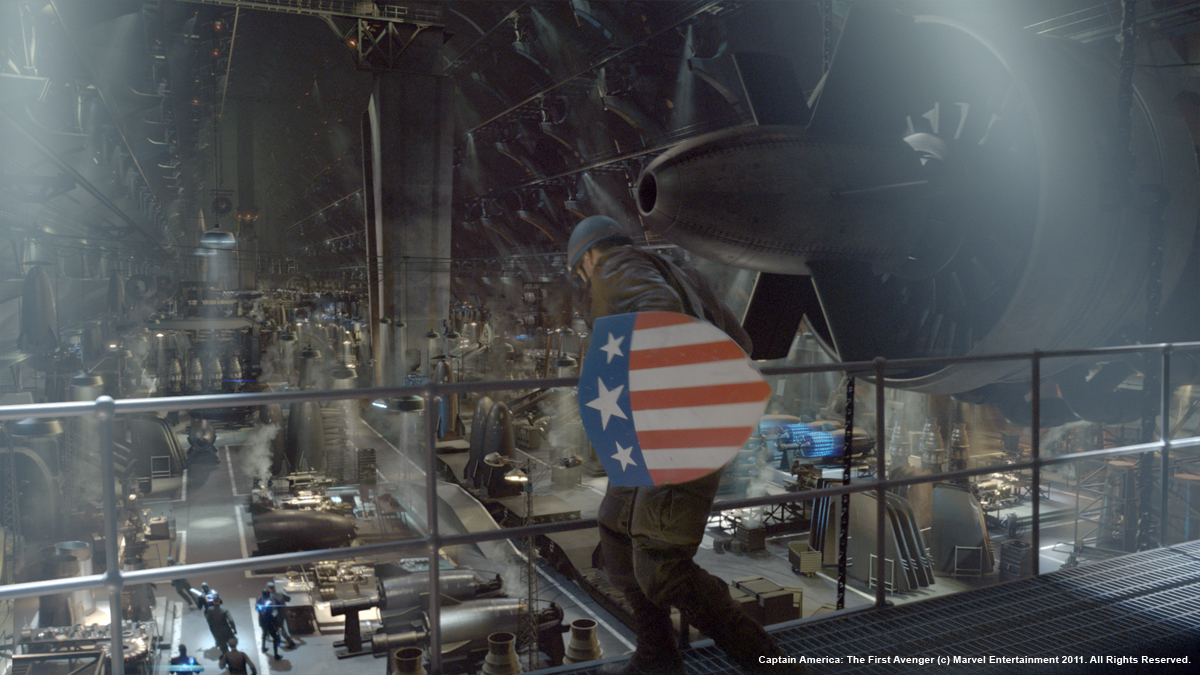
For sheer complexity, amount of geometry, number of passes both hard surface and FX, the Factory sequence tops the list, lead by Vanessa Boyce, who elaborates:
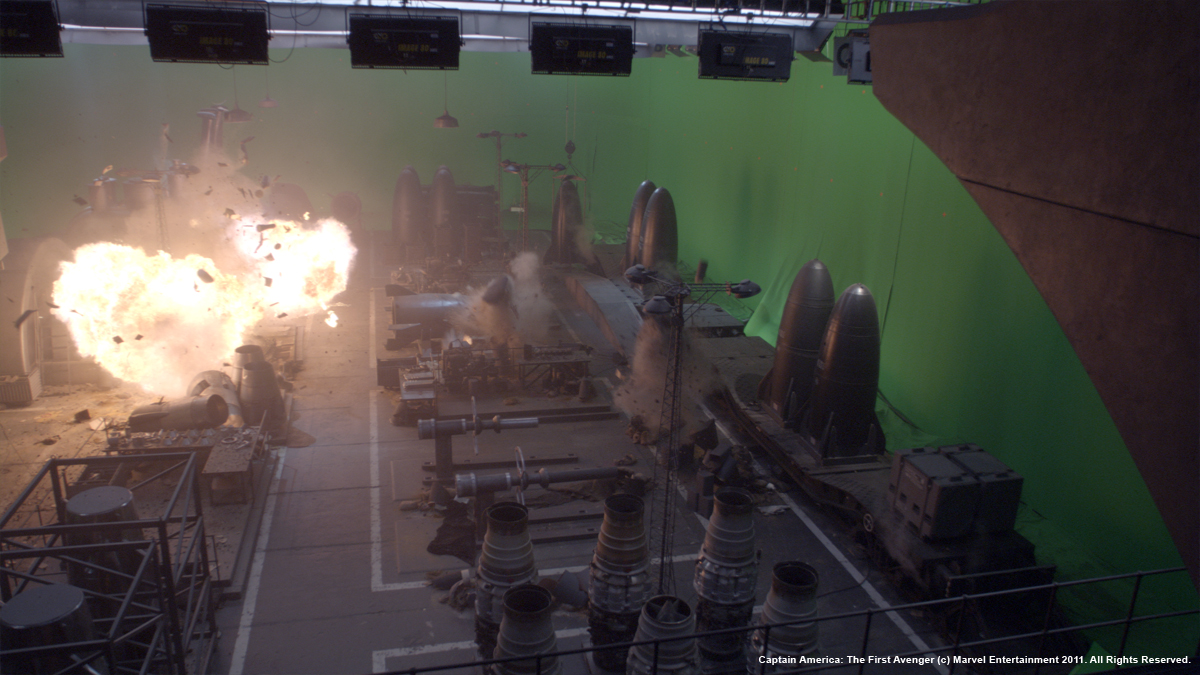
“A huge set was built on H-stage at Shepperton and it was our task to extend this out to be over 10 times larger. The Hydra Factory became 300ft x 1500ft and filled with over 1000 props (weapons, machinery, vehicle parts, etc). The main challenge became about keeping it efficient to render and easy to manage. Due to the huge amount of potential geometry, we used DNeg’s publishing tool dnAssets, where a model can be unloaded from a maya scene and still rendered through the use of a rib archive file that gets created when a model is published, to build up a relatively small library of component parts to use for the internal structure (walkways, staircases, walls, supports, etc) and we built around 40 unique props to repeat across the factory floor. We also had at least two but usually three different level of detail models for each asset which were easily swapped out when it came to shot time. The lighting approach to the factory was two-fold; we had to light a working factory and we also had to light a burning factory. The working factory had more lighting complexity because we had to consider how to light a huge environment which was filled with hundreds of strong down lights on the factory floor and architectural lighting throughout. For the initial layout stage and for big areas at shot time we used gobos attached to very large spotlights and that would give a very similar effect to having lots of spotlights but was much cheaper. When it came to shot time, we knew that this approach wouldn’t suffice for the more close-up areas of the factory so we lit it in a more traditional way (spotlights, reflection cards, etc) to get what we needed. Raytraced reflections were only used on assets that we thought needed it in order to keep render times down.
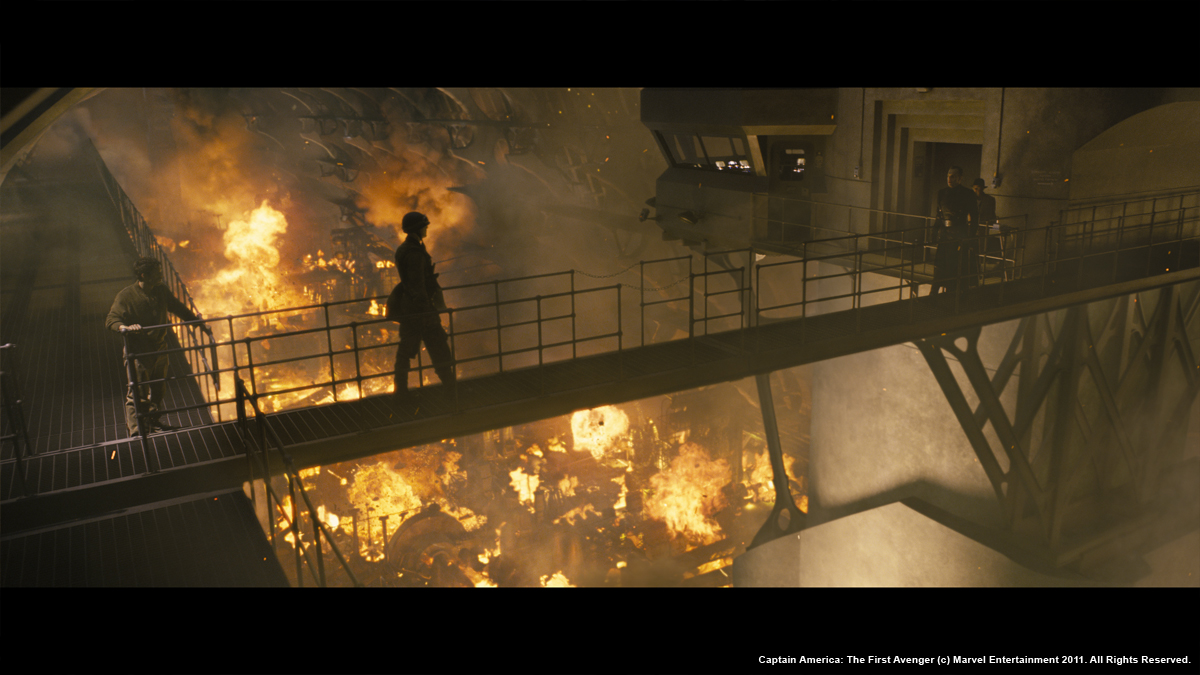
The approach we used for the exploding factory lighting setup was to provide Trevor Young (Composite Lead) and his team with enough variety in lighting passes and control over individual lights within the passes so that they could achieve the chaos and randomness that you’d expect in an exploding weapons factory.”
 |
 |
What was the challenge for a sequence like to Factory destruction?
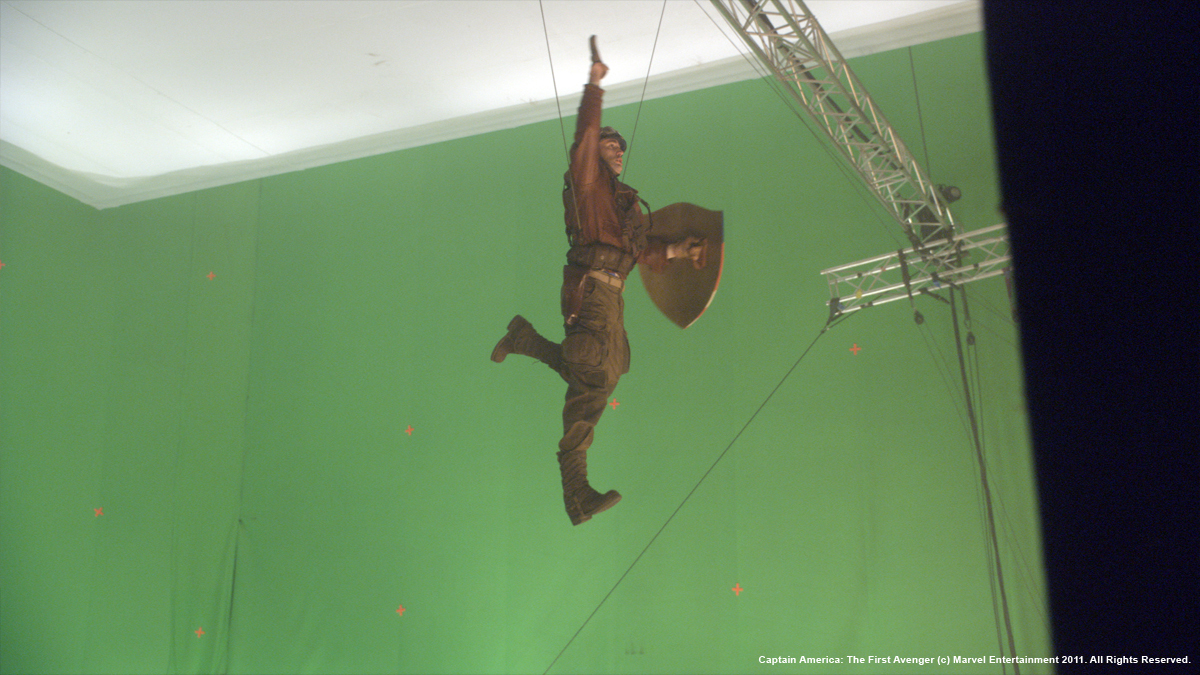
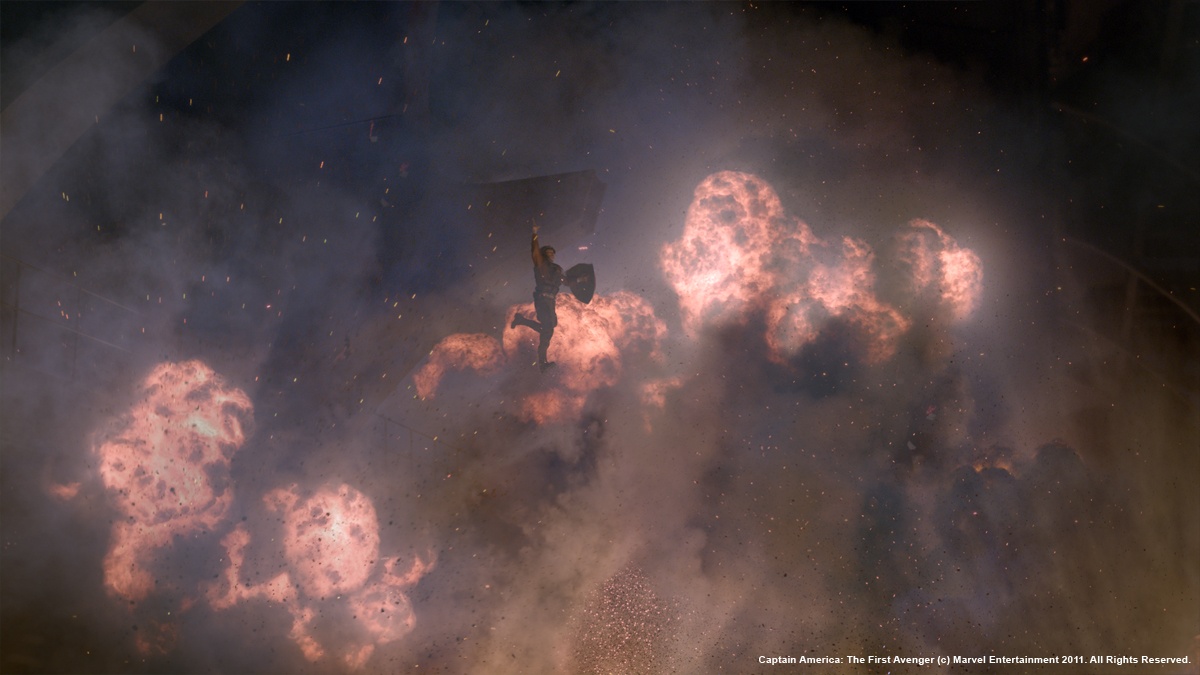
In addition to building the entire factory and all the props, a significant proportion also had to be built for destruction as well which were then handed over to Marie Tollec and our FX team to run destruction sims on.
 |
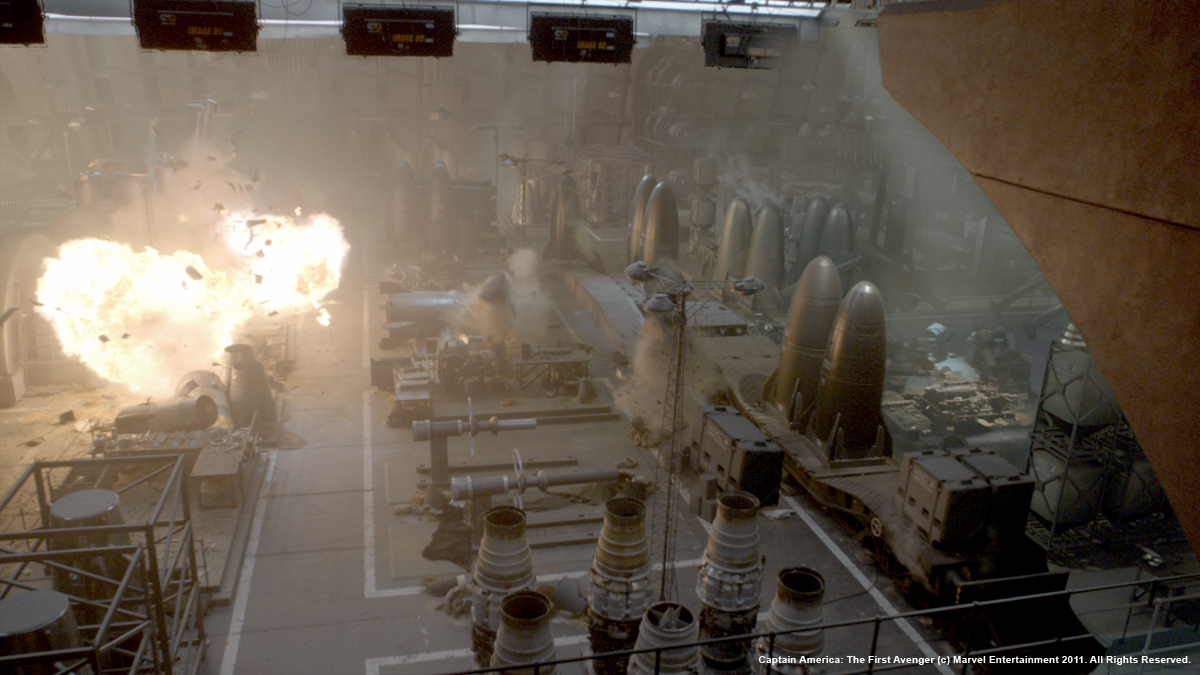 |
We had also spent a day shooting large explosions on the skid-pad at Longcross and once cleaned up these formed an invaluable library to help fill the vast space but given the magnitude of the space and the need to choreograph certain beats, the majority of the explosions and smoke were CG.
 |
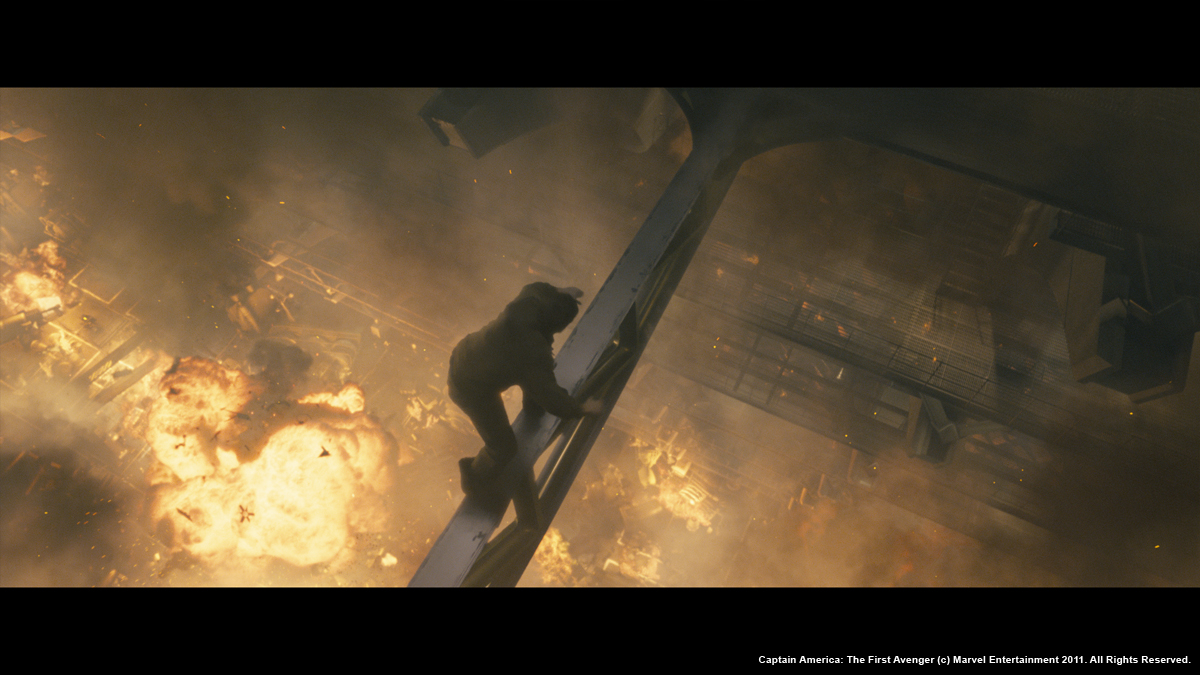 |
After a brief testing period of using different solvers we opted for Maya Fluids, utilising its new heat expansion features. We were able to squeeze every last drop out of Maya’s solver, getting some very large sims through, they ended up taking days to calculate. These high-resolution simulations were then rendered using our recently updated in house volume renderer Dnb. With its new feature set we were able to manage larger more complex scenes, with full 3D motion blur and advanced secondary outputs.
I can’t praise Mike Nixon, Milos Milosevic, Chris Keller and Zeljko Barcan enough for the lovely work they did on the factory destruction.
 |
 |
How did you create the big plane of Red Skull?
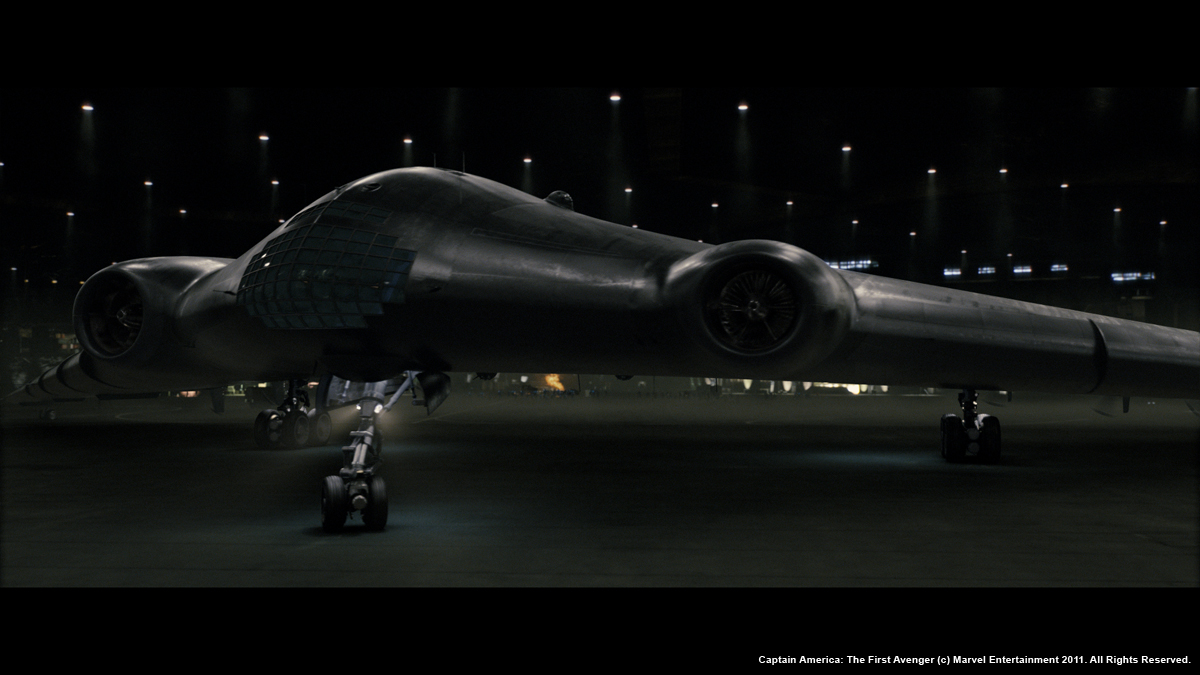
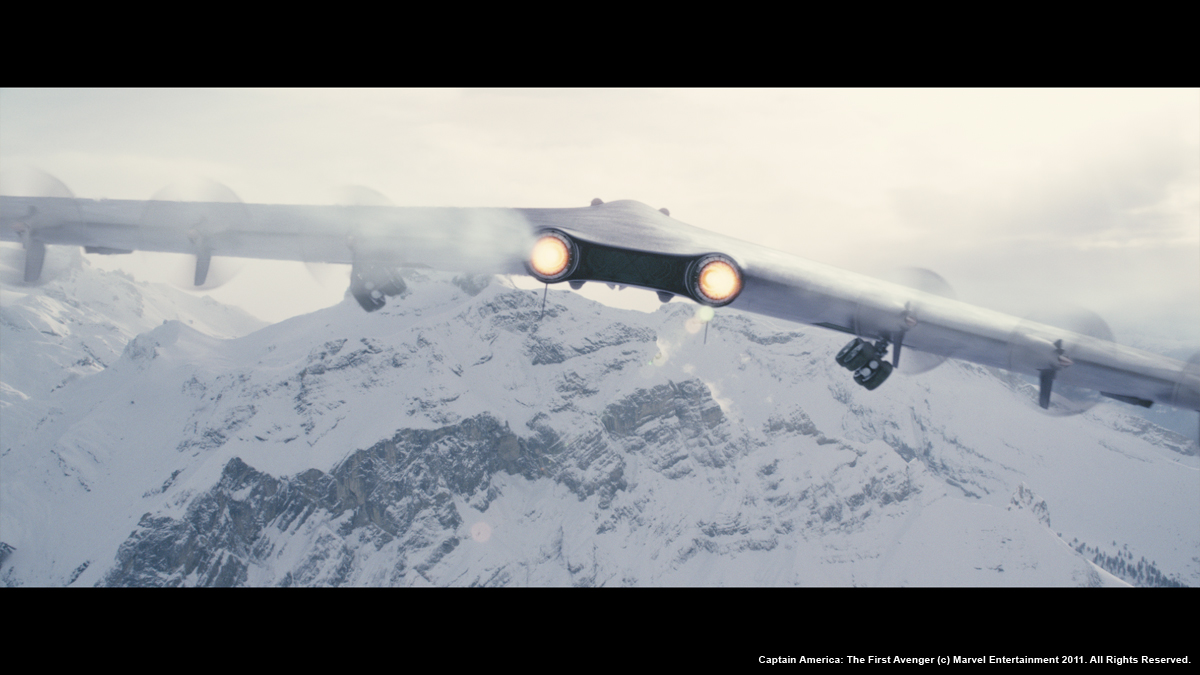
The bomber has a wingspan of 165m, over twice that of the Airbus A380, so it is vast. We started out with the Art Dept plans, then added in any of the interiors that had been built as sets (the cockpit, flight deck and area between the engines at the rear) before extending out the rest of the airframe from the section that had been built.
This then gave us sensible panel lines and displacement maps for the outer skin. Onto this we added loads of access/maintenance panels and hatches along with all the decals you’d expect on an aircraft. The brief for the Hydra technology was that it is 10-15 years ahead of the game, so for the paint we went for the stealth finish we saw on the Lockheed sr-71 at Duxford but dialling up the sheen to give it a slightly more satin look. For something that is so much larger than we’re accustomed to seeing in the air, it was important to get subtle variation in the panel textures and small-scale breakup into the spec and reflections.
We ended up with eight 8k texture maps for the skin which served for the majority of the shots with a handful of super closeups requiring bespoke additional texture paintwork.
 |
 |
About the Pod Fighters dogfight, was there already a previs for this sequence or did you start from scratch? How did you create it?
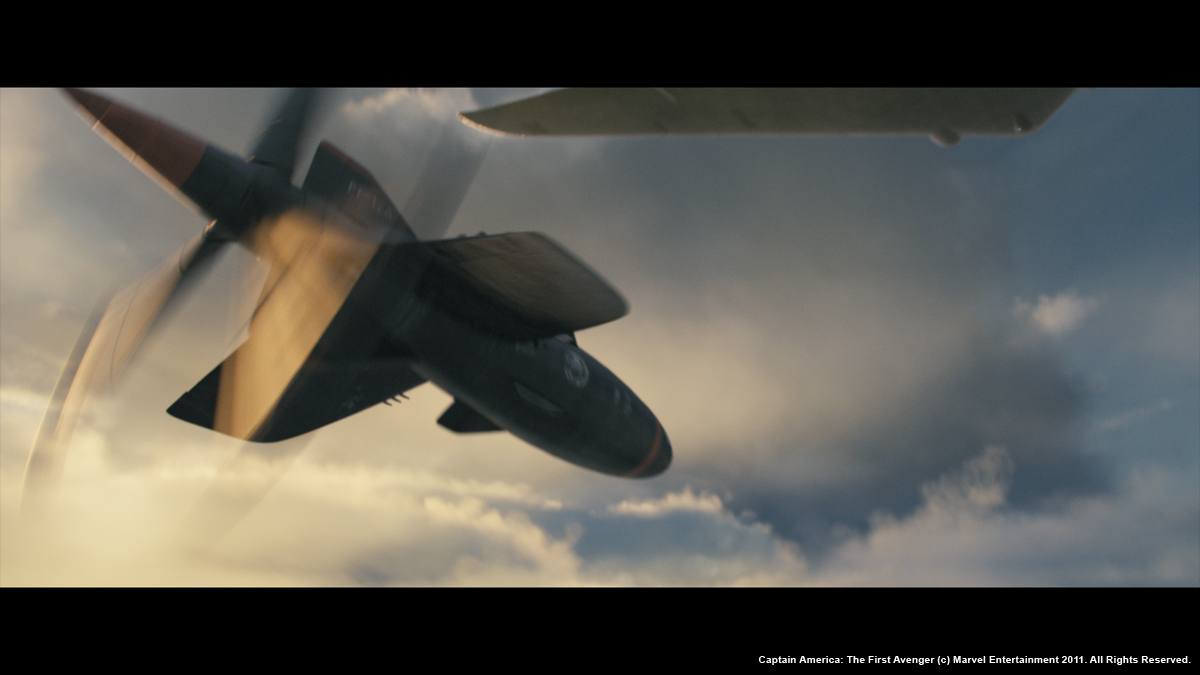
There was no previs as such for the podfighter sequence. The podfighter action was filmed on a 6 axis motion base built by Paul Corbould and once cut together, the all cg shots were supplied as post-vis by The Third Floor which we then matched to.
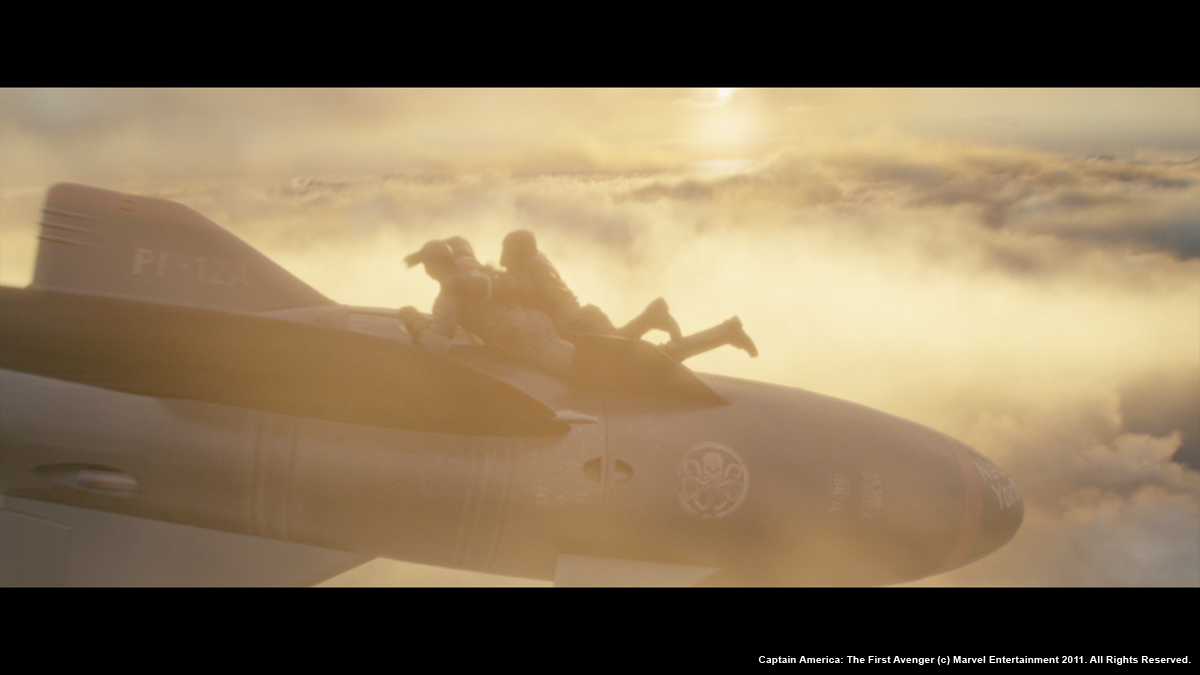
Cloud maestro Nick New supervised the creation of our aerial environments along with engine con-trails and exhaust heat distortion passes, composited by Gruff Owen and his team.
We had to create around 100 shots where we’re flying around in the clouds, with 25 of them rendered as full stereo shots. The clouds were rendered using our in-house volumetric renderer DNB, using a new node-based shader system nicknamed Meccano which allowed very flexible lighting and arbitrary output setups without the need to write code. We worked up a set of outputs to give comp full control over the look, using fake single and multiple scattering, density and shadowing.
Our base cloud layouts were done in Houdini using satellite photography to scatter points, then artists could import these point caches to Maya and adjust the layouts per shot or sequence as required. To get as much detail as possible in the clouds, we instanced fluid simulations onto these layout particles, allowing us to crank the detail even close to camera without having to rely on procedural tricks.
 |
 |
What were the references that the director gave to you for the cube universe and the death of Red Skull?
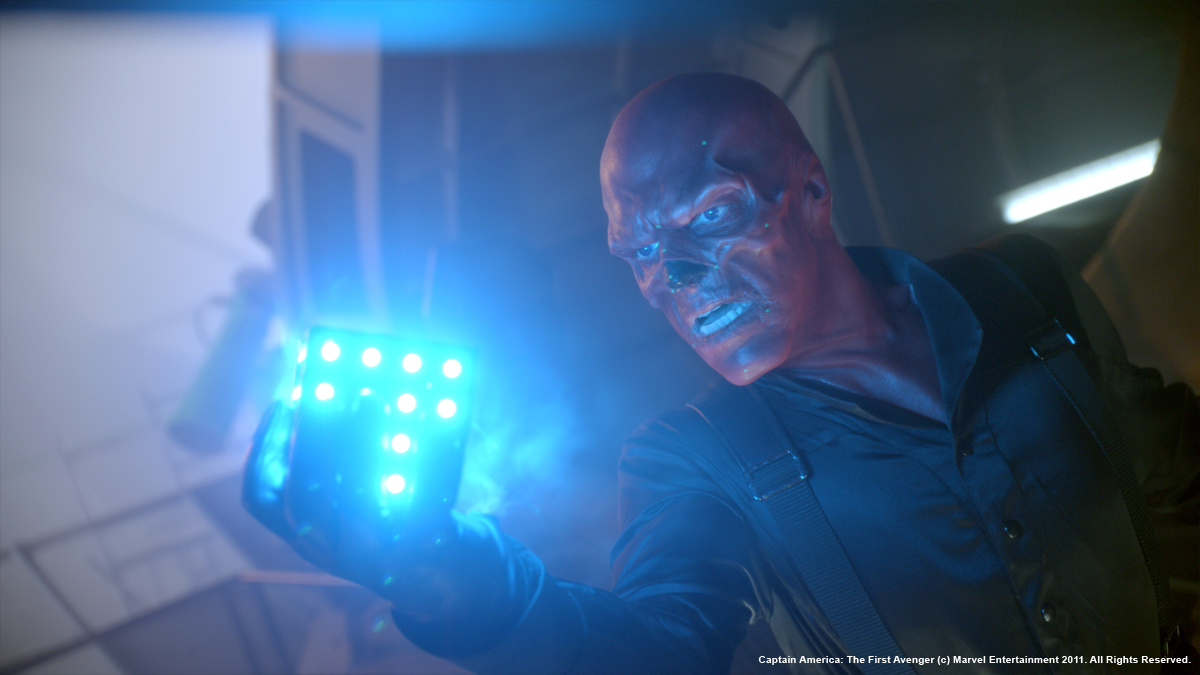
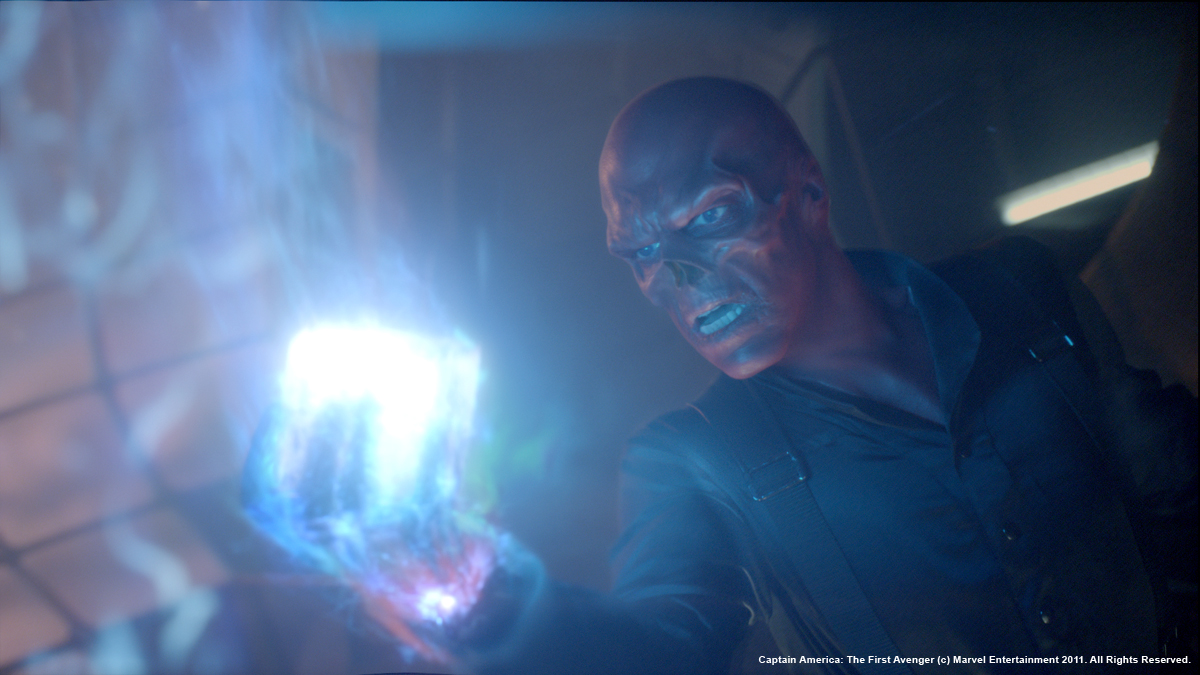
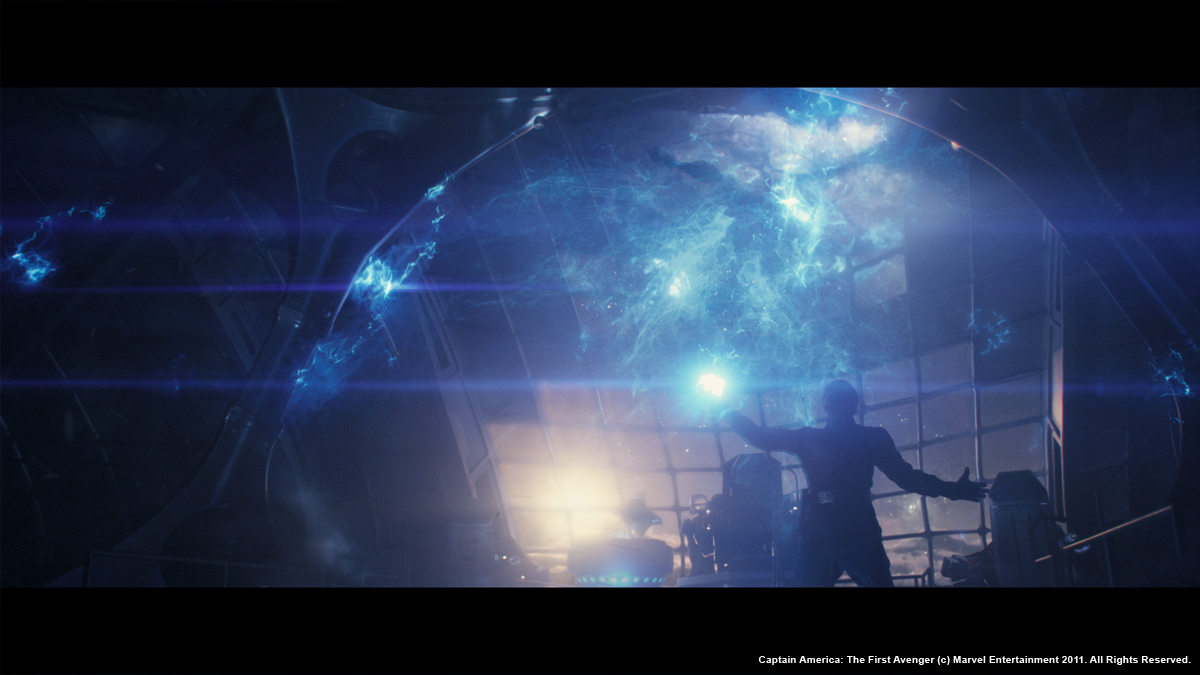
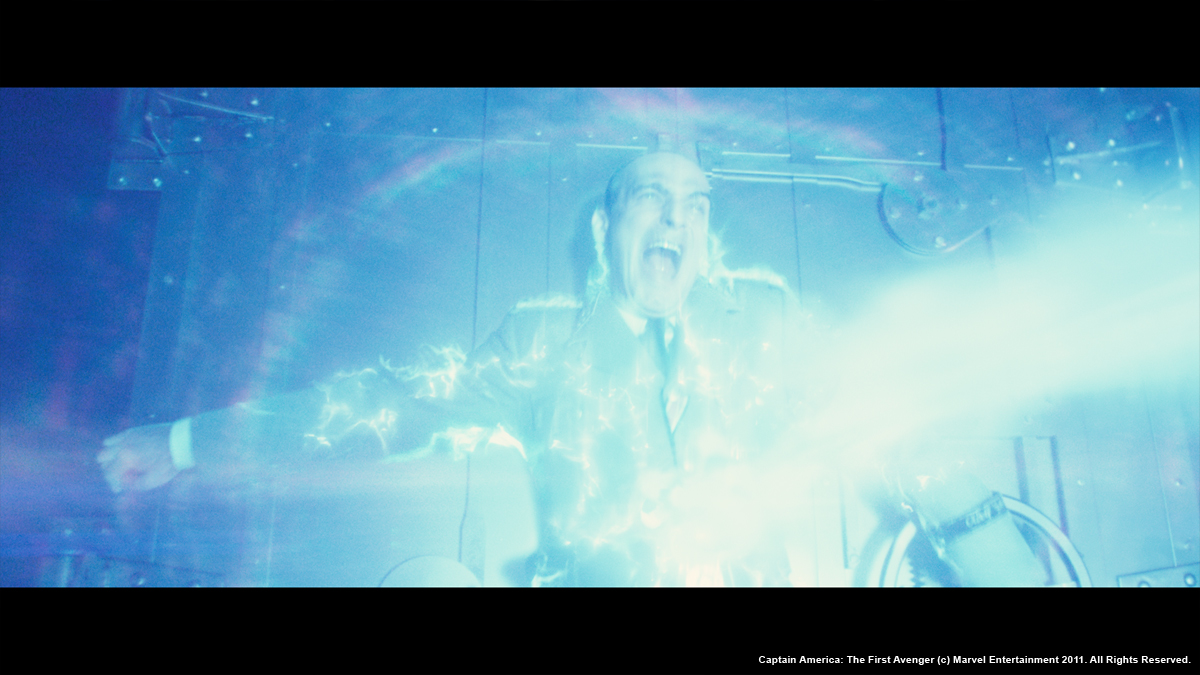
We were shown some lovely work from Buf for THOR to ensure that we remained in the Marvel universe and ours evolved from there thanks to the talents of Graham Page and Mike Ellis who lead the cube energy work with FX passes from Andrew Dickinson and Andy Feery. We initially worked on the Schmidt’s Office sequence, and created a particle based Houdini system for the energy that escapes the cube. This could produce both energy rift “crackles” and energy that wrapped around objects in the scene. These particles were also surrounded by millions of secondary particles that the crackles bled light onto, giving a very volumetric feel but with everything based off many tiny particles rather than true volumetrics. Red Skull had many extra custom particle passes that were heavily treated in the composite to build up the desired look flexibly.
 |
 |
How did you manage so many particles?
We tried to keep our particle simulations as small as possible for iterating the look of the crackle simulations. We then relied on a library of crackles and energy clouds, which we would layout in Maya per shot. By avoiding the need to re-simulate for every shot, and having a solid library of building blocks, we could tailor the look of the energy for each shot to the director’s specifications. Our in-house tools let us display just a small percent of the particles being referenced when inside the viewport, so we have interactive placement, but then at rendertime our particle rendering plugins can cope with the full huge cloud of them efficiently, so we’re never limited by the technology or particle count bottlenecks.
 |
 |
Did you develop new software for the clouds or the snow?
Our volume renderer DNB has been developed over the course of many projects to cope with the sort of scenarios like a sequence filled with fullscreen clouds. The new aspects worked on specifically developed for the show were some new single and multiple scattering techniques which enabled us to get such optical effects associated with clouds as Glories and Fogbows. This was made possible with our new node-based shader system for DNB.
Can you tell us more about the crash scene?
Only three shots but a fairly big challenge and one for which we knew we’d need some top notch texture reference. To that end CG supe Pete Bebb and sequence lead Maxx Leong strapped tennis racquets onto their boots and set off for Svarlbard in Norway. We hired a helicopter to shoot some HD plates and to get us to remote areas of specific interest and also spent a day on skidoos out on the ice taking thousands of stills and multiple HDRI environment domes. They returned with spectacular aerial plates of seas. fjords, icebergs and lovely stills of the ice and glaciers from the ground along with some hair-raising tales from a very harsh environment. Drifting snow and blizzard was created by David Hyde in many many layers in an echo of what we saw at the opening of the movie when the bomber is discovered.
Can you tell us more about the impressive Alpine sequence for the Zola train?
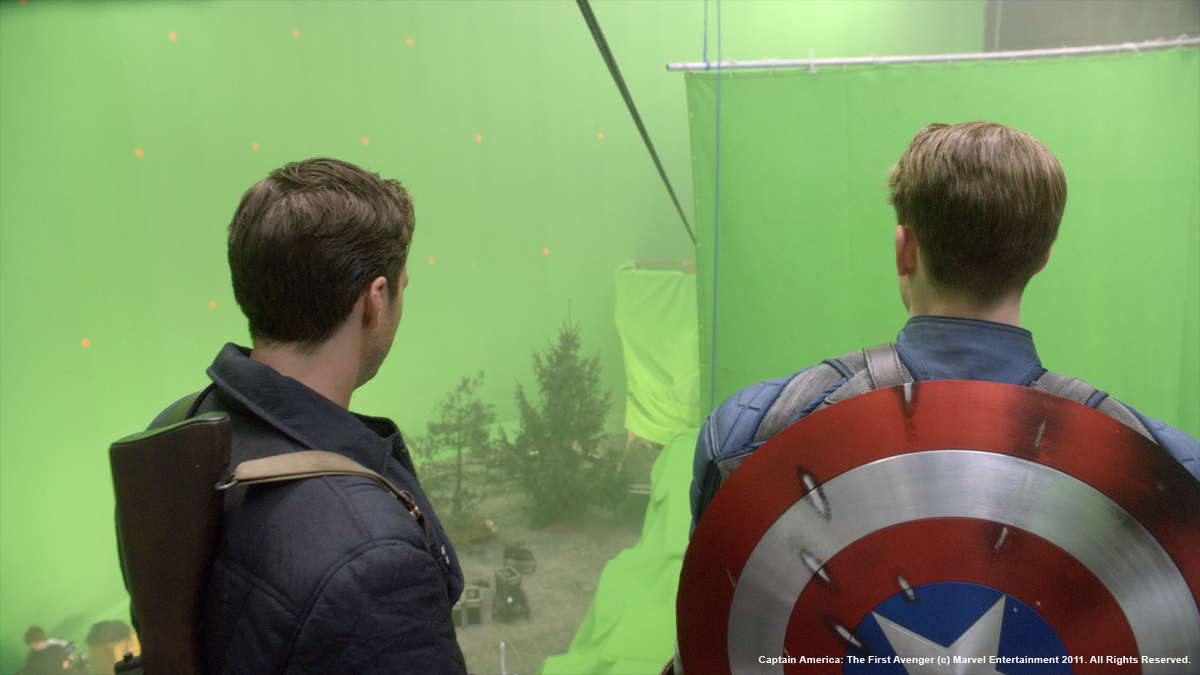
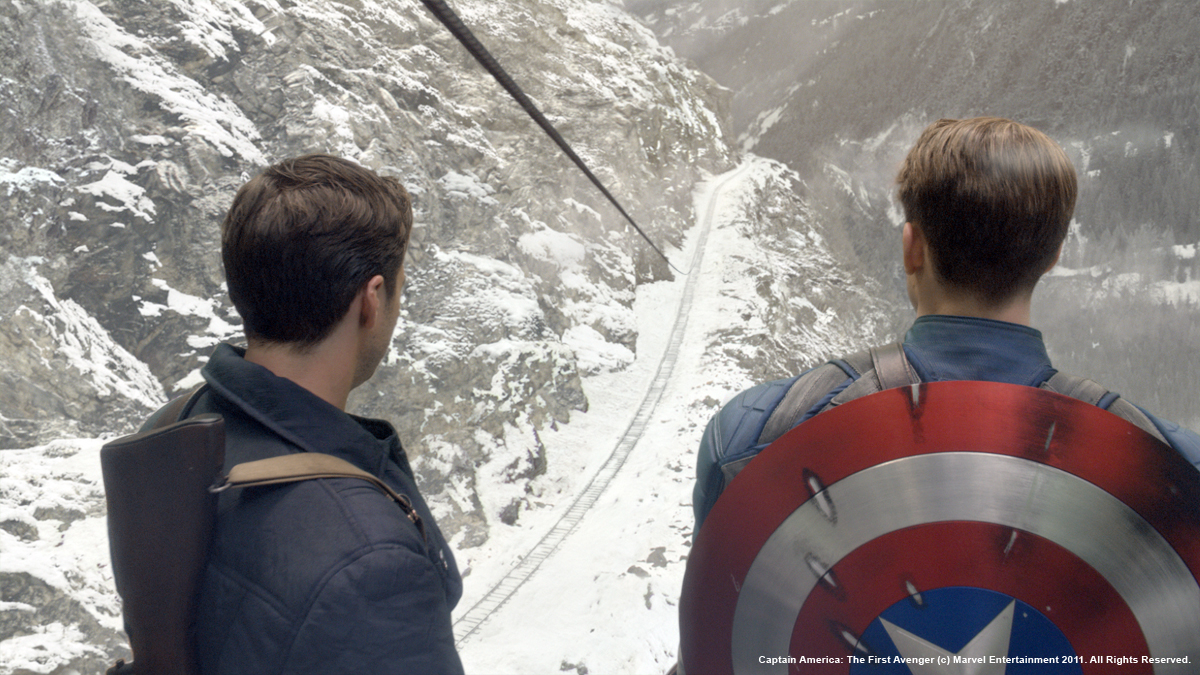
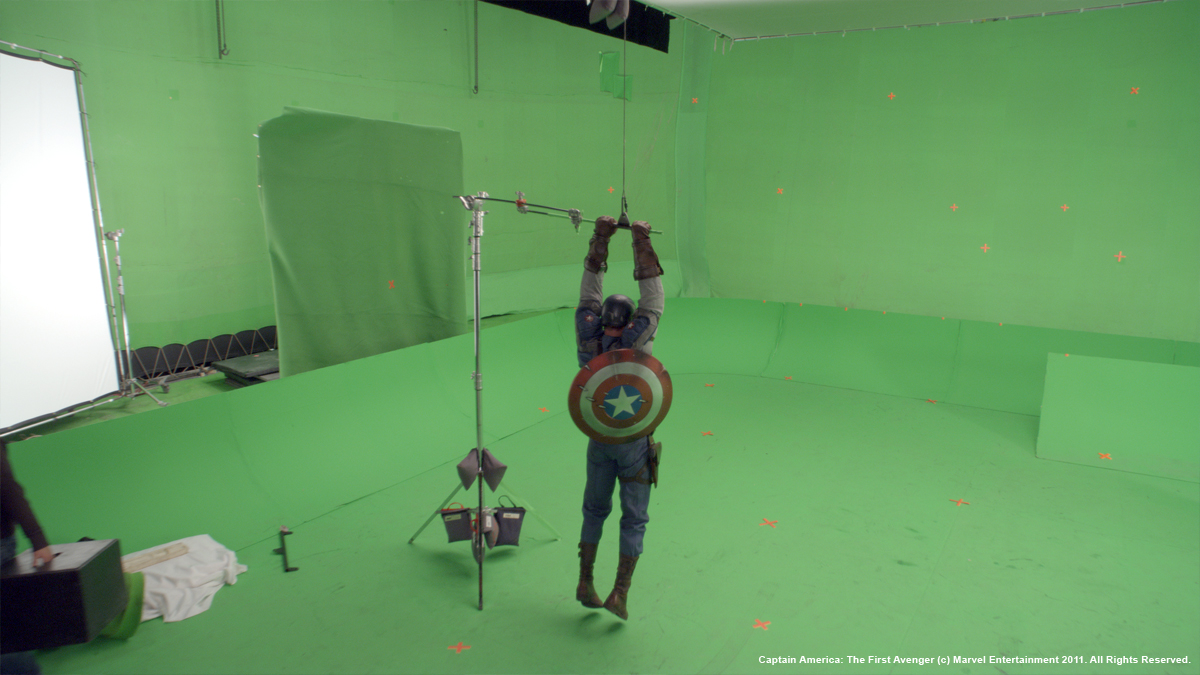
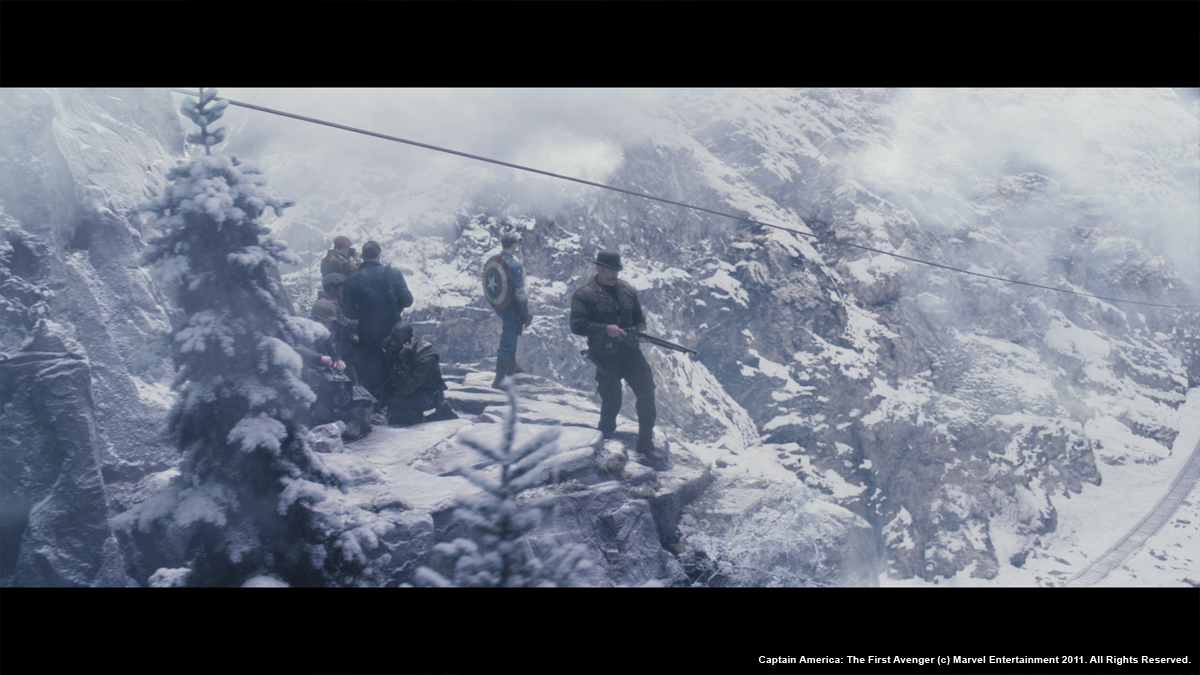
One of the most challenging sequences takes place in the Alps and sees Cap, Bucky and Gabe zipline down from a rocky outcrop onto to the roof of a speeding Hydra train. Foregrounds were shot at Shepperton and Longcross on partial set-builds and aerial plates were shot in Switzerland for the distant bgs. The Herculean task of creating everything else in between fell to Dan Neal who lead the sequence.
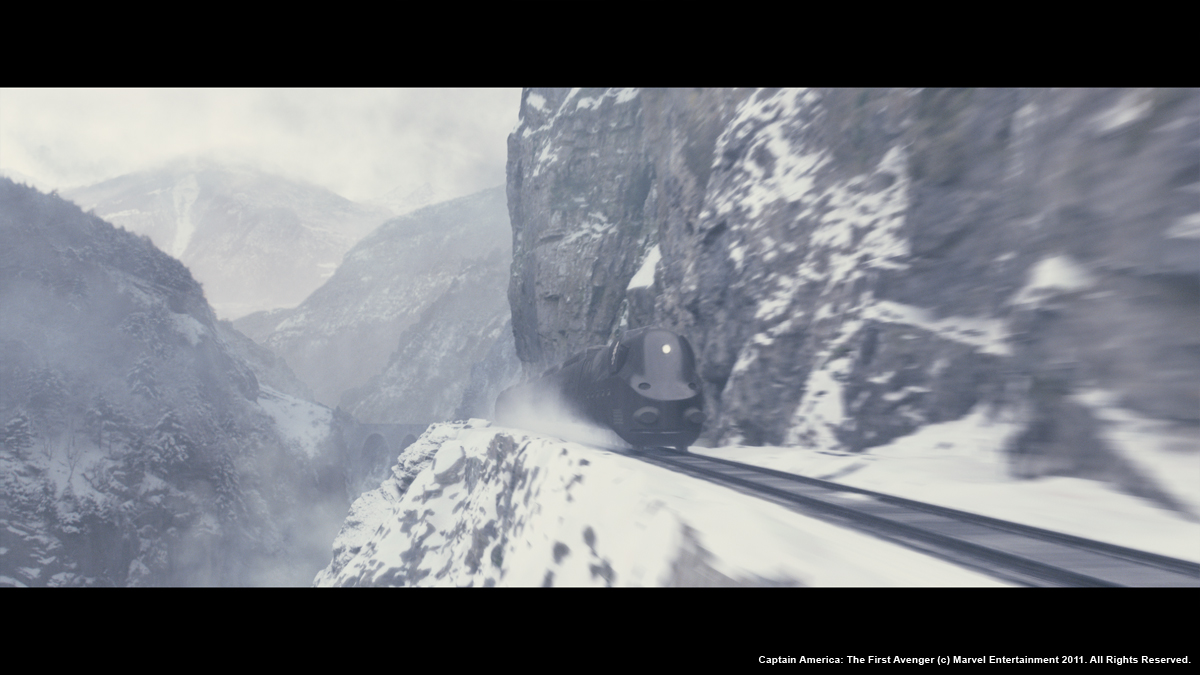
We built a digital version of the hydra train based on Art Dept plans and a partial set build of the top half of one carriage, digi-doubles of the actors, and all the atmospheric effects like snow, cloud and low lying mist.
DNeg got involved early to help plan a background plate shoot with second unit VFX supervisor Stephane Ceretti. The location for the shoot was in Switzerland, around Sion. The shoot was divided in 2 groups: the aerial Unit for the helicopter plates shot on Panavision Genesis and a ground unit with a tracking vehicle mounted with 2 Arri Alexa cameras on an Ultimate Arm. Dan also took thousands of tiled photographs of the environments and rock textures on canon 1Ds in order to build digital versions of the landscape.
 |
 |
Dan Neal continues:
“We built the train model with an engine, 5 carriages and a caboose with gun turrets. This was then rigged with controls for the speed, the amount of movement between carriages and the banking. A separate rig allowed the artists to generate train tracks procedurally and constrain the train to the tracks. All this was animated in autodesk maya 2011. The textures of the train had to be seen fairly close. This meant having to use 3 high resolution textures of a resolution of 8000 pixels per carriage. In total, the train had 9 textures per channel (colour, specular, reflection, dirt, displacement, bump). Then each carriages had variations in the textures. This accounted for a total of over 80 textures. The texturing was done in Photoshop and Mari from the Foundry. The look development, lighting and rendering was done by David Mucci with Pixar renderman using HDRI image based lighting and raytracing. DNeg’s team also modelled, textured, and rigged the cable and zipline. The digi-doubles of Captain America, Bucky and Gabe were used in some shots at a maximum of a quarter of the screen height in pixels. They were constrained to the cable rig in a hanging position and were animated to the correct speed to land on the train.
To plan the whole sequence, production provided DNeg with a post-viz animation cut done by the Third Floor.
 |
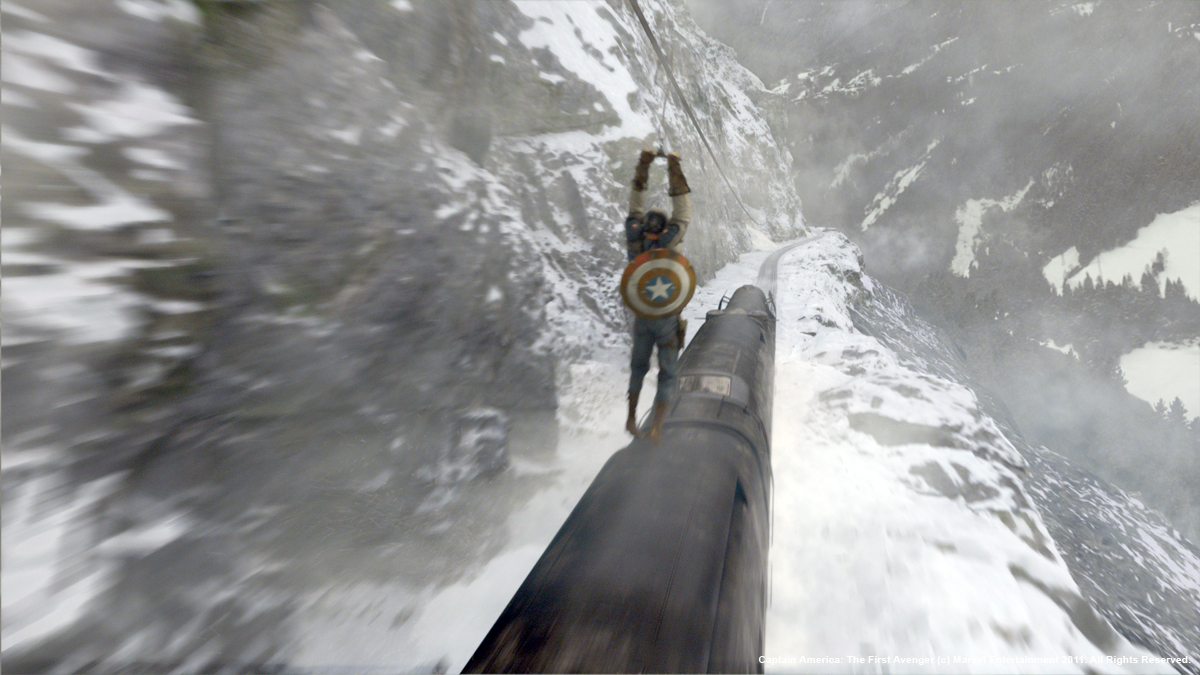 |
We then had to model the whole environment based on the layout of the shots to ensure geographic continuity in the sequence. This meant having to go from large vistas to hugging a cliff side when on top of the train. This was a challenge in itself as the resolution of the rock face needed to holdup to full screen with a train going past at 90 mph, therefore covering lots of ground in a single shot.
To this end myself and our in-house surveyor, Craig Crane, took our lidar out to Cheddar Gorge, surveyed a number of locations to produce a vast high resolution mesh. This was then handed over to Rhys Salcombe to be cleaned in 3D coat and textured in Mari using a projection technique. The photography was sourced from the rock faces corresponding to the lidar scans. Rhys also modeled and textured a couple of viaducts that we see at the start and end of the sequence. The entire landscape was recreated in maya, with the addition of trees generated in houdini. Finally, the snow was added by a procedural shader in prman. For the distant plates, we used a mix of matte painting projection and the background plates shot in the alps. Various layers of effects and atmospherics were also added by Howard Margolius and his FX team: snow falling, snow being kicked by the train, mist and clouds and one hero explosion when a hole gets blasted in the side of the train.
 |
 |
Was there a shot or a sequence that prevented you from sleep?
Not really. They were long days and once my head hit the pillow – that was it (laughs).
What do you keep from this experience?
Working with such a stellar crew here at DNeg was a privilege and a godsend.
How long have you worked on this film?
About a year with the bulk of the turnover coming in March.
What was the size of your team?
At its peak around 280 artists.
What is your next project?
I’m doing bits and pieces. Breaking a script down but not greenlit yet so won’t jinx it by putting it into print.
// A big thanks for your time.
// WANT TO KNOW MORE?
– Double Negative: Dedicated page about CAPTAIN AMERICA on Double Negative website.
© Vincent Frei – The Art of VFX – 2011


