Last week, Vincent Cirelli and his team at Luma Pictures spoke about their work for THE AVENGERS. This time, they explain their involvement on the movie that marks the return to SF for Ridley Scott: PROMETHEUS.
How did Luma Pictures get involved on this show?
Payam Shohadai, Executive VFX Supervisor and Luma Co-Founder // We were introduced to VFX Producer Allen Maris a few years ago and PROMETHEUS was the first opportunity that arose to collaborate. We also have a great relationship with FOX, having worked on several of their films.
How did you collaborate with Production VFX Supervisor Richard Stammers?
Vincent Cirelli, VFX Supervisor // Richard gave clear concise notes and was a pleasure to work with.
What have you done on this movie?
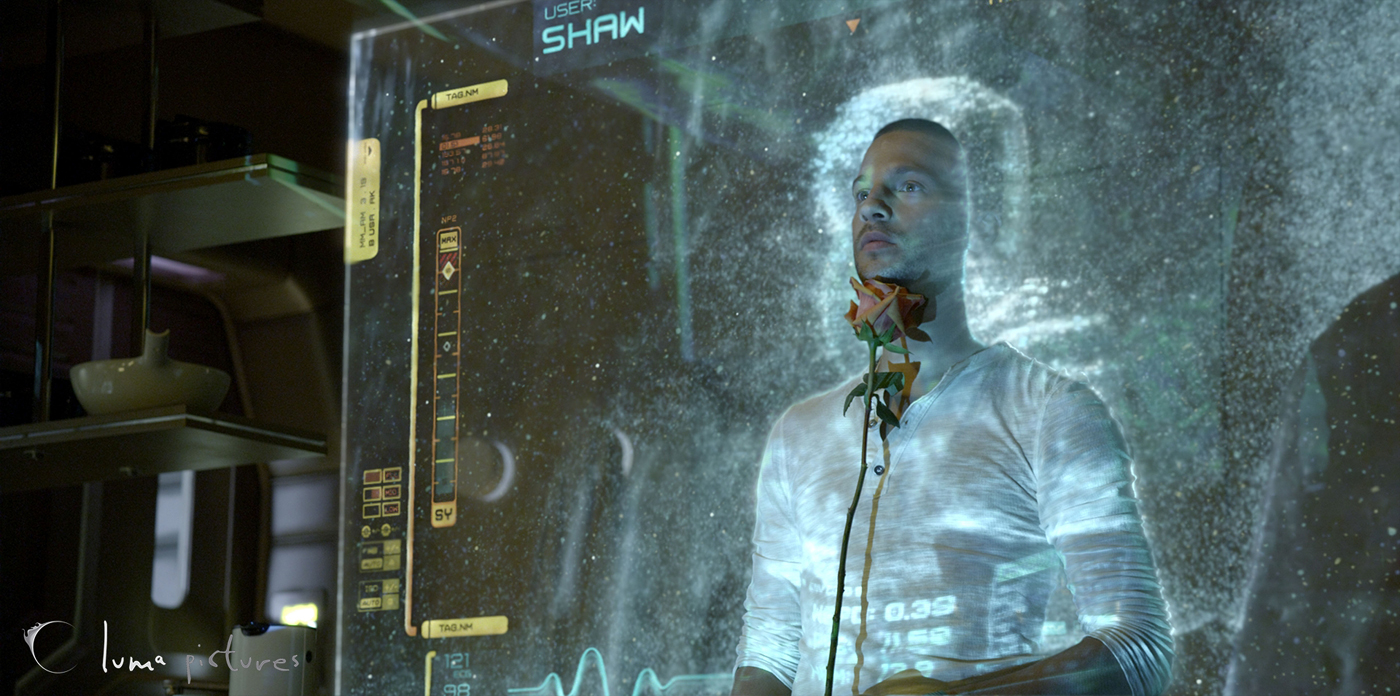
Vincent Cirelli, VFX Supervisor // We worked on the hologram volumes in the sequence in which Holloway comes into Shaw’s quarters of the ship to make up and give her a rose.
How did you design the hologram?
Richard Sutherland, CG Supervisor // We received reference of what the design should look like from the art department. Along with design reference, we also received the footage that needed to be projected into our fluid volume.
Can you explain to us in detail the creation of the hologram?
Vincent Cirelli, VFX Supervisor // For scenes in which the actor was partially inside the volume of the hologram, we were faced with creating detailed holdout geometry and matchmoves of the actors, so they would integrate properly within the CG fluid.
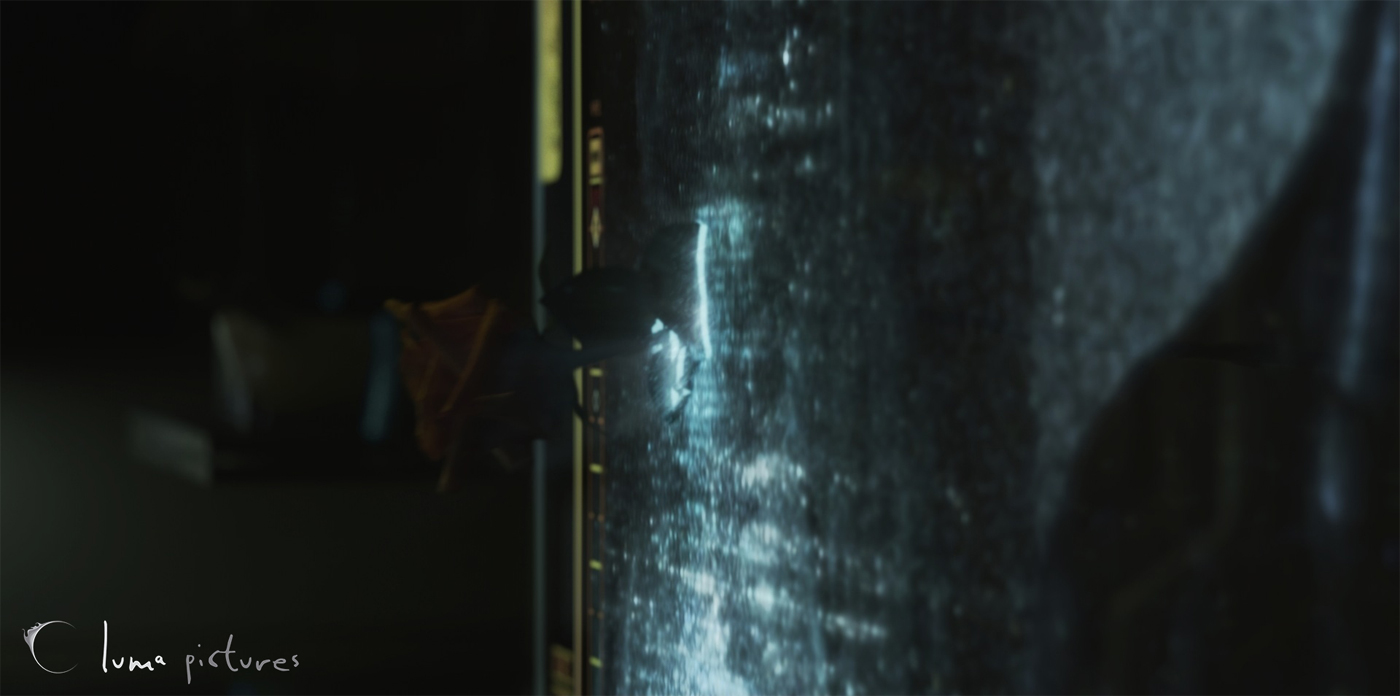
Richard Sutherland, CG Supervisor // To create the look of the distortion field for this hologram shot, we used FumeFX for Maya, which we recently worked with Sitni Sati to implement. PROMETHEUS was the perfect testbed for this new fluid based tool.
How did you manage the interaction with the character and the rose going through the hologram?
Richard Sutherland, CG Supervisor // We created models for the actor and rose, then matchmoved them into place. This allowed us to create a proper distortion field around the geometry, in addition to data passes that could be used inside of Nuke to create a believable falloff of light emission.
Can you tell us more about the CG fluid?
Vincent Cirelli, VFX Supervisor // Our developers worked with Sitni Sati to create a Maya version of the FumeFX solver. We were able to create a volume inside of Maya, rendered through Arnold, then comped in Nuke.
How did you create the distortion field?
Richard Sutherland, CG Supervisor // The distortion field is a combination of turbulence in the fluid volume and some complementary Nuke tricks.
Have you collaborated with other vendors to have the same hologram aspects?
Vincent Cirelli, VFX Supervisor // Yes, we were provided certain elements such as the HUD and various reference, although the final look of this particular effect was unique to this scene.
What was the biggest challenge on this project and how did you achieve it?
Richard Sutherland, CG Supervisor // The biggest challenge on the film was integrating a light-emitting hologram with lighting that was shot practically.
Ridley Scott’s return to SF is something highly anticipated. What was your feeling to be part of it?
Vincent Cirelli, VFX Supervisor // As you can imagine, it was very exciting to be a part of PROMETHEUS. Many of Ridley’s films have inspired our career paths.
A big thanks for your time.
// WANT TO KNOW MORE?
– Luma Pictures: Dedicated page about PROMETHEUS on Luma Pictures website.
How did Fuel VFX got involved on this show?
We’ve been working with Marvel for a few years now. THE AVENGERS is the fourth film we’ve done following IRON MAN 2, THOR and CAPTAIN AMERICA and it was really good to work with Janek Sirrs (VFX Supervisor) and Susan Pickett (VFX Producer) again who we got to know on IRON MAN 2.
Can you tell us more about your collaboration with Production VFX Supervisor Janek Sirrs?
Janek is great to work with because he’s a very good communicator and gives clear briefs with reference materials to help illustrate the look or feel that’s required. We’re very fortunate with Marvel that we’ve been trusted to bring some of our own design ideas to the table, and Janek is excellent at giving the necessary feedback on what’s the right direction for various effects.
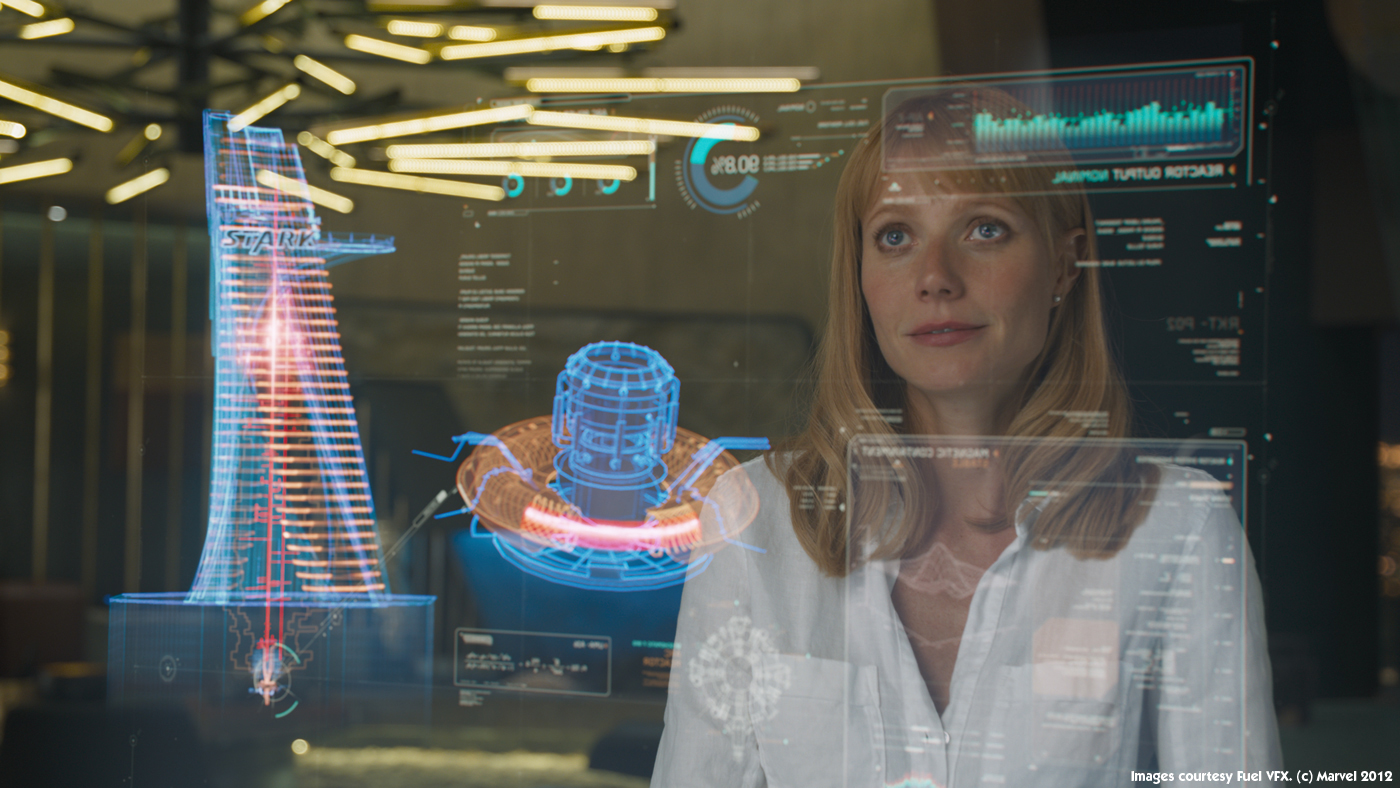
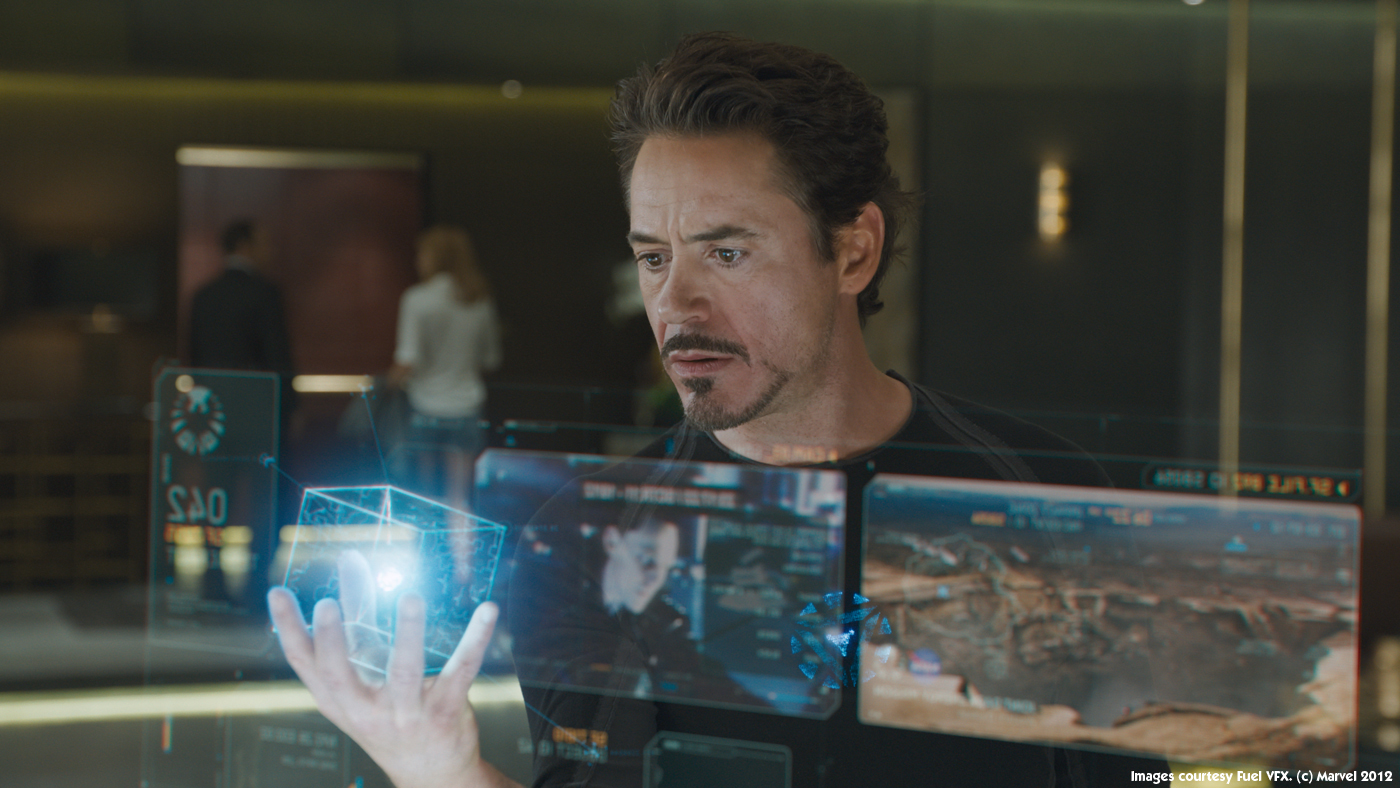
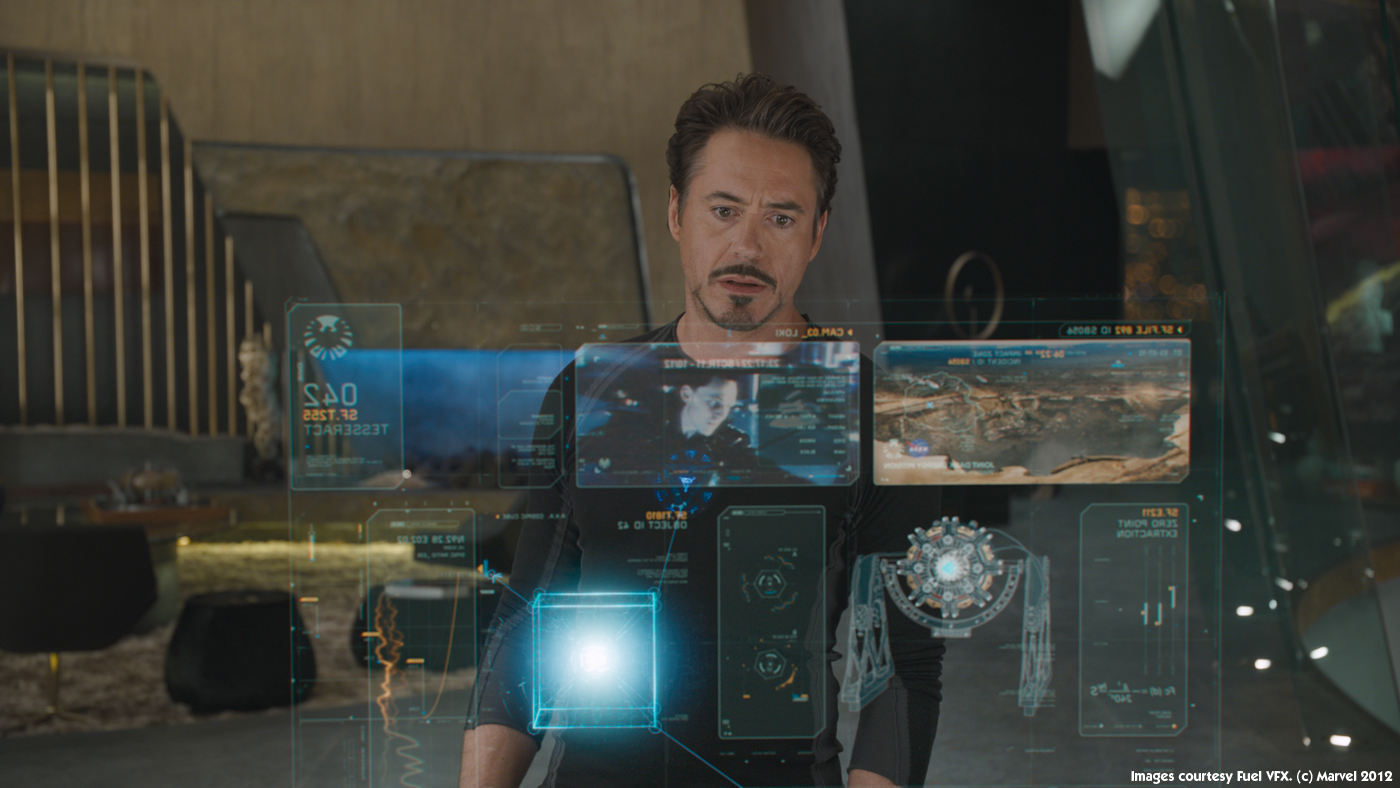
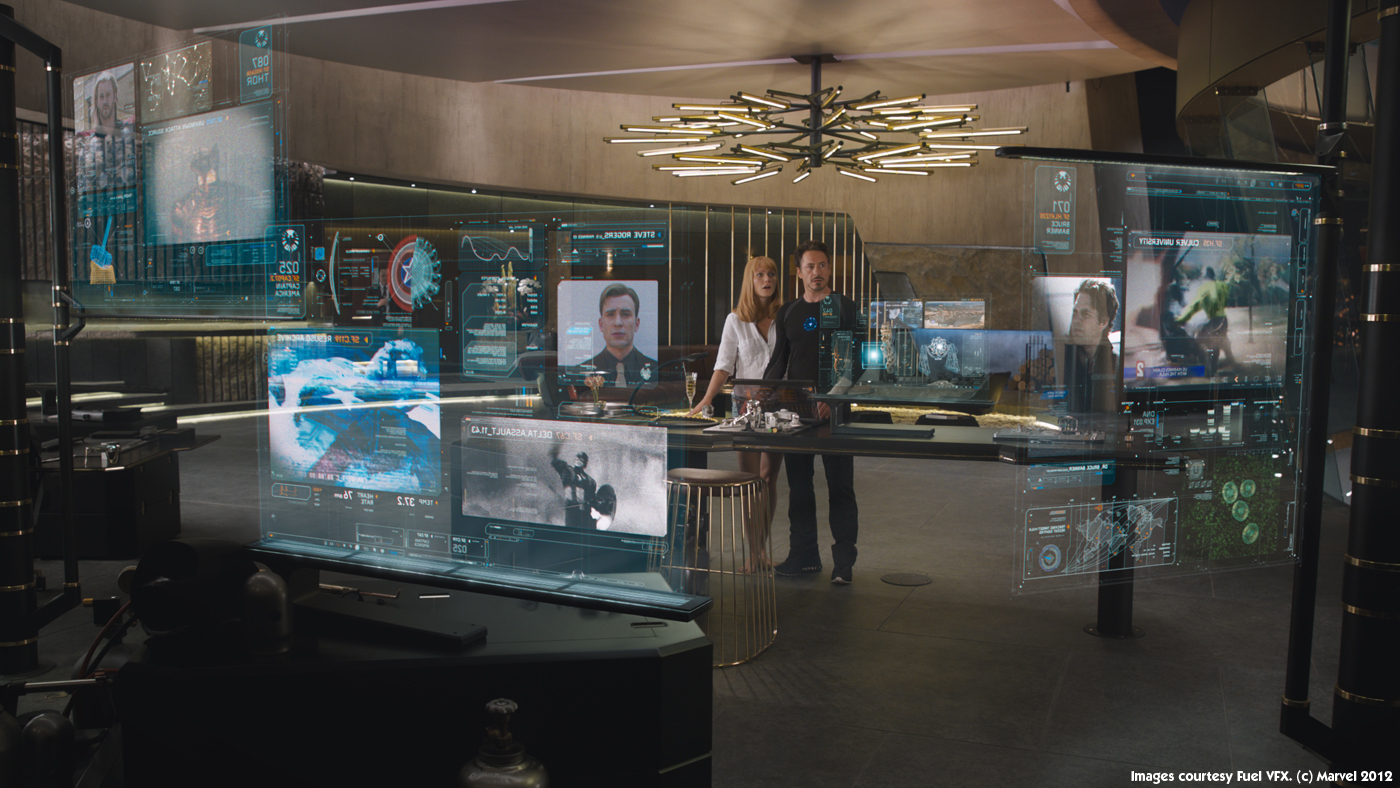
What Fuel VFX done on this show? Fuel looked after three sequences in and around Tony Stark’s penthouse. In a scene near the film’s opening Tony and Pepper are celebrating Stark Tower coming online when Agent Coulson from S.H.I.E.L.D interrupts them. Fuel designed and created the various holograms featured in this scene that give an insight into some of the other members of the Avengers team as well as the tesseract artefact.
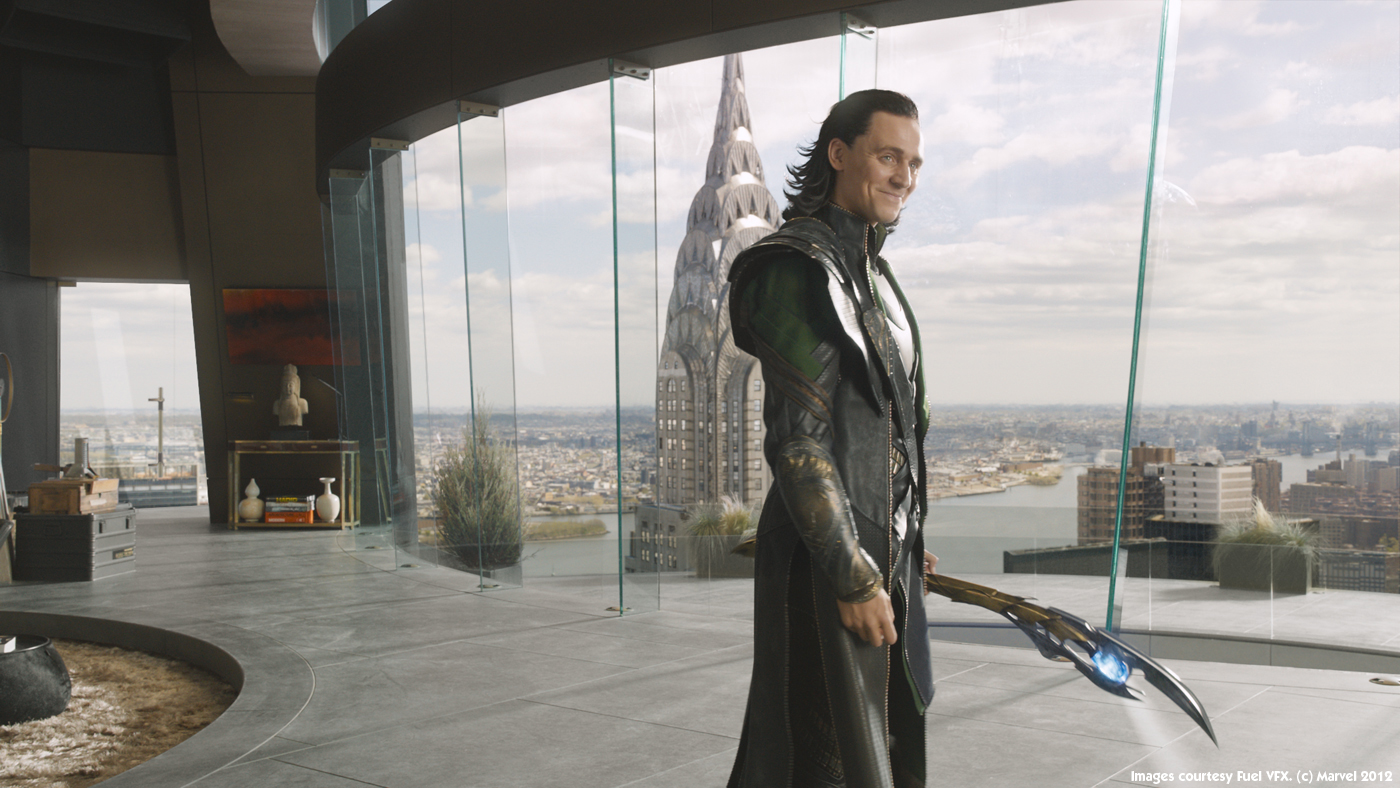
We added the sweeping views of New York behind the large glass windows for both night and day looks in two different sequences, and extensions to parts of the interior set.
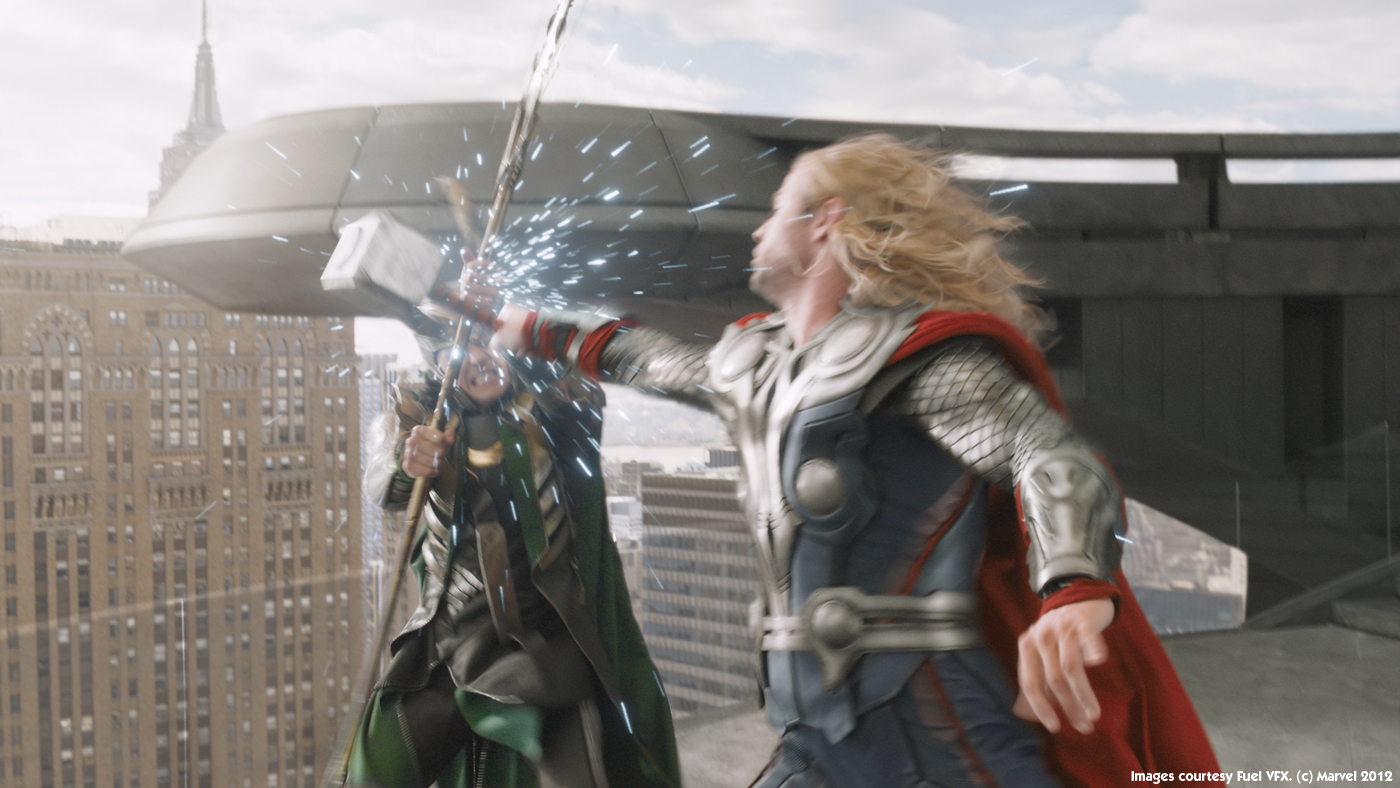
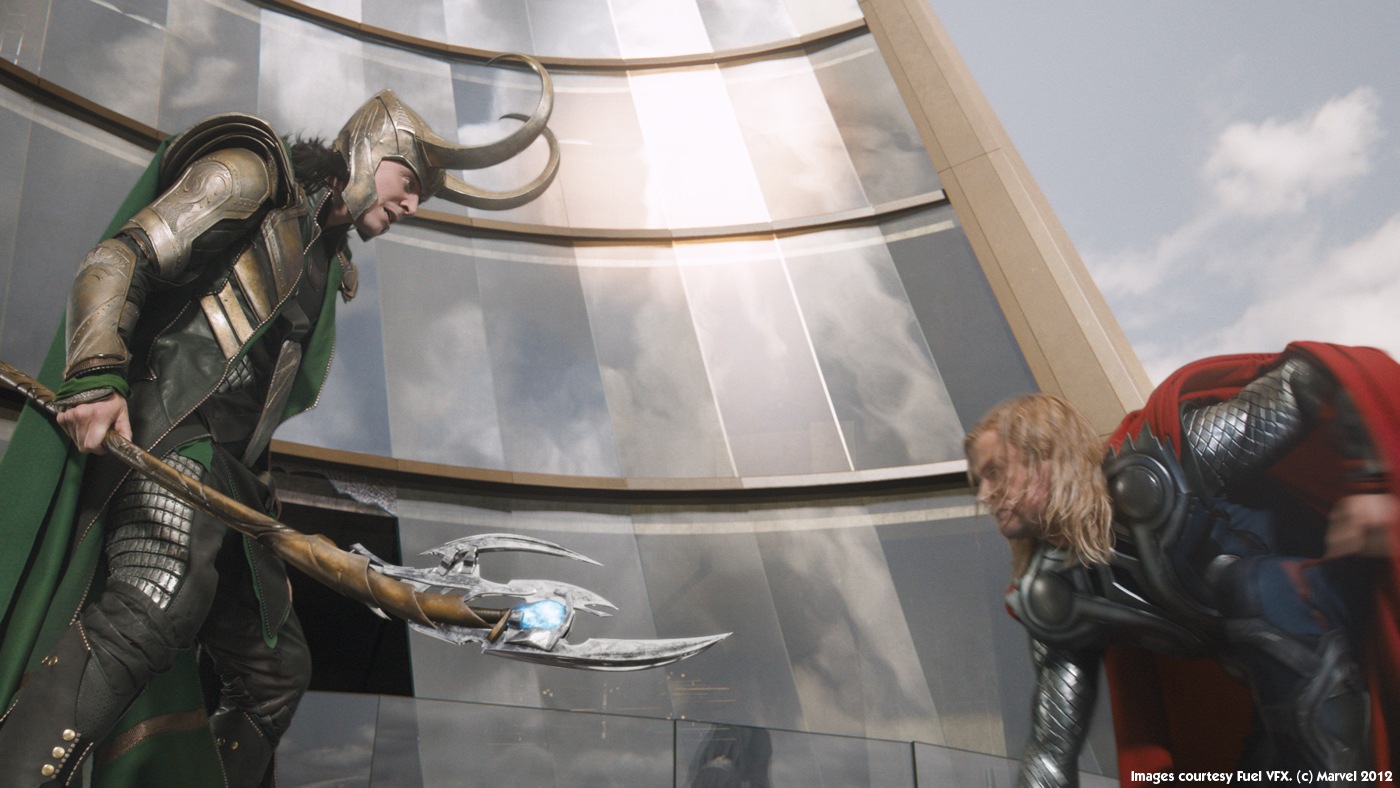
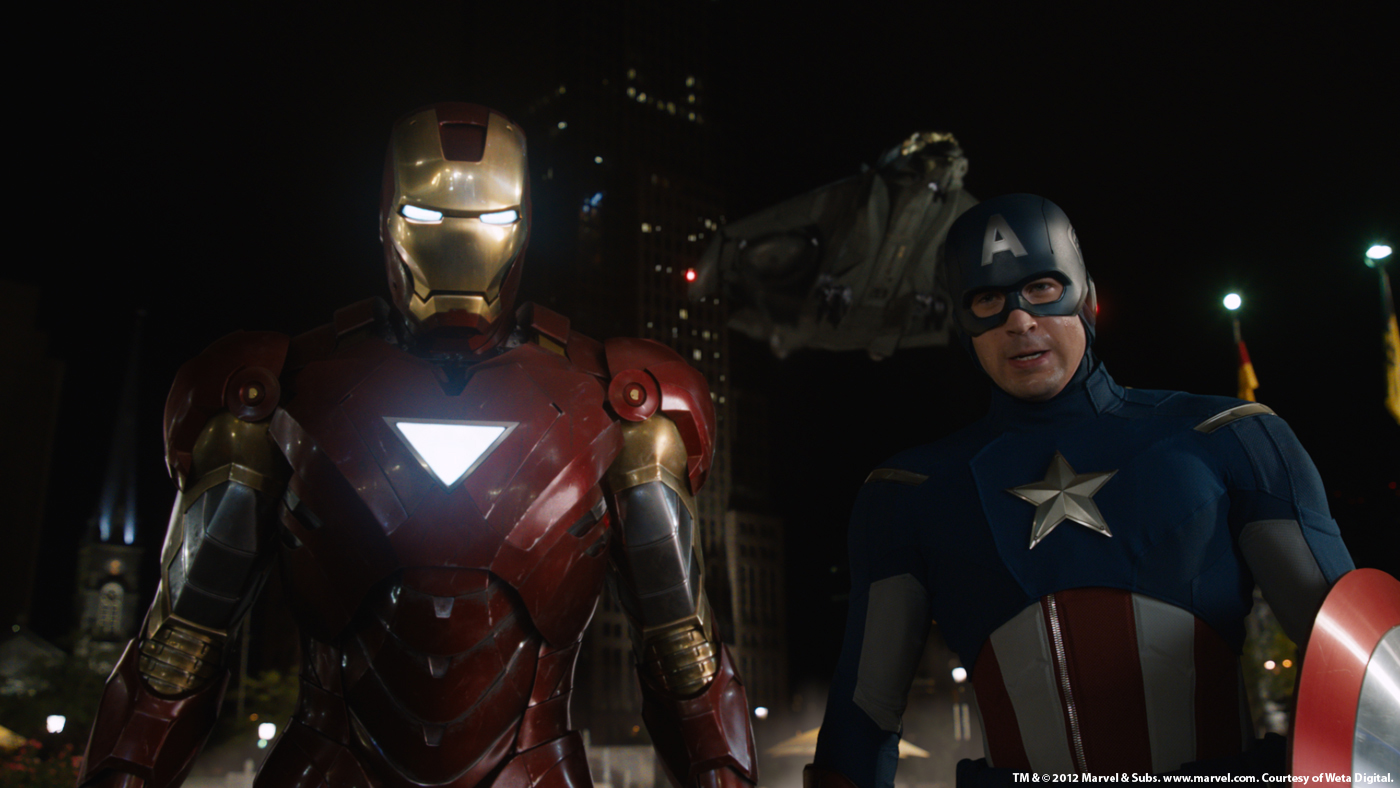
Towards the end of the film, Loki and Thor battle it out on the balcony outside of Tony’s apartment. This was shot on a blue screen in a studio, but needed to look like it was on the Stark Tower balcony in New York so we created a CG exterior of the Tower that could replace the small set piece where required and also join up to some of the live action elements.
And then there were some extra shots including the CG Stark Jet (a re-use of the Fuel design used in IRON MAN 2); the Security Council monitors; and some shots at the end of the film to integrate Loki into the smashed concrete floor after he has a run-in with the Hulk.
Can you tell us in detail the design of the various holograms inside Tony Stark apartment?
We really started by referencing the IRON MAN films because there was a strong design precedent set there, so we spent a lot of time discussing what was relevant and what we could do with them.
Some of the things we paid attention to when designing the holograms included the lighting. If we pushed how much it ‘flickered’ for example, it looked fake. Push it too far the other way and it was hard to read, or just didn’t look good.
Another important factor was how much focus we placed on each of the elements in the dossiers. When Tony activates them, there are over 70 unique elements of information all on the screen at the same time conveying parts of the story. We needed the audience to take some of that information away, but it still needed to look cool, not interfere with Robert Downey Jr’s performance, and we needed to incorporate the tesseract. So we were careful to get the balance right.
Most of the early work on the holograms was done using Photoshop and After Effects with the 3D done with Maya. All of our compositing was done in Nuke.
Can you tell us more about the creation of the impressive New York background and how did you manage the challenges of the day and night versions of it?
The New York background was a digital asset supplied by ILM. However, the way we needed to use it was a bit different to their usage so we had a bit of work on our end to adapt it – mainly additional work on the Chrysler building as it was quite prominent in our shots and adding life to the background cyc that was particular to our shot angles.
For the daytime cyc this included steam from rooftop vents, moving clouds, moving reflections on the water and some slight rolling highlights on the Chrysler Tower when the camera moved. At night though, these subtleties wouldn’t be readable so for that we mainly just added bright defocused city lights that danced around because they were being affected by the atmosphere. Some distant planes in the sky and moving traffic with headlights also helped in certain shots.
Can you tell us more about the challenge with the reflective glass windows to composite the cityscape?
There’s two parts to that challenge: the technical work of extracting the set and cast reflections, which were sometimes corrupted by the undesirable reflections of lights and gear; and then the creative decisions regarding what reflections to keep in the shot and at what brightness.
Getting the overall exposure of the New York cyc for the daytime shots was probably the most important thing. Obviously you want to be able to see the city outside the window but you also need make it bright enough so that it looks like it’s all been exposed in the same image as the foreground. If you really tried to shoot that with a camera you would probably find that the background would have blown right out. We came to a balance with Janek by pulling it down slightly from where it should probably sit in reality and using the idea that the glass in the windows was slightly polarized. There’s a number of layers of glass in those shots and if you look carefully at the balcony outside the apartment, you can see that the more levels of glass you see through, the darker the background appears to be. Other less obvious things helped as well, such as how much the light wrapped around the edges of the foreground plate, especially the actors’ hair.
Have you extended the interior set?
Yes, there was some minor set extensions required for the inside of the penthouse. The glass windows needed to be extended to the ceiling and we did some extensions to the underside of the balcony outside.
Can you tell us more about your work on the Loki – Thor fight sequence on the balcony?
The sequence is quite complex in that we needed to include a lot of CG elements such as a CG Stark Tower set extension, a New York city panoramic cyc, a CG replacement of Loki’s scepter, scepter blast FX and hammer/scepter clash FX, background alien chariots and reflection replacements in the practical glass. It’s also got about 60 shots in it, which is many more than you think when viewing it.
Getting the Stark Tower set extension looking right was probably the biggest challenge. It wasn’t long after we received the plates that we realized that the partial set-piece wasn’t a good fit with the CG version of the Tower. So we had to modify the design of the CG Tower as well as replace more of the practical set than we originally intended. That would be OK in most circumstances, except in this case, any changes we made affected ILM because they also had Stark Tower in their shots. So with a bit of back-and-forth with Janek and ILM’s supervisors, we worked it out to make sure we found a solution.
Meanwhile the lighting in the plates was proving a bit tricky. The Loki-Thor fight was filmed on a sound stage with the partial set against blue screen, but needs to take place outdoors, on Tony Stark’s penthouse balcony. So we were fighting the studio lighting a bit – the plate photography was telling us one thing, but we needed to make that look like something else. To complicate matters, our shots also had to seamlessly intercut with ILM’s fully CG shots.
Janek was fantastic in this respect, working closely with us to push the live action grade and lighting in one direction, while working with ILM to keep their adjacent shots in line as well.
As the bigger issues were sorted, we could concentrate on getting the close-up textures on the Tower right, as well as focusing on the finer details such as the reflections in the glass windows, matching sun flares across the shots, and concentrating on the colour and brightness of the sky across all the shots – not to mention pulling keys through Thor’s messy hair which were still being worked on right up until delivery. All those things you take for granted when you’re watching the film, but without that attention to detail, would compromise the final shots..
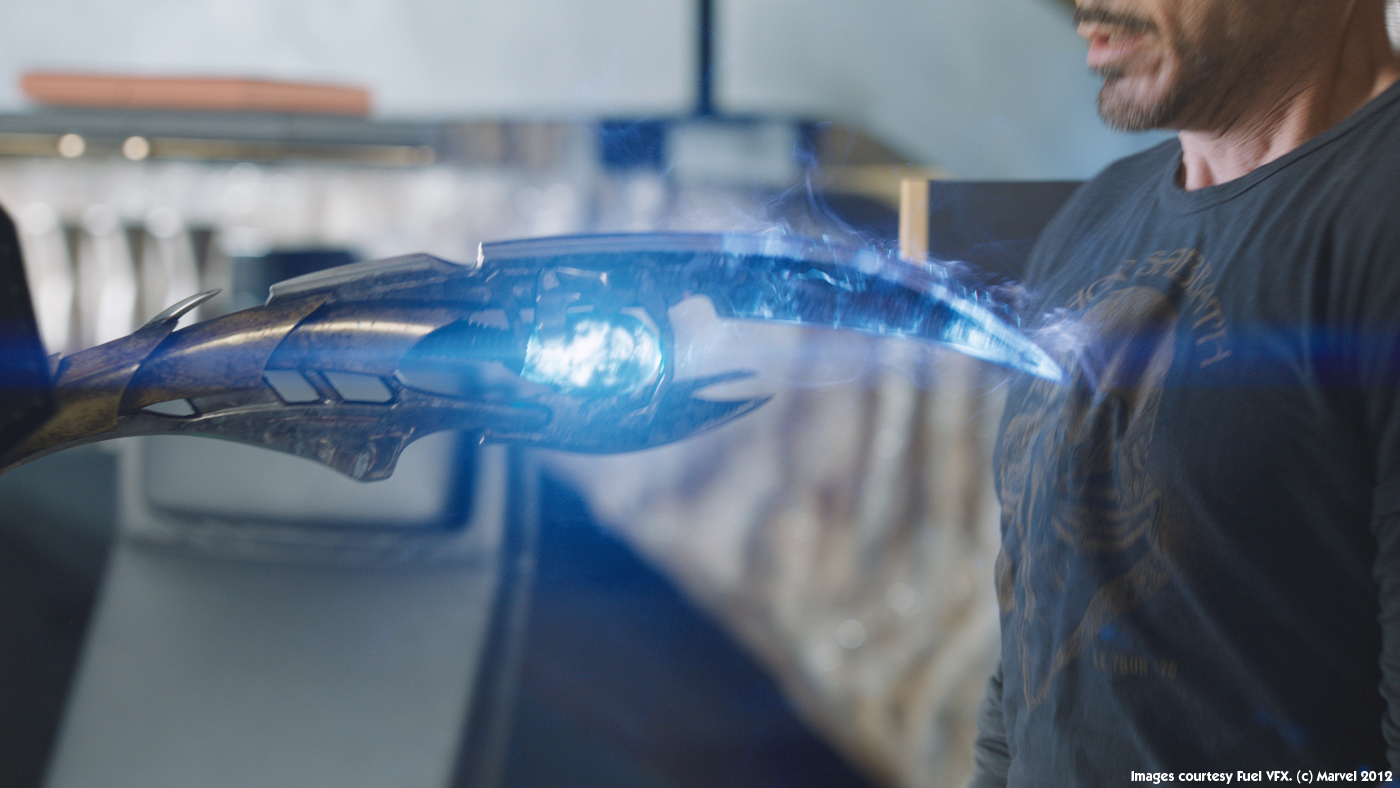
Can you tell us more about the FX for Loki’s scepter?
There were two different effects in our sequences: an energy blast; and what became known as the ‘hijack effect’ where Loki taps his scepter to the chest of people to gain control of them.
These effects appeared in various other scenes throughout the film so it was really a matter of liaising with Janek about how he was directing the other vendors and coming up with a look for our shots that was consistent. Both of our scepter effects were relatively straight forward particle FX achieved in Maya.
How did you work with other vendors especially for the shots continuity?
Fuel’s work had continuity implications with ILM’s work, mainly in relation to the Loki-Thor fight scene where our work intercut with theirs. Janek was invaluable here and kept his eye on the bigger picture directing each vendor accordingly. Every so often both the Fuel and ILM teams would get on a call with Janek and talk through any issues and how we could help each other stay on track – the need to make changes to the CG Stark Tower model is a good example of where we needed to get our heads together.
What was the biggest challenge on this project and how did you achieve it?
Probably the Loki-Thor fight sequence for the reasons outlined previously.
Was there a shot or a sequence that prevented you from sleep?
No not really.
What do you keep from this experience?
A positive collaboration with clients and fellow VFX vendors allows for challenges to be overcome in the most efficient way possible and will make for the best results.
How long have you worked on this film?
We were in production for approximately 5 months.
How many shots have you done?
We delivered just over 150 shots.
What was the size of your team?
We had about 50 crew work on THE AVENGERS over the course of the schedule.
What is your next project?
Fuel was one of the lead vendors on PROMETHEUS, looking after most of the design-driven visual effects. So we are looking forward to telling people about our work on that.
A big thanks for your time.
// WANT TO KNOW MORE?
– Fuel VFX: Dedicated page about THE AVENGERS on Fuel VFX website.
Luma Pictures is back on The Art of VFX to tell us about their participation on THE AVENGERS. Vincent Cirelli and his team explain in detail their work on this show.
How was the collaboration with director Joss Whedon and Production VFX Supervisor Janek Sirrs?
Vincent Cirelli, VFX Supervisor // We worked directly with VFX Supervisor Janek Sirrs. He was our accomplice on the client side and it was an absolute pleasure to collaborate with him. Janek is a consummate professional and very enjoyable to work with. He goes out of his way to clearly articulate notes and, in spite of a busy schedule, makes himself readily available for discussions. Janek is not only extremely technically knowledgeable in visual effects, has also has great aesthetic sensibilities. »
What Luma Pictures have done on this show?
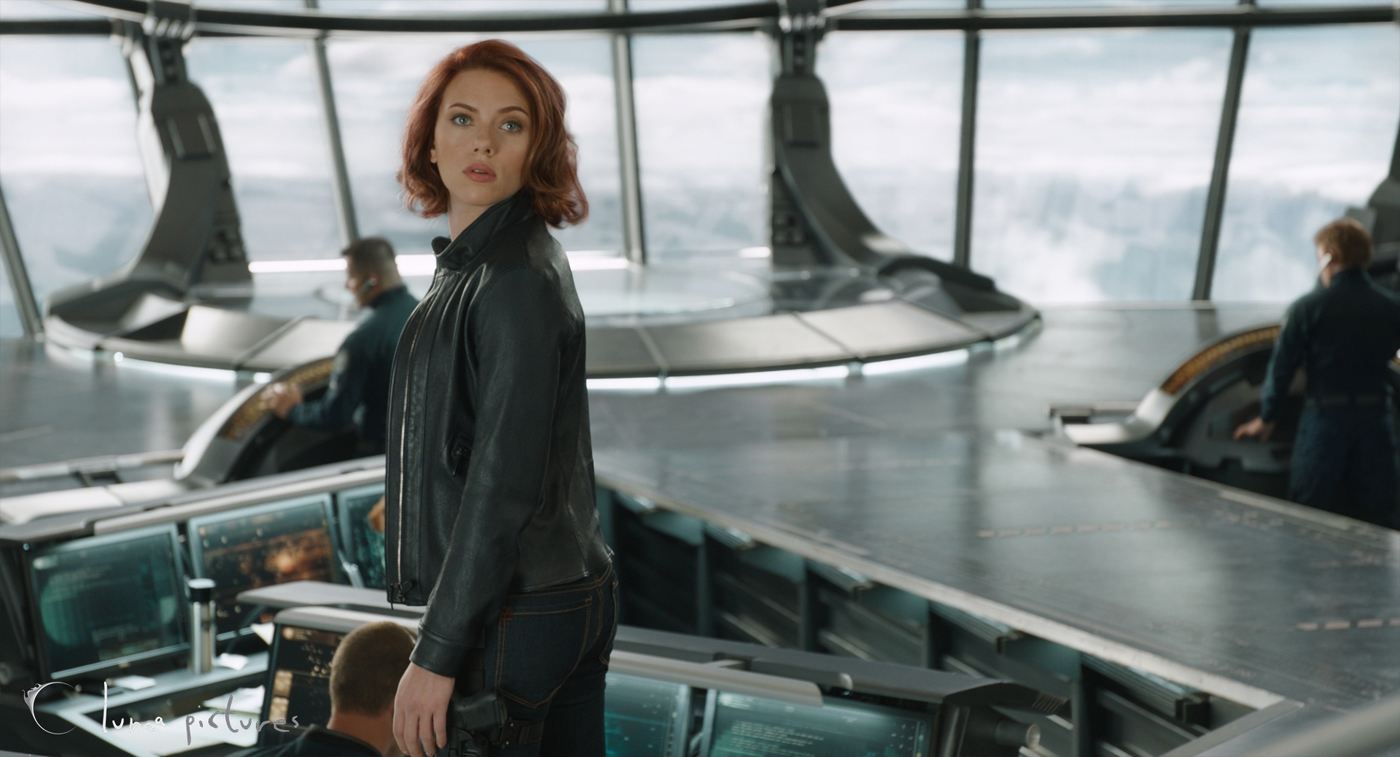
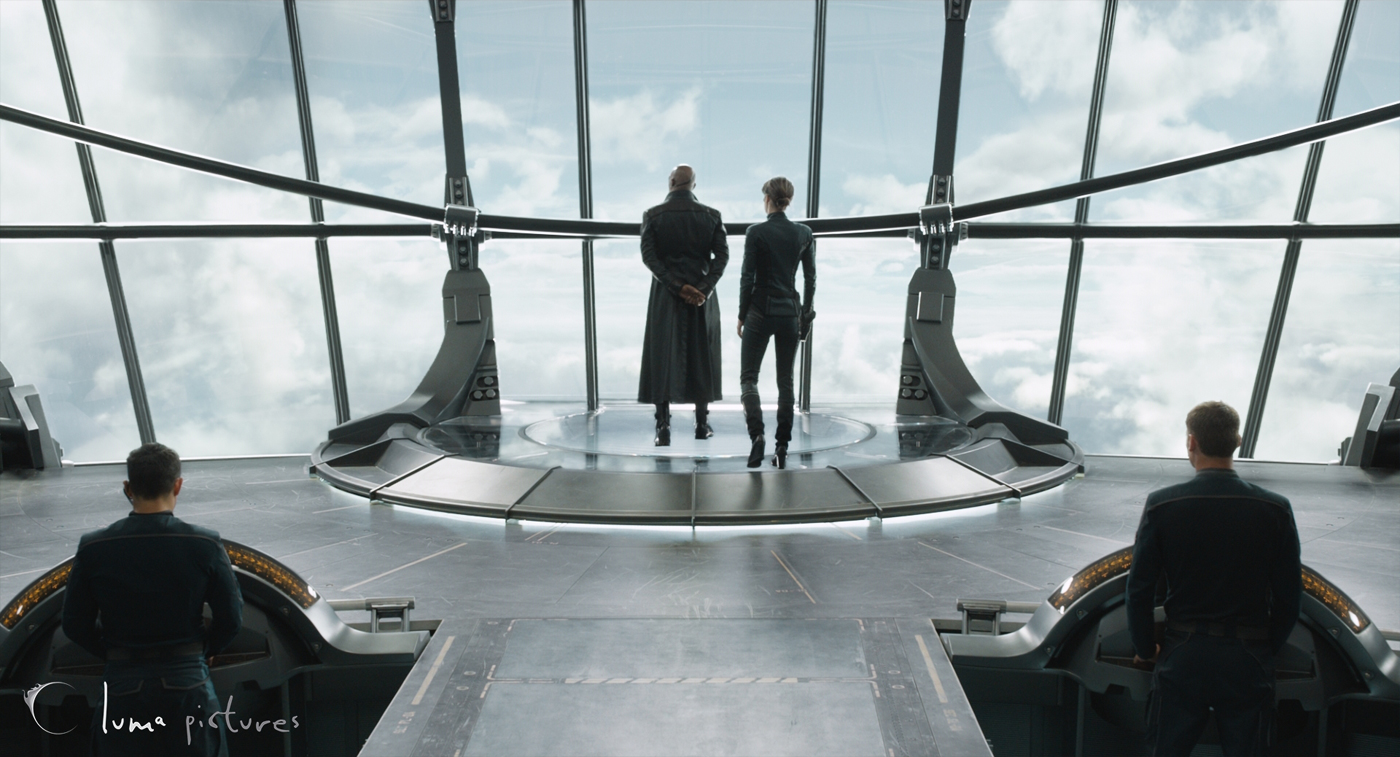
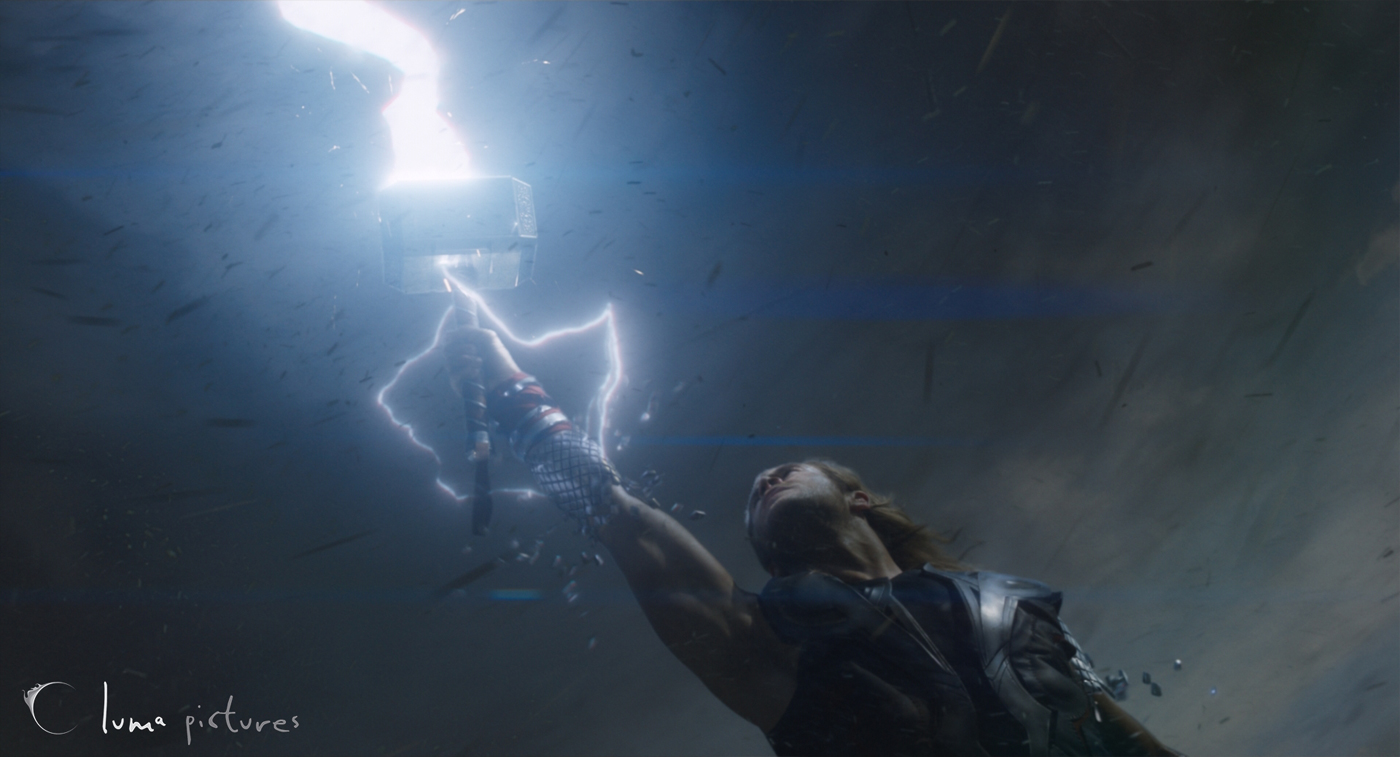
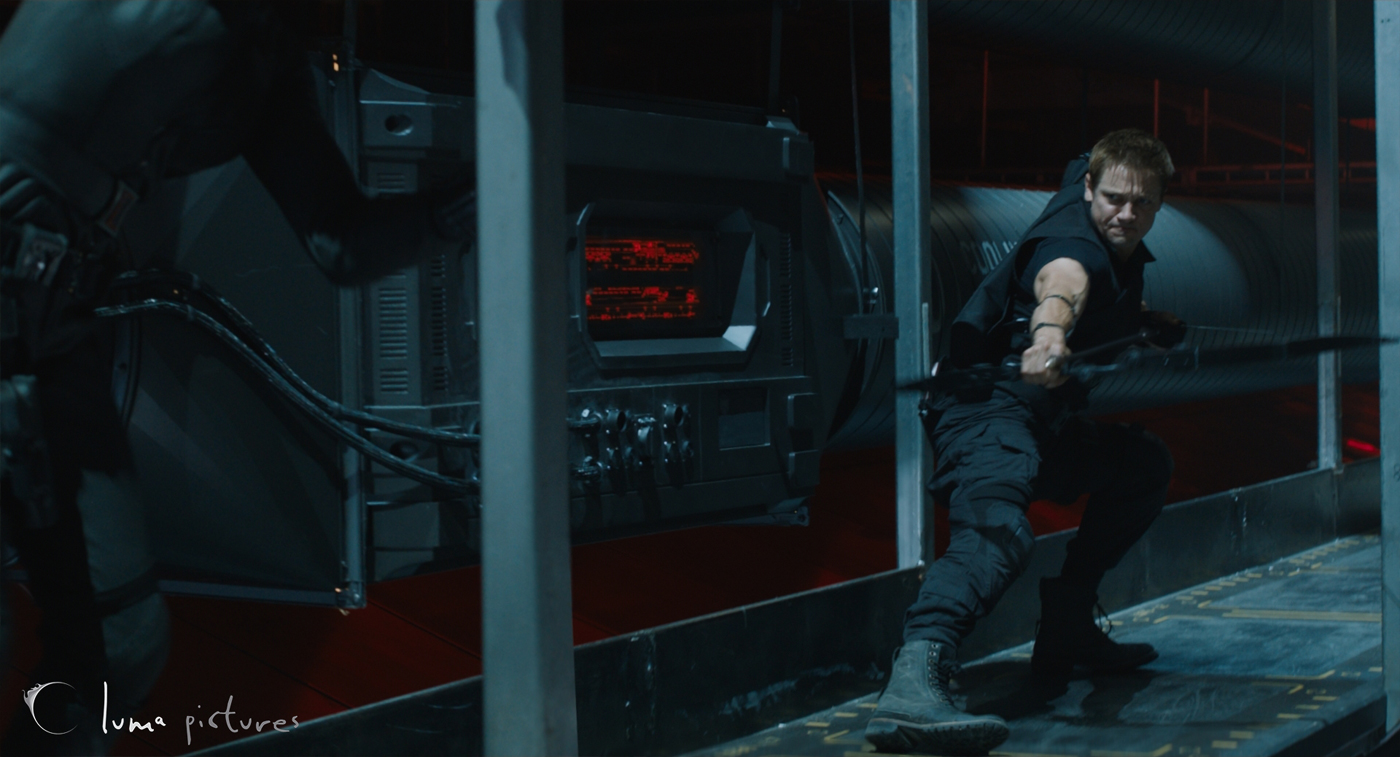
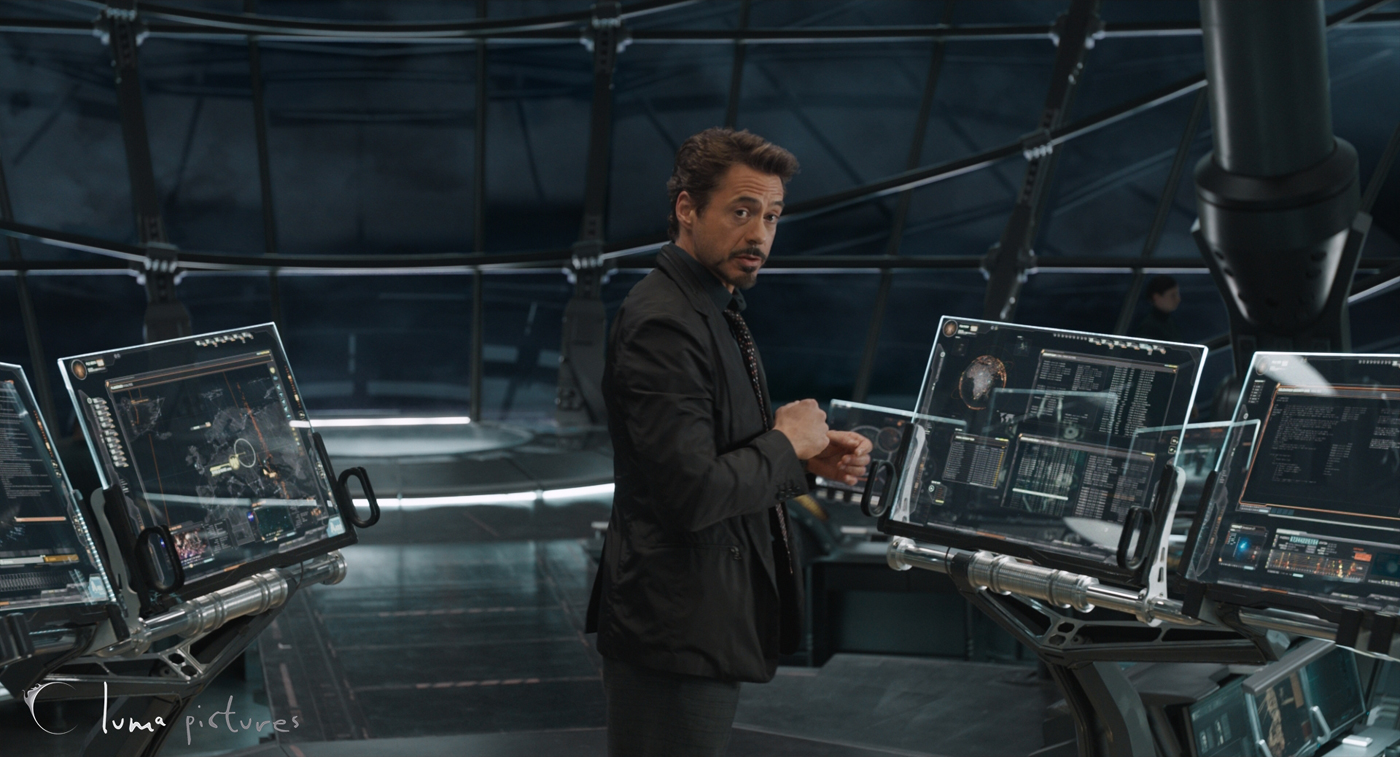
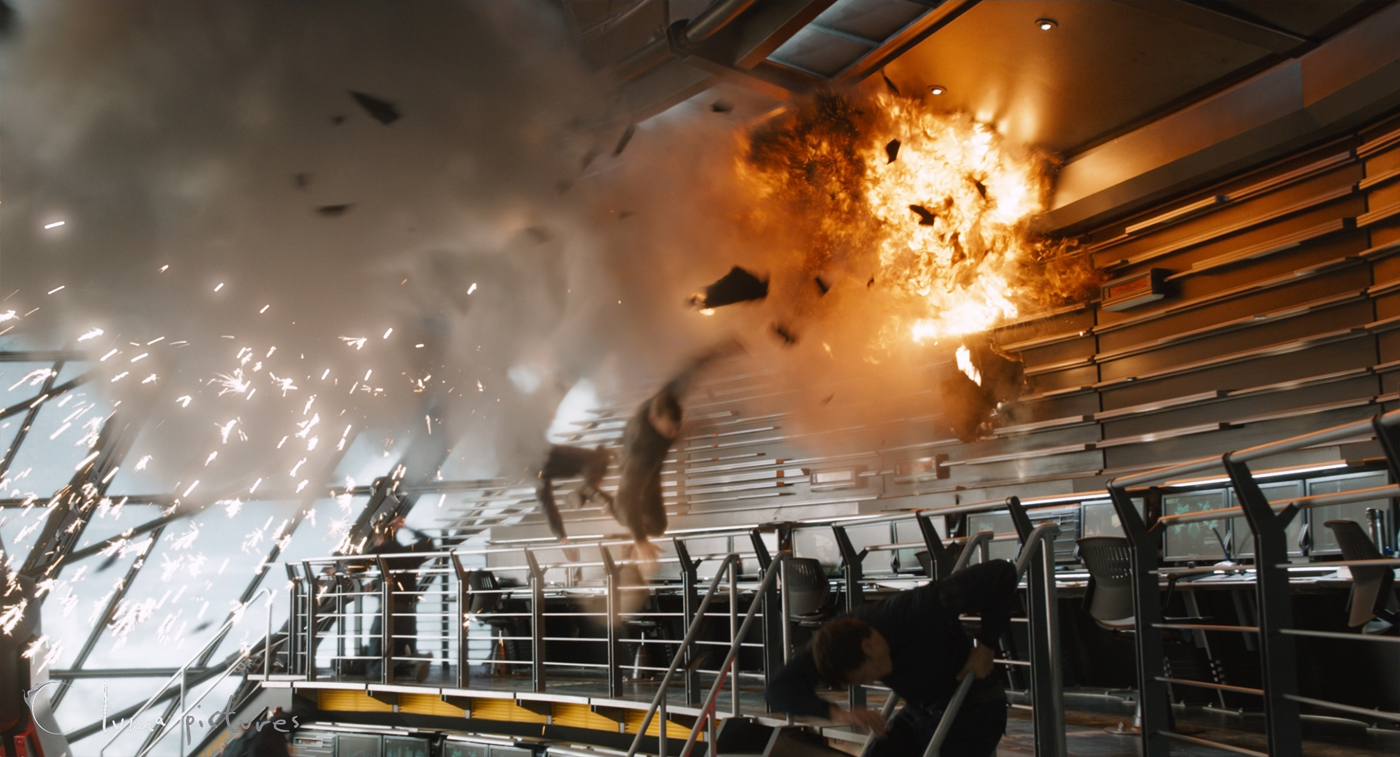
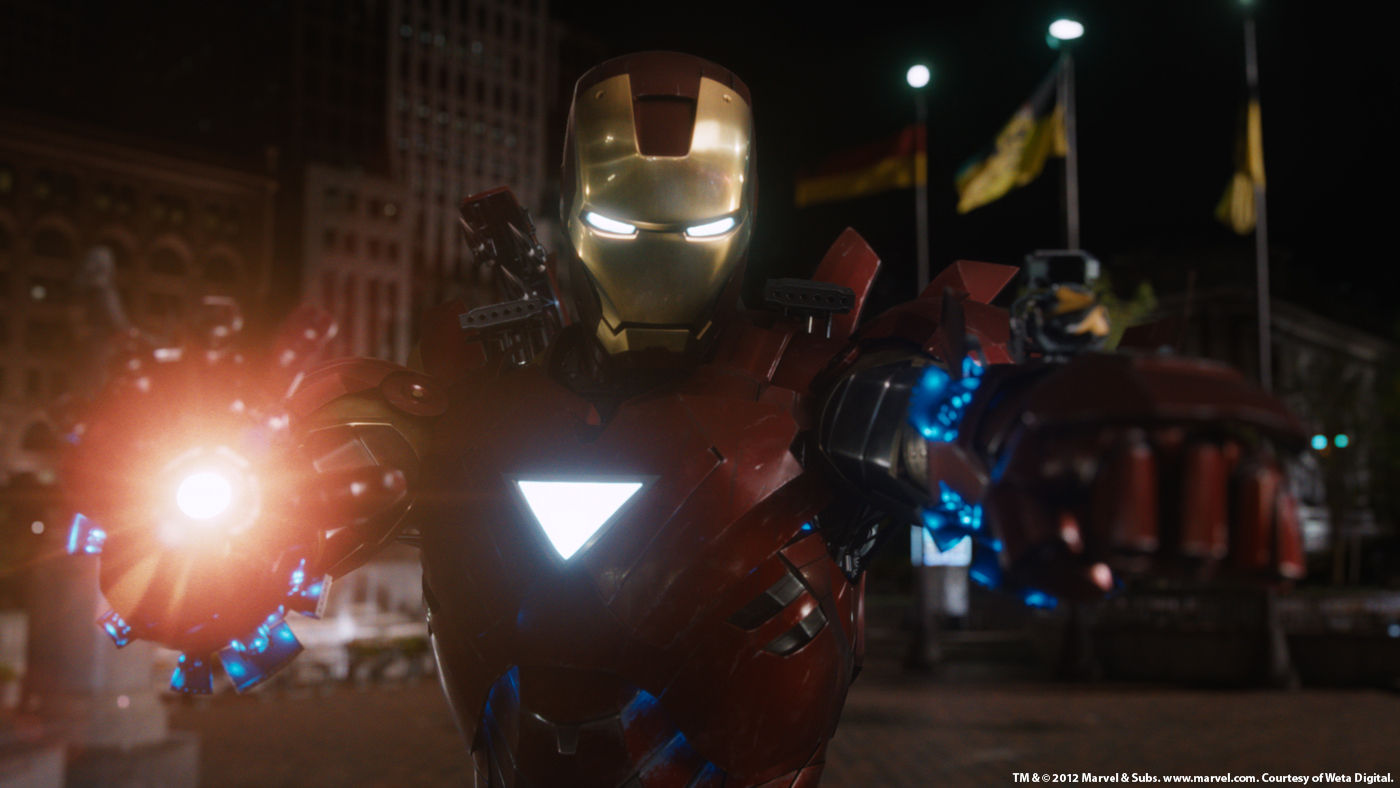
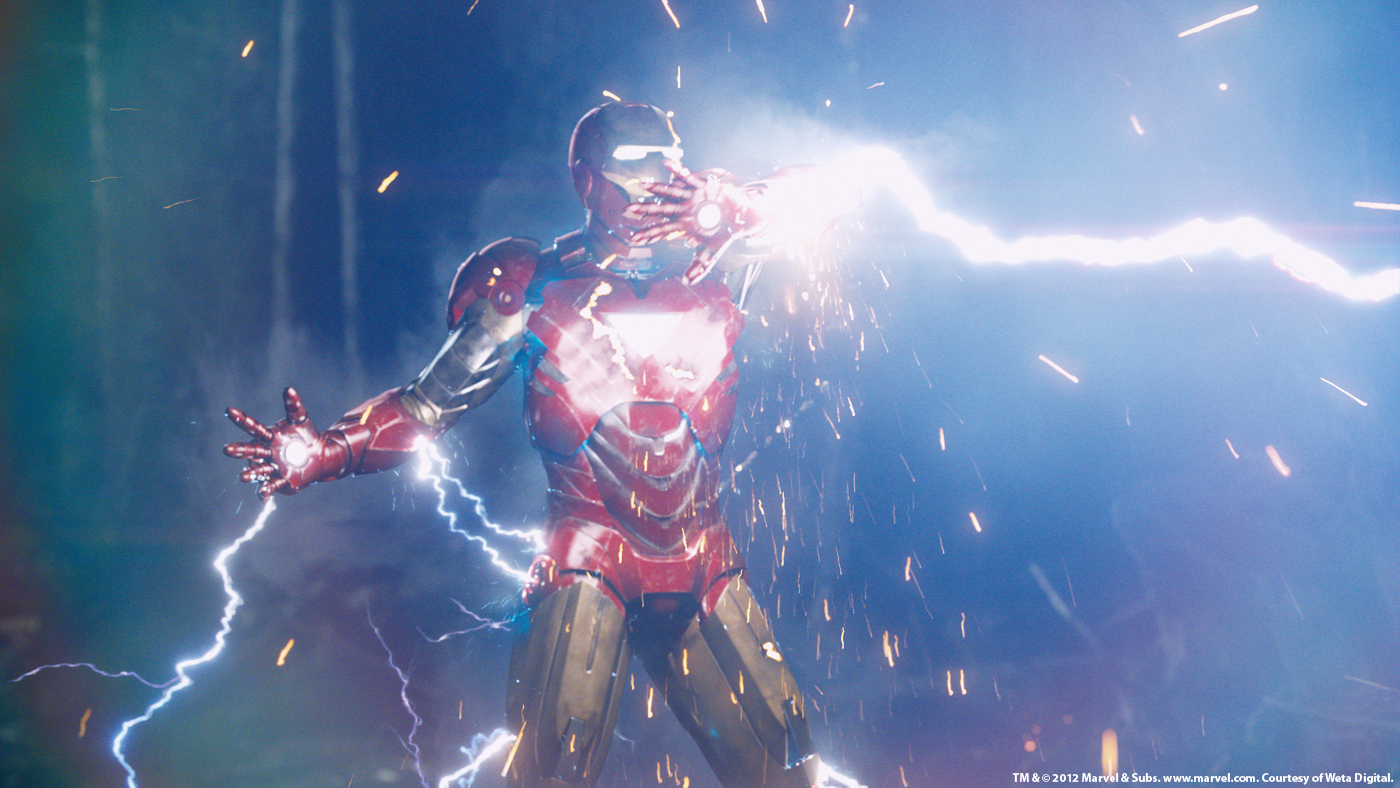
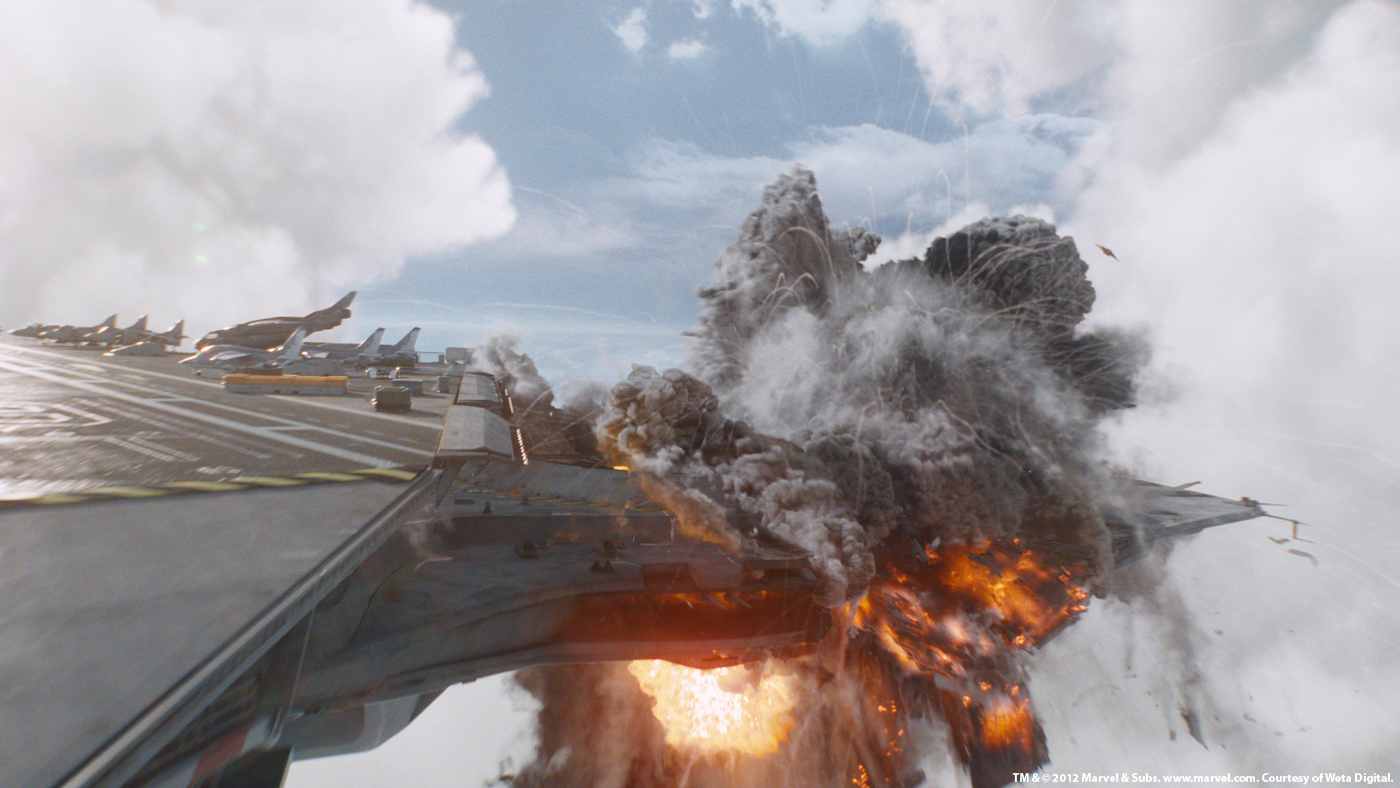
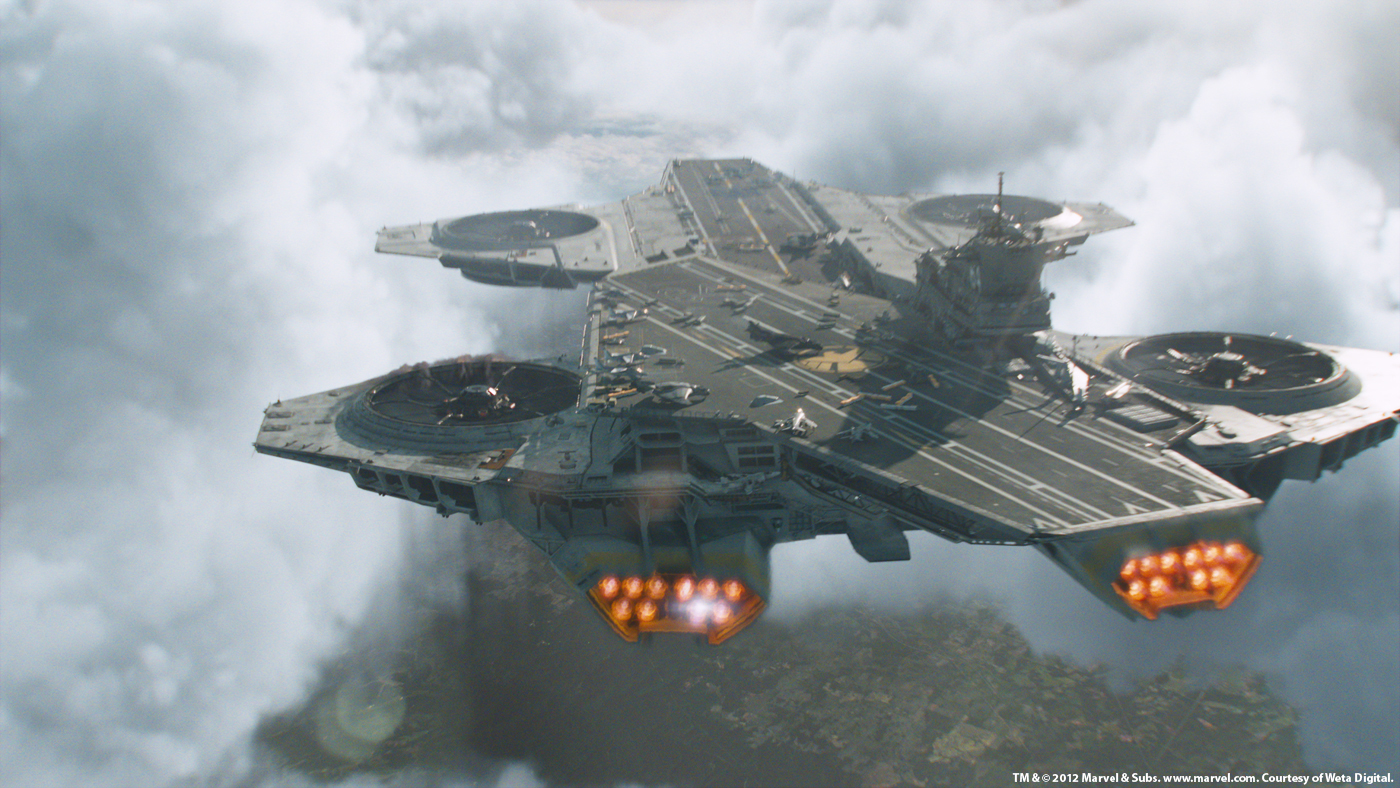
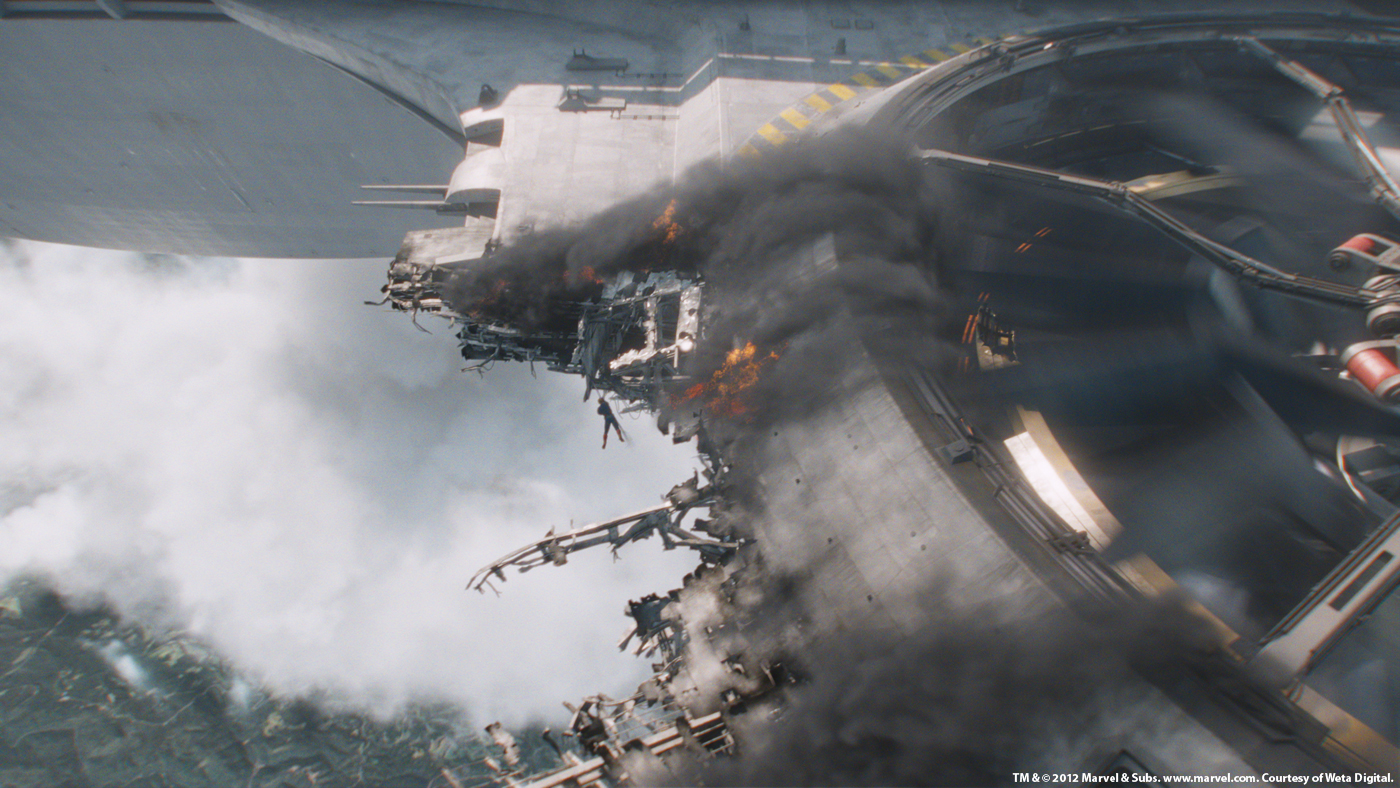
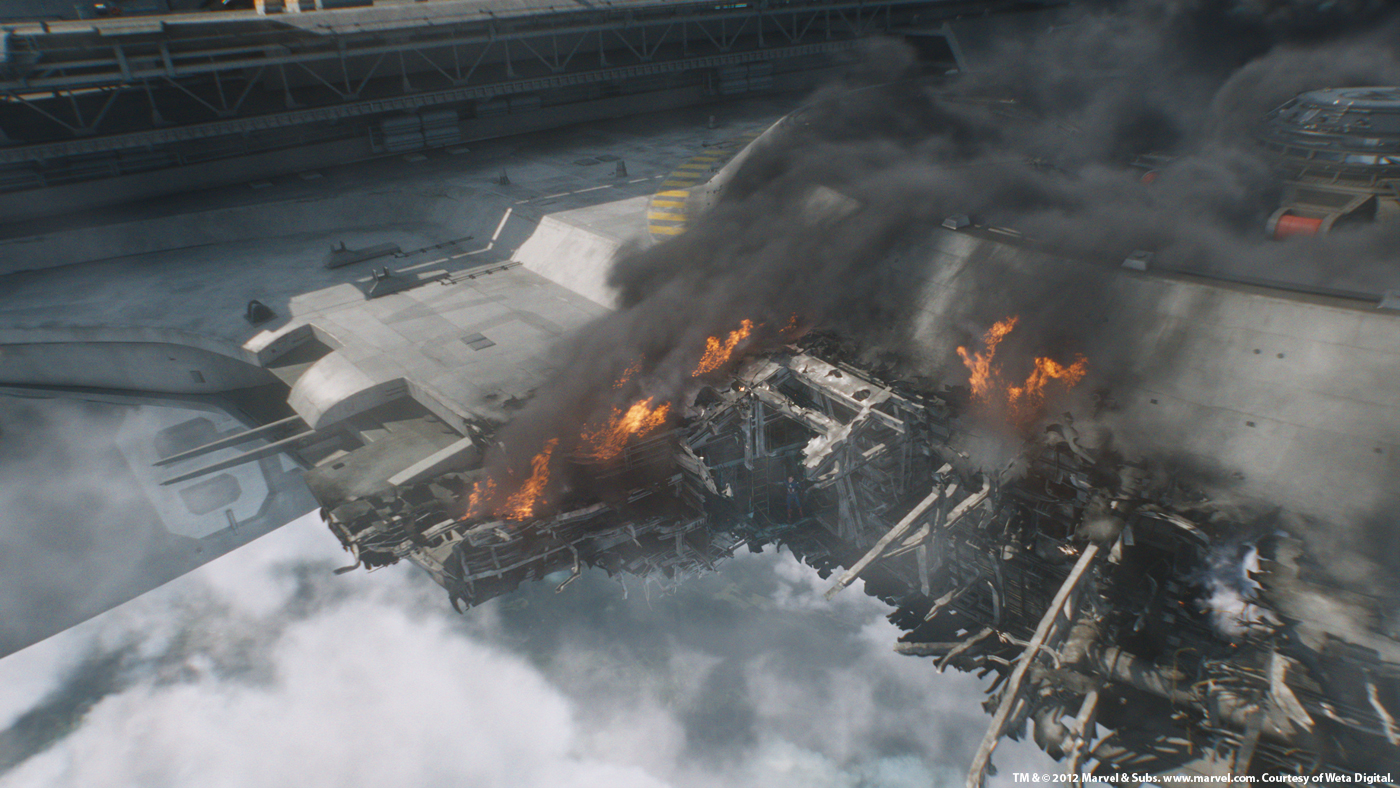
Payam Shohadai, Executive VFX Supervisor and Luma Co-Founder // A majority of the work was on the Helicarrier Bridge, which involved CG set extensions, multiple exterior cloudscapes, and glass-panel monitor replacements. We also executed shots of Thor conjuring his ‘Thornado’ storm with lighting and tornado simulations, as well as a few miscellaneous effects such as Hawkeye’s arrows and a CG desert environment.
What was the real size of the set for the Helicarrier and especially for the Bridge?
Richard Sutherland, CG Supervisor // The entire Helicarrier is basically the size of an aircraft carrier and this ambitious scale runs through all parts, including the bridge. The interior space of the bridge is a large circular room over 30 feet high and almost 100 feet in diameter. The front of the bridge features 160 degrees of windows which are over 20 feet tall.
Can you tell us more about the tracking challenges for the set extensions?
Richard Sutherland, CG Supervisor // The main challenge was achieving a perfect track over the length of each shot and over the entire frame. When adding CG to a plate, it normally only interacts with one section. For instance, a creature standing on the ground allows you to focus your tracking resources on that one spot. Since the bridge extensions mated with the practical bridge build-out along the entire top edge, the track had to be perfect across the entire frame. Our tracking team did a great job dealing with lens distortion, sweeping camera moves, and lots of moving people to get solid tracks for every shot.
How did you design and create the CG set extensions?
Richard Sutherland, CG Supervisor // We were very fortunate to be able to work from the incredible practical set that was built and filmed. Production provided a scan and blueprints of what they built, along with an incredible amount of reference photos. These photos showed the different materials that comprised the bridge and many of the details and fittings they used on set. We used these to turn some of the concept art provided into a few rough models which we could present for a design discussion. There were some details that were not really evident in the 2D paintings, as well as others that did not seem substantial enough to fit in with the massive scale of the Helicarrier. We worked with the director and VFX supervisor to come up with a design which worked structurally, matched the feel of the practical set, and satisfied the aesthetic of the film.
Did you received some assets for other vendors?
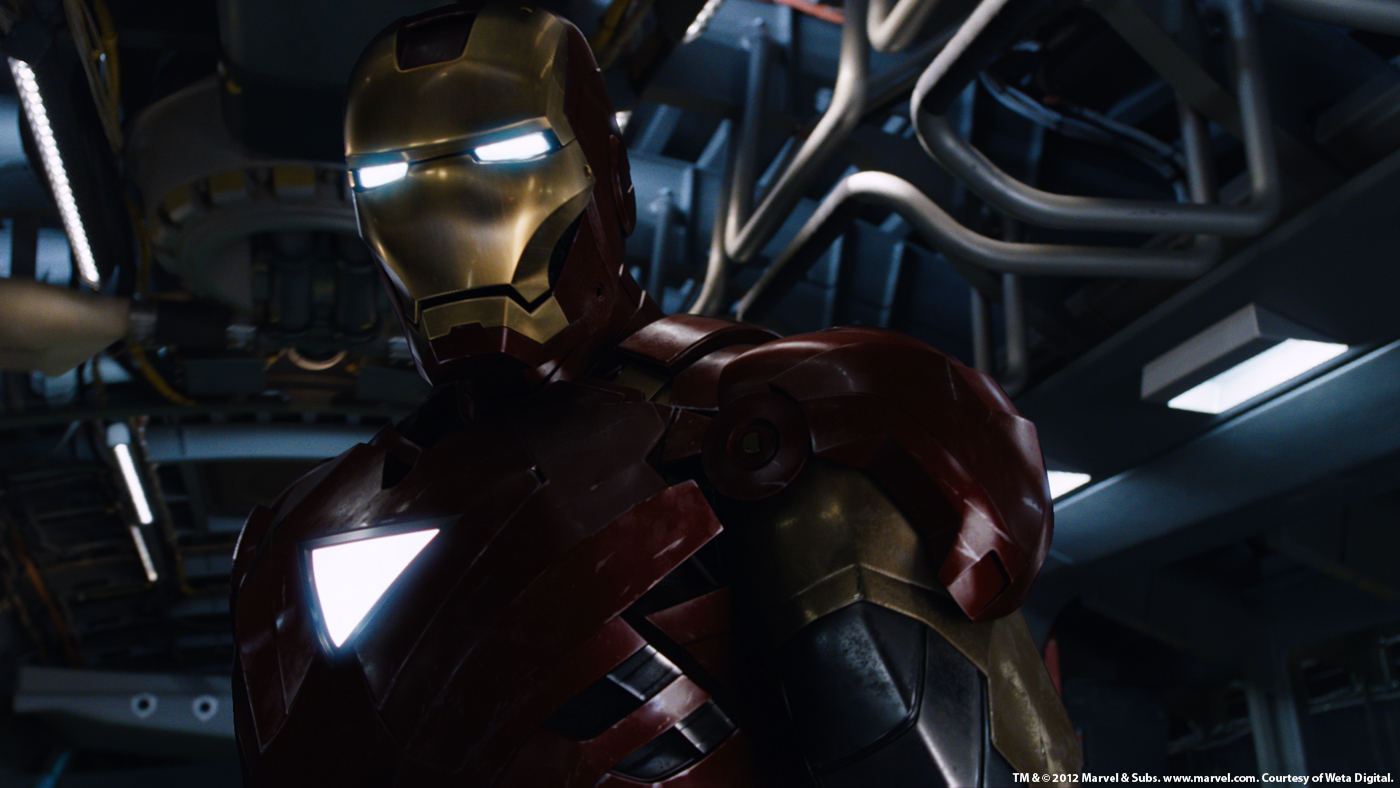
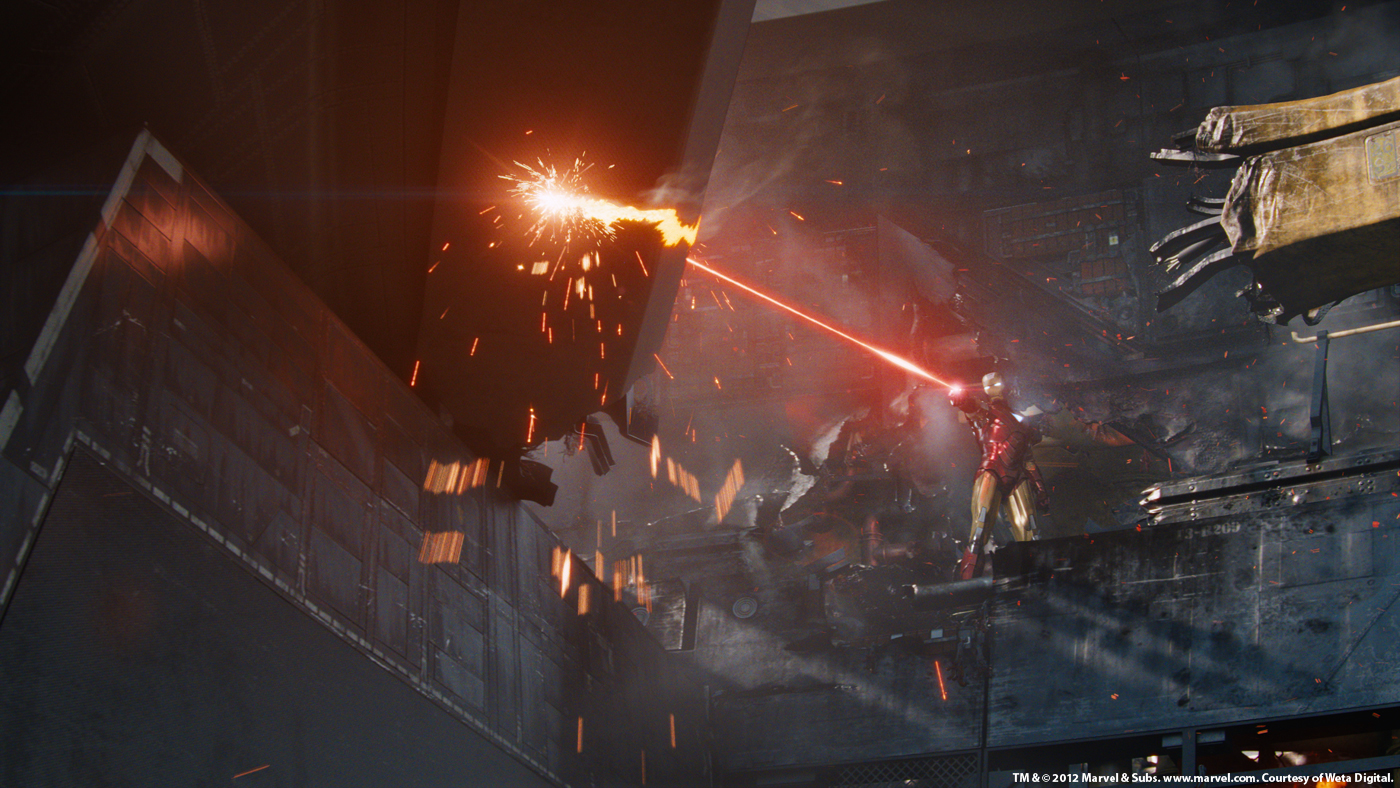
Payam Shohadai, Executive VFX Supervisor // We received some of the Hawkeye arrows from ILM, which formed the basis for our particular design and creation of the special ‘virus’ arrow. We also had the opportunity to animate, light, and composite a shot of Iron Man flying with a QuinJet hot on his trail, two additional assets provided by ILM.
Can you tell us more about the various skies and clouds for the background interior views? Did you used real footages for the skies or were their all CG?
Vincent Cirelli, VFX Supervisor // We completed five different cloud environments in total across various sequences, four of which were daytime and two nighttime. All the skies were CG and each one required various amounts of motion as the Helicarrier traveled through the cloud layers. Since a number of shots needed to be altered as the edit progressed, and to maintain continuity, we wanted to put as much control in the hands of our compositors as possible.
Richard Sutherland, CG Supervisor // Each environment started with a 2.5D Nuke sky gizmo we created using rendered cloud elements. We generated all of our skies in various CG packages, starting with a partial skydome rendered in Vue for the daytime skies. We then broke it up and reassembled it in Nuke with additional cloud elements, tweaking details and adjusting elevation based on the mood and needs of each scene. We added more controls so each compositor could then further refine the Helicarrier’s apparent elevation, forward speed, and placement within the clouds, based on the shot. This allowed us to block out the sequence quickly and respond to editorial changes.
Vincent Cirelli, VFX Supervisor // Depending on the amount of apparent motion through the clouds, we added full volumetric clouds as needed. We did quite a bit of cloud development in various packages, including Houdini, Maya and the Arnold renderer.
Richard Sutherland, CG Supervisor // For the night sequence and another scene in which we were inside the clouds, we used a combination of matte painted clouds projected onto basic shapes in Nuke and rendered volumes for added depth. As the shots neared final completion, we augmented many of them with full volumetric renders.
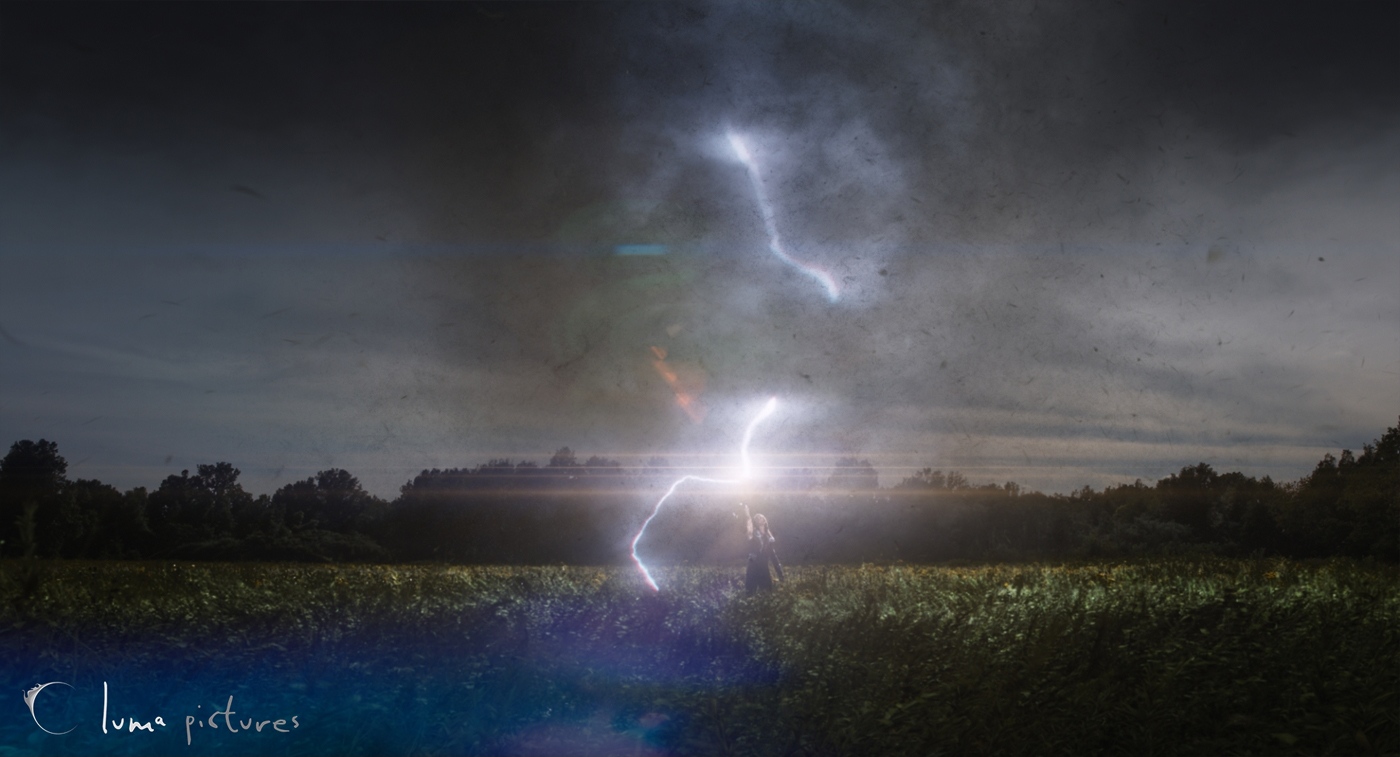
How did you create the lightning and tornado effects?
Raphael A. Pimentel, Animation Supervisor // Our animation team started the process by blocking out the lightning and tornado timing and placement. This information was then turned over to our FX team to produce the fluid simulations for clouds and the tornado using our updated FumeFX pipeline, which we originally set up during our work on THOR.
Richard Sutherland, CG Supervisor // The FX team also produced several additional simulations for dust, leaves and larger debris. For one of the shots, we ended up replacing the entire field of plants and grass Thor was standing in so that we could add some lighting and wind interaction. The lightning went directly to our lighting team, along with all of the FX elements, so that they could all be rendered with passes for our compositors to layer in correctly.
Have you developed specific tools for the various FX such as the smoke and sparks?
Richard Sutherland, CG Supervisor // We have a collection of rigs and scripts from past shows for sparks and the like, in addition to a pre-rendered library of elements our compositors can choose from and place in 3D space. For smoke and other fluid effects, we have been working since THOR on a FumeFX-based pipeline. For THE AVENGERS, we expanded this pipeline to include not only rendering of FumeFX in Maya on Linux, but also simulation in our standard Maya and Linux pipeline. This was a huge accomplishment from our FX pipeline developer and we were very pleased to have it ready in good time.
How did you create the CG arrows of Hawkeye?
Vincent Cirelli, VFX Supervisor // Luma designed the virus injection tip for an unusual arrow Hawkeye uses in a strategic attack. We began with the shaft and fletchings received from ILM, then created several tip designs that would fit into the socket that had been built on set. Each arrow tip opened in a unique way to insert prongs into the socket and enable the computer virus injection. We incorporated some specific ideas from the Marvel team into every design, such as the spring-loaded feel and electronic progress meters, but approached them in different ways in each. After a few revisions, we came up with a design which was aerodynamic when closed, but fit well into the machinery shot on set. »
How did you animate the CG arrows of Hawkeye?
Raphael A. Pimentel, Animation Supervisor // Hawkeye’s arrows were animated with a main control used to translate the arrow through space. Additionally, it featured flex and bend attributes which the animators used to achieve the bow release wobble in conjunction with high frequency vibrations seen in real-world arrows once they impact a surface.
The Helicarrier Bridge features a impressive number of monitors. How did you approach this part?
Vincent Cirelli, VFX Supervisor // Organization was definitely a key to getting the monitors into the shots. Each shot had very specific footage for each monitor, and that would change from time to time as the edit was refined. We received plans and scans for the practical set early on. Using these, we built a representation of all the monitors and synced up our naming with those provided by the graphics vendor. Each shot was tracked and we loaded the camera and monitor geometry into Nuke, where we had a script set up to load the appropriate footage onto each monitor for the compositors.
What was the biggest challenge on this project and how did you achieve it?
Richard Sutherland, CG Supervisor // While not technically difficult, the Helicarrier bridge sequence as a whole was a clerical challenge in that there were several dozen monitors to keep track of and propagate across different scenes and from different angles. Seamlessly integrating the CG set with the clouds plus the glass-panel monitor graphics required some elbow grease and a deceivingly high level of attention to detail.
What do you keep from this experience?
Vincent Cirelli, VFX Supervisor // What we really keep from this experience is an even greater appreciation for how buttoned-up the visual effects crew is at Marvel. It’s impressive how many studios and shots they can juggle without missing a beat. It’s also a testament to the collective talent of Luma’s artists, supervisors, and managers. We take pride in our ability to quickly react to and accommodate changes, and this mission was made even easier for us thanks to our excellent ongoing relationship with Marvel.
How long have you worked on this film?
Payam Shohadai, Executive VFX Supervisor // Turnovers and look dev began trickling in back in late August 2011 and we wrapped in March.
How many shots have you done and what was the size of your team?
Payam Shohadai, Executive VFX Supervisor // We employed a team of approximately 80 at its peak (counting artists as well as production and operations staff) to complete close to 200 shots across various sequences.
What is your next project?
Luma Pictures recently completed work on PROMETHEUS (Scott Free Productions/20th Century Fox) and Sacha Baron Cohen’s THE DICTATOR (Paramount Pictures) and are currently wrapping up G.I. JOE: RETALIATION (Paramount Pictures).
A big thanks for your time.
// WANT TO KNOW MORE?
– Luma Pictures: Dedicated page about THE AVENGERS on Luma Pictures website.
Since my interview of Cédric Fayolle for GAINSBOURG, he has worked on over a dozen films including GARDIENS DE L’ORDRE, 2 DAYS IN NEW YORK or BELOVED. In the following interview, he talks about his passion of working with directors and the many challenges of RUST & BONE.
How did Mikros Image got involved on this film?
For a project like this, producers have asked the major French companies VFX. We had already worked with Why Not Productions on other projects, but this time the issue was different, because the effects are included in the narrative, so they expected a greater understanding of the script and the director’s universe. So I met Jacques Audiard, we did tests, build a file, discussed the goal. It turns out that I had made a shot roughly similar for Michel Gondry’s INTERIOR DESIGN (1 of the 3 short films of the project TOKYO). In this short film, the main character turned into a chair, and we replaced the legs with wooden feet. He found the technique useful for its freedom of movement. Jacques decided to trust us.
How did the collaboration with director Jacques Audiard?
I could use all the superlatives, but it would not be sufficient. Our collaboration was total, and that throughout the project! The first working meetings were quite unsettling, because I was impressed by his longtime collaborators (writer, DoP, production designer, costume designer, script, editing …). I feel like the new family member, except that here they were all Cesarized. Both say that I feel very small. The strength of Jacques is that he has a lot of confidence to all his head of departments, he listens very carefully and that creates a great dynamic to work.
What was his approach to visual effects?
His approach is primarily emotional and script orientated. During the meetings, we stopped on each sequence to decide about what was important whether or not to see the legs cut: Does the effect brings too much emotion or is it rather disturbing narrative, distract the viewer from the original intent of the scene?
Then he has never talked about technique. He told me « We need the stumps to be sexy », « believe in your dramatic effects, » or « always works within the limits of the offscreen ». At first, we don’t know what to do with this information. For example, for the submarine shot of Ali who hits the ice, I was doing tests with this information: « should be darker, think of Orpheus that want to retrieve Eurydice from the underworld ». At first, it is confusing, but our job is just to translate these intentions technically.
Have you increased the crowd of the pool in Antibes?
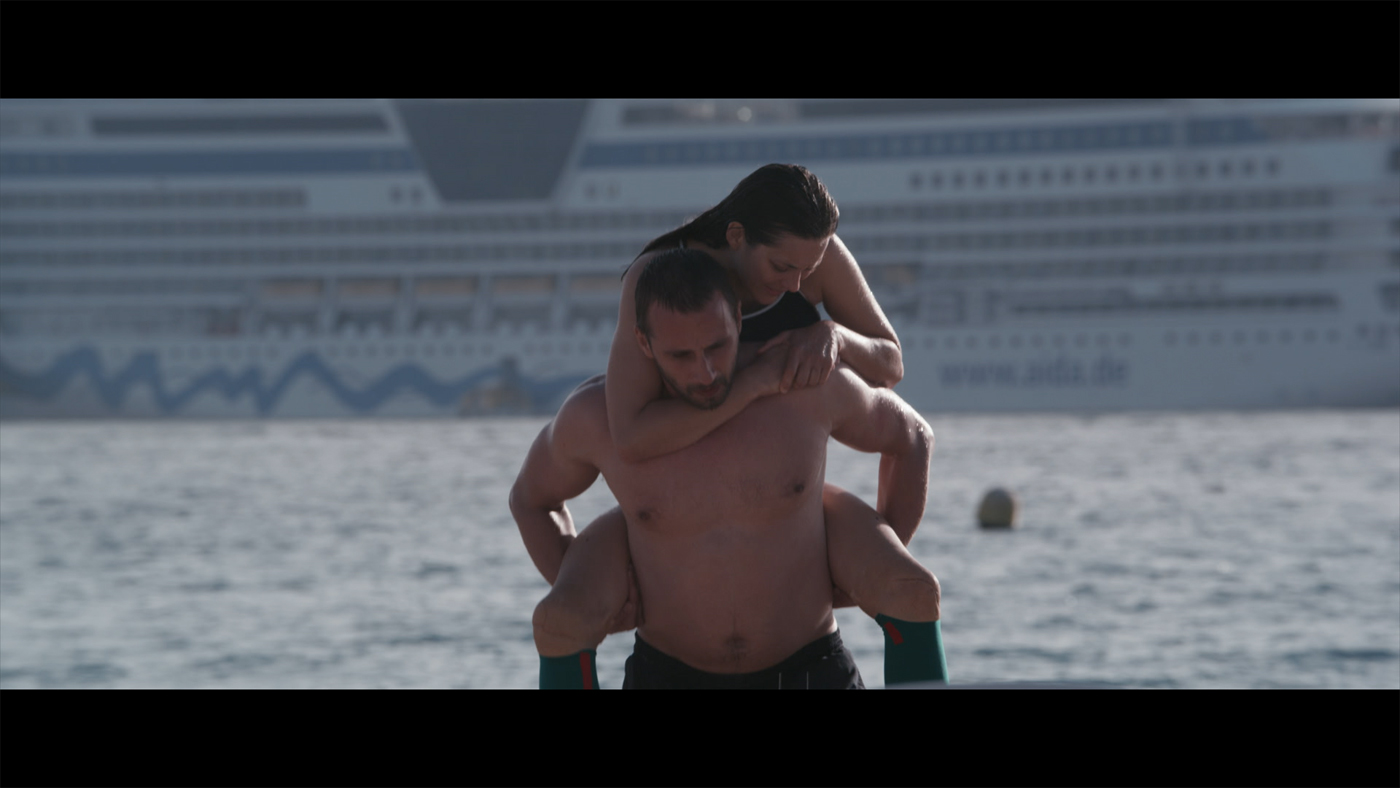
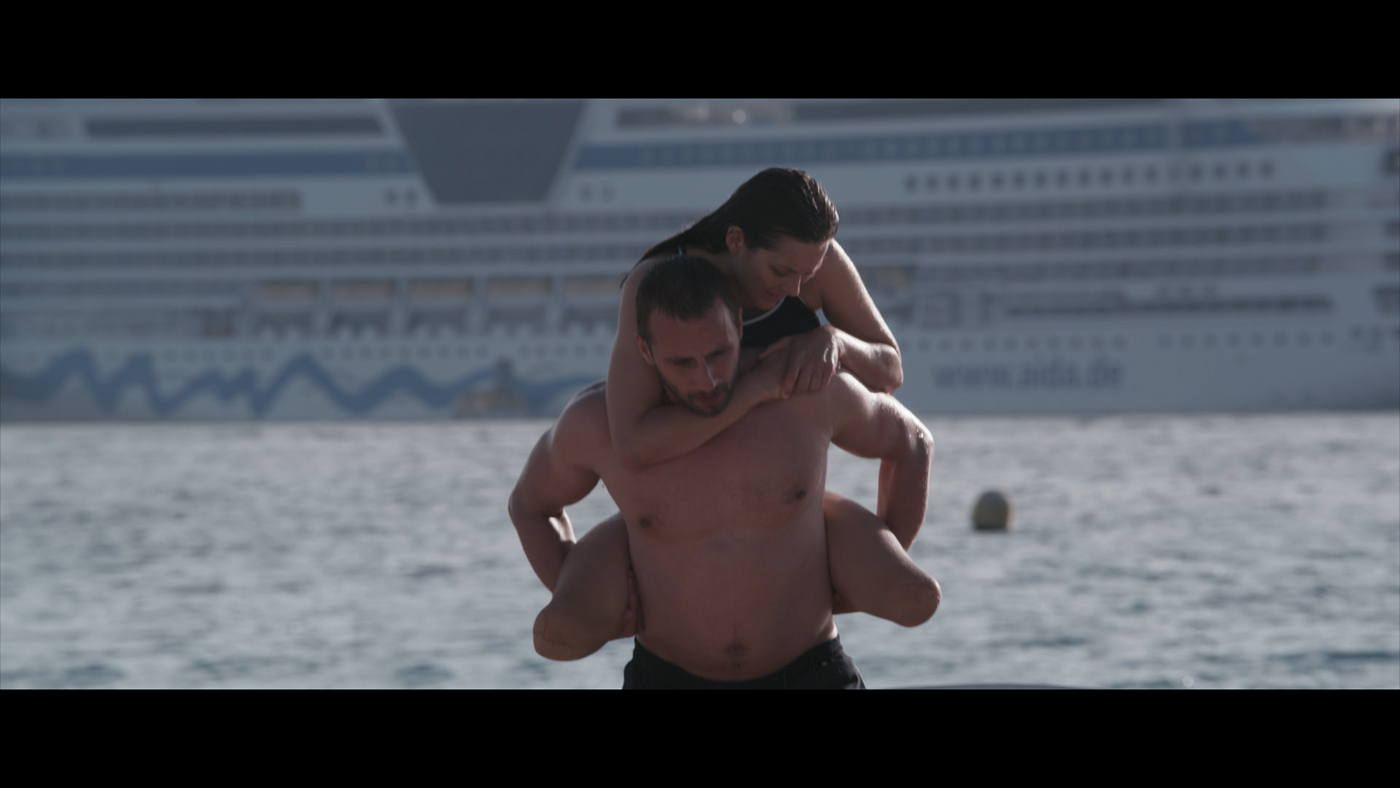
Yes, but only for purposes of continuity. Jacques wanted to make a real show filming, but with the schedule of Marion Cotillard, it proved difficult to shoot during the summer (season where the stands are full). So they made a first shooting without Marion. A second shooting was done with Marion as trainer, but as it was late September, the stands were a little less full. So we mixed the crowd of the two shootings. Still, the spectators who had come to see a show of killer whales in September were surprised to see Marion Cotillard in the show!
Can you explain in detail the creation of the submarine shot of the accident?
The accuracy of this shot was really tricky to find. It need to be awesome, but don’t need necessarily to explain everything. Jacques Audiard really mastering the climax, and then he wanted the Marion’s awakening in the hospital to be really the culmination of the accident. By doing an accident too demonstrative or too impressive, the awakening scene would have lost intensity. So we made many previz early before reaching to the version that is in the film. To make this shot, we filmed for two days in the tanks of Marineland. The camera was 8 meters deep in the tank, and we let go the separate elements (at 1:2 scale) with complex crane systems in order to made quick takes. Then the Marineland trainers made the orcas jumps in front of the camera, and finally a stunt jumped many times to made this body that sinks slowly into the depths. Then we composited all these passes, simulated a CG platform that fell..
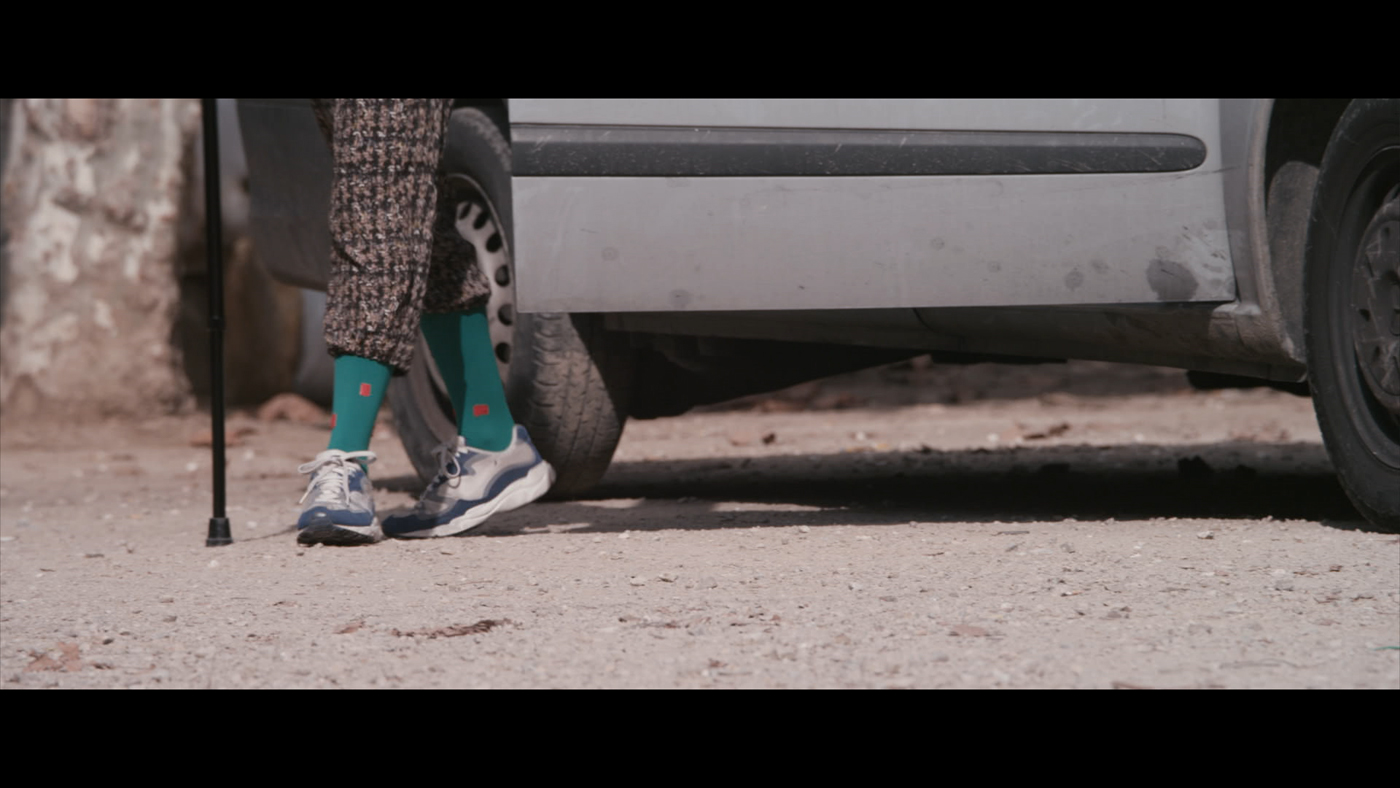
How did you approach this huge challenge to remove the legs of Marion Cotillard?
Surely with a lot of unconsciousness! Seriously, I have a passion for the directors and one of the things I love about my job is to blend into their world. It does not happen by saying « that you can not do it, it will be like that … » No, we listen, we translated his desires, we learns about his work habits. Today everything is possible in VFX, we just must know where we should put our energy. Here it was necessary to limit the visual effects to things really impossible to make real.
So we thought with the production designer, costumes, props, light to take advantages of the techniques of each departments. The production designer has put a hole in the furniture so that Marion could hide her legs and the wheelchair has a seat modified to allow it to sit crouching. Similarly, the clothes have been carefully chosen to hide the forms.
The Audiard’s way of directing involves a lot of handheld cameras. How have you faced the tracking challenge?
I opted to say « do what you want ». I wanted our shots will be filmed in the same way as other shots of the film. The only constraint that I imposed was that after the master shot, they let us shoot double, triple, quadruple passes, set pictures, actors pictures, shooting HDR… On the set of complicated shots, I was accompanied by Nicolas Rey (VFX supervisor at Mikros image), because we have to forget nothing, and especially we have to be fast to avoid slowing down the shooting process. After each big VFX shots, they let us between 5 and 10 minutes to go “shopping”. Everyone played the game (assistants director, the DoP, actors…) with the greatest simplicity and good humor. It was great! Often these purely technical passes bored everyone but on this project everyone was aware of their importance.
There was also a great dialogue with the editors. This has been crucial. I provide to the editors my VFX reports on which I noted if the takes was ok or if there were technical problems making it difficult to made the VFX. Obviously Juliette Welfling and Geraldine Mangenot his assistants editor creates a first version without looking at my reports, because the acting is a priority, but then we compared the selected takes and my reports. In the end we never changed the takes because of the effects, but the simple fact check shows all the collaborative work that was installed on this show.
Can you explain the impressive awakening shot of Marion?
This is a great example of collaboration between all departments, since for us it is one of our simplest shots. Two holes were made in the bed, the framing is at the correct height, and for the rest is the talent of the actress. On the set of this shot, I was behind the combo, so I saw his green stockings, but the emotion was there, everything was there!
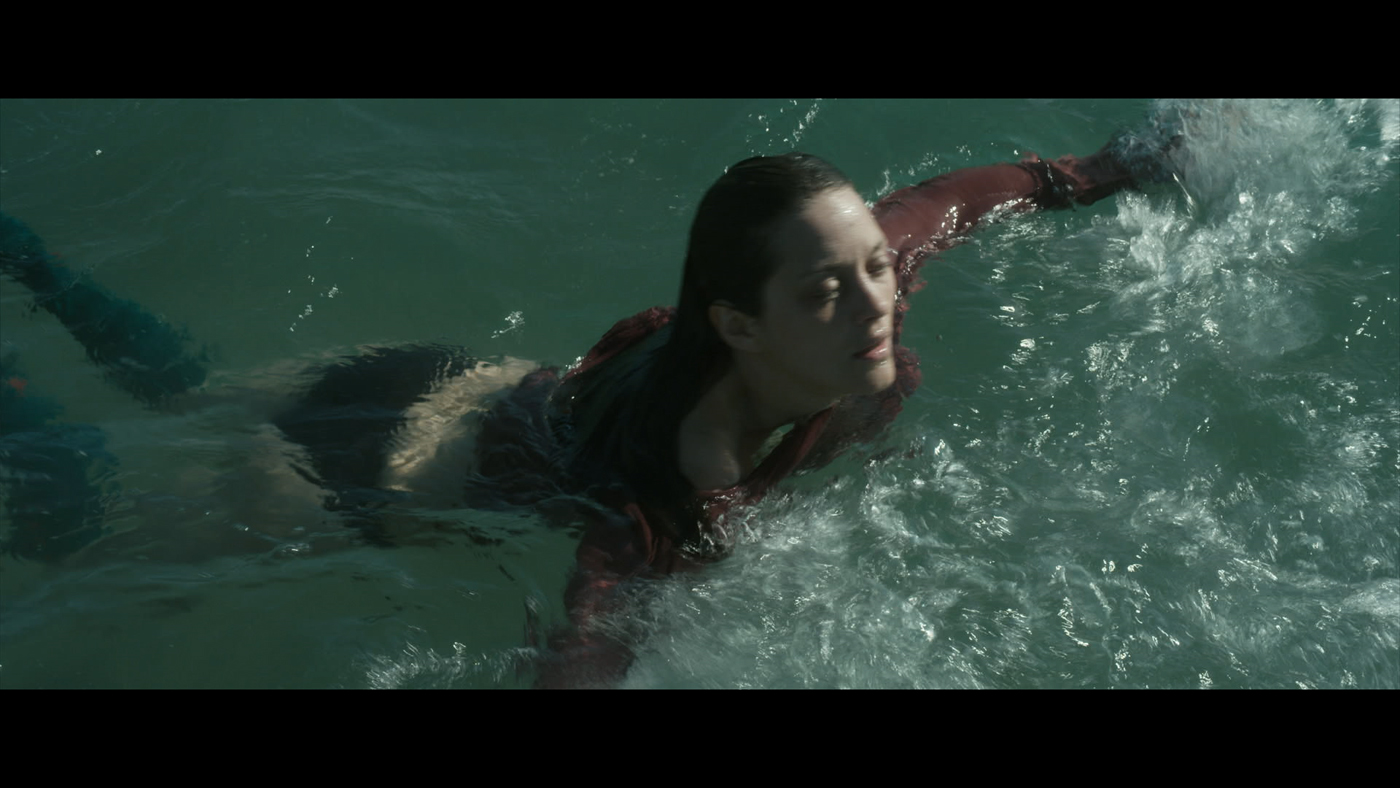
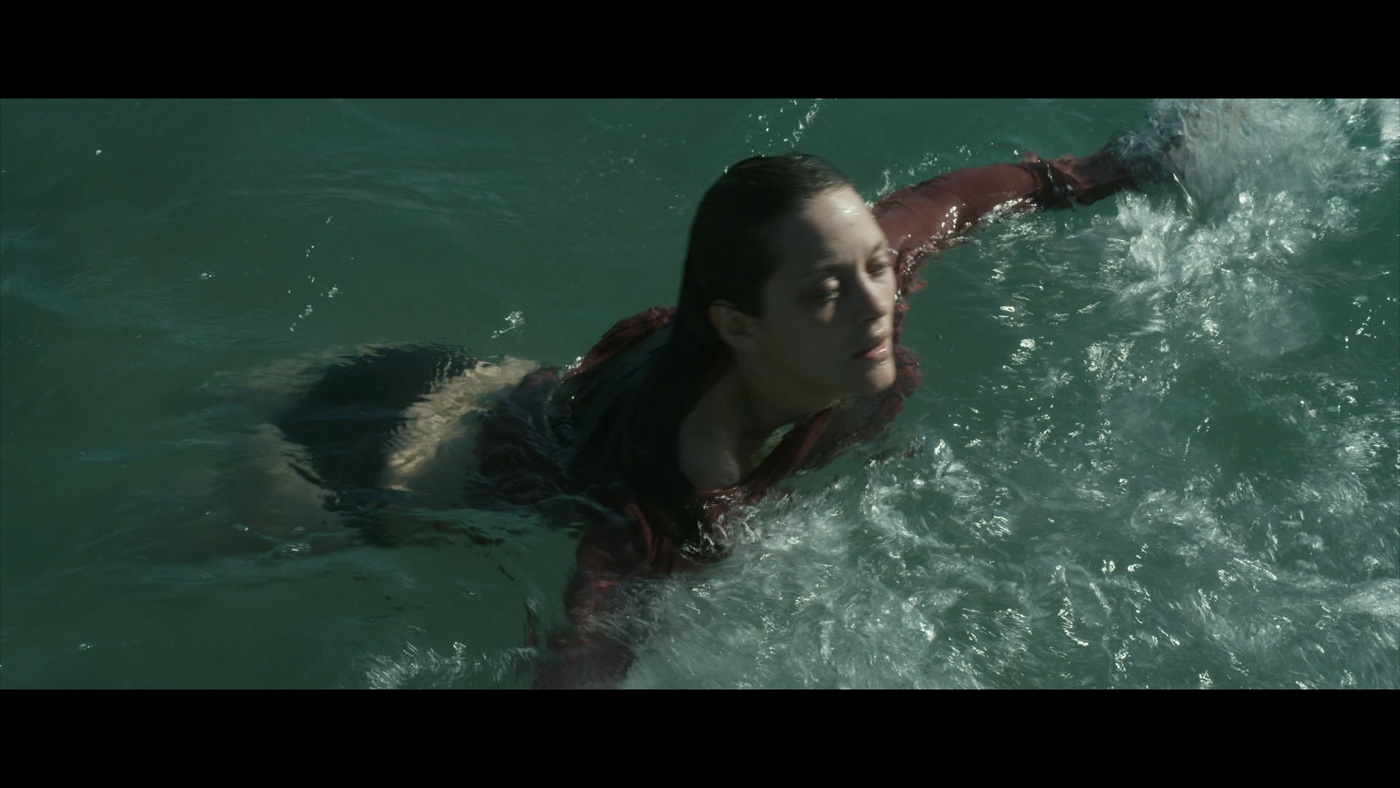
At one point Marion goes swimming. How did you manage her entering into the water with her legs?
It is always difficult to work with water, because our software can not hang on it, everything moves. But don’t forget that we are working on a flat image in two dimensions, we must convert this problem into an asset. It moves so much that the precision gives way to sensation.
For shots where she enters or goes out the water, it was more difficult. As with all the shots of the film, we decided at the last moment (after the first rehearsal) for the best position of the legs. Tense, semi-folded, folded… Sometimes during the takes, Marion need to move from fold to tense in order to facilitate the restoration work, particularly to avoid too much interaction between her green stockings and Matthias (Ali) body. For safety, we were doing a clean plate and then a take with Matthias only who remade approximately his movements in order to retrieve the hidden parts of the frames shots during the master take. We were also making lights references with silicone stumps to help the CG department to find the right light.
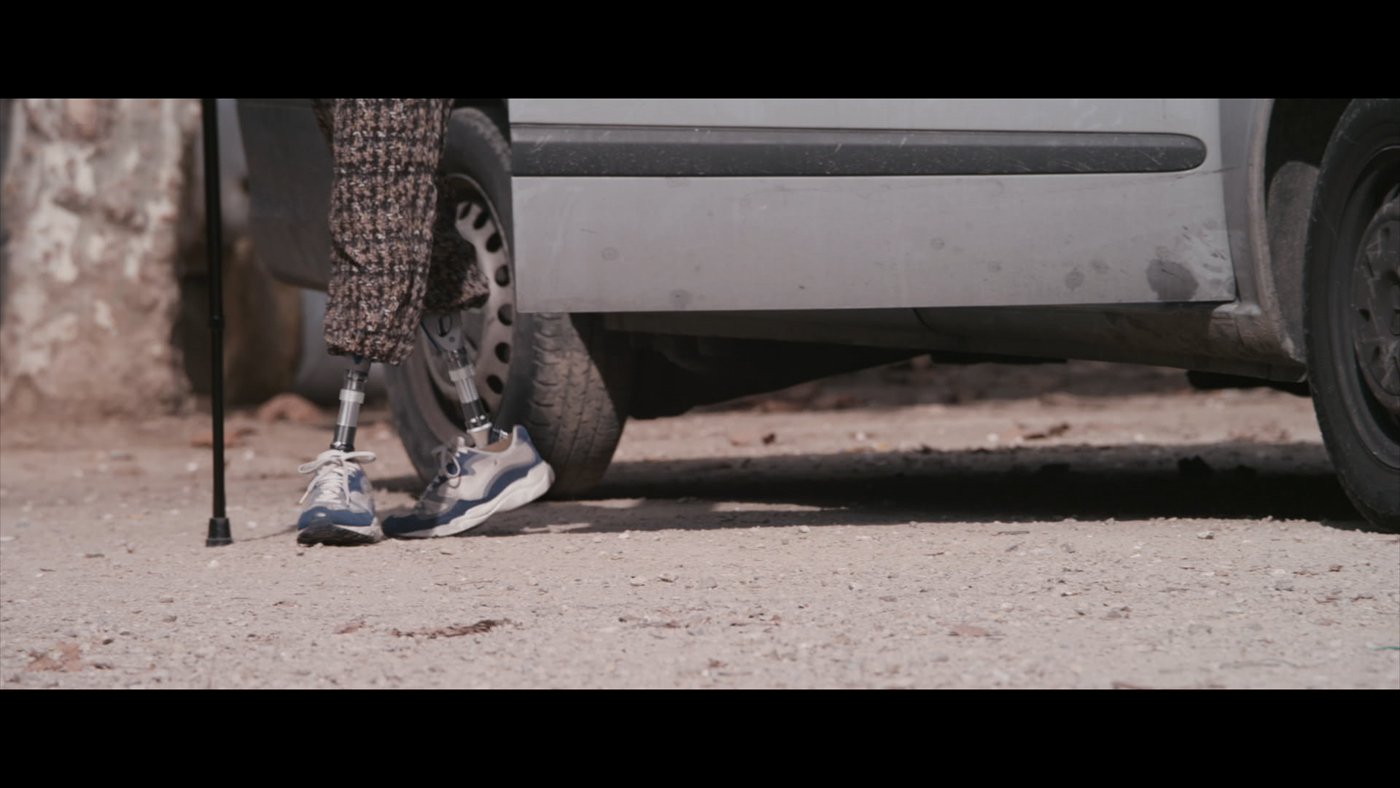
Later in the film, Marion wears prosthetics. How did you created these?
As for the stumps, it’s a mix of several techniques, but it’s mainly CG. Stéphane Thibert (who oversaw the CG production) has put together an incredible team of 5 people (1 tracker, 1 modeler, two animators, and a lighter). They had a whole month to prepare, and only 2 months to made all the shots. Where they surprised me was that they had to work with the risky choices I’ve made on the shooting. But instead of suffering, they have met the challenge by bringing proposals. I told them they need to be rock and roll on this film, they were punks!
How did you manage the people’s interactions with Marion’s prosthetics?
We had 3 three kind of prosthetics on the shooting. When there was an interaction, as the sequence in which the child touches the metal, we chose the one that was the most complete. Marion’s leg was right behind. So the interaction was real. But it happens only few times in the film, most often it was just the top part (the sleeves) and then the green stockings, and we have everything rebuilt in CG.
Can you explain in detail the creation of beautiful shot in which Marion calls and plays with the Orca in front of the tank window?
Uh, it’s live action! It is the result of Marion’s work, we just need to add some metal ankles. On the set it was just as impressive, and I remember that during the take I was subjugated by the play of Marion and the huge and majestic beast. When they said « cut », they asked me if it was good for me, and I had to admit that I haven’t looked, so we had to use the playback in the combo to check if everything was fine .
Many shots are in slow motion. Are you involved on those kind of shots?
Many slow motion were made directly with Epic RED camera that was used to shoot the film in 5k for a post-production in 4K. So we spent quickly from 24 frames per second to 120 or 300. This time, we have rather done the opposite, we gave to lot of scenes shot at high speed a 24 frames / second speed.
Can you explain to us what you did on the frozen lake sequence?
Our initial work on this sequence was to find a technique to put the child under the ice. After filming all the shots Matthias searching for her son under the ice, we went to a pool to filmed the child shots. He has trained throughout the filming to go under a plexiglas window, on his back and the eyes open. He enjoyed doing it, I was surprised that a 6 year old manages to make so many takes.
But we also had to do another treatment of this sequence. We filmed for a week on this lake in Savoy, but the weather did not help us. The first day was sunny, the following day the lake began to melt, then it started to rain, there’s even a morning when we arrived and it was 10 » of snow fell across the lake!
It was therefore necessary to standardize all this, knowing that everything is handheld and that tracking the white snow is not simple. All the shots needs to have projected matte-paintings. In addition, for convenience, we decided to add more and more snow throughout the sequence to highlight the desperation of the character. Finally, it is impossible to suspect the extent of our involvement and I am extremely proud of the work.
Can you explain the distribution of work between Paris and Liege?
Given the short time we had, it was necessary that each studio was autonomous.
For the shots of the legs, I wanted to be very close to their making, so we did that in Paris, same thing for the accident sequence. Everything else was done in Belgium under the supervision of Guillaume Pondard, which is responsible for the effects of the studio in Liege and especially someone who is animated by the same passion for cinema as me. With the distance, it was important to have someone you trust. He and his team were perfect.
Was there a shot or a sequence that prevented you from sleeping?
When the shooting was finished and the shots to made were received, the stress was gone, giving way to manufacturing process. It took a lot of anticipations, some really important choices, and priority daily dialog with the editing room. But no shot has prevented me from sleeping, although some (like the beach where he raises her from her chair, or its entry into nightclub) have been slow to finalize because of their complexity. But a few months earlier, and specifically the first day before the shooting, my back was blocked and I finished the night in hospital. Looking back, I had to somatize because I started to put a huge pressure on myself!
What do you keep from this experience?
This experience showed me that there is no great director without great producers. The production team of Why Not has been exemplary in how they produce this film and especially in my case, in how to behave on a film where there are visual effects. They were in perfect harmony with the desire of Jacques Audiard. They offered us their confidence and the means to satisfy the director.
On a personal side, it’s indescribable. Working for Jacques Audiard was a wish for a long time, but I had no idea that this would happen with a film whose effects are as important to the narrative. After an adventure like this, you are a bit changed. Today it is still too fresh, but it is certain that I won a lot.
How long have you worked on this film?
Personally I have a busy year, between the preparation, the shooting and the post-production. With regard to the manufacture it was very fast, because just after the end of the shooting (in late December), the production asked if we could finished the work for Cannes. We therefore have a one-month preparation in January, then two and a half months to finish the shots in mid-April (because in addition to the official selection at Cannes, the film will be also released in theaters).
How big was your team?
Before answering the question directly, I would like to digress. When we have knew that we were doing the film, I quickly gave the names of artists that will made those legs shots. They were warned four months before the start. Because I’d never start this adventure with much confidence without their presence, two of them have even come back from London. They met the challenge of the choices I had done on the shooting, and they are only few artists to know how to do it. I have blind faith in their work, their talent and mindset. It’s a real team without misplaced ego with the sole objective of the project’s success. In summary this is my « A-Team » of VFX. In the end, we were fifteen in Paris, and about the same on the Liege side. And there was also all the production side of Mikros Image (Beatrice Bauwens, Sophie Denize), who managed all these people. But I must stop, I want to talk to everyone because it was perfect on all levels!
What shots have you made?
We worked on about 200 shots. Divided almost 50/50 between France and Belgium.
What is your next project?
What is extraordinary in our job is to dive from one universe to another, without transition. I just finish right now, MAIS QUI A RE-TUÉ PAMELA ROSE by Kad & Olivier. I love these guys, they have a keen sense of comedy and you have a good mix in the effects to made the gag works, it’s exciting and very funny … I have also just finished FOXFIRE by Laurent Cantet (Palme d’Or in 2008 with ENTRE LES MURS), and other projects are being studied, it is exciting… LONG LIVE THE CINEMA!
A big thanks for your time.
// WANT TO KNOW MORE?
– Mikros Image: Dedicated page about RUST & BONE on Mikros Image website.
On July 11th, we are pleased to offer you a conference with Sue Rowe, VFX Supervisor at Cinesite, Ryan Cook, VFX Supervisor at Double Negative and Kevin Hahn, CG Supervisor at MPC who will speak about their together work on JOHN CARTER. The conference will be moderated by Pascal Chappuis.
We also have a masterclass hosted by Michael Fink, VFX Supervisor including Mars Attacks!, X-MEN, THE AVATAR or TREE OF LIFE.
Mark Breakspear has worked for over 20 years in visual effects for studios such as Digital Muse, Rainmaker or CIS Vancouver. He participated in many TV series like STAR TREK VOYAGER or STARGATE ATLANTIS as well as films like THE DA VINCI CODE, LIVE FREE OR DIE HARD, SALT or THE GREEN HORNET.
What is your background?
I started making movies as a kid, my father owned a video camera, the kind where the tape was housed in a separate machine you hung off your shoulder. I made sketches and sent them in to the BBC with my friends and a youth club that I was part of. I still have the videos and I think they are pretty good! The BBC always wrote back and said they were grateful to me for sending them, as they needed VHS tapes to keep the door to the toilet open on hot summer days.
I was always interested in movie making, and where I lived, a small film studio called Oxford Scientific Films shot time-lapse and other types of special effects photography for films, tv shows and commercials. I wrote to them countless times, eventually getting a chance to work there as a runner. At the same time I was doing a degree in visual communication and design in London, and managed to get on to the moving-image course, which boasted a Harry and a HAL. (Those modern types reading this will need to consult the interweb to work out what they were!) Think Nuke with all it’s arms and legs cut off, both eyes poked out and a sock in the mouth covered in paint thinner. But back then it was state of the art and it was a brilliant opportunity to get from our degree in to the industry.
After the degree, I went and worked at Quantel, from there to Los Angeles to a great boutique called Digital Muse. I was running the compositing department there in LA for about 5 years, before moving up to Vancouver to be the senior compositor at Rainmaker. A few years later and I made the mystical transition to VFX Supervisor and over saw a few small TV shows before supervising features.
How did Method Studios get involved on this film?
We have worked with vfx supervisor Angus Bickerton before, and he contacted us to bid shots for the film.
How was the collaboration with director Tim Burton?
I only spent a little time in person with Tim on set during the shoot of our visual effects plates. Shoots are manicured craziness and most of the “collaboration” was between Angus and myself.
What was his approach about visual effects?
Angus has a very organized and developed style of film making, always preferring to plan ahead, rather than shoot from the hip. The style seemed to work very well on this movie, allowing Tim to shoot the movie he wanted to make, but allow Angus the freedom to shoot the visual effects correctly.
How did you collaborates with Production VFX Supervisor Angus Bickerton?
Having worked with Angus on several films prior to DARK SHADOWS, we have developed and are continuing to develop continuity in the ways we both like to work. We both love to target the preparation of any visual effects shot, whether that be in previs, or just experimental effects work, trying to come up with a look that will drive a procedure or way of shooting it on set.
? What have you done on this movie?
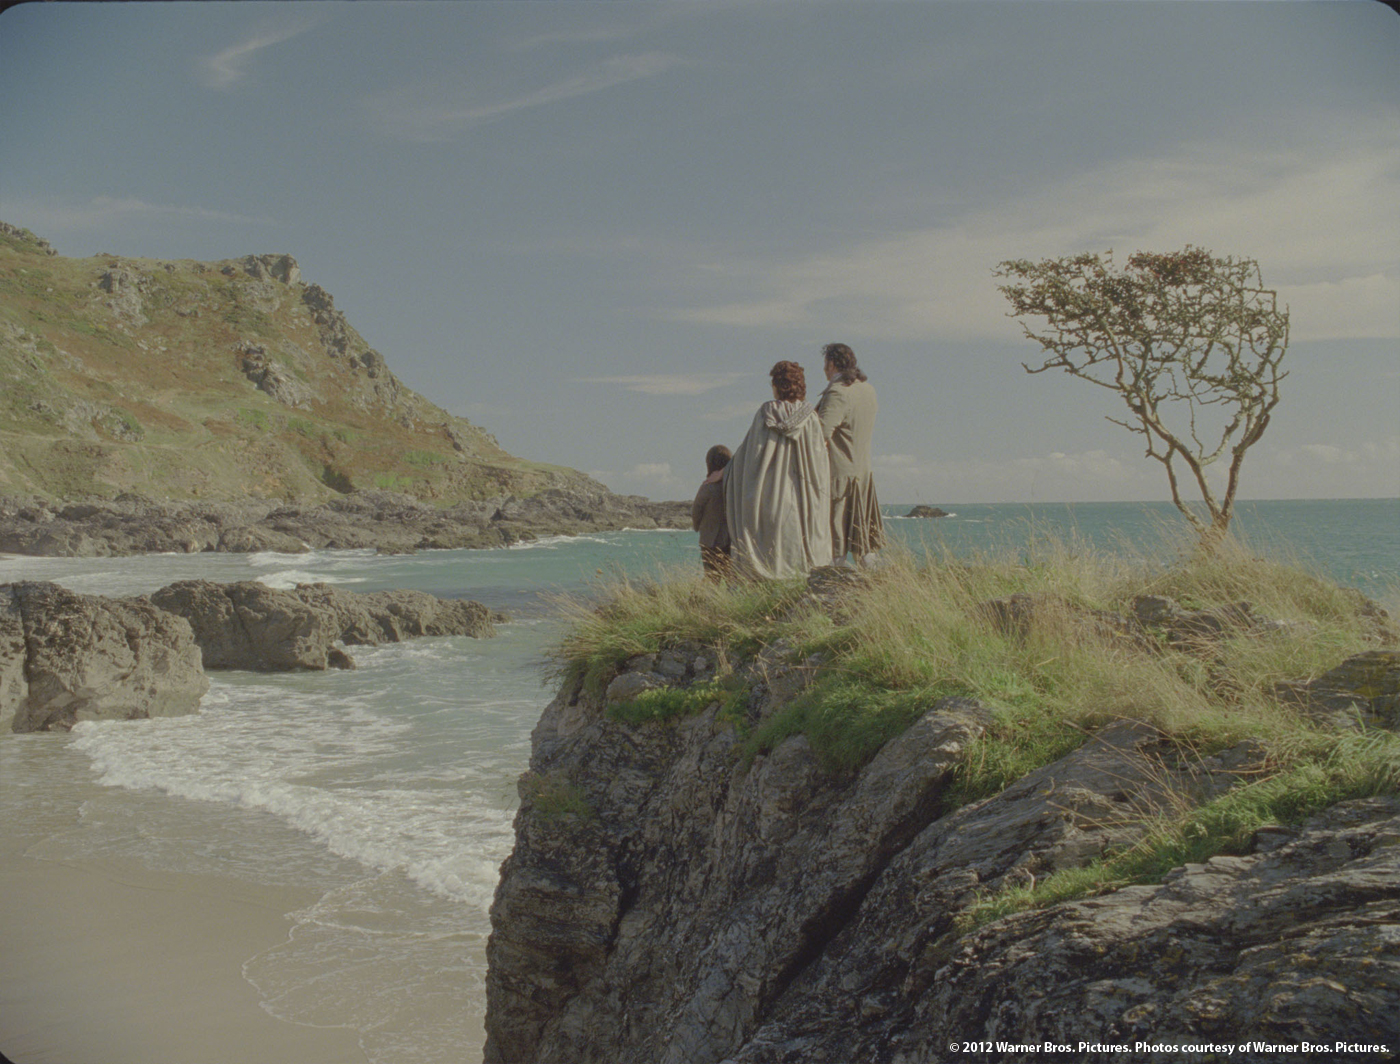
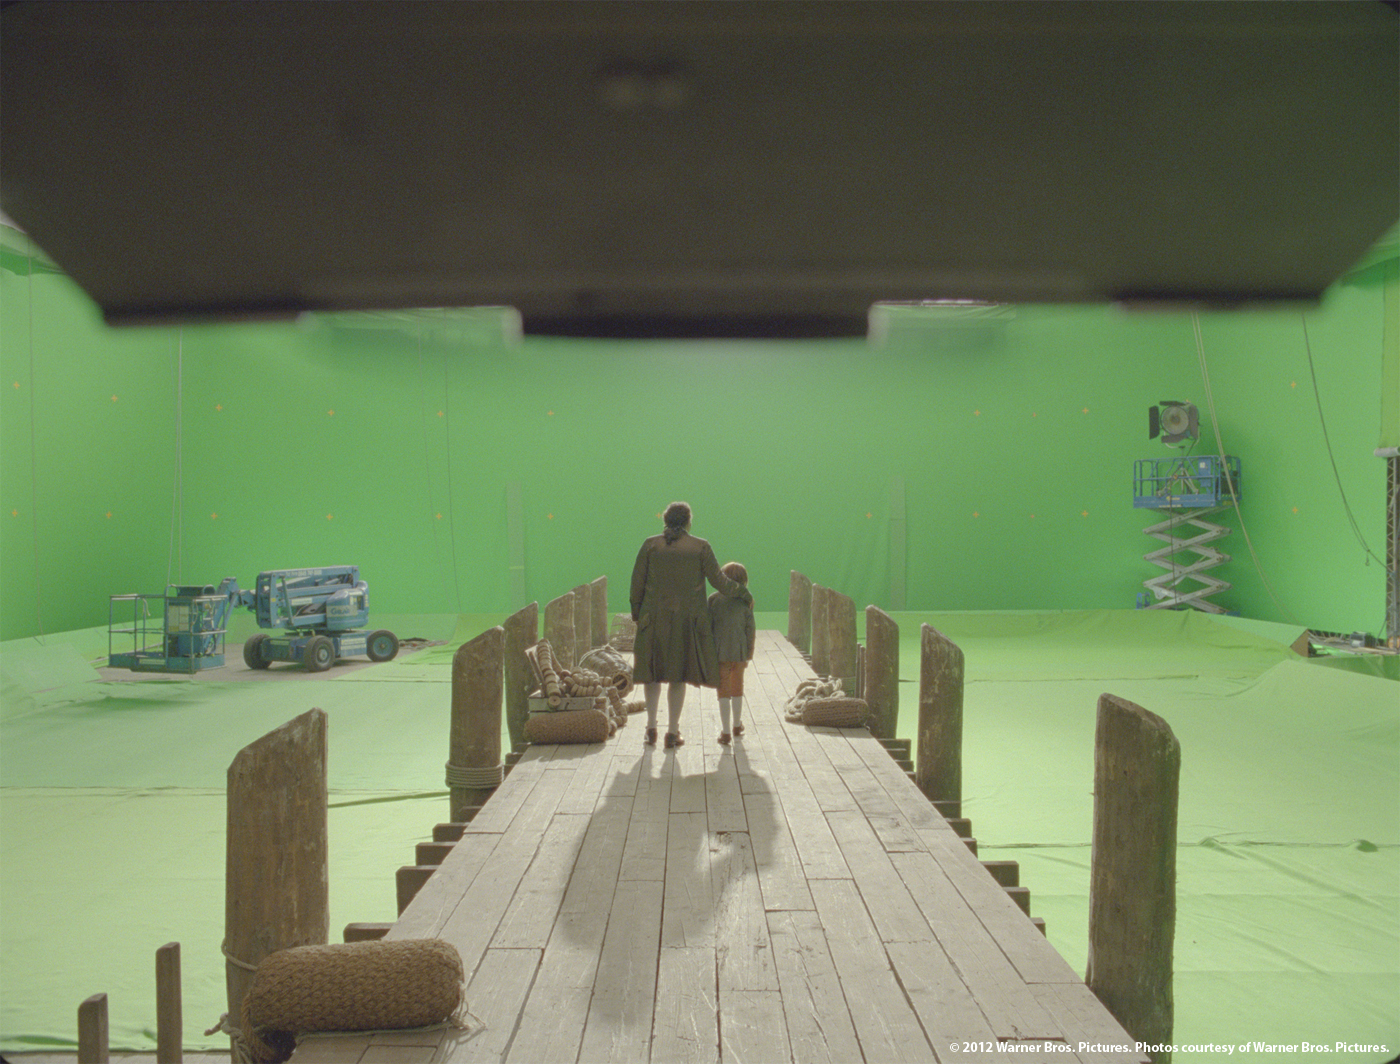
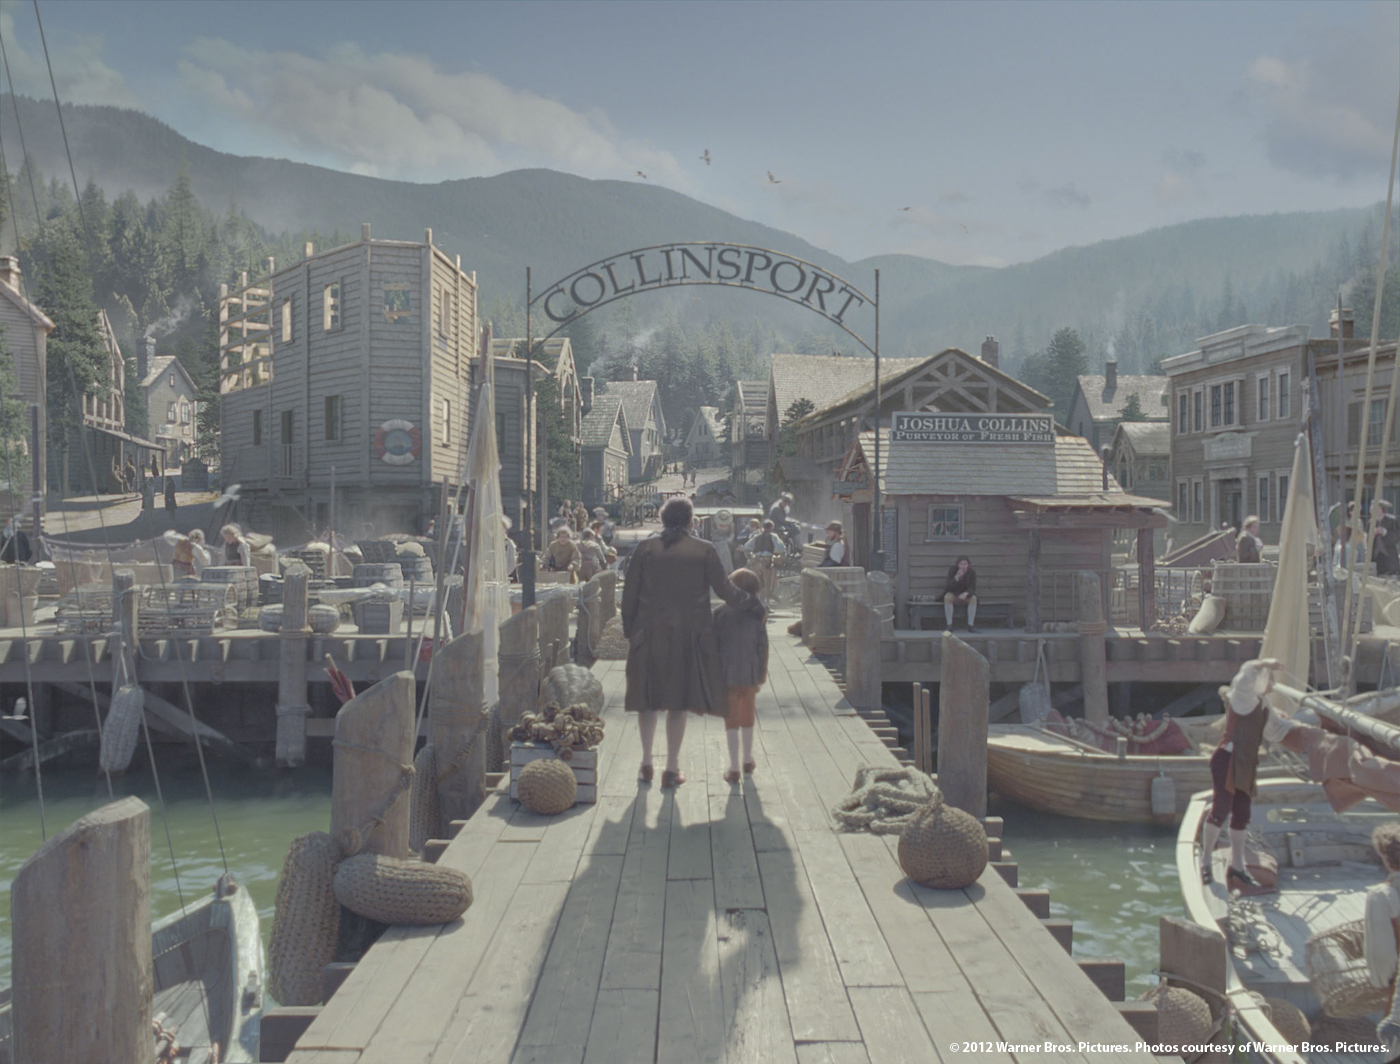
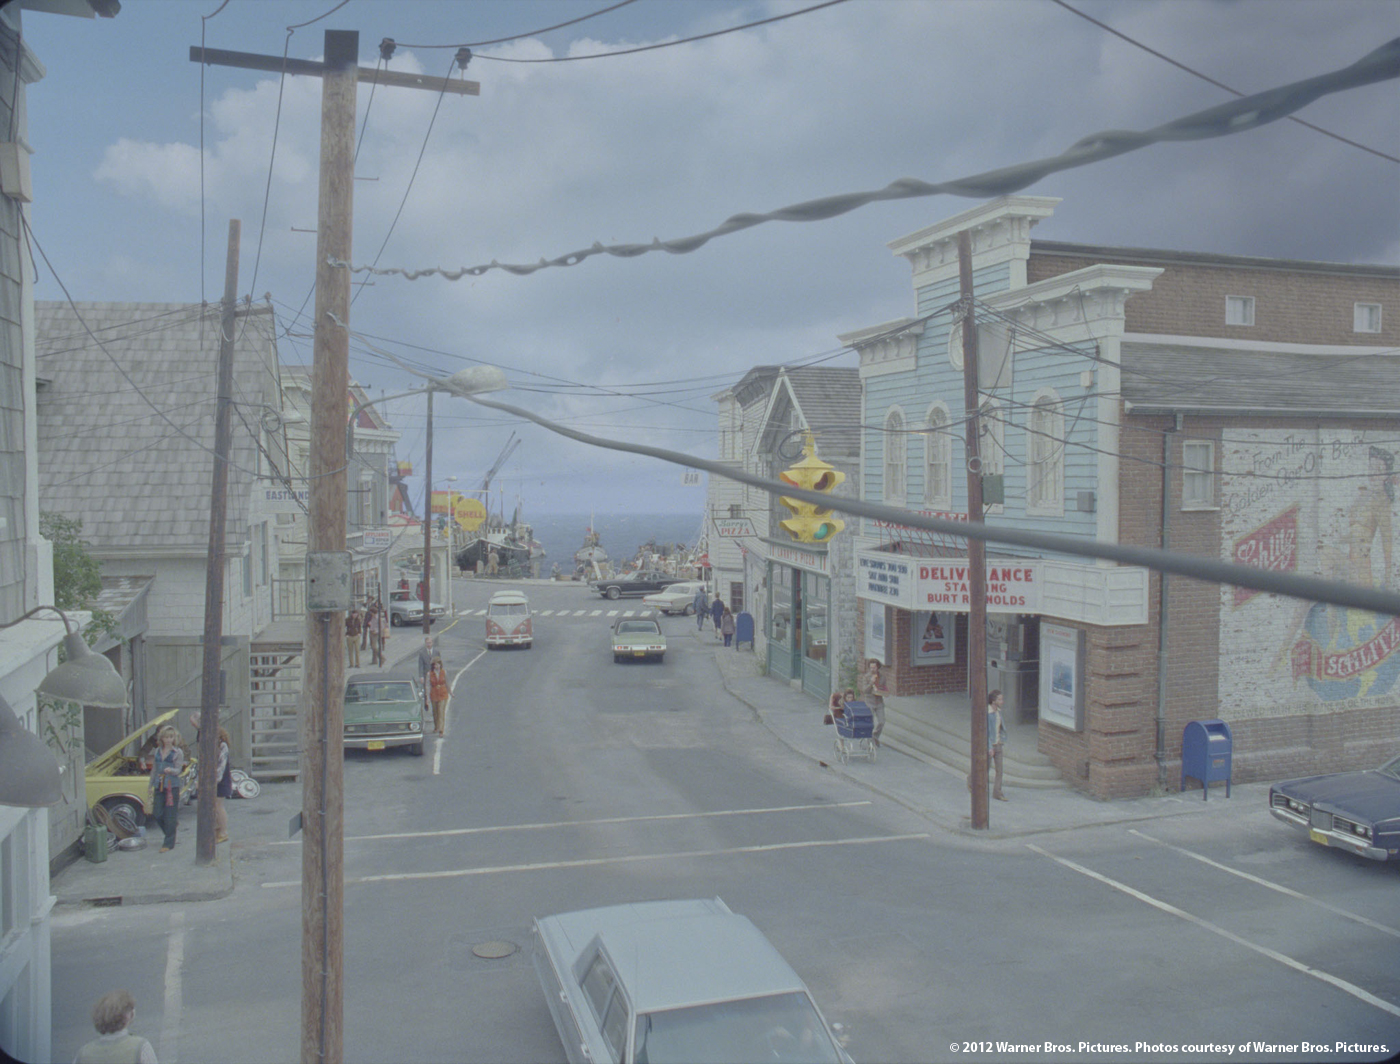
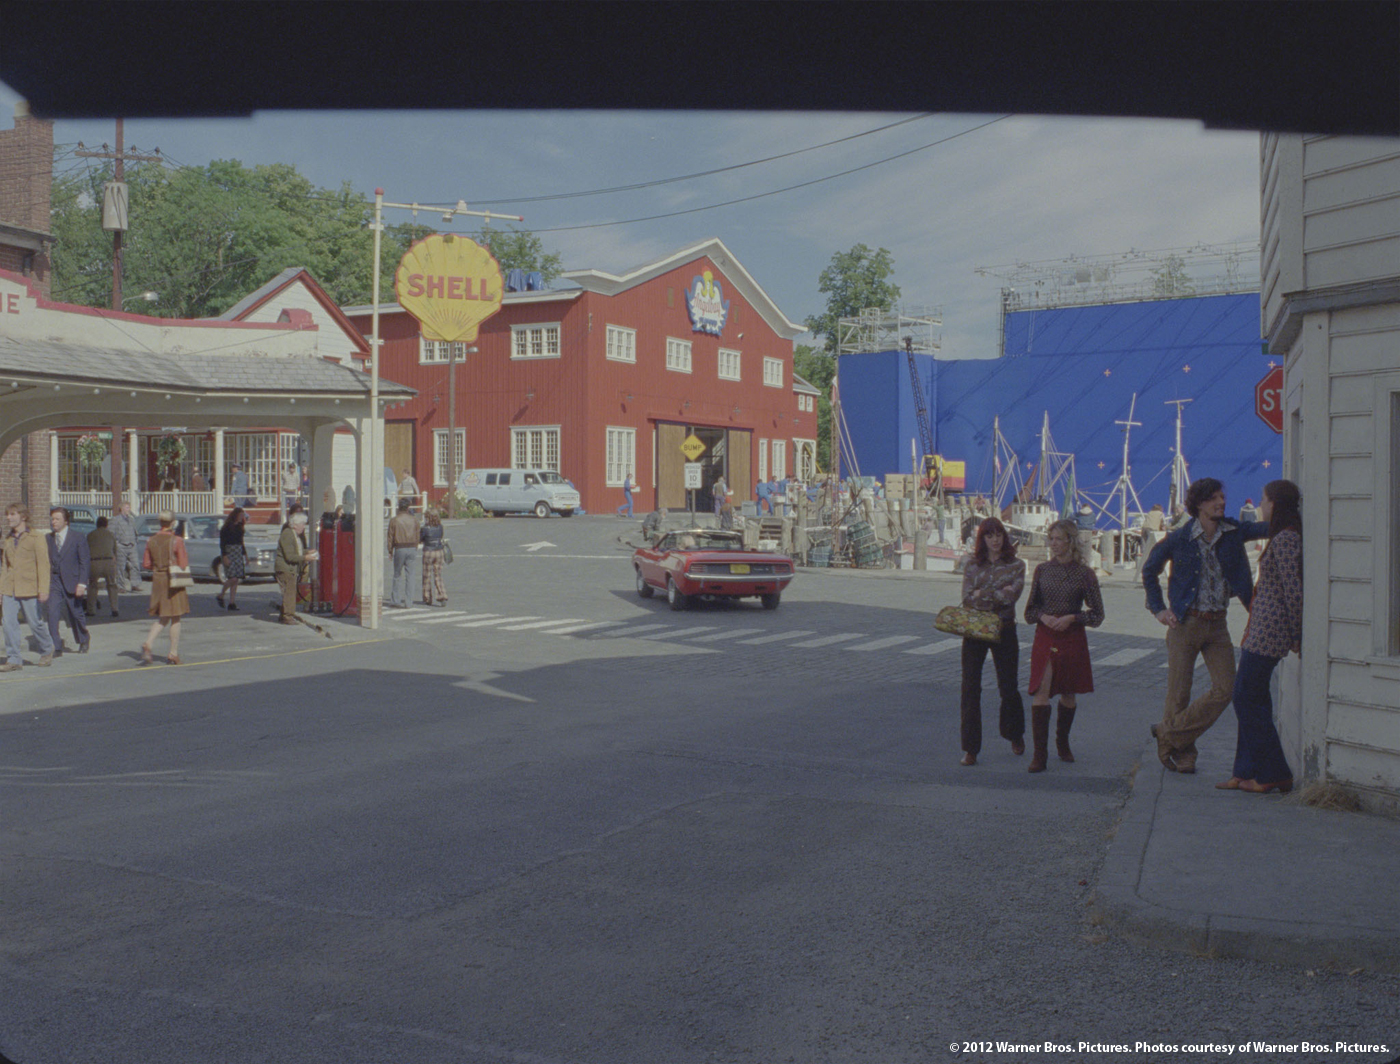
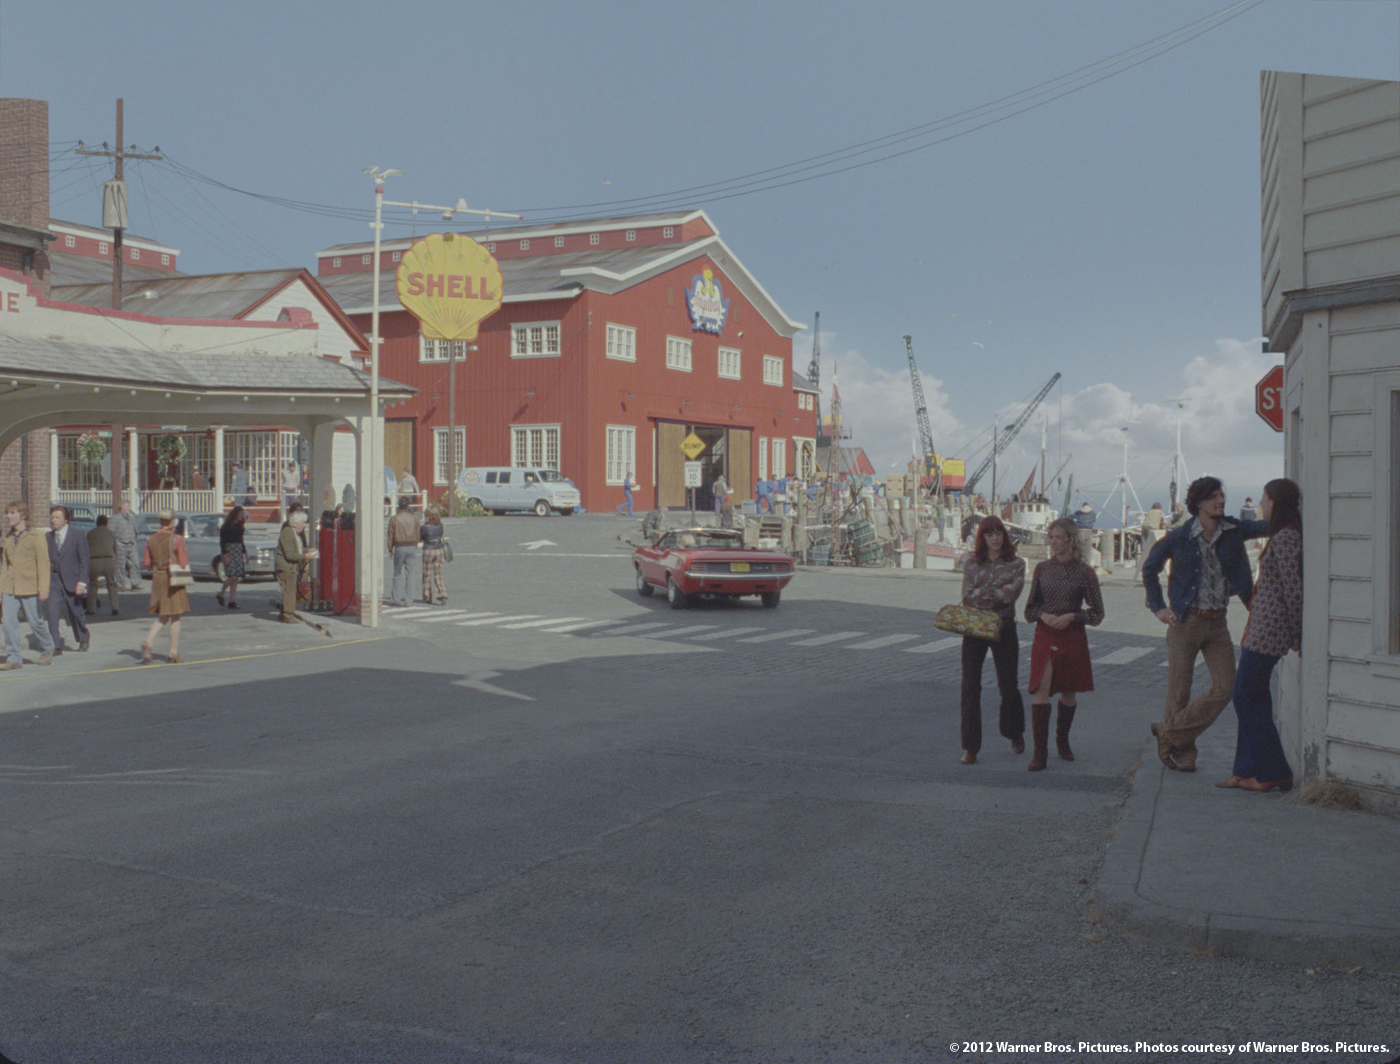
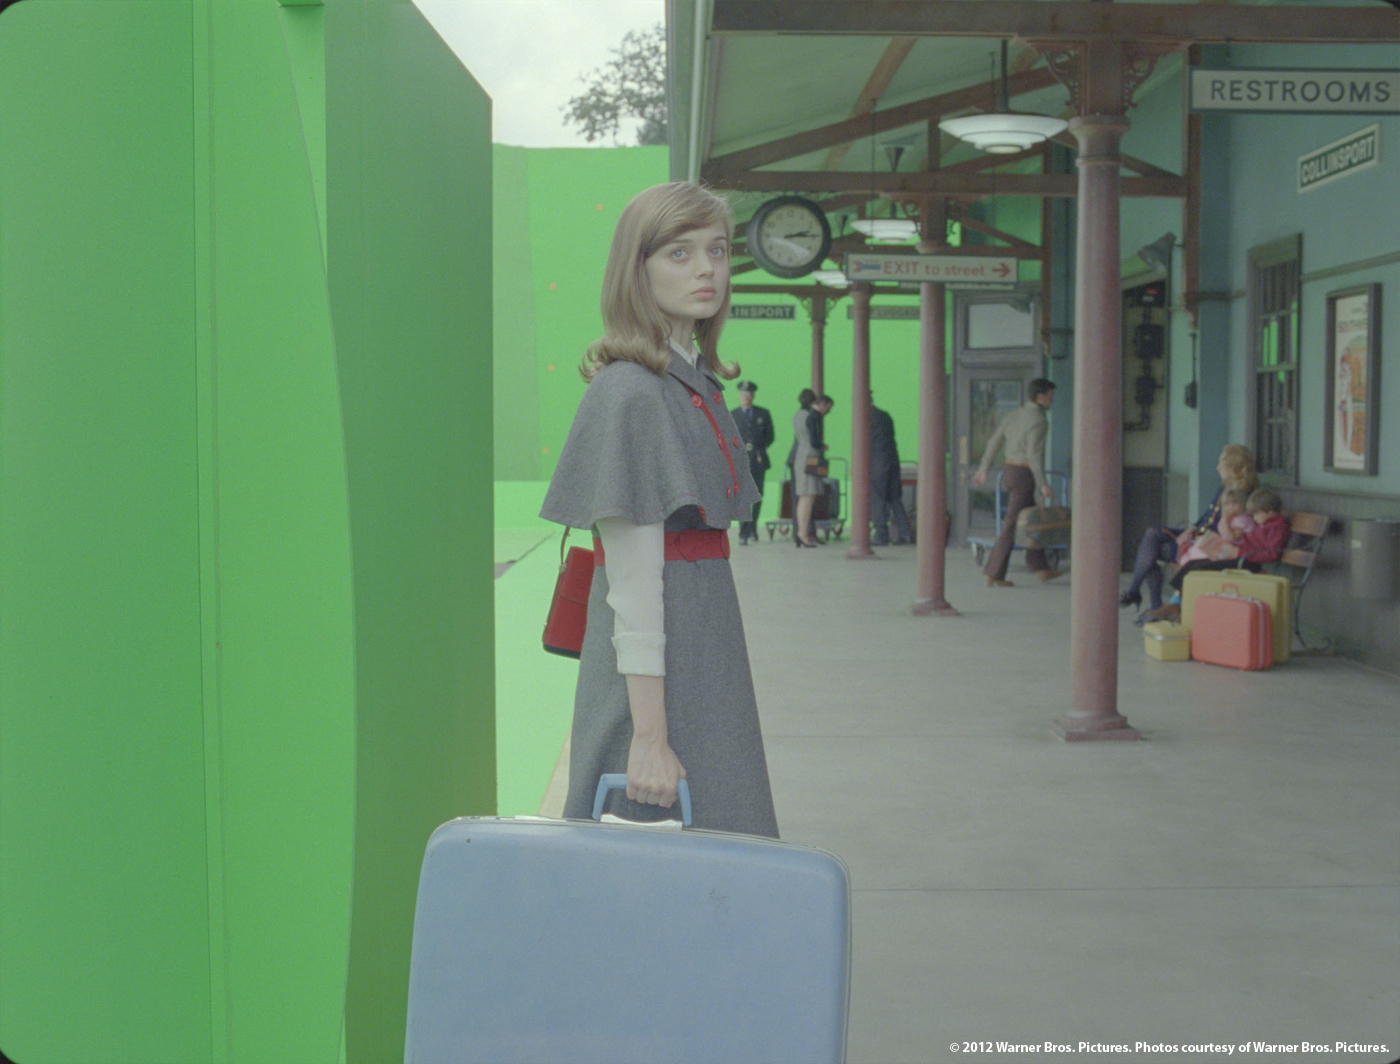
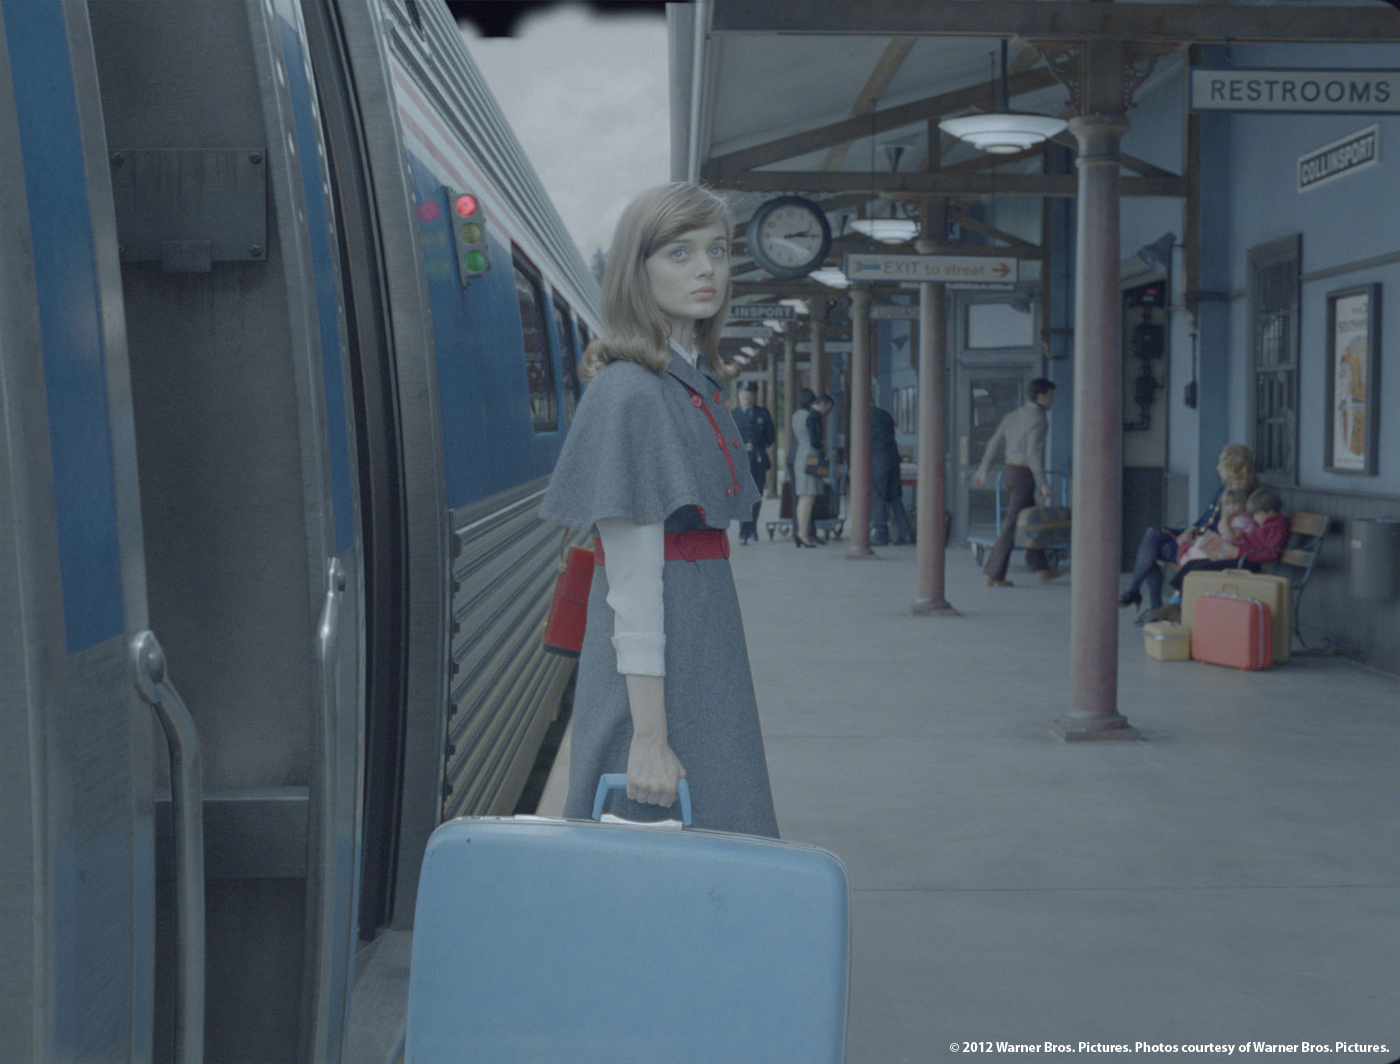
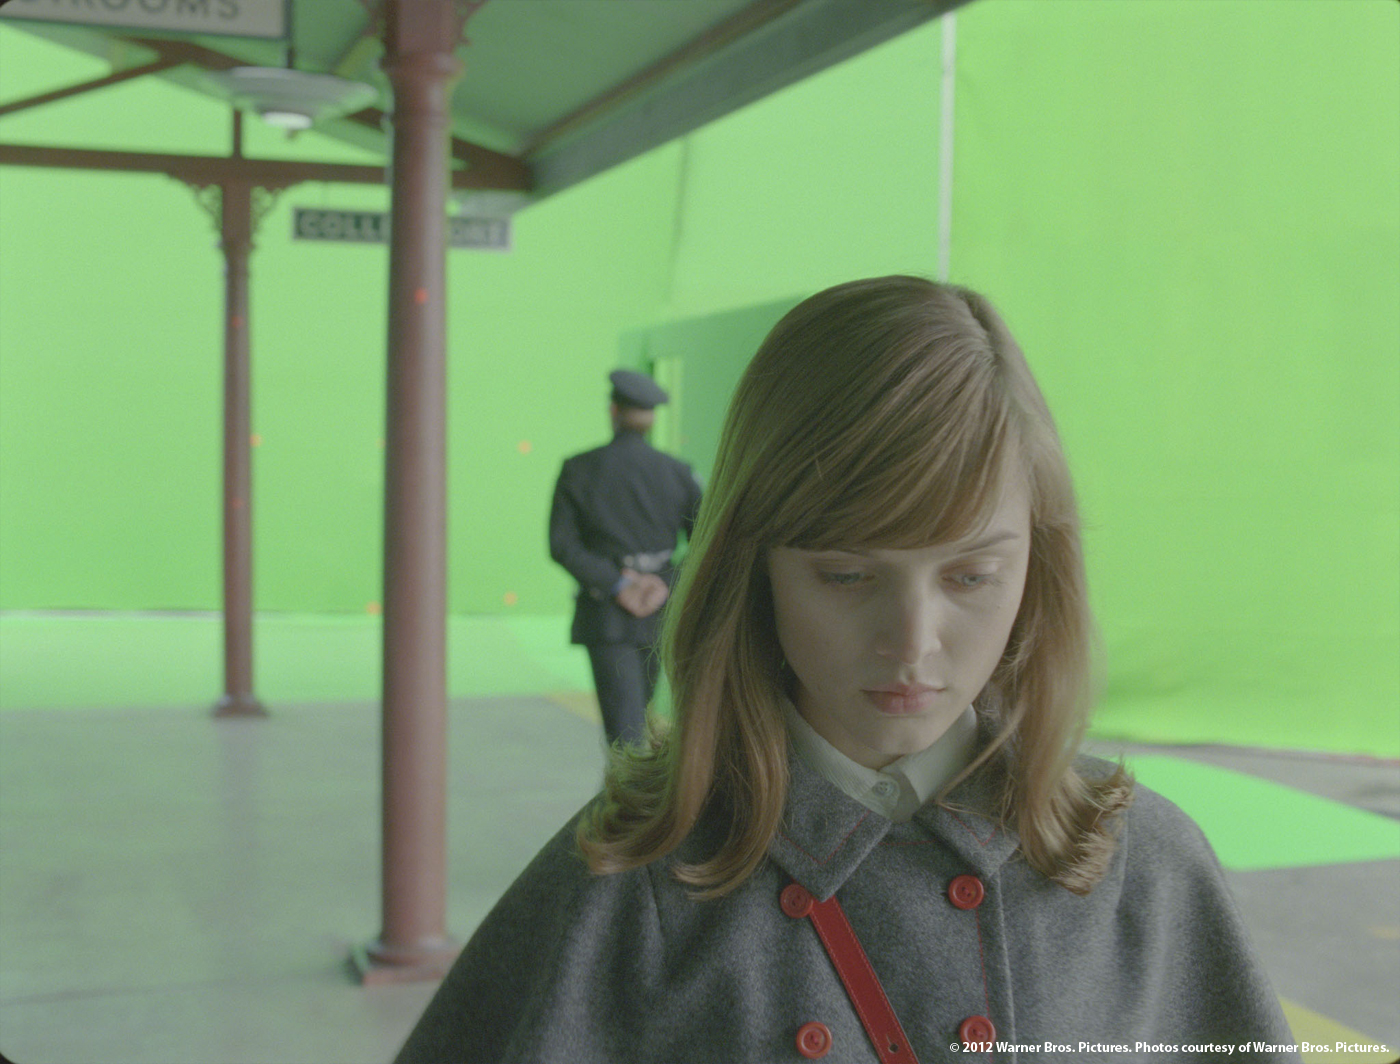
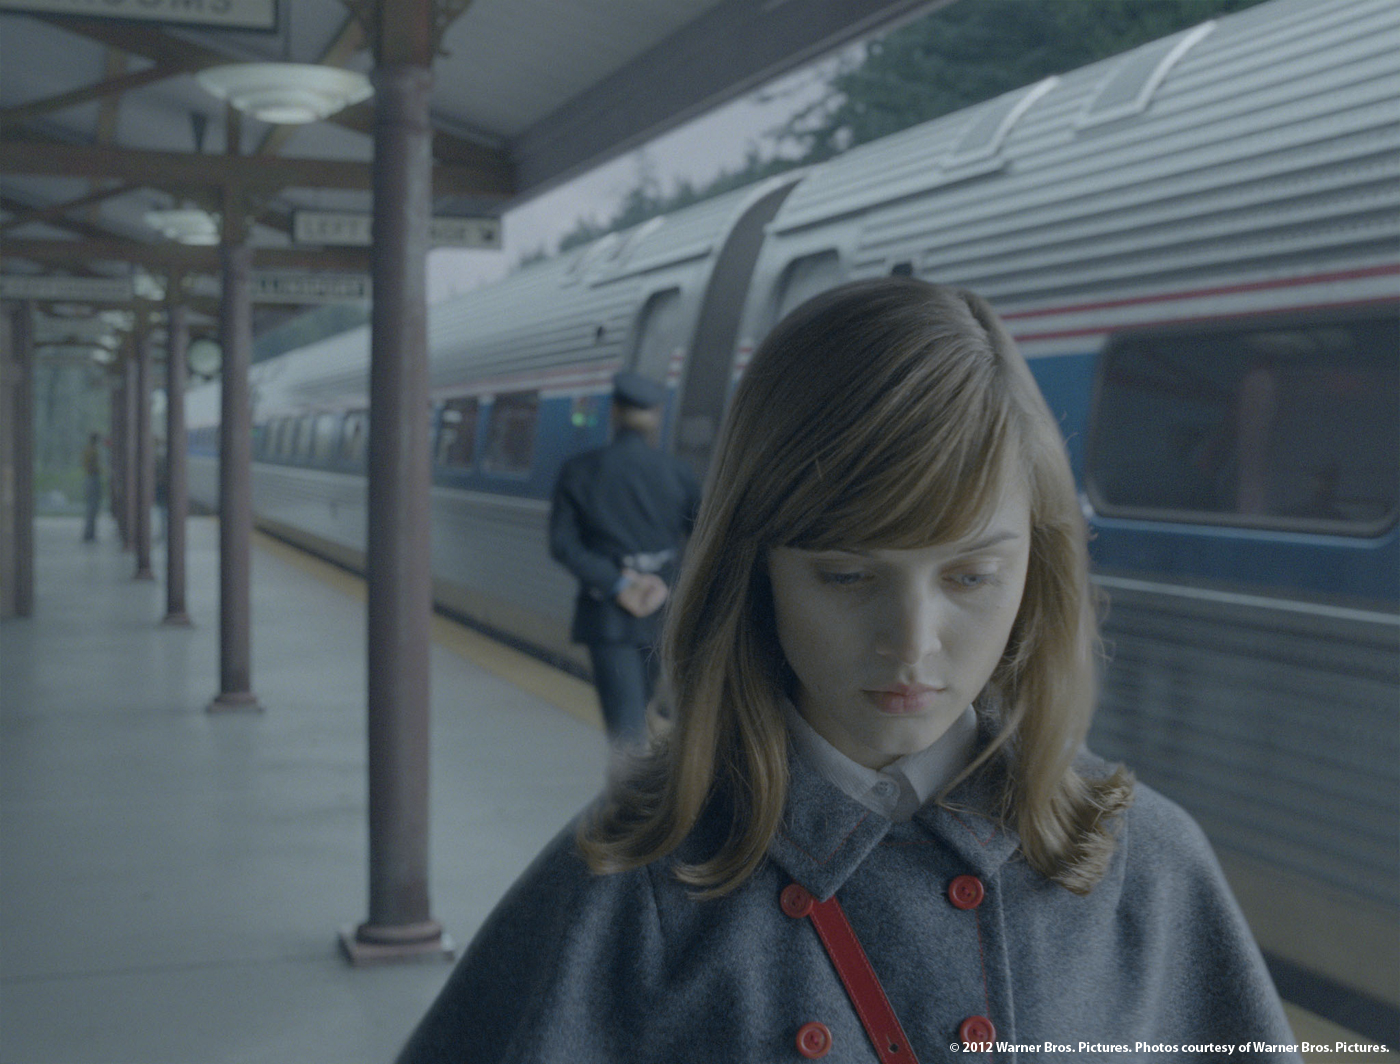
We created the environment of Collinsport (both for 1750 and 1972), a sleep east coast Maine town. We also created a couple of unique scenes where Barnabus walks down a mirrored hallway, showing for the first time how he does not reflect. We also did a sequence where Victoria Winters arrives at Collinsport by train, creating both the train, platform and environment in CG.
How did you work with the art department to create Collinsport for both periods?
The art department had a very developed and concise view of what they wanted. It was rather a dream for us as they knew exactly what they wanted right down to the style of curtains in each shop window. They gave us all the set drawings and early CAD models that they had created. They also allowed the lidar scanning crew access to get a detailed survey of the set for us to replicate.
Can you tell us in details the creation of the impressive town of Collinsport?
With every environment build there are specific things you do on every show, but there are always unique issues that need resolving. For Collinsport we had to always be wary that the modern 1972 town was derived from the 1750 town and that there had to be a link between the two. Growing up in Oxfordshire in the UK, I came from a tiny village that has been around since at least 860 AD. The way the streets curve, the landmarks that hint at its previous self all played a part in the design and layout of the town’s two time periods.
From the layout up, we began building an identical replica of the practical set that was build in Pinewood. From there, we expanded the streets in every direction, adding new buildings, cars and people in the style and design that the art department had built the few real buildings. We didn’t know the full extent to which shots would require town extensions, but we were pretty sure that some angles were going to feature heavier than others.
To save costs, the art department did not add roof tops to any of the buildings, so we had to add those in. It made sense as the cost to build an entire rook for the houses was extreme and we were going to need to build them any way.
A town is so much more than just buildings. We added street lights and electrical wires based on a genius hair system that one of our CG team built. It allowed us to have them move in the air as though they were being blown by the wind, control their thickness and match how real electrical wires behave when they connect to the poles.
We also added trees and side streets, road markings from previous road works, birds, cloud shadows and various objects that seem to be common in fishing towns on the east coast such as lobster nets, boxes and other gak to liven up the streets.
The town was then broken in to various passes for comp and rendered out of Maya in Mental Ray. Dan Mayer, our CG supervisor oversaw the whole process, having also worked on several of Angus’s previous features. Our Nuke compositors, lead by Comp supe Martyn Culpitt, placed all the elements together, grading and refining key edges as required.
Have you created digi-doubles to populated Collinsport?
Surprisingly no! Angus had the forethought to shoot lots of elements against green screen of people moving around for us to add in later.
What was the real size of the sets in Pinewood?
They were pretty big. But the amazing thing about the Collinsport set was that it was built around the water tank at Pinewood and in order to get the correct height between the dockside and the water’s surface, the whole town was built about 18 feet off the ground. When you stood in the middle of it, other than the blue screens, you would think you were in Maine.
How did you manage the aspect of those blue screen shots?
I always told myself that I was lucky we had blue screens at all! There really was not many shots that had much blue screen in overall, and when they did, the scope of the shot was so massive, the blue screen was tiny in frame. For many shots we relied heavily on our roto teams to give us suitable mattes to work alongside the keys we were pulling.
What was the main challenge with those Collinsport shots?
Believability. Common every day places are very hard to replicate because you can’t rely on the fact that what you are creating doesn’t exist. Towns are hard because they are real and most of us see them everyday. But that also means we have great reference from which to pull and so long as we can spend the time noodling little details, we knew we’d be able to make something pretty real.
For Collinsport, we knew that we wanted to add as much life to the street as possible so that you didn’t question them. We added seagulls to all of the shots closest to the ocean and added cars from that period driving up and down streets where needed.
Can you tell us more about the CG seagulls especially their rigging and animation?
Our seagulls were rigged and animated in Maya by Michael Mulock. He built a series of animations that could blend from one to another, flying, hovering, swooping etc and then created paths for them to follow. Depending on the path, the seagulls would use different animations that made sense to their movement.
We studied seagulls in the local area, filming how they took off, flew and landed. Also how they behaved in each of the those modes. Seagulls are constantly looking around for food, even when flying and even though many of the CG gulls are small in frame, you can make out all the details we put in.
Our rigs were designed primarily to control complex wing and head movement. We didn’t create a feather system for the wings, we just were never that close, but we did build quite a complex model to give the illusion of detail where we needed it.
How did you create the train station and the train?
We knew with the CG train that we would have to keep “on track” and not go off the rails. Sorry couldn’t resist.
The main challenge was, as ever, realism. Our train was full screen, for a long time. It had to be modeled with extreme attention to detail and make sure that the textures and lighting never said fake. That’s pretty hard to do right and because everyone in production would be looking at that specifically we knew it would be a big challenge to pull it off.
We began by modeling the train to match the 1970 train selected by production. There were no trains available for us to photograph as there were none in museums, and the active ones were felt to be off limits for security reasons.
The model took quite a while to get right, but it had to look great at this stage if it was going to stand up to scrutiny. Textures and lighting came next, both having to work together to make sure the massive amount of metal on the train reflected the environment accurately.
Dan Mayer then choreographed the trains movement across the cut and we created temp renders for editorial to get buy off on the speed and placement. Our temps by this point looked pretty good, and it was gratifying to know production really felt the shots looked great as well.
To finish off the trains, we had a mountain of work still left to do however. We also had to build and extend the train platforms in both directions as they only built a small section at Pinewood for Victoria to walk on.
There is an impressive scene in which Barnabus is walking in a hallway of mirrors without its reflection. Can you tell us in detail about your work on it?
The scene shows Barnabus escorting Elizabeth along a secret passageway which eventually leads to the families treasure store. The hallway itself is lined with mirrors on both sides, so you get the infinite reflection effect. Barnabus, being a vampire, does not reflect in the mirrors, but the lamp he is carrying does. So we have this eerie scene where the mirrors reflect the lamp swinging by itself and Elizabeth walking behind. The big shot is where Elizabeth first sees that Barnabus does not reflect in the mirror, proving that he is in fact a vampire.
This sequence was shot early, before we were awarded work on the show. Once we joined the production, we were shown the plates and we picked up on what seemed like a fairly high level of stress about how this sequence would be achieved.
It was a very narrow shooting space, and shortly after being filmed, was taken apart so hardly any of the usual texture gathering could take place. This had everyone a little worried about how we would achieve the effects that Tim wanted.
Angus was able to take the deconstructed panels and have them photographed at various angles with greenscreen reflecting in the mirrors. They were also able to get a quick lidar scan of the actual set before it was dismantled.
Armed with both those elements, we felt pretty confident that we would be able to build a full CG version of the passageway enabling us to rebuild the reflections as required based on the shot.
The main shot where Elizabeth sees that Barnabus has no reflection was originally not shot to really take advantage of seeing the lamp floating in the air. We decided to extract Barnabus from the practical plate and put an entirely CG passageway around him, allowing us to alter the camera move and extend the time we spent seeing the lamp.
Initially we set up a simple grey shade version of the passageway so we could get buy off from Angus and Tim on the move and new length of the shot. Once we had that, we dedicated time to making the CG passageway match the practical one. Dan Mayer, experimented with the infinite reflections to make sure we maximized on the effect, adjusting the camera angle slightly so we could take in the moment.
After rendering the elements, the comp team assembled the shot together, using the original texture elements of the dirty mirror surfaces that had also been rendered to give the mirrors a suitably old look.
Was there a shot or a sequence that prevented you from sleep?
Nope, I sleep like a baby. I always have. If I can fix something, I will fix it, so there’s no need to worry about it. If I can’t fix something, then, well, there’s also no need to worry about it. Zzzzzzzzzzzz. If you believe that …
Which branches of Method Studios have worked on this show? Method Vancouver worked on the show, but Method London were sent tickets to the cast and crew screening! We obviously couldn’t go, so we sent them our tickets.
What do you keep from this experience?
Every project has the potential to teach you something new. I’d say that this project really pushed our team to excel in certain areas of our environment pipeline. For me personally, just finding new ways to guide and inspire the team to do the best work they can is amazingly rewarding in itself. I remember as an artist that the best work I ever did was because I was given great direction, then left to actually do it. I always wanted to be able to do that for others.
How long have you worked on this film?
From the summer of 2011 to Spring 2012
How many shots have you done?
186.
What was the size of your team?
About 25 people.
What is your next project?
I have to plant carrots in the vegetable garden at home. The weather has finally reached the point that the ground is warm enough for them to germinate.
What are the four movies that gave you the passion for cinema?
LOGAN’S RUN (Loved the Washington matte paintings)
THE BLUE LAGOON (I always thought it was a brother and sister)
FLASH GORDON (Ming the Merciless looked like my ceramics teacher)
QUATERMASS AND THE PIT (Back to the internet you go!)
A big thanks for your time.
// WAN TO KNOW MORE?
– Method Studios: Dedicated page about DARK SHADOWS on Method Studios website.
Paul Mitchell has worked 13 years at the BBC as a design director. In 2007, he joined Prologue Films and worked on numerous commercials and movie title such as IRON MAN 2 as Creative Director. He explains the challenges in this adaptation of the board game Battleship.
What is your background?
I’m a formally trained graphic designer with a passion for storytelling and film. I studied Graphic design in London and worked at the BBC for 13 years before moving to LA and joining Kyle Cooper’s Prologue Films in 2007. Since working at Prologue I have been fortunate to work on some great projects; IRON MAN 2 and BATTLESHIP are two of those projects.
How was the collaboration with director Peter Berg?
Pete had a strong vision on the whole movie and that was true of the graphics he wanted. We met frequently throughout the whole process, he was open to many of the creative suggestions we put on the table, but above all, he wanted it to tell the story.
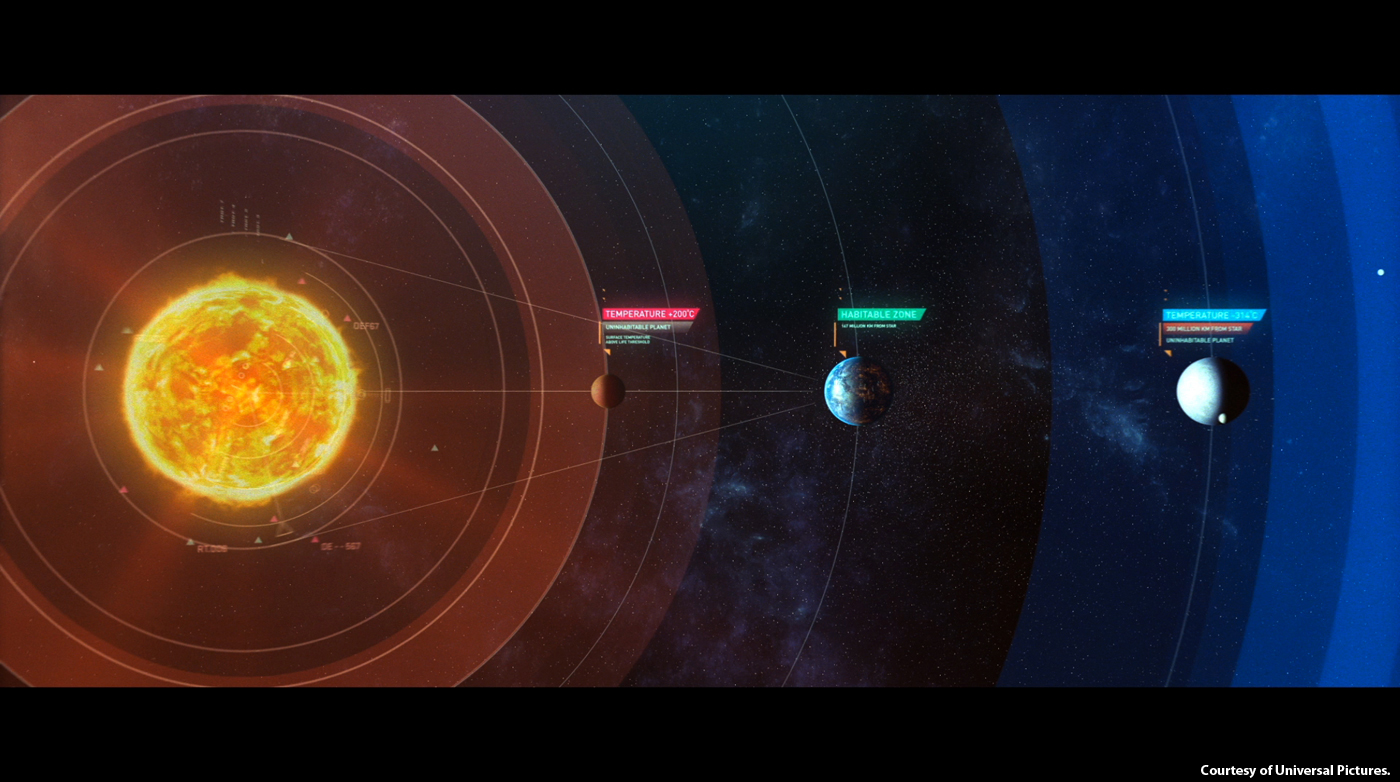
Can you tell us more about the design and the creation of the shots showing the space map?
This sequence was designed to illustrate the common factors which make up a habitable planet; for example, the right distance from the sun creates an earth-like planet. The actual final design had to clearly show this in a computer program demonstration. We designed this sequence with some basic color coding principals so that the information was very easy to understand, and then added layers of secondary infographic elements. The CG planets were created in C4D because we wanted to give the sequence a more graphic feel, rather than creating fully realistic VFX shots.
Which softwares did you used to create the various animations?
We used a combination of off the shelf tools to create the animations, mainly After Effects supported by Nuke, Flame, Maya and C4D.
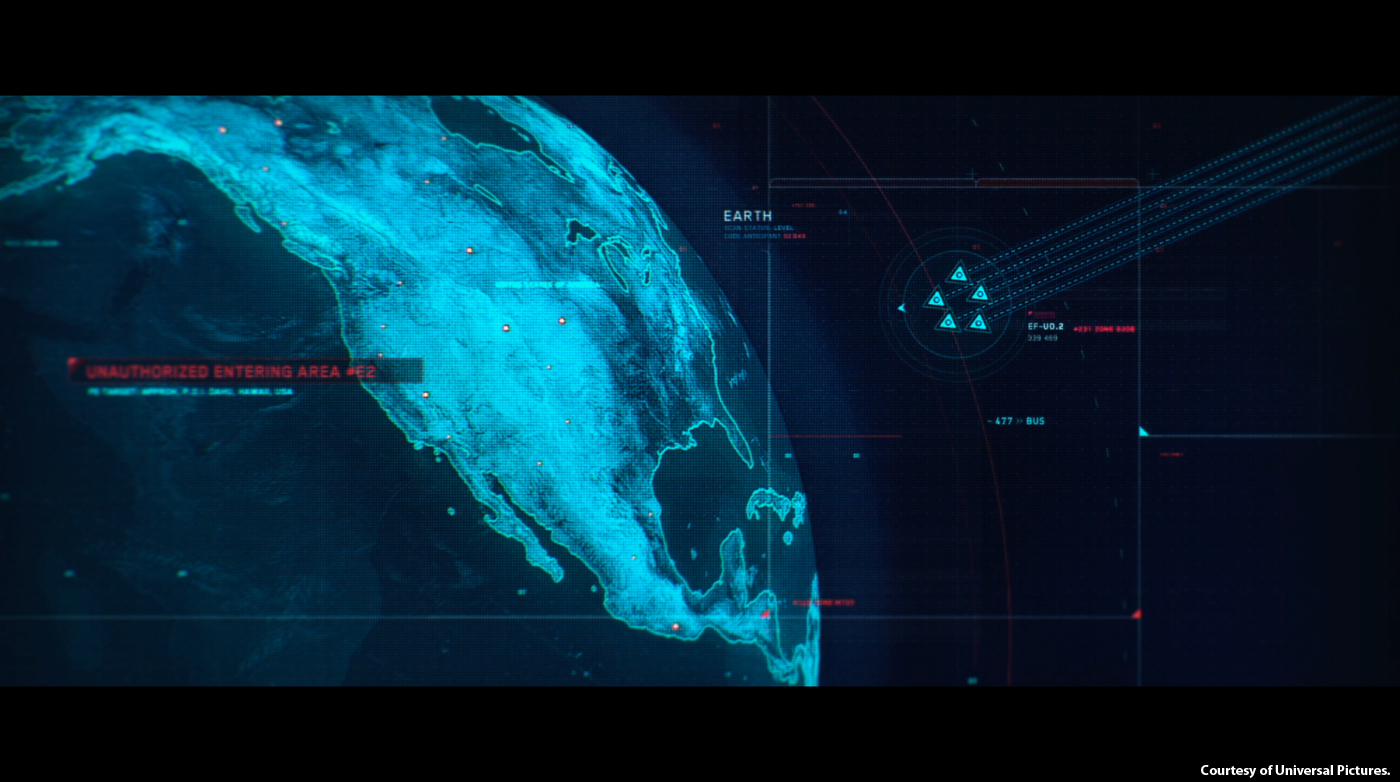
How did you create the map and its animations that is a reference to the original Battleship board game?
It took a while to get this map to work well. We really needed the right balance of story information and suspense because it was part of a very critical moment in the movie. We worked through numerous iterations of the map and what appeared on it; some maps were complex, some simple but all had subtle references to the basic idea of the original Battleship board game. The grid itself needed to be relatively simple, but was brought to life with multi buoys scattered around. Each buoy had various levels of animated states helped to guide us through the scene. After Effects was the tool we used because it required a lot of detailed animation components.
Can you tell us more about how you approach the creation for the end title?
We knew we wanted something fun that tied in the Battleship map but had an extra layer of action. So we designed a grid environment which lived in 3D space – this allowed us to have fun with the 3D ships given to us by ILM. We took the models and developed a graphic rendering style. We also took time to explode the ships in a graphic way, which was in keeping with the overall style of the end title sequence. We then reenacted moments from the battle scene.
Did you received some assets from ILM especially for the end title?
Yes. ILM very generously gave us their models from a number of scenes which really helped us at Prologue. Especially the ships and missiles for the end titles – this really brought the whole sequence to life.
How was the collaboration with Grady Cofer and his teams?
Grady and the guys at ILM were super helpful and great to work with. They supplied us with elements and support in a very timely manner. Those guys really know what they are doing. We also supplied them with various graphic interface elements for their alien screens.
The Aliens have a scan system. Can you tell us more about its design?
The scan system is like a head up display – it’s function is to isolate objects of interest or threat. We designed a display system which overlaid information and analyzed objects within the shot. We also added some dirt, scratches and condensation to the helmet surface so that the whole display had an extra element of grunge to it.
What were the challenges about the scan system?
The main challenges were to make sure that the scan system didn’t confuse the audience, that it enhanced the story, and that it didn’t slow down or detract from the action.
What is your methodology to create the various animations from scratch to the final result?
Our main focus as a studio is design. So at the core of every shot, we made sure the design worked and fit the tone of Pete’s movie. Then we explored how it moves; we go through a lot of animation tests and always cut them into the scenes to keep check on the bigger picture. Once we get to a good place with that, we then try to push it and make it better.
Some shots involved a huge number of elements. How did you manage these?
You can’t do a project like this unless you have a strong Production team who really know VFX and understand assets. They managed and organized the vast number of elements, provided by the client and other vendors like ILM, through Shotgun and various other tools. This allowed our animators to really concentrate and push themselves to create complex yet easy to understand animations.
What was the biggest challenge on this project and how did you achieve it?
The biggest challenge was really the amount of shots we had and keeping the level of design and finish to a high standard across the board.
Was there a shot or a sequence that prevented you from sleep?
The Battleship map sequence kept a few of us from sleeping. It’s an important part of a critical sequence in the movie. So we had to get it right on multiple levels.
What do you keep from this experience?
This was an invaluable experience because you get to work with great artists, which really makes you want to push yourself. By artists I mean everyone from the Director, the Editors, ILM VFX Supervisors and our very own Prologue artists. The collaboration of all these artists is what I will keep with me.
How long have you worked on this film?
Prologue worked on this film for about 9 months from design to final delivery.
How many shots have you done?
We had around 150 shots.
Can you tell us the four movies that have given to you the passion for cinema?
Growing up, my first wonder moment in cinema was STAR WARS. I had never seen anything like it. LORD OF THE RINGS blew my mind at the time – the sheer scale of the scenes was epic. More recently, INCEPTION was amazing, from the concept to the cinematography. Finally HUGO purely from a craft point of view – the art direction, cinematography, costumes and just overall beauty really inspired me.
Arundi Asregadoo is in visual effects for over 10 years. He worked at Framestore and then at MPC where he worked on films like TROY, X-MEN: THE LAST STAND or HARRY POTTER AND THE ORDER OF THE PHOENIX.
How did MPC get involved in this show?
We have a great relationship with Tim Burton from working on SWEENEY TODD, CORPSE BRIDE and CHARLIE AND THE CHOCOLATE FACTORY and with Angus Bickerton on THE CHRONICLES OF NARNIA: VOYAGE OF THE DAWN TREADER, ANGELS & DEMONS and THE DA VINCI CODE.
How was the collaboration with director Tim Burton?
It was a fascinating experience working with such a creative director. He has an incredible imagination and a very clear vision of what he wants. He would focus on particular parts of the image, once he feel you have achieved this, he’d leave you to complete the image
What was his approach about visual effects?
Tim is very VFX savvy director. He is very aware of what is capable within visual effects. For him, DARK SHADOWS was more about the performance. The VFX was more of a dressing to what he was shooting and he wanted to have that flexibility to make changes in the post production phase of the making of the film. A great deal of time was spent on very elaborate set builds and miniatures, with minimal greenscreens.
How did you collaborate with Production VFX Supervisor Angus Bickerton?
Angus is an old friend of MPC. He brings huge amount of creative, technical and methodology experience to the table and it’s always an amazing experience working with him. From the first set of meetings we had, he would present us with a vast array of reference material he had collated, from old film clips to paintings as well as suggesting different methodology on how we could approach the challenges we faced.
What have you done on this movie?
MPC was awarded several sequences. MPC Vancouver completed work on the establishing shots of Liverpool which open the film and two sequences set in and around a 200 foot high sea-side cliff and pine forest referred to as Widow’s Hill. MPC London completed the supernatural showdown in the grand foyer at Collinwood manor between Barnabas Collins and his scorned ex-lover, the witch Angelique, wooden statues (caryatids) coming to life, Angelique’s gradually cracking skin, a vengeful ghost and of course no horror film would be complete without a werewolf. In addition the team also had to augment the scene with various destruction elements including bleeding walls, floors cracking and flowers dying.
Can you tell us more about the establishing shots of Liverpool and the Providence ship?
With the exception of the family boarding a walkway on a green screen set, this work was entirely CG. The Providence Boat was re-purposed and re-textured, forming the focus of the shot. An entire CG dock was built using digital props and buildings cobbled from various other shows. Finally basic CG water, fog and mist were built onto cards to set the scene.
How did you create the Widow’s Hill and Pine forest for the two periods?
The cliff itself was comprised of seven large slices of rock-face, all built at different resolutions depending on their usage in the movie. The cliff edge, where much of the action takes place, needed to match a set piece built during production. This is where the first and highest LOD slice of cliff resided. Several other promontories were then built along the coastline. These were mainly featured in large establishing shots of the area.
For all of the cliff shots a combination approach was taken splitting the tasks between DMP/Env and traditional assets. The rough shape of the cliff was built, and some portions of it were sculpted in Z-brush to help add detail. It was lit in such a way to pull as much topology as felt natural. This was then married with a bespoke set of Env textures that were projected onto the slices. Above the cliff was a pine forest and the Manor that held the Collins family. The forest was built by seeding individual trees using VUE software and then painting over the top. This allowed a lot of natural variation and parallax on the moving shots.
Can you tell us more about the final fight between Barnabas and Angelique?
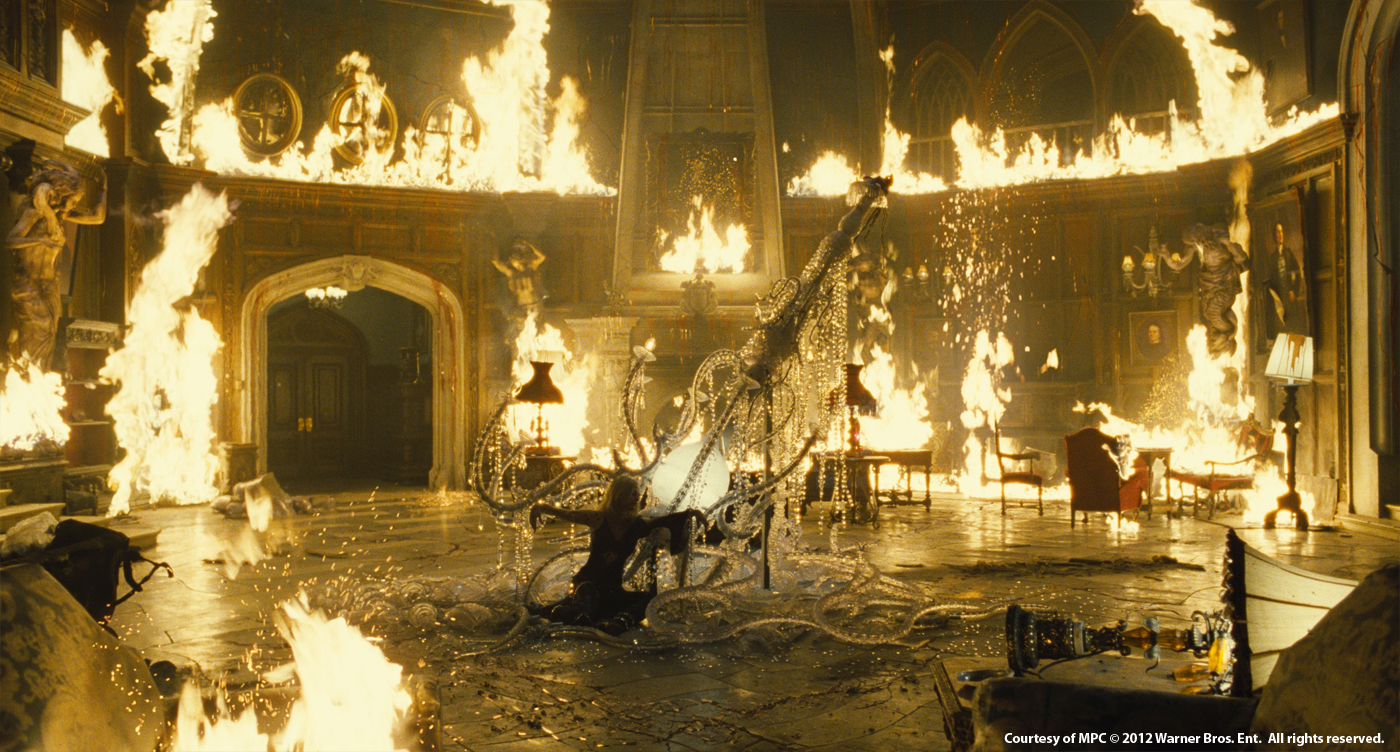
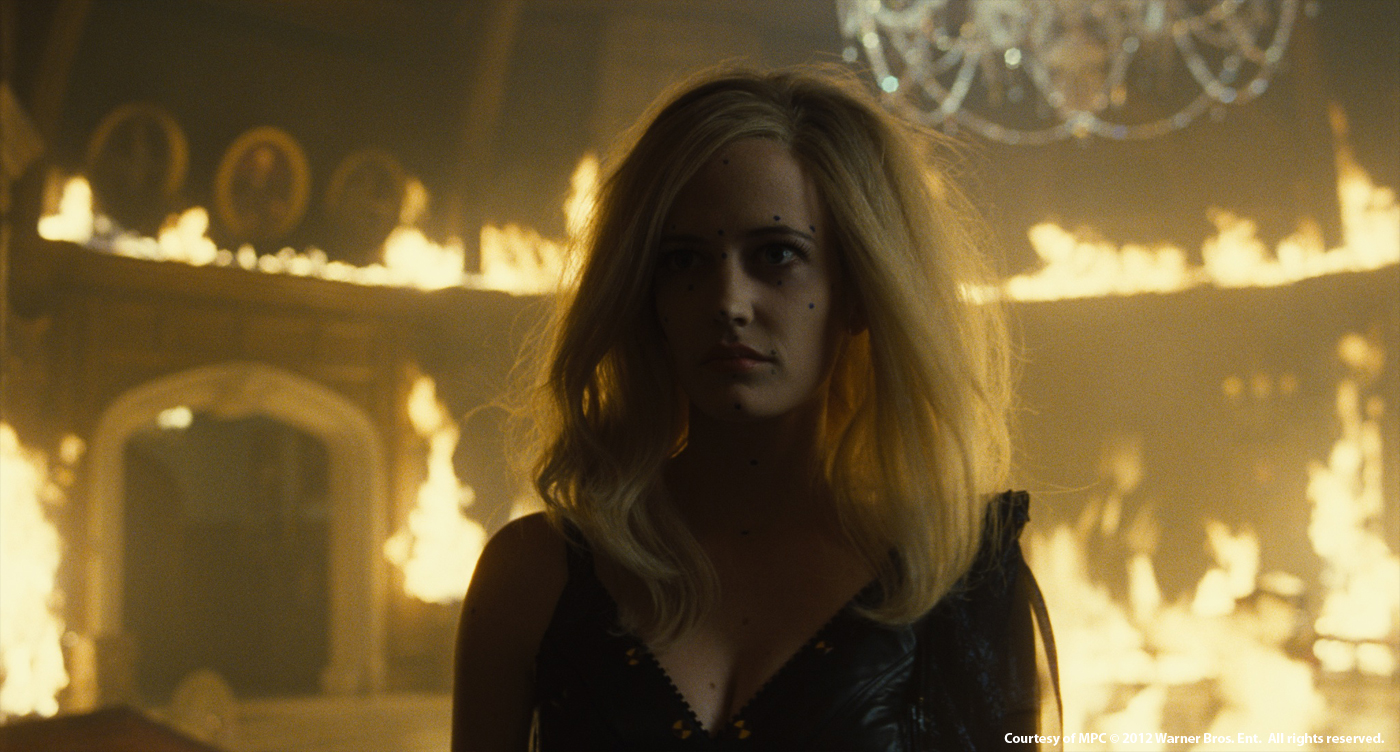
In this sequence Angelique battles with the Collins family. In the scene the room almost starts to breath, the walls start to bleed and crack, and wooden statues come to life. We also see Carolyn transform into a werewolf to battle Angelique. But the main duel is between Angelique and Barnabas! Angelique is unveiled as a porcelain doll and as the battle become more in intense, the more cracks are revealed.
At a moment Angelique skin begins to crack like a porcelain. How did you design and create this beautiful effect?
We started with the concept art. There were lots of ideas on how the cracks would look and what would be revealed once she started to crack. Would we see a 200 year old hag or would she maintain her beauty? Tim, Dermot and MPC’s Concept Artist Mark Tompkins created a series of images which showed the stages of change within her face and body. These were then projected onto a hi res model we had created of Angelique. This gave us a 3D form of the concept images which we were then able to use to work out how to articulate the cracks.
What were the challenges with these effects?
Eve Green’s performance was amazing in the sequence and we wanted to make sure that the CG work didn’t take anything away from that. It was therefore crucial that the roto animation was perfect. Tim wanted to have as much control over the cracks as possible including the way the cracks moved and the size and direction of cracking. For this amount of articulation, Sam Berry, our lead rigger came up with a very complex and flexible rig.
The big challenge was the integration of the CG renders of Angelique and the live action performance of Eva Green. Digital Supervisor Kevin Hahn, CG Supervisor Sheldon Stopsack and 2D Supervisor Axel Bonami came up with a solution, where we rendered a number of passes. We started by creating a digital double of Angelique. We then worked out that there were 6 stages which depicted the destruction of Angelique; each cracked version had to followed the concept we layered out with Angus. These were then rendered and passed onto comp, with additional passes and then combined with the plate. It was crucial to keep the surface of the cracks, looking as close, as possible to the skin.
Can you tell us more about the impressive shot in which Angelique is pulling her heart out from her body?
The look and design of the heart was an on going process. Tim wanted something magical. We went through a series of different concepts at MPC, from a heart made of feathers, to metal and even the possibility of it being a bug. The reference we went with in the end was actually closer to a real heart, but with the luminescence of a jellyfish.
The final look was a collaboration between CG Supervisor Sheldon Stopsack and 2D Supervisor Jeremy Sawyer who created the glowing heart you see on screen.
The breaking up of the heart, however needed to feel like it was made of porcelain. Using Kali, our in house finite element destruction tool, we created a simulation of the heart cracking and falling into pieces.
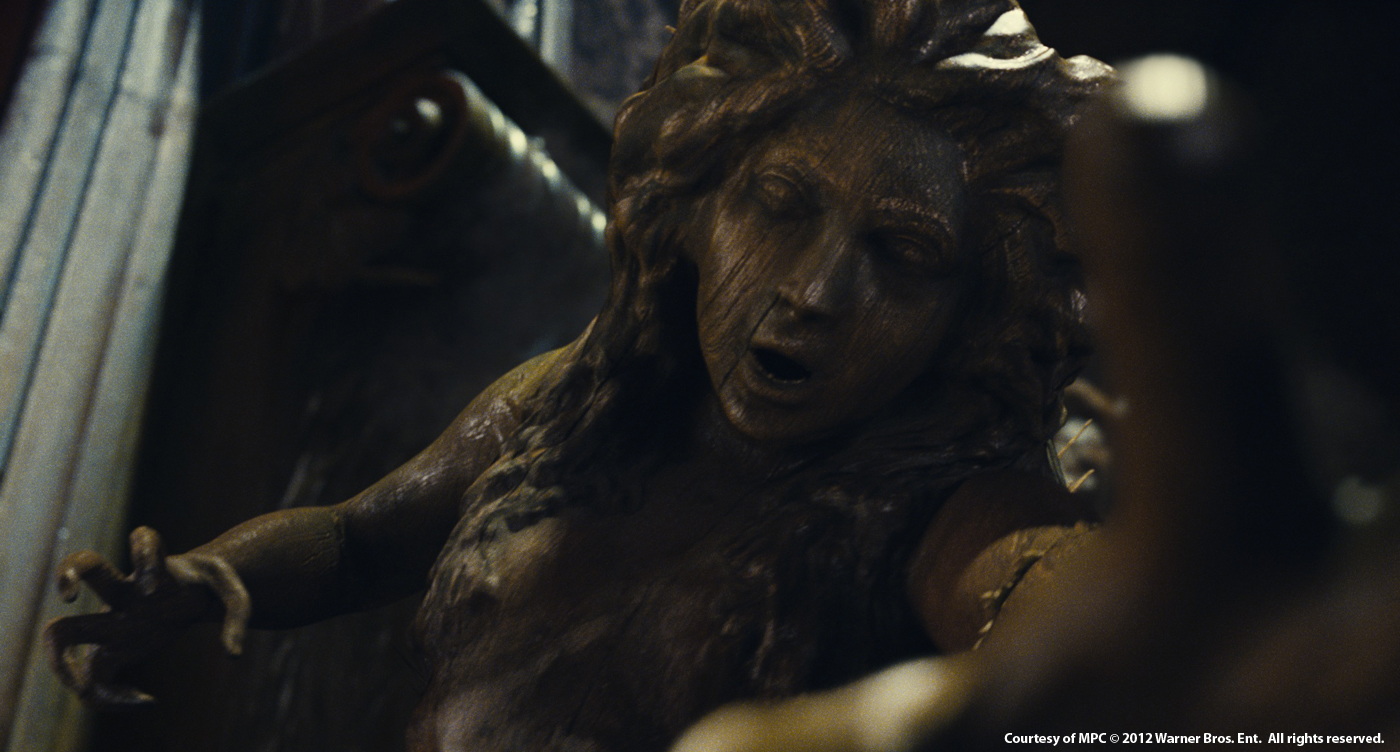
How did you create the wooden statues?
The wooden statues, are some of the weapons Angelique uses to attack the Collins family at the manor. When Elizabeth (Michelle Pfeiffer) starts shooting at Angelique, she commands the coiled serpent around the foot of the stairs to come to life, rips itself away from the banister and grab the Shotgun from her hands.
To make the statues we started by creating a series of concepts with Mark Tompkins, which included time-lapse sketches to help with the animation of the sea serpent statue. Tim Burton was clear from the beginning that he wanted the statues to be almost stop motion in feel and Angus Bickerton would often reference Ray Harryhausen. The set for the grand foyer, where the battle takes place was an incredible build, designed by set designer Rick Heinrichs and the team were able to cyber-scan the onset statues, to help us build the hi-res CG models. The main aim for the animation team, led by Peta Bailey, was to convey the heaviness and stiffness of the statues through their movement. The animation had to feel staccato, as if animated on twos. In addition, the team created splinted breakaway areas at the back of the statues and the elbows, so that we had the ability to animate the statues holding and grabbing. In one scene Elizabeth shoots at a statue blowing its head off. To create the destruction of the head, we again used our in house destruction tool Kali to create splintering wood, simulating the impact of the gun shot. Finally, in comp we added extra layers of dust and weathering to the statues.
Can you tell us more about the Werewolf?
From the outset Tim did not want Chloe Moretz wearing prosthetic makeup as he felt it would hide her performance, so during filming, tracking markers were applied to her face, as well as green leggings so our team could create CG wolf legs. Working together Dermot Power and Tim Burton came up with some really striking images for the werewolf.
Using this as a starting point, we gathered reference images of wolfs and foxes, and studied the way the fur looked and the structure of their legs and feet. Tim asked that we kept her looking elegant as possible, so the groom had to have a well-kept look and feel.
We used our in house tool Furtility, to create the groom. The fur had to follow the sculpture of the form of the body and a hi-res model build of the legs and face were created. The final development of the look was created in lighting and comp. The fur needed to look soft and the eyes were created in nuke.
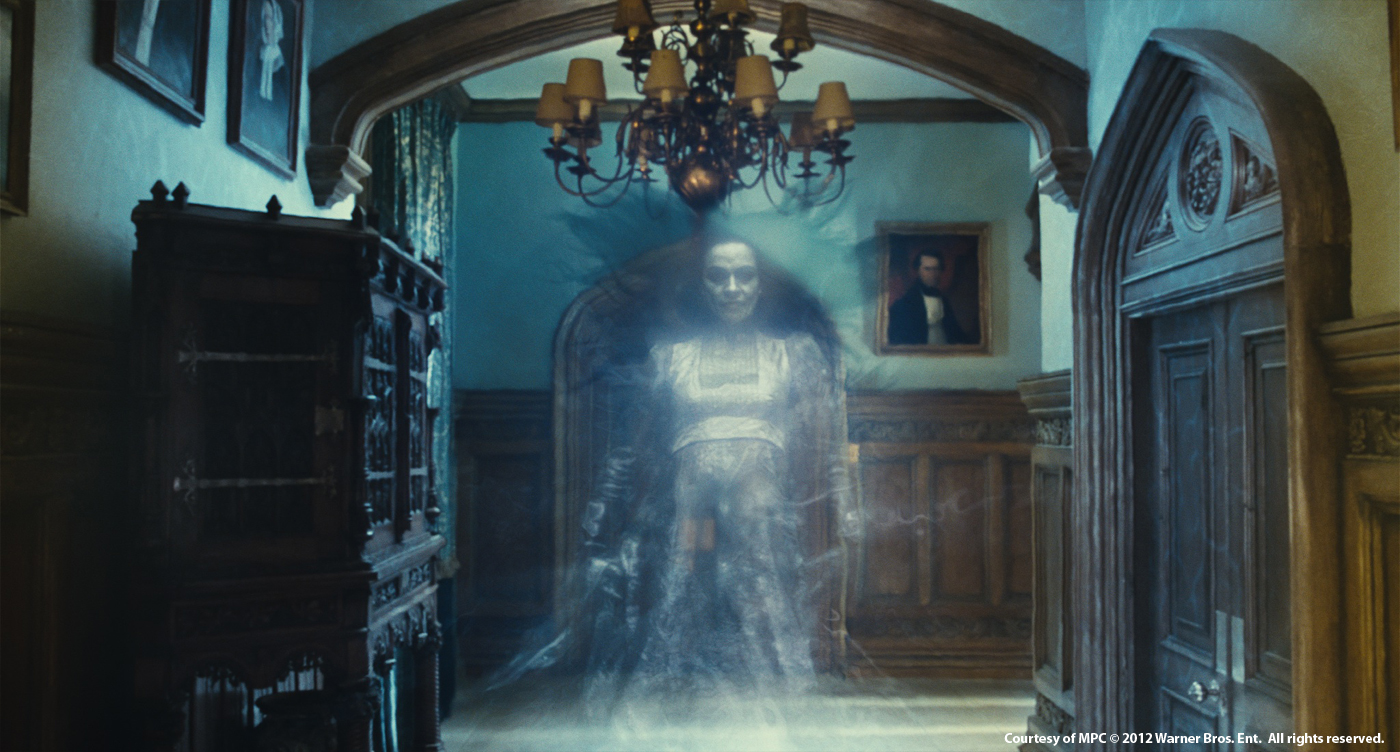
How did you create the ghost in the corridor?
In the script, David loses his mother at sea, so we wanted to use this theme for the look of the ghost. Early into production, Angus shot a series of tests, using a stunt double on a greenscreen with a couple of fans blowing onto the artist. The footage was shot over-cranked to help create the flowing effect. The results were great, but to achieve what we needed, we also had to shoot the artist underwater. There was however a drawback to the underwater footage. The effect of the water pressure on the artists face/skin, did not give us the desired look. To resolve this Comp artist Anthony Peck combined the two extreme elements, together with other practical elements to create the ghostly look.
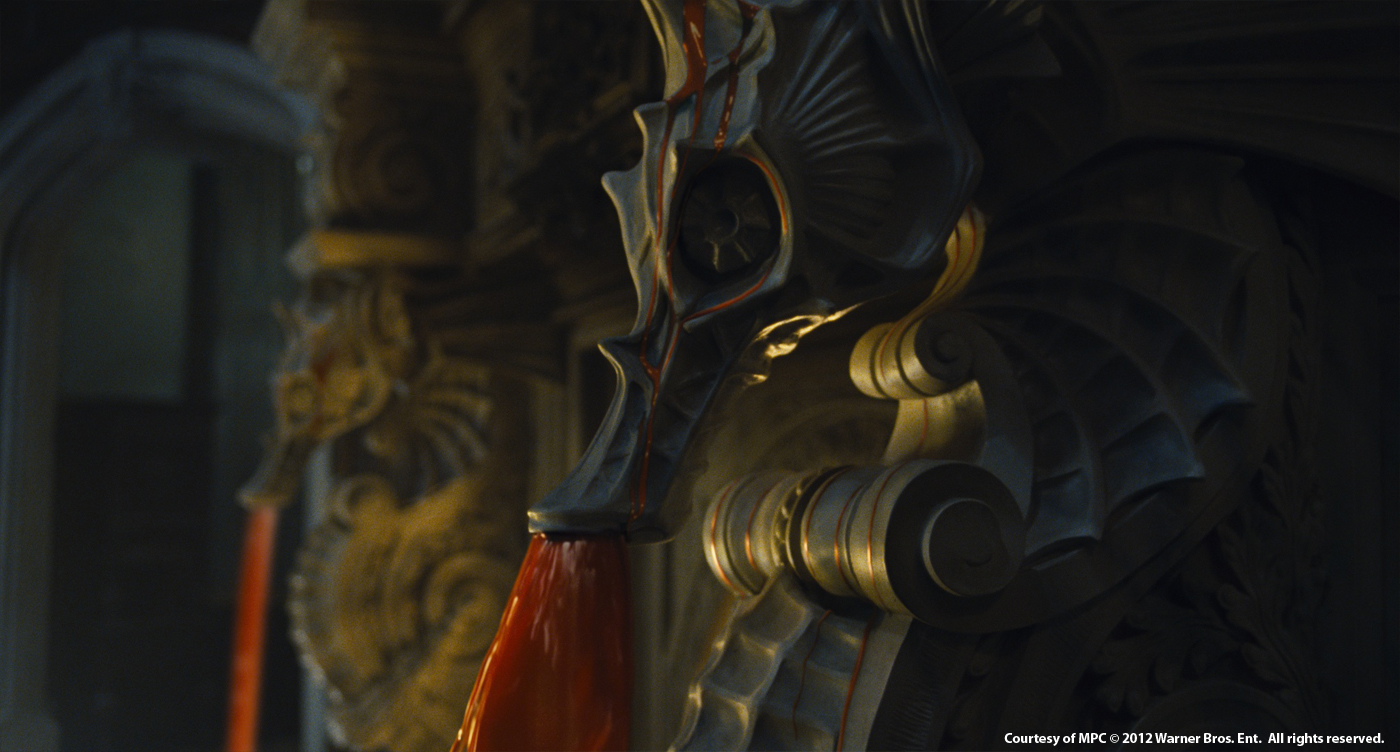
Can you tell us more about the destruction elements in the room like the bleeding wall, floors cracking and the dying flowers?
In the story, Angelique takes control of the room. We started with the painting of Barnabas bleeding. Tim had a clear idea how he wanted the blood to look and flow. This was achieved using two methods; first Angus shot blood elements again a green surface which replicated the wall in the room. These elements were used for close up shots. For the wide shots, we used a different methodology. The Environment team led by Isabella Rousselle used the lidar scan of the grand foyer, Jerome Martinez created a 360 degree geometry of the room and the dmp of blood and cracks on the wall was then projected onto the geo surface. These elements were finally integrated into the plate by the comp team.
Was there a shot or a sequence that prevented you from sleep?
The biggest challenge was to keep Angelique’s beauty even with the cracking of the skin.
Which branches of MPC have worked on this show?
MPC London, Vancouver and Bangalore.
What do you keep from this experience?
We had extremely complex work to achieve in quite a short space of time. This could not have been achieved without huge effort and dedication from a great team at MPC.
How long have you worked on this film?
We worked on the show for 8 months, of which we were in post for 5 months
How many shots have you done?
We completed 350 shots.
What was the size of your team?
Worldwide the team totaled over 300
What is your next project?
The latest Bond movie, SKYFALL.
What are the four movies that gave you the passion for cinema?
There are lots of films but maybe DUNE , 1984 , ALIENS, SLEEPLY HOLLOW, DAYS OF HEAVEN.
A big thanks for your time.
// WANT TO KNOW MORE?
– MPC: Dedicated page about DARK SHADOWS on MPC website.
Dadi Einarsson has over 20 years experience in the VFX. He started in Iceland before moving to London and New York. He has worked at The Mill and Framestore for projects like AUSTRALIA, SHERLOCK HOLMES or CLASH OF THE TITANS. In 2008, he returned to Iceland and founded Framestore Iceland.
What is your background?
I have 20 years experience in VFX, starting out in Iceland in 1992 then moving to London in ’98 and NY in ’03. My work has mostly been with Framestore and The Mill where I have been animation and vfx supervisor on several films and commercials. In 2008 I came back home to Iceland and 6 months later opened Framestore Iceland.
Can you tell us more about Framestore Iceland creation?
We opened in the summer of 2008 and have built a team of really good artists working on a wide range of vfx. We have created some stunning volumetric nebulae in Houdini for the MMO Eve Online, animated a cattle stampede for the Baz Luhrmann’s AUSTRALIA, created a capstan that destroys a shipyard in Guy Ritchie’s SHERLOCK HOLMES and put together some tricky comps for TINKER TAILOR SOLDIER SPY to name a few. On the commercials side we’ve recently made a CG pegasus made of smart phones for Huawei and just finished a photoreal dancing hamster for Gem 106 radio station. We’re situated right in the middle of Reykjavik in amongst the hustle and bustle of bars and restaurants.
How did Framestore Iceland got involved on this show?
Director Baltasar Kormakur is Icelandic and was interested in collaborating with us on his film. Framestore has a very good working relationship with the film’s producers Working Title so all the pieces came together.
How was the collaboration with director Baltasar Kormákur?
It was absolutely fantastic. He had every confidence in us doing a good job so the experience was very collaborative. When he had storytelling needs that were difficult or impossible to shoot we would discuss whether there was a way to achieve it in vfx and then go ahead with what we agreed was the best approach.
What was your approach on this show?
Our approach was to respect the cinematography and storytelling style that Baltasar and DOP Barry Ackroyd had created. What was foremost in our minds was to make every single visual effect in the film totally seamless and in the style of the rest of the film. You can make the best CGI and comp in the world but if it feels different to everything else in the film then it will be conspicuous and therefore will have failed.
What have you done on this show?
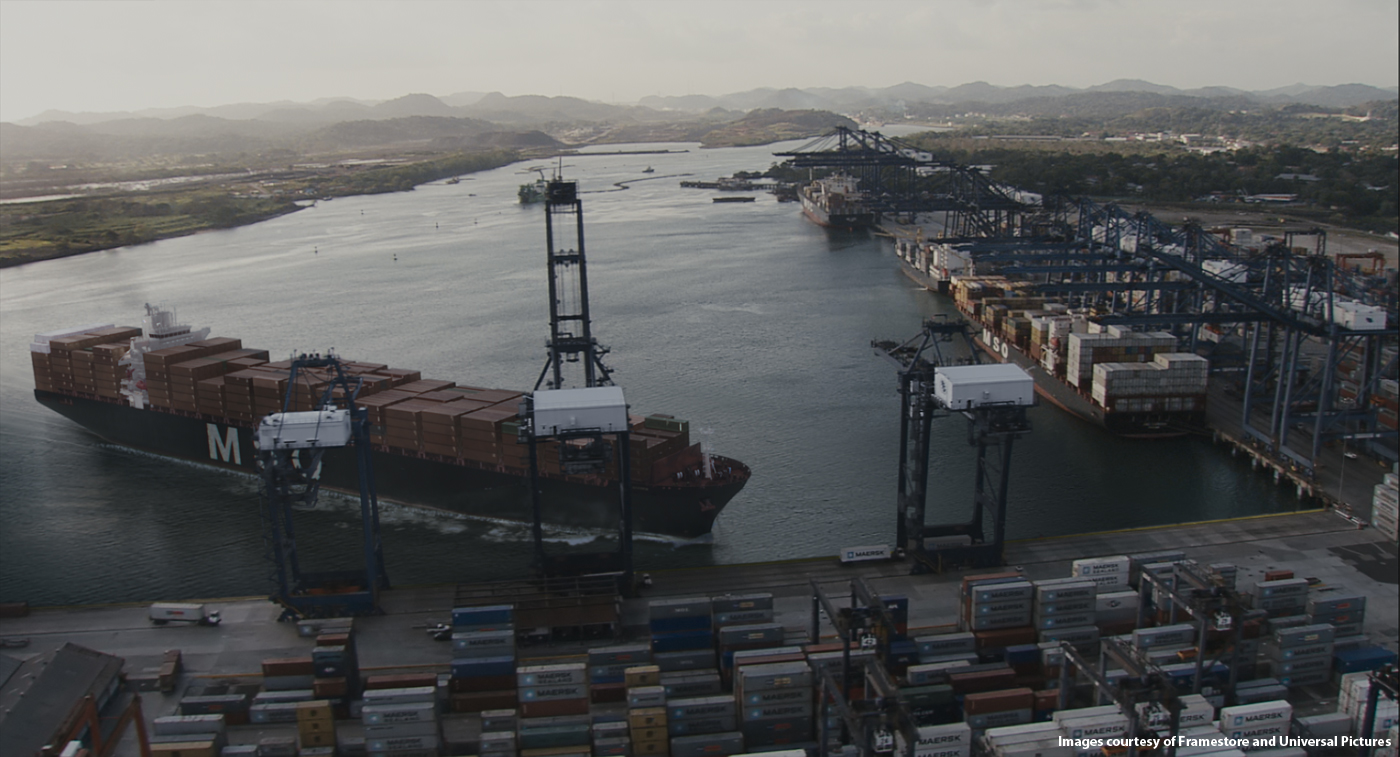
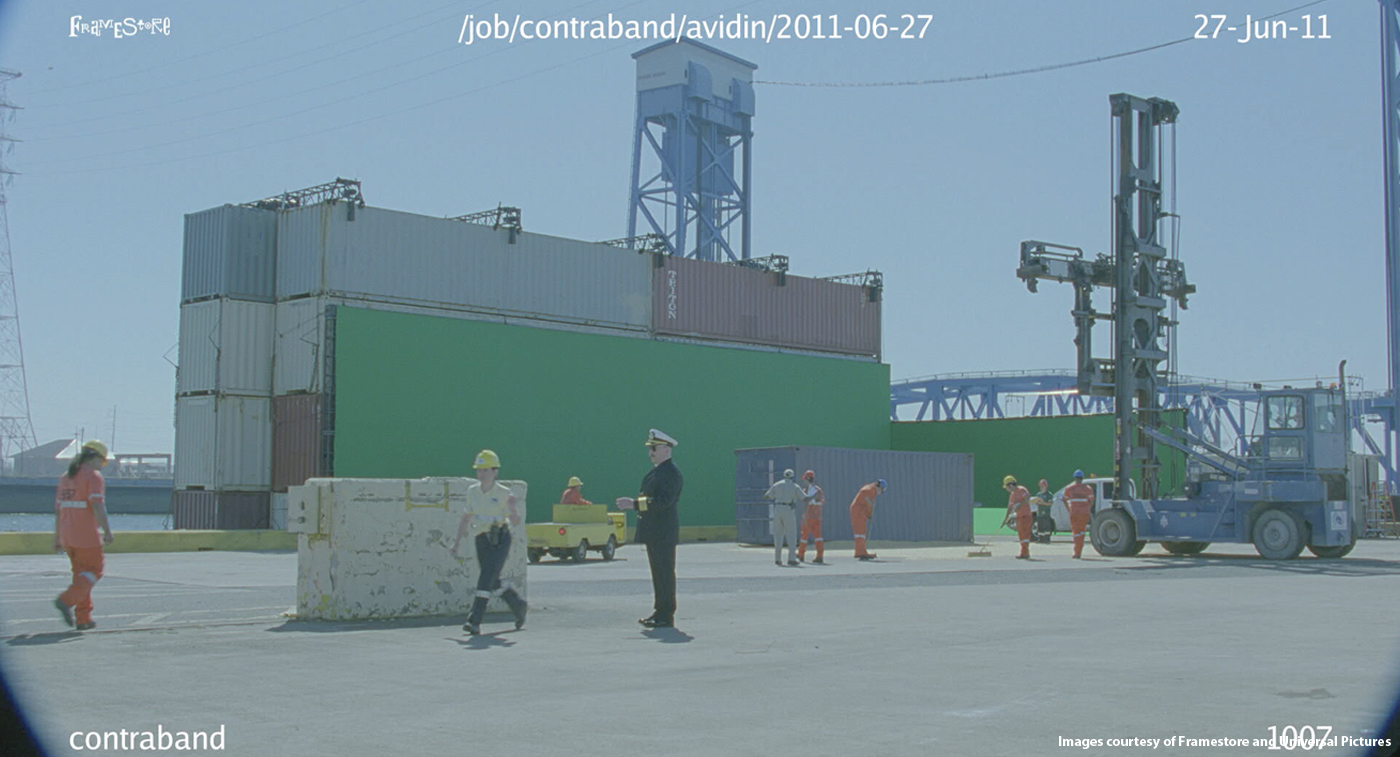
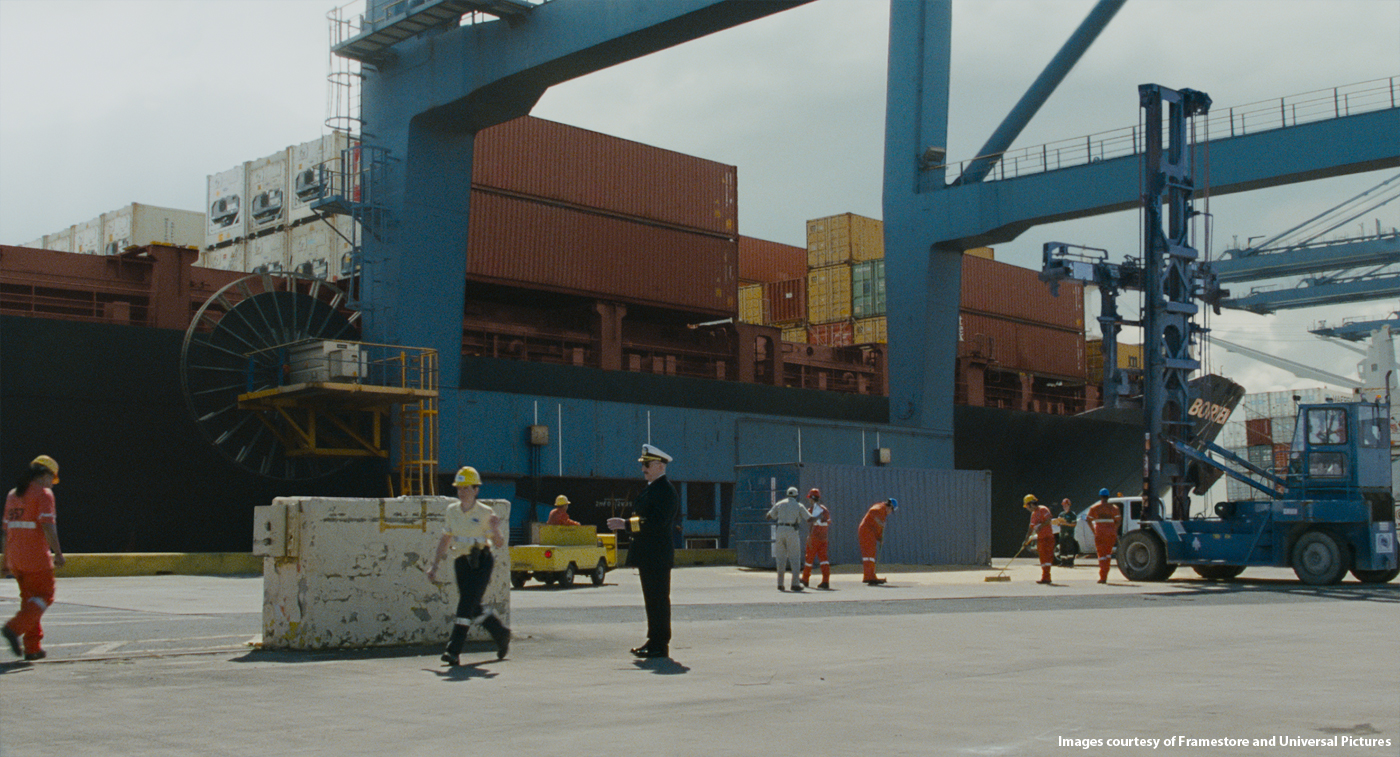
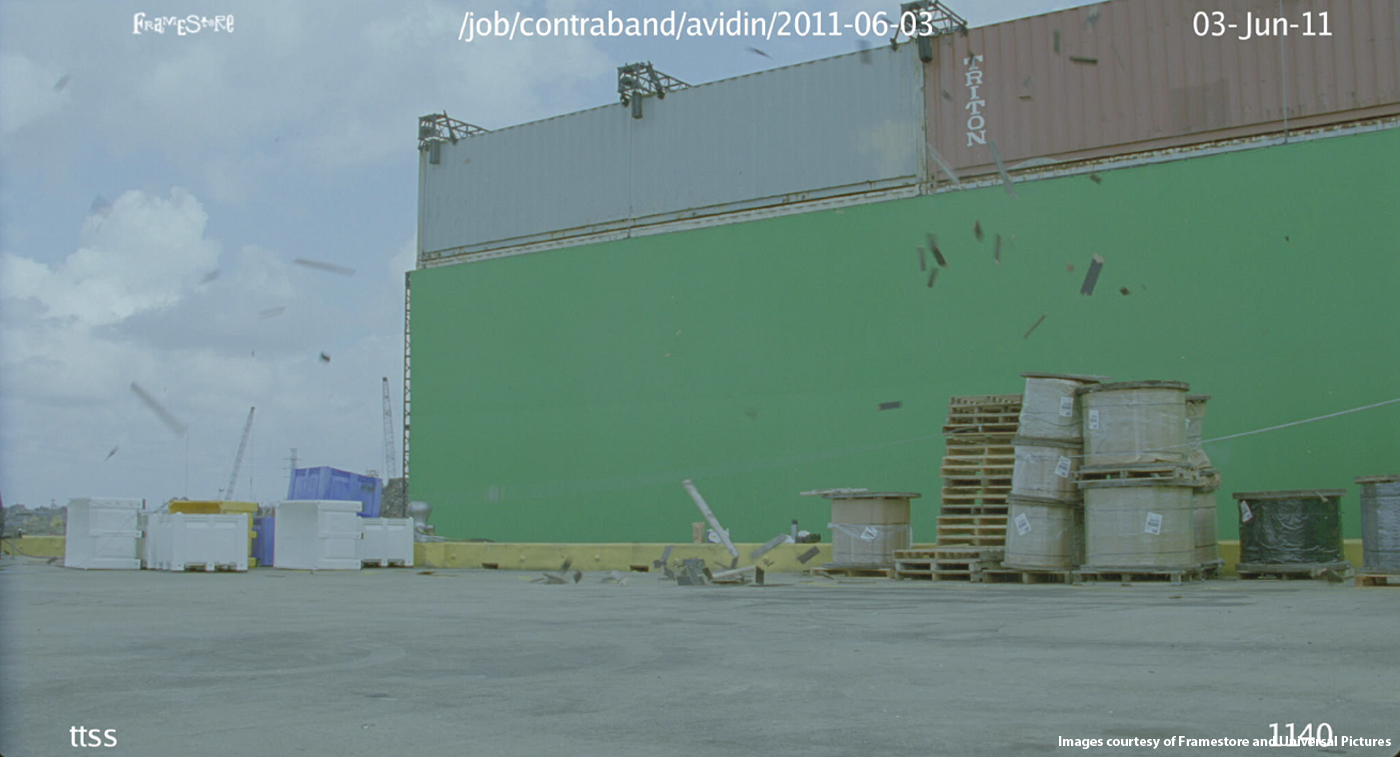
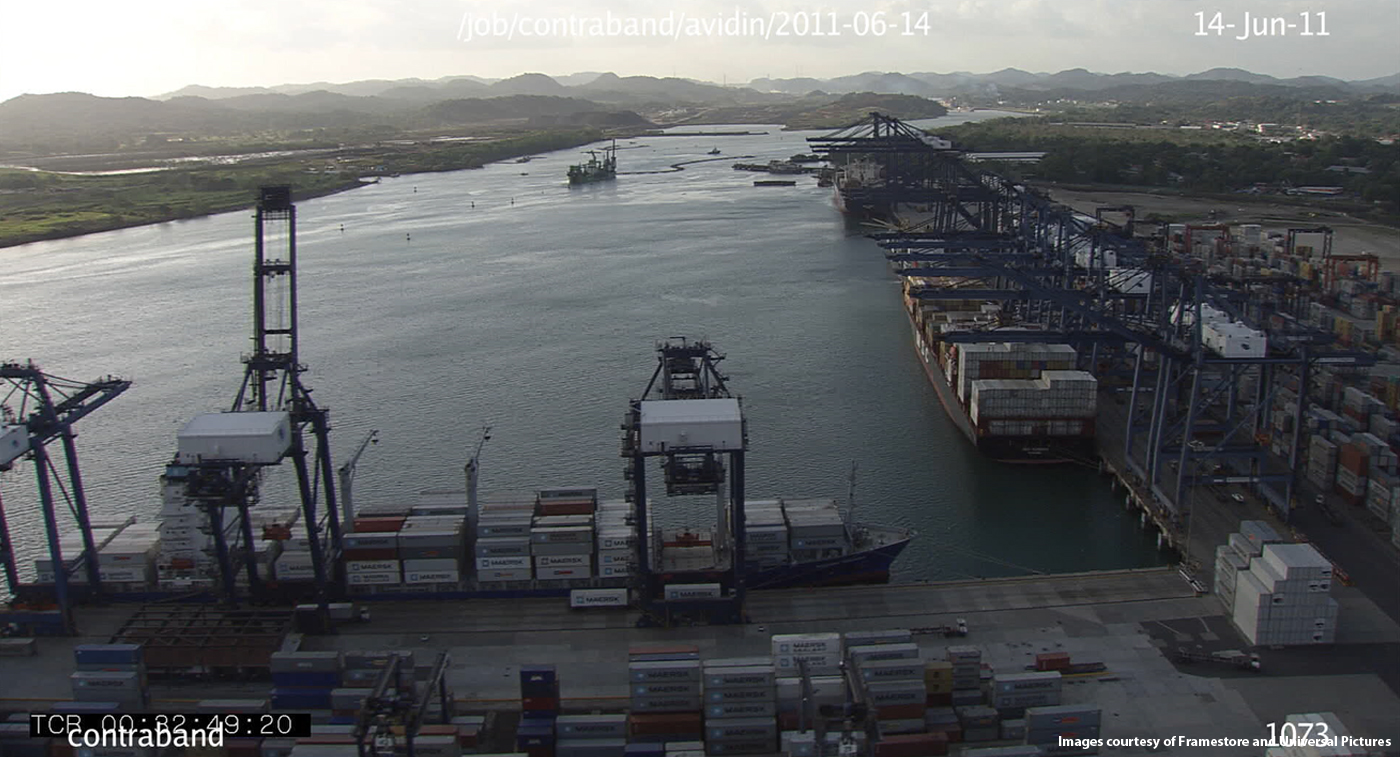
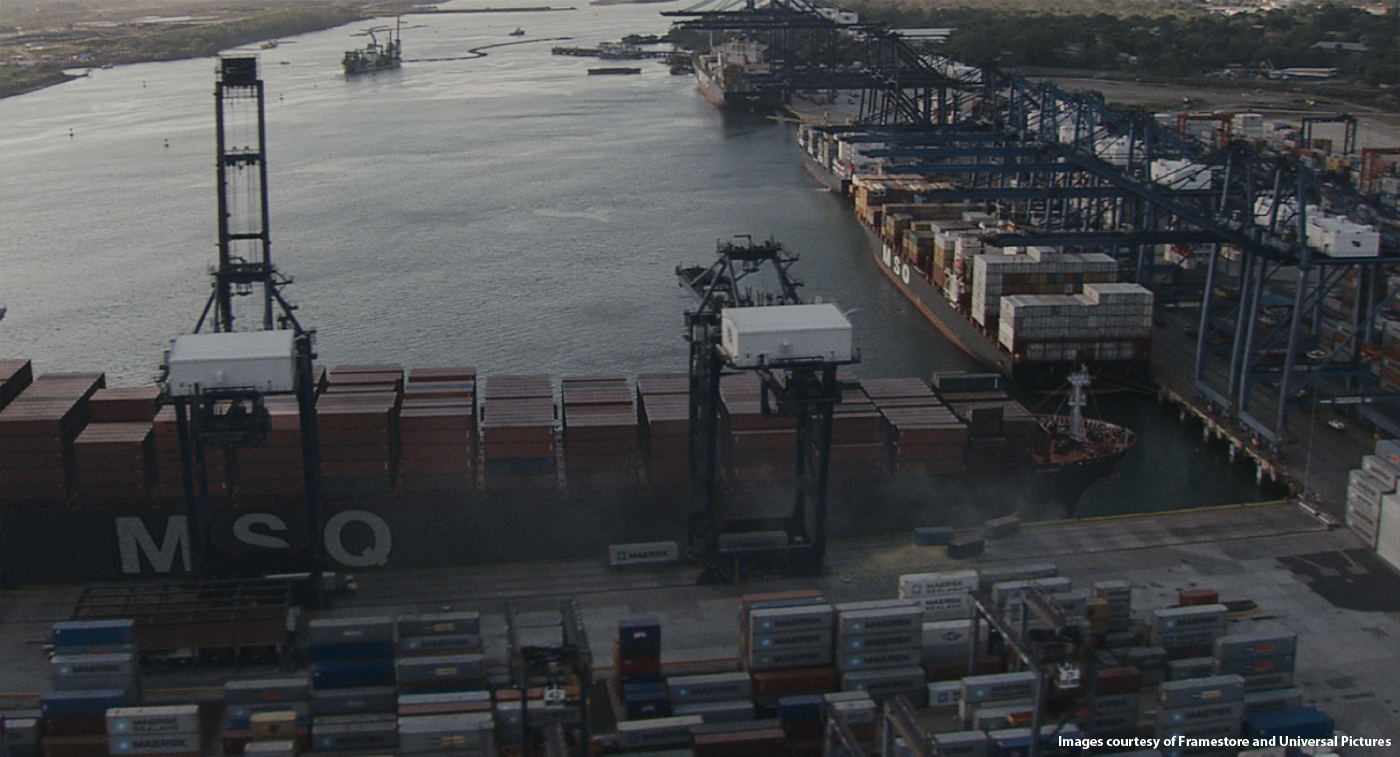
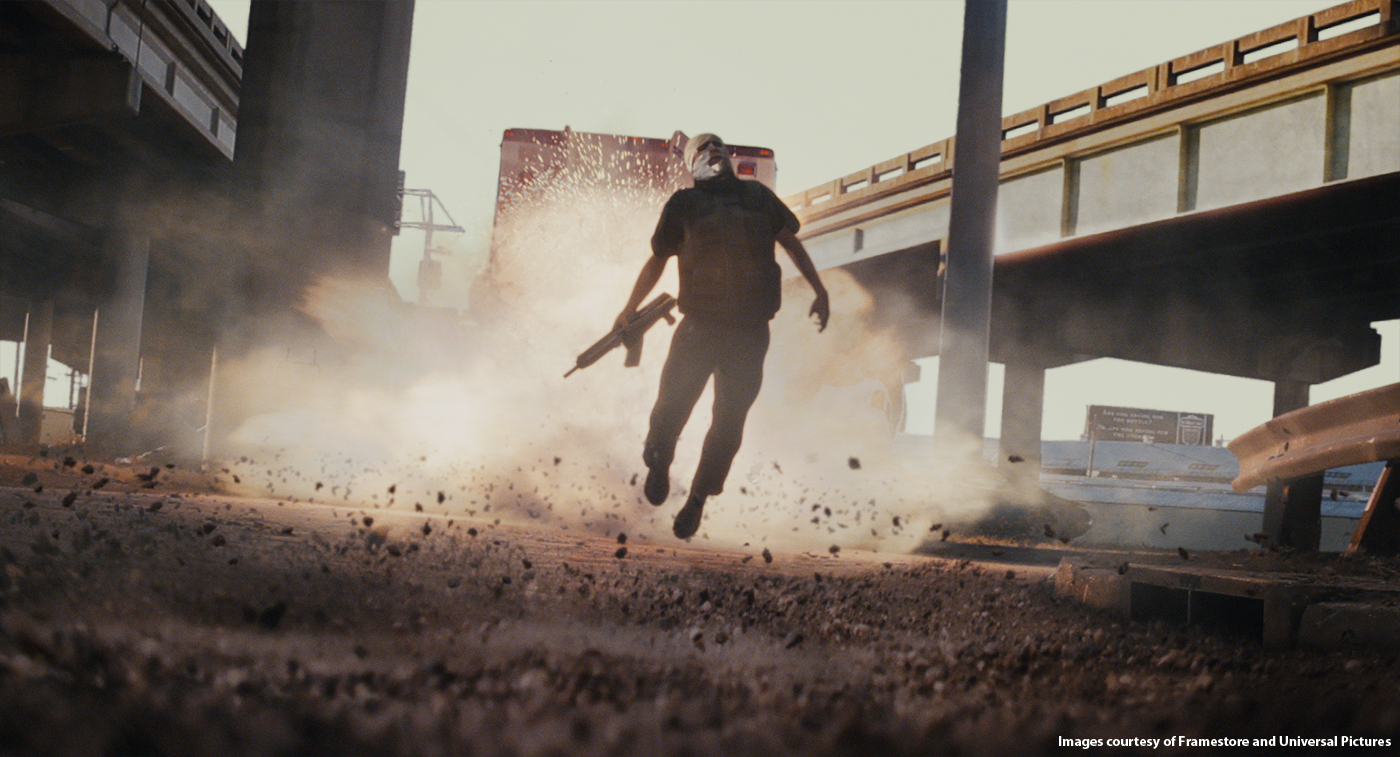
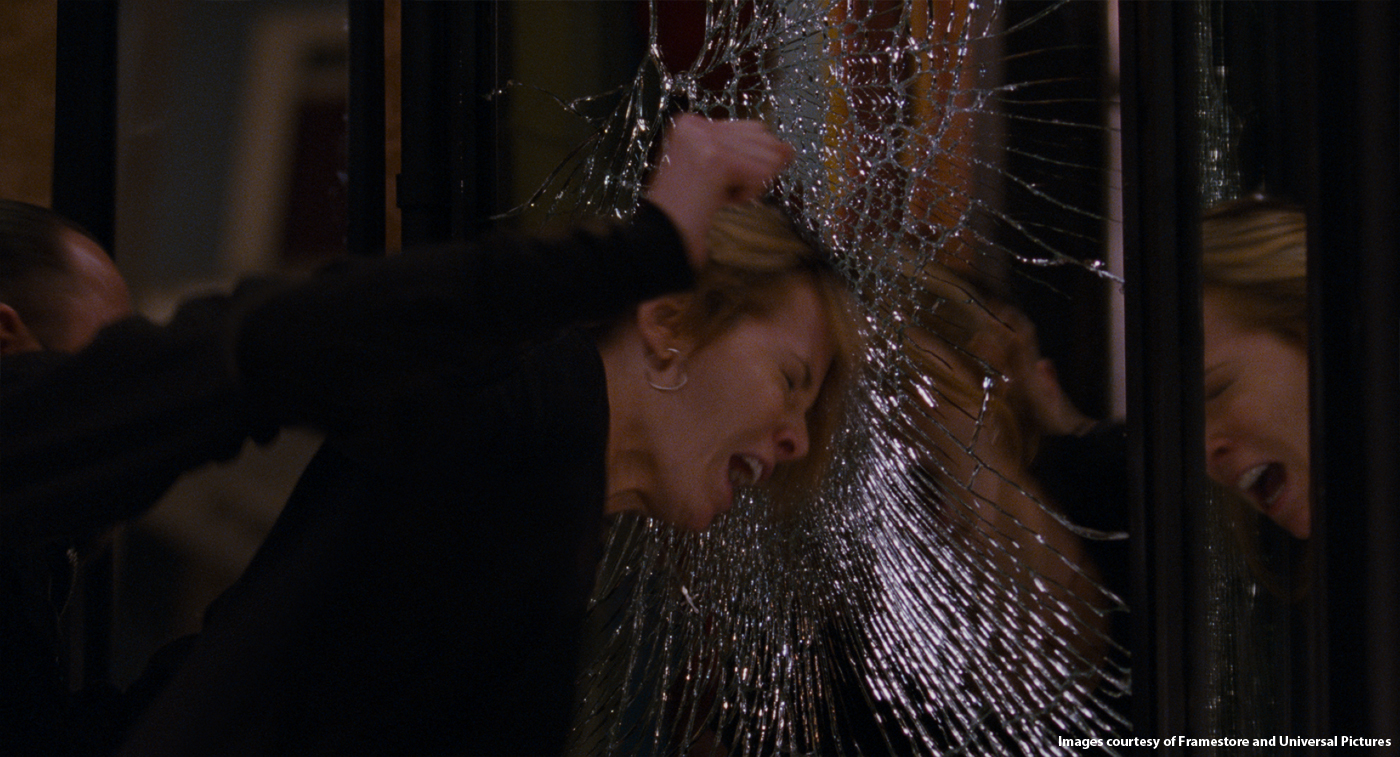
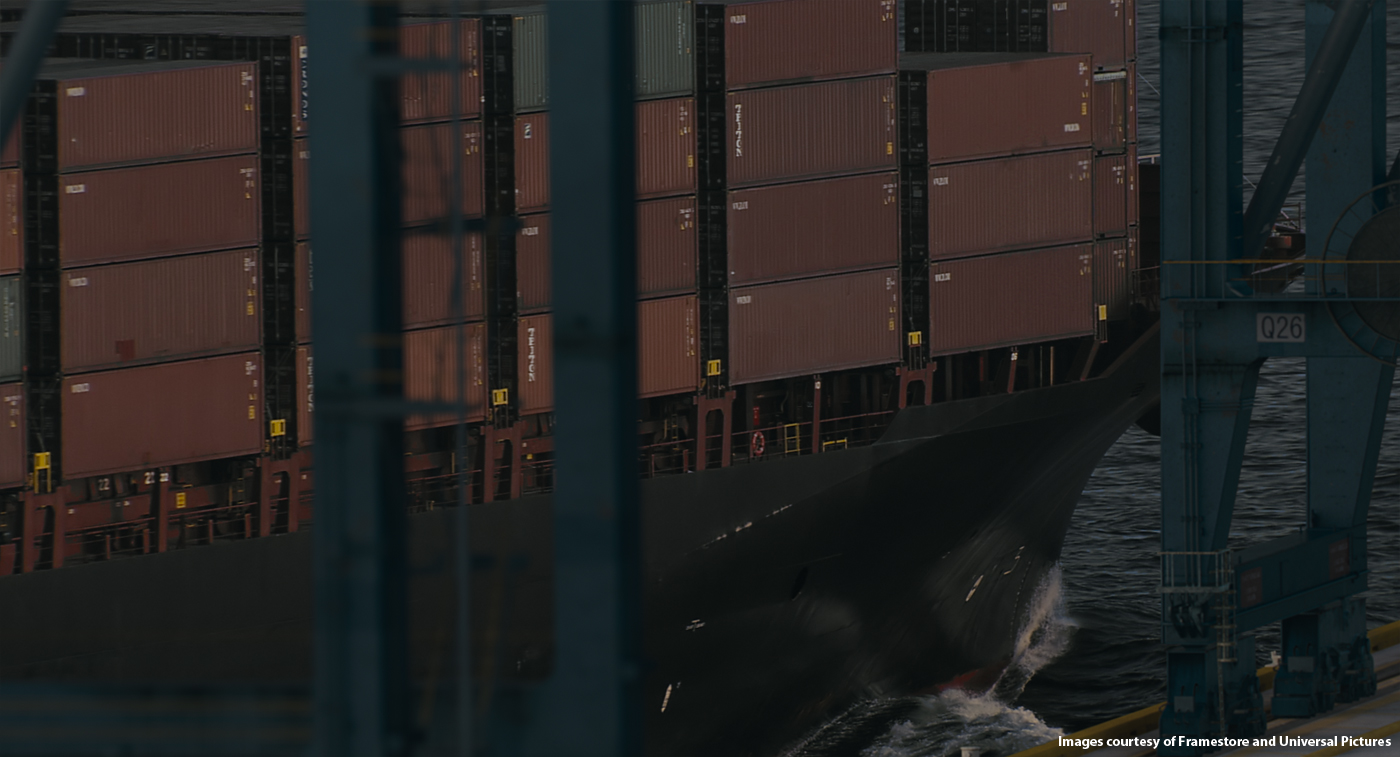
There were around 220 vfx shots in the film including a fully CG 300m container ship crashing into Panama harbor, a CG shipping container crashing from the ship, a CG ‘claw’ that hoists the containers onto the ship, some CG rats, a lot of green screen shots for car crashes and location changes, Kate Beckinsale having her face smashed into a mirror, muzzle flashes and blood spurts.
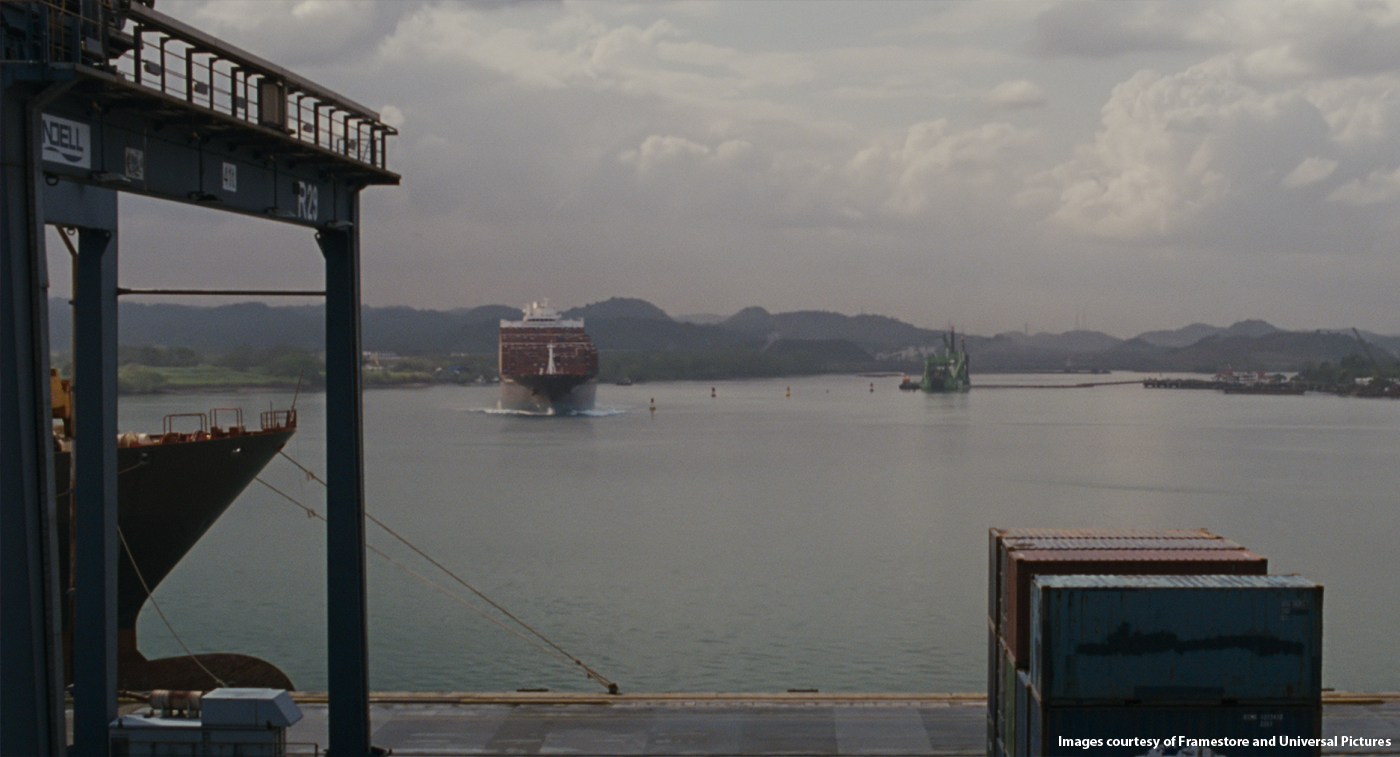
Can you tell us in details the recreation of the Container Ship?
The CG container ship was needed after it became clear that they couldn’t shoot around the issue. There had been talk of shooting plates and putting the crash together in comp but once the edit started to come together it was obvious we needed to build the ship in CG. There are a bunch of aerial shots of several similar ships in transit taken from helicopter. These were the same type of vessel but had different markings and a completely different container load out, so we had to change those with CG containers and paint out and replace the markings on the ship to make them all look like the same ship.
For the crashing into the pier on set we shot a plate of some air mortars and boxes exploding on the pier with a green screen behind. In the end we used a still of the pier, painted out the exploding practical elements and animated the CG ship hitting the pier, adding both CG and practical smoke and dust elements as well as a CG gantry crane.
How did you take your references materials for it?
VFX Supervisor Aron Hjartarson was on set and shot HDRIs in all locations as well as hundreds of stills for reference of the type of ship which were docked in Panama harbor. We built up a pretty big library that we were able to draw from.
Can you tell us more about its interaction with the water?
For the wakes we used CG particles, a displaced surface for the bow wakes and footage of real wakes we shot from helicopters stabilized and pinned to a CG surface around the ship. Comp supervisor Janelle Croshaw did a great job of piecing it all together to sell the shots.
One impressive wide shot is showing the Container Ship about to hit the dock. What was the challenge with it and how did you create it?
The plate we used was some aerial footage shot on digital (there were several different formats used for 2nd unit although all principal photography was 35mm). The footage had to be reversed and re-timed and lots of people and fork lift trucks milling about on the pier painted out. There wasn’t any space for our ship to hit the pier so we had to paint out two ships that were docked and behind some big blue gantry cranes, so quite tricky. We then had to recreate the sea where the ships had been. While the ship animation was obviously quite simple we had to hit a fine line between making its trajectory a believable turning arc but still exciting enough to sell the sequence. Adding the bow wakes and was quite difficult but absolutely essential to selling the shot. Then replacing the sky and grading it away from its digital colorspace to look like film made it feel like it belonged with everything else.
Have you created some matte-paintings especially for the Panama Canal and the city?
There were several shots where we made dmp composites. For instance all the shots where we see Mark Wahlberg and Lucas Haas on the ship with Panama in the background were shot in New Orleans, so we had to create Panama matte paintings, roto the actors and put behind them. Likewise, everything seen from the ship’s bridge was shot in New Orleans so all view out of the windows were comps. Aron and I went around Panama and shot as much coverage as we possibly could in.
The movie features some car crash shots seen from inside the car. How did you create these shots?
All the car crashes were shot on a green screen stage with the actors in a car on a gimbal rig in order to create the roll. Depending on the shot, we then shot plates either of a stunt car crashing into the camera on a truck or used plates or stills we shot of the location which we animated to give the feeling of the world rolling by outside the windows.
Are you involved on the extreme slow-motion shots during the van attack?
The Phantom footage of Mark Wahlberg and Lucas Haas in the car was all in camera against green screen, so in that instance we simply changed the background.
In the shot where the van explodes we had only some very limited footage shot on a Canon 7d from which to create a Phantom style shot, which wasn’t going to work so we decided to build the shot from the ground up. We had the exploding van element which Janelle retimed with optical flow but then added several layers of fireballs, explosions elements and CG debris. We projected the background plate onto a CG version of the environment in order to be able to add a slight camera move to the whole shot. The guy getting blown off his feet went through several tries of manipulating a still to warping between several stills until in the end we built him in CG and animated him. We then added CG stones getting bounced off the ground by the shock wave.
How did you create the various background for the driving shots?
They were usually plates taken from a moving vehicle specifically for each sequence.
Did you add some atmospheric effects like the fog on the docks at the end of the movie?
No, that was all in camera. We did have to change the signage and container load out of the ship in that sequence so it wasn’t untouched.
Can you tell us more about the multiplication of the money packages on the river?
We built CG versions of the money bags, tracked the shots, and then used a combination of the CG moneybags and real ones which we roto’d out, re-timed, moved around and reused.
Is there any other invisible effects you want to reveal to us?
There was a shot where Kate Beckinsale gets her face smashed into a mirror. Obviously that couldn’t be done in any way shape or form in camera so Aron came up with a great way of shooting it by hitting her head into a soft, stretched out mylar canvas which looked very much like a mirror surface. We then smashed a mirror where her head would have hit it, lined her up with that same spot and shot her pulling away from the mirror. We had to do some roto and warping but the result looked convincing and made for a very violent shot.
What was the biggest challenge on this project and how did you achieve it?
I think the biggest challenge was piecing together the aerial ship footage, augmenting the ship and creating the CG ship and container shots that were missing in order to make a convincing and exciting sequence for the Panama Pier. We had the rushes of all the aerial footage to use as we needed either for reference, to use parts of or as the plate for a shot and then it was up to us to fill in a lot of the gaps and make the shots feel like they were shot by Barry Ackroyd.
There were other aspects which were difficult, for instance there’s a big gunfight where we added hundreds of muzzle flashes, squib hits, sparks and blood splats, but that was just sheer volume in a short time.
The main challenge overall was for us to be completely invisible and for every single shot we touched to feel like it was all in camera and for the film to never slip into the vfx genre. A lot of the comments I hear are « what visual effects? » which on a show like this is the best compliment.
Was there a shot or a sequence that prevented you from sleep?
The exploding van shot which ended up as CG was the very last shot we delivered and there wasn’t much sleep while that was in progress. It grew a lot in complexity and ended up as a big vfx shot.
What do you keep from this experience?
It was great fun to collaborate closely with the director and deliver a seamless product. We had a great spirit in the team and got really good feedback from the studio and everyone involved. The film being such a success was the icing on the cake.
How long have you worked on this film?
We started on tech scouts and meetings around new year 2011 and delivered the film in September of that year. From vfx turnover to delivery was just over 3 months.
How many shots have you done?
All vfx in the film, around 220.
What was the size of your team?
25 people.
What is your next project?
We’re currently bidding on a number of films. It wouldn’t be wise of me to name them.
What are the four movies that gave you the passion for cinema?
Wow, there are so many its difficult to name 4. I remember seeing BLADE RUNNER in the cinema when I was about 14 and thinking it was the coolest thing ever. I’m of the old STAR WARS generation so that kind of defined cinema and vfx for me. JURASSIC PARK blew me away when I saw it in the cinema as it was a real sea change for what you could achieve with CG. I think Kubrick’s BARRY LINDON is an amazing film and I love Lynch’s MULHOLLAND DRIVE.
Guy Williams started in visual effects in 1993 and worked on films such as DROP ZONE MARS ATTACKS! or WING COMMANDER. In 1999, he joined Weta Digital and work on the LORD OF THE RINGS trilogy, I ROBOT or KING KONG. As a VFX supervisor, he took care of AVATAR, THE A-TEAM or X-MEN FIRST CLASS.
What is your background?
I started in visual effects in 1993 at Boss Film in LA. Since then I have worked primarily in the film industry at a variety of companies before landing at Weta Digital in 1999. I was lucky enough to be here before THE FELLOWSHIP OF THE RING, so I got to see Weta Digital grow from its original roots to the company it is now.
How was the collaboration with director Joss Whedon?
He is a joy to work with. I have been a fan of his since the FIREFLY series (I never watched BUFFY). I really enjoyed his ability to breathe individual personalities into his characters. Getting to meet him and work with him was a treat. His great sense of humor isn’t just reserved for his writing, it’s always there. He is a hoot to be around.
Can you tell us more about your collaboration with Production VFX Supervisor Janek Sirrs?
Getting a chance to work with Janek on this was brilliant. He has a great sense of epic scope and knows how to push something to a grand level without going too far and making it camp. He was very easy to work with and always eager to hear new ideas that might help make the scene even better. Tack on his dark sense of humor and you can imagine that between him and Joss, our client calls were always a riot.
What was your approach for this show?
We knew the post for this show was relatively short so we focused on planning and preparation. We tried to front load as much of the planning and setup as possible to give ourselves an easier time once we started working on shot production. Plans change though, so we also used bribes and extortion internally to assemble a talented team of artists. This part is key (not talking about the bribes). Talented, enthusiastic people do great work.
Can you tell us what Weta have done on the show?
Weta worked on the part of the film starting where Loki exits the museum and fights Captain America to the point where Thor levels half of the forest by hitting Captain America’s shield. We also worked on the Helicarrier exteriors when Hawkeye flies up and shoots the arrow into Engine 3 through to Iron Man working on the damaged engine and getting it spinning again.
Can you tell us more about the Museum Square battle?
We did a variety of effects for the Museum Battle. They range from scepter shooting plasma effects to Loki illusions and finish with a digital Quinjet and Iron Man.
For much of the fight between Captain America and Loki, the onset team used stunt staves for safety. We tracked all of the stunt staves and replaced them with hero 3d staves. We also added all of the glows to the gem in the scepter. Cap’s shield was also digital for much of the fight.
Early on, as Loki is emerging from the museum, he transforms from his business suit to his Regal Armor. For these shots, we tracked Loki in 3D and added the armor back onto him digitally and used that for the transformation. We used the same setup for when he changes from his regal armor to his more sedate walk about armor at the end of the scene. For his other illusion effects, we used comp tricks and clean plates to make him seem partially ethereal.
Towards the end of the fight, Cap is getting dealt a losing hand. It’s at this point that Iron Man arrives to put the balance back in favor of the good guys. He flies in and delivers a flying RT shot that throws Loki back 20 feet before landing in a very classic Iron Man pose. He then opens up all of the weapons on his suit to challenge Loki to continue. Iron Man was fully digital in all of these shots. We used the excellent suit made by the Legacy guys for lighting reference and went from there. We had to design some new weapons for Iron Man so that he could be imposing enough. For the landing shot, we did fluid dust for the impact with the ground and a rigid sim for the bricks shattering under his weight.
How did you create the digi-doubles for Iron Man, Thor and Captain America?
These models came to us from ILM. We fit our Genman asset to these models allowing us to leverage all of the generic man development done to date. This gave us a complex skin and muscle solve. We also used our hair tools to add grooms (these don’t transfer between companies due to their proprietary nature). Lastly, we modified some of the cloth elements to better work with our sim software.
The textures are migrated to the new models using a raytrace from one texture space to the other. New textures are painted to add detail where needed.
How was the collaboration with Jeff White and ILM teams?
We have had the pleasure of working with ILM in the past so the process of passing assets back and forth was somewhat defined. It is always made easier when the team on the other side of the line is as skilled and helpful as Jeff’s team was. I’ve got nothing but positive things to say about this part of the show (laughs).
Can you tell us more about the creation of Iron Man?
Weta Digital worked on the Iron Man Mk6 suit for the movie. This is the same suit that was in the end of IRON MAN 2. We received the model and textures from ILM and migrated them into our system as discussed earlier. We then set about figuring out the shading and lighting. For shading, we wrote a shader that simulates metal flakes suspended in colored enamel. To top the look off, we added a clear coat finish to the surface to get that car-like shine. The clear coat constantly fought the red under coat causing the red to want to go purple (blue lights or sky reflected into the clear top coat). This took some careful balancing but in the end the asset was stable and could easily be lit into shots.
For our lighting pipeline, we used our Spherical Harmonics lighting system with HDR image based lights acquired on set for each set up. We wrote a tool that allowed us to pull image areas out of the IBL and put them onto area lights so we could get the proper reflections in the proper places but get much nicer shadows and a sense of positional lighting. We also raytraced everything (shadows and reflections) to get the suit to really sit into the scene.
For rigging, we worked hard to build a rig that had enough freedom to allow the animators to move the character as they needed to but due to the complexity of the interlocking plates we ended up needing to augment this with a post bake step on some of the shots to clean up panel intersections or silhouette issues. For his eye and chest lights, we rendered an extra pass for every shot of volumetric light beams to give to comp. In some of the smokier shots, it is easier to see this pass dressed in giving a sense of his eyes lighting the smoky air around him.
Can you tell us more about the huge storm around the Quinjet?
The large storm around the Quinjet as Thor arrives to take Loki away was done using our in-house cloud system. The tool is written into Maya and Renderman as a plug-in. The artist is able to see the volumetric clouds as he builds them in Maya. Then the plug-in can take that data and render it in Renderman using its own shaders for the volume rendering.
To make the lightning, we used a tool that makes lightning bolts that fork from a predefined point. The lightning tool outputs extra info (temperature, position, etc) so extra visual effects can be added in the comp. The lightning can also be used to light the clouds. As the lightning passes into the cloud, its light fluoresces the cloud from the inside out. A second much thinner set of clouds was also created closer to the Quinjet so that as the jet moves through space, there is strong sense of high-speed travel.
What was the real size of the forest?
The forest was a location about a half an hour outside of Albuquerque. We shot in a small ravine on top of a rise. Some of the shots in the mountain top fight between Iron Man and Thor were completely digital. For these, we used reference photos taken during the shoot to build complex digimattes to replace the forest. These digimattes were extensive enough to allow us to translate the camera in a shot. If a tree was too close to camera in a digimatte shot, we replaced it with a full 3D tree. This same approach was used for the wides of the forest when Iron Man and Thor fly up and fight on the cliff face (though the face of the cliff was full 3D).
During the fight many elements especially trees are destroyed. Can you tell us more about that?
The amount of FX work in the forest fight was staggering at times. Often, the camera move or the action of the character would necessitate a full simulation instead of a plate-based effect. The FX Department used Maya’s particles for creating some of the dirt impacts or bark hits. These particles would get instanced at render time with geo for added complexity. Some of the larger or more hero interactions needed a rigid solver. For these we used our own implementation of the Bullet rigid body solver in Maya. For the large tree sims, we used our own solver to deal with the shattering and fracturing of the trees. The branch dynamics were solved using our own hierarchical curve simulation tool in Maya. These curves were replaced with the high rez trees at render time. Fluid sims were used for the dust from the tree falling and also for the resulting cloud of dust as the trees hit the ground.
In creating effects like these, it is important to build up many layers of different materials/effects. It is this layered complexity that makes these effects look real and natural.
How did you create the various FX such as the lightning?
For the lightning, we used a tool we had from a previous show as listed above. For the mountaintop battle, we took it a step further and gave it the ability to not only start from a point but to also go to a specific point in space. We then created a series of points on Iron Man that covered the area that Iron Man would end up being damaged on. By choreographing which points the bolt would go to, we were able to get the bolt to travel from Thor’s hammer to Iron Man and hit where we wanted it to. We then ran the process a few more times to get the extra arcs from Iron Man to the ground and also from the Bolt itself to the ground. We then could take the points that the bolt was hitting on and use that to drive a particle system for sparks and a fluid system for a jet of gas being launched off the contact point. The bolt was used as an indirect light so that it could light the volumetrics that were coming off of Iron Man.
There are many explosions and destructions on the Helicarrier attack. How did you create these?
We were lucky to have a very talented effects team to work on the large explosions and subsequent fire and smoke on the Helicarrier. The large explosion sims were done using Maya fluids and rendered in Renderman using our inhouse volume shaders. A rigid body sim was done for the flying debris from the explosion and then these pieces were used to drive another smoke sim for the trailing smoke and fire on the flying pieces. We modeled a large section of the engine blown away and used the explosion to hide the transition between the two models. We also added in some very large sections that fell away and simulated smoke and fire on those pieces as well.
Can you tell us more about the clouds and environment creation around the Helicarrier?
We used the same cloud system we used for the night time storm. One thing to note is that we used anisotropic scattering of light into the clouds. Anisotropic scattering is when light wants to travel in the direction it entered the clouds and not scatter to the sides as fast. This gives clouds a silver lining when seen from behind or, more importantly for us, gives them more detail when front lit.
We also extended our cloud tools for this show with some scripts that allowed us to add detail fast to large clouds so that we could create a sky full of good-looking clouds fast.
At a moment, Iron Man is trying to save the Helicarrier engine. How did you manage those full CG shots?
We started the scene of Iron Man entering the inside of Engine 3 to fix the damage to the blade system by launching straight into the animation of the scene basing it on the previz that had been done. We also started a build for the engine as it would require more detail then was needed for the wide shots.
For the build, we referenced images of warships and large turbines to get an idea of the things we wanted in the engine. We added in the banks of electromagnets that are mentioned in the dialogue so that we could have more visual detail on the walls of the engine. We used the explosion damage to reveal large banks of these copper magnets. The blades were designed to look like a large wall more then a propeller, this was key to getting the sense of scale.
Once the assets were in place and the animation was ready, we started on getting the lighting to work for us. We tried to keep the light always working in our favor but with camera moves of 270degrees or more, this became tricky. We used the overhead blades and the smoke to create areas of shadow to hide the fact that the sun should be front lighting the shots at certain times. For all of the shots inside of the engine, we also added smoke and embers swirling around to heighten the sense of destruction.
Have you adapted your pipeline for this show?
I would say we extended our pipeline more then we adapted it. We wrote some new tools to enhance the capabilities of existing tools and allow us to do new things (build clouds faster, have lightning be more controlled or even make an IBL a more positional light). We also pushed all of the tools to the bounds of what the machines could handle. The fluid sims were some of the largest we have done. Also, the destruction in the forest had to be split into layers as it was getting so large, it was reaching the limits of what could be rendered.
What was the biggest challenge on this project and how did you achieve it?
The biggest challenge was the destruction of the Helicarrier Engine 3. This was a very large set of shots for the effects team and it came to us a bit later in the schedule so we had less time to complete it. I feel our guys pulled another miracle out of the hat and not only finished it but did so with élan.
Was there a shot or a sequence that prevented you from sleep?
Not really. There was some work that was tight in the schedule but the production was very clear in what they wanted so we were able to keep focused and get the work done to a good quality level.
What do you keep from this experience?
Many things. I have many fond memories of our calls with the client. This was a very enjoyable show to be on (lots of humor and a very creative environment). I also have to say that I am the target audience for this film, so in that regard it was a blast getting to work on it. I got to unleash the inner geek and let him roam the fields free.
How long have you worked on this film?
From the moment that we started planning the shoot to when we delivered the last shot for the film, just under a year.
How many shots have you done?
We worked on a little under 400 shots.
What was the size of your team?
We had no problem finding people to work on this show (the source material and the director were great draws). By the end, 500 people had worked on the show.
What is your next project?
Sadly, I can’t say yet (top secret, would have to kill you).
Can you tell us the four movies that have given to you the passion for cinema?
Great Question…
1) JURASSIC PARK – this is the film that did it for me. This was the first time I had gone to the movies and seen the impossible. At that moment, I wanted to do this.
2) STAR WARS Trilogy (the first one).
3) TERMINATOR 2 – another one that was full of things that shouldn’t be possible.
4) DRAGONSLAYER.
Pour offrir les meilleures expériences, nous utilisons des technologies telles que les cookies pour stocker et/ou accéder aux informations des appareils. Le fait de consentir à ces technologies nous permettra de traiter des données telles que le comportement de navigation ou les ID uniques sur ce site. Le fait de ne pas consentir ou de retirer son consentement peut avoir un effet négatif sur certaines caractéristiques et fonctions.
Fonctionnel
Toujours activé
L’accès ou le stockage technique est strictement nécessaire dans la finalité d’intérêt légitime de permettre l’utilisation d’un service spécifique explicitement demandé par l’abonné ou l’utilisateur, ou dans le seul but d’effectuer la transmission d’une communication sur un réseau de communications électroniques.
Préférences
L’accès ou le stockage technique est nécessaire dans la finalité d’intérêt légitime de stocker des préférences qui ne sont pas demandées par l’abonné ou l’internaute.
Statistiques
Le stockage ou l’accès technique qui est utilisé exclusivement à des fins statistiques.Le stockage ou l’accès technique qui est utilisé exclusivement dans des finalités statistiques anonymes. En l’absence d’une assignation à comparaître, d’une conformité volontaire de la part de votre fournisseur d’accès à internet ou d’enregistrements supplémentaires provenant d’une tierce partie, les informations stockées ou extraites à cette seule fin ne peuvent généralement pas être utilisées pour vous identifier.
Marketing
L’accès ou le stockage technique est nécessaire pour créer des profils d’internautes afin d’envoyer des publicités, ou pour suivre l’utilisateur sur un site web ou sur plusieurs sites web ayant des finalités marketing similaires.