Jeff White joined ILM almost 10 years ago and has participated on projects like VAN HELSING, STAR WARS EPISODE III, TRANSFORMERS: REVENGE OF THE FALLEN or TRANSFORMERS: DARK OF THE MOON. He received a VES Award for Outstanding Visual Effects in a Special Venue Project for TRANSFORMERS: THE RIDE 3D.
What is your background?
I grew up where the cows roam in upstate New York and went to Ithaca College for Cinema and Photography. From there I got my MFA from Savannah College of Art and Design before starting at Vinton Studios (now Laika) working in commercials. I started as a Character TD at ILM doing rigging and simulation work. It’s a great department to start in because it’s right in the center of the pipeline.
How was the collaboration with director Joss Whedon?
I’ve been a huge Joss fan for a long time and feel very lucky to have been able to work with him. He’s amazing at working with actors and there was a natural extension to working with our animators. He brought a fresh perspective to the work and was sure to let you know when he was happy the shot was heading in the right direction or if we’d missed the mark he would offer very specific feedback to get us back on track. All the humor that comes through his writing in the films is a part of working with him everyday. The entire crew looked forward to shot reviews with him.
What was his approach about the VFX?
The great thing about working with Joss is you know that he’s going to keep the visual effects working for the story and character development and not the other way around. He came up to ILM when we were in the trenches of character development on Hulk and had a very in-depth discussion about who this Hulk is, how he moves, literally what his motivation is. He showed us comic book reference of poses he liked. It was enormously helpful for the entire team and the animators at ILM did an incredible job interpreting that into the character on screen. Joss was in our shot reviews with the rest of the great team from Marvel, it was a true collaboration. He was able to identify the big picture items a shot needed and let us work through the details.
Can you tell us more about your collaboration with Production VFX Supervisor Janek Sirrs?
We were very fortunate to be working with Janek on this project. He was deeply involved in the previz work for the film which we used extensively in planning our New York City photography shoot. He has a great eye for the work and brought a wealth of knowledge from his experience on IRON MAN 2. He was great at keeping the various VFX houses working on the film on the same page with the extensive amount of asset sharing and intercut sequences that we had. I look forward to working with Janek again in the future.
Can you tell us more about the Avenger’s Jet creation?
The Quinjet was one of the first models that we started on. We had an excellent design from the Marvel art department to start with as a reference. We did several rounds of texture work on the completed model to ensure that we had a very natural feel to the weathering. We almost always positioned a light to get a nice specular roll across the wings to bring out the breakup in the maps. One of the great features is that it can go into hover mode and actually change its profile to look more like a bird of prey. On location, we used a helicopter as a stand-in for the jet to give the camera operators something to frame up on as it landed and to give our animators something to reference for flight dynamics.
How did you create the Helicarrier?
The Helicarrier was by far our largest asset on the show and was built by Rene Garcia and painted by Aaron Wilson. We started with a design from the Marvel Art department. Once we had the major forms correct, we started into all of the detail work. The Helicarrier is seen from almost every angle and each time we’d start a new shot we needed to add additional geometry and texture detail. We shared the asset with Scanline VFX and Weta. As each of the vendors would add damage or additional detail for a given shot, they would send it back to ILM to be folded in for continuity. We spent most of our time working on details that we’d pull from photos of aircraft carriers like the spec breakup on the hull or waterline staining of the paint. We added carrier catapult launch strips, arrestor cables, blast doors, moving vehicles and digital double crew on the set, all with the goal of selling the scale.
Can you tell us more about the asset sharing with the other vendors?
We had several assets that were required by other vendors for their sequences. For instance, we built the Helicarrier and sent it to Weta. They created all of the damage when Hawkeye blows up engine 3 and passed it back to us for Helicarrier shots we had which occur later in the film. It was a very smooth process and Janek made sure all of the vendors were staying on the same page with the look of the assets.
On this show, Tony Stark got his own Tower. Can you tell us more about it?
Like the Helicarrier, Stark Tower is seen from a variety of angles and needed to be created at a variety of resolutions. We used it for wide shots but the profile was significantly narrower than the Metlife building it was replacing in the plates which resulted in a lot of reconstruction work on the backgrounds. Additionally, we had numerous scenes that took place on the balcony outside Tony’s apartment that required a separate high resolution asset in order to seam together perfectly with the set piece that was built and shot in New Mexico.
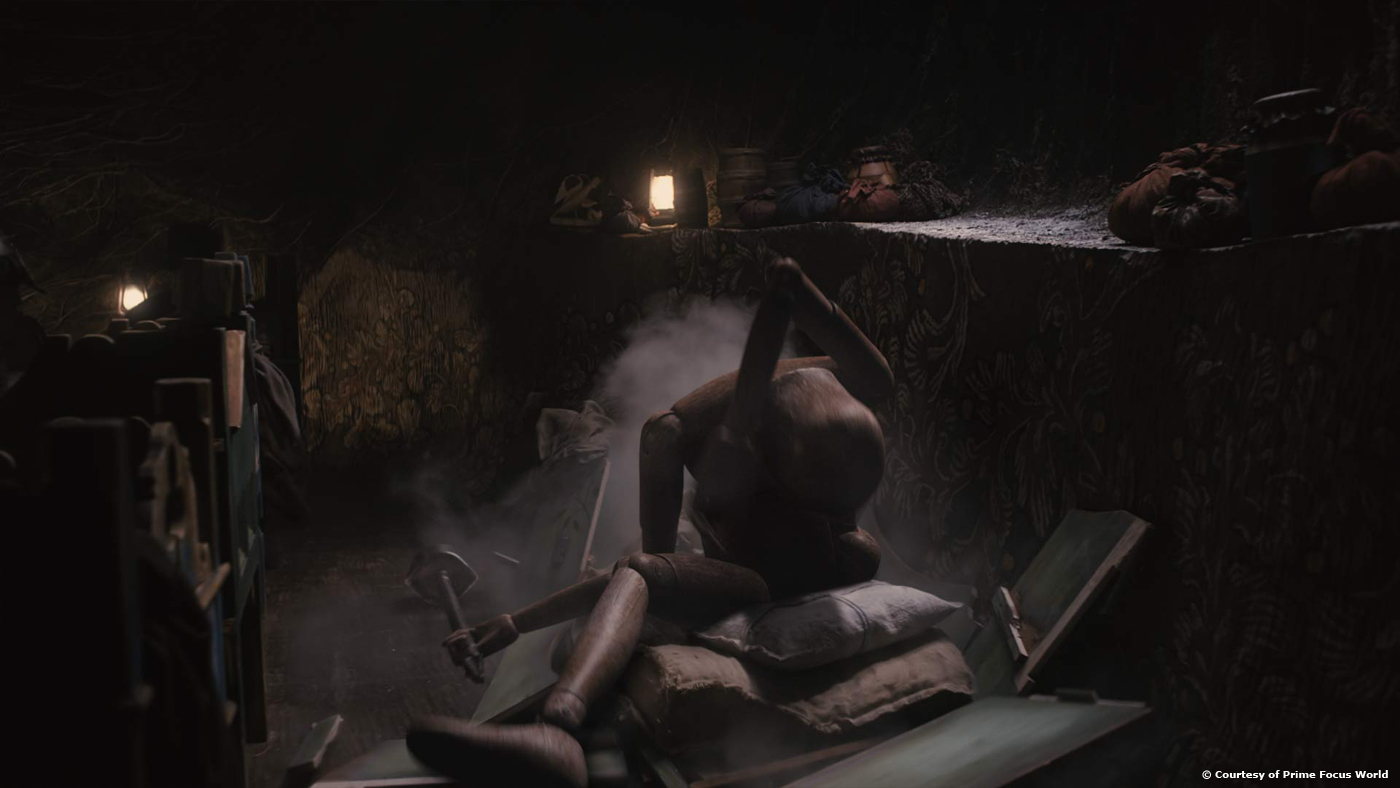
Can you explain to us step by step the creation of the impressive shot showing the suit-off process?
Each film with Iron Man seems to add a new, cool way for him to de-suit and THE AVENGERS is no exception. Joss’s idea was that Robert wouldn’t have to be locked into the machine; instead it would work around him to take the suit off so that he walks naturally and never breaks his stride. We started the shots with a very tight Imocap track on Robert that we’d use to constrain the Iron Man suit to and use for shadowing. We worked out how much of the suit was removed in each of the shots and then Michael Easton and Bruce Holcomb did several rounds of adding secondary animation of arms moving, mechanisms turning, etc. We ended up replacing the entire walkway that he’s moving down so we could animate the floor opening up as the “carwash” (as we referred to it) moves with Tony Stark. The backgrounds are all constructed from nighttime photography captured from the top of the MetLife building with moving traffic that we recorded on Canon 5D Mark IIs while we were up there.
How did you improve the Iron Man model and animation for this show?
In addition to fleshing out the design and building the under-suit, for THE AVENGERS we had an opportunity to add a bunch of new gadgets to Iron Man’s Mark VII suit. The most significant change was the addition of the jetpack. Joss wanted Iron Man to be able to hover and fire without always having to engage his hand RT’s. This freed up the animators to come up with some great new poses while he’s in the air, especially when he confronts Loki after suiting up for the first time.
Can you tell us more about the shot in which Tony Stark put his new armor during a free fall?
Expanding on the idea of more complex ways for the suit to be put on Tony Stark, Joss built a sequence around the idea that the new Mark VII suit could fly on its own and save him as he plummets down the side of Stark Tower. Nigel Sumner supervised our team at ILM’s Singapore studio on the sequence and like the carwash, we had to work out how much of the suit would be deployed in each shot to save him in the nick of time while keeping the duration of the fall believable. Foreground plates were shot with Robert Downey Jr. on a wire rig, though in several shots we added CG legs with cloth simulation so that we could get more movement and wind flutter in the pants. The backgrounds are constructed from our Metlife building photography while Stark Tower was a CG asset. We also added a bit of flutter to Tony’s cheeks, atmosphere and objects close to Stark in the shots to help maintain a good sense of speed.
Did you create some procedural animation for the Iron Man armor to help your animators?
No, each shot ends up being so customized to the given camera angle and cut that it’s quickest to do it by hand. Michael Easton, Keiji Yamaguchi and Bruce Holcomb did all of the animation for the suit up.
How did you create the digi-doubles for the super-heroes?
We did Lightstage and Mova capture sessions for all of the digital doubles knowing they were going to have to hold up close to camera. We also had full body scans from Gentle Giant and our own photography shoots of the costumes to work from. All the time and hard work the crew put into building those the assets paid off when we needed to switch a number of shots from plates to digital doubles to achieve more dynamic camera moves.
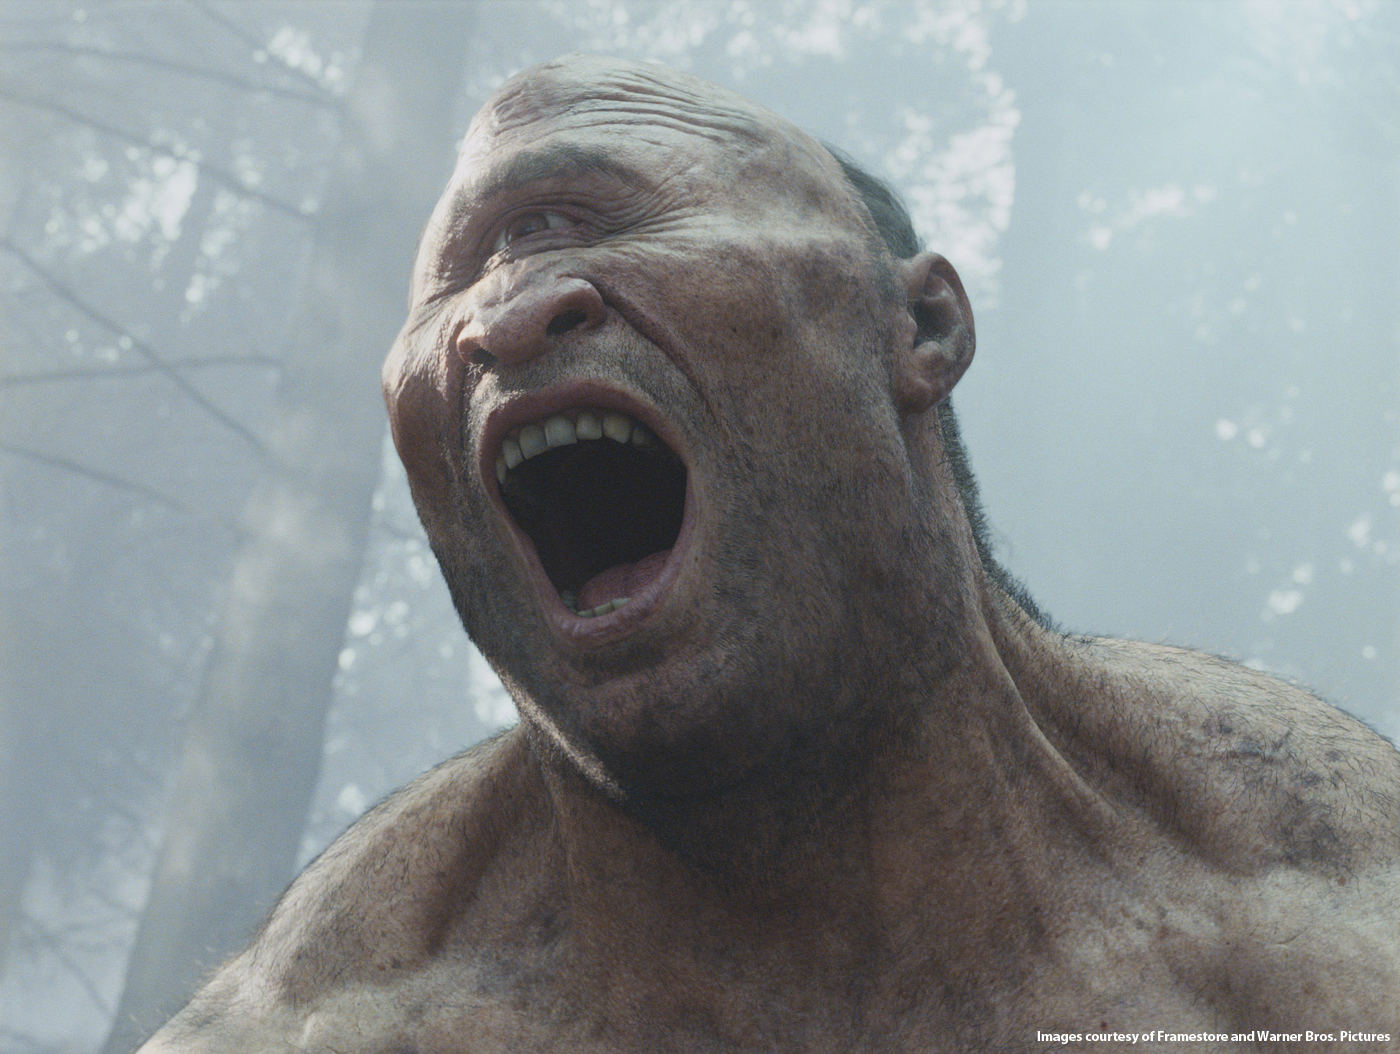
About Hulk, how did you create this new Hulk and rig it?
We were fortunate to be working with Mark Ruffalo, who went the extra mile in partnering with us in creating this Hulk. One of the things that really works for this latest incarnation of the Hulk is the integration of Mark into the design. Every bit of Hulk stems directly from Mark, from the pores on his skin, to the grey hair of his temples, right down to using a dental mold of Mark’s teeth as a basis for Hulk’s teeth. Our strategy was to work out rendering and texture issues on the Banner digital double until it looked indistinguishable from Mark Ruffalo.
Because our Banner and Hulk models shared the same topology, we were able to transfer textures, material settings and the his facial library for animation. This gave a decent base to start from but with their significantly different proportions, there was a lot of retargeting work that needed to be done. We typically try to be economical with our poly counts but with Hulk we made a conscious decision that he was going to be extremely dense in his resolution. That way we never came up short on resolution for all of the close-ups and detailed shape work that was required to represent the anatomy under the skin. We then invested in a robust multi-resolution pipeline so that he was manageable for the artists to work with.
As the cut was coming together, Joss and Mark came up to ILM and Mark did a performance for every Hulk shot in the film in a full Imocap suit with integrated facial cameras. Joss was able to make selects on that Imocap performance data which we would apply to the Banner digital double to verify the accuracy of our capture and then re-target the animation onto Hulk. This gave the animators a great base to work from but there was a tremendous amount of work required to get the performance to read correctly and the weight of Hulk’s movement right. After animation, we would run three layers of muscle and skin simulations to get the dynamics and slide of real skin. There was a coarse tetrahedral mesh sim for large-scale ballistics, and then cloth and thin walled flesh sim on top of that for accurate slide and wrinkles. Additionally, there was extensive per-frame anatomy work done by the modelers as needed to make sure he was exactly right.
Can you tell us more about the amazing shots in which Hulk is chasing The Black Widow destroying the lab and all that in slow-motion?
That shot was supervised by my colleague and our associate VXF Supervisor on the show, Jason Smith, and was a great chance for us to do our version of the slow motion Olympic sprinter and really show off all the layers of dynamic simulation. On set, Dan Sudick, the special effects supervisor, had built piece of modern art metal sculpture roughly in the shape of Hulk that he pulled down the hallway to get all of the great destruction and interaction with the environment. Hulk was then animated to roughly match the pace of the mandrill and several passes of CG glass, debris and sparks were run to integrate him into all of the practical destruction. Black Widow was later composited in from another take.
Can you tell us more about the ILM Imocap system and what improvements you made to the technology?
For this film, Ronald Mallet and our engineers improved our solvers and supplemented the patented pattern bands with a geometric pattern that was screen printed onto the suits. Combined with the data we get from set this helped us get even quicker and more accurate solves on the motion.
About the New York final sequence. What was the real size of the sets?
There was a 300’ stretch of the Viaduct built as a set in New Mexico with 40’ green screens on each side and dressed with damage and damaged cars. We built the city around the set by shooting nearly 2,000 tiled spheres, akin to a high resolution Google street view. Using those photos the digital environment was spearheaded by Andy Proctor and David Meny. We had to paint out all of the cars, trees, people, streetlights, and anything that needed to parallax as the camera moves and replace them with CG assets. Using a custom shader we developed we ended up replacing every single window with a dynamic CG version that would take into consideration the appropriate reflection, add a window blind and randomly choose a room interior from a library we had built which would change perspective with the camera. We then built a library of 190 assets with thousands of variations to dress our synthetic New York streets including cabs, police cars, street lamps, awnings, and sandwich boards, even hot dog carts. For the viaduct we rebuilt the Pershing Square café as well as replacing the Metlife building with Stark Tower. To avoid having our rendered photographic environments from appearing too static we used the battle at the end of the film to introduce smoke, dust, debris, embers and ash to add texture and movement to the shots.
How did you create the huge New York environment and also what was your preferred method of destruction?
The flying shots were created using the same techniques as the Viaduct but required extensive planning for the photography shoot to make sure we had access to the right vantage points from building rooftops. The animators had representations of our photo spheres in their Maya scenes which they used as a guide to make sure our flight paths didn’t stray too far off nodal where the photography would break down.
Once all of that was built, we added the destruction from the alien invasion by adding damage patches onto the buildings. In cases where the camera was moving we built full 3D damage sections we could splice into the buildings. The Leviathan is a massive winged creature that doesn’t quite fit down a New York City street, so there were many opportunities for building destruction simulation which we did with a combination of rigid simulation of building debris with effects simulation for dust, glass and fire.
How did you design and create the Aliens and the Leviathan?
The original design for the aliens came from the Marvel art department and ILM’s VFX Art Director, Aaron McBride, did the final design for the Leviathan. They shared similar themes of gold armor and purple lights to connect them to their home world. In shots, however, the gold was too vibrant so we played up the patina on the metal and added battle damage and weathering.
What were the challenges with the Leviathan?
Selling scale was the big challenge. Marc Chu, ILM’s Animation Supervisor found the right balance of speed and a subtle swimming motion to keep them dynamic. The Leviathans serve as a transport for the foot soldiers and it was a real challenge to get that to read amidst all of the chaos. We ended up adding explosions, cables and goo as the foot soldiers burst out to help them read on screen.
Can you tell us more about the way you choreograph the numerous fights on the final sequence?
Joss worked with the stunt team to choreograph the fights on set. This was really helpful where the Avengers needed to interact directly with the Chitauri. As we moved into shot production we made changes to the animation to have the fight work better for the cut.
Most of the shots in New York involve an impressive number of elements. How did you manage these on the pipeline side in order to finish the sequence within the deadline?
ILM has an extremely robust production pipeline and asset management system. Set dressing New York City was split between our Digimatte and TD groups because the volume of work was so large. Ryan Martin wrote several tools that allowed us to dress in the traffic jam, randomizing the layout per block so there was enough variety to keep it from being repetitive. The key was to build as much movement back into the scenes as we could to overcome the static photography. We added driving traffic, parking cars, digital doubles, cyclists, sun reflections, boats on the water, anything we could find to add some life back into the scene.
Can you tell us more about the impressive continuous shot that shows each super-heroes around the city and ends on Hulk and Thor?
The idea was to have a continuous shot showing all of the Avengers working together, it’s a really turning point in the film where they set aside their differences and work together as a team. We shot a plate for Black Widow, Hawkeye and Thor, the rest of the shot is created in CG. We used our photography as a base and then spliced together several New York City streets to create a run that was long enough to sustain the shot. The animation and camera layout took months because there were so many interconnected pieces. After that, we added a huge number of elements and simulations to bring it all together.
Can you tell us more about the use of ILM’s Plume for this show?
Plume was used extensively in our effects work. Being GPU based, it has a very fast iteration time, which is key to developing the look of explosions and debris. On THE AVENGERS, we added deep compositing output into Plume which gave us the flexibility to make tweaks to the animation or rigid sim without having to rerun all of the effects passes.
What was the biggest challenge on this project and how did you achieve it?
The most challenging part of the project was getting the performance and look of Hulk just right. There were many technological advances that helped that happened but in the end it was a very dedicated and passionate team of artists that worked tirelessly to make him a believable character and bring him to life on screen.
Was there a shot or a sequence that prevented you from sleep?
The tie-in shot was pretty daunting and went right down to the wire. As far as loosing sleep, I’ve got one year old twins so they take care of the sleep deprivation department!
What do you keep from this experience?
It was an amazing experience, I feel truly lucky to work on a film with so many talented artists, great visual effects challenges and also be this caliber of a movie. The chance to collaborate with Joss, Mark and the entire team at Marvel is one I would jump at again. The fact that it’s been so well received critically is really a testament to Joss’ vision for the film.
How long have you worked on this film?
About a year.
How many shots have you done?
Just over 700 shots.
What was the size of your team?
Roughly 300 people.
Since its last interview on The Art of VFX, Jonathan Fawkner oversaw the effects of THE CHRONICLES OF NARNIA: THE VOYAGE OF THE DAWN TREADER and CAPTAIN AMERICA: THE FIRST AVENGER. He explains now the many challenges on WRATH OF THE TITANS at Framestore.
How was the collaboration with director Jonathan Liebesman?
JL as we called him to distinguish him from JF (me) was fairly easy to work with. He had a pretty good idea about what he wanted to see and how he wanted it to look. He had established an aesthetic for the movie and he was always wanting it to look filthy, which of course we had anticipated so we had plenty of cg dirt and dust on hand to chuck into the mix. That would generally make him happy. But that aesthetic also affected shot selection and camera style which we were careful to try to replicate in our full 3d shots. He and the editor were generally happy to receive suggestion, during the shoot and in post which makes the whole process more collaborative.
How was the collaboration with Production VFX Supervisor Nick Davis?
This time around Nick Davis was 2nd unit director as well as VFX supervisor, so that brought a new perspective on things. He needed to rely more heavily on me for one thing in his absence, but it also meant he had a deep understanding of how the shots were conceived, and had more influence on the look and feel of the movie. He and Rhonda Gunner and the whole team were fun to work with and it felt like a really positive joint effort.
What have you done on this movie?
We were responsible for the sequence involving 3 cyclops that chase and fight with Perseus. We also took on the Labyrinth, involving a huge rock tower, a mechanical doorway, and the ever moving and collapsing interior.
How did you take all the on-set informations such as tracking, lights, topology, etc for the Cyclops sequence?
I relied hugely on Giles Harding the lead data wrangler. He was very thorough and understands how to take and present all the data you would need in a user friendly format. We surveyed the lights and camera for each slate. We took hdr light reference of all the light sources. We shot mirrored and matte spheres for each slate as well as shooting hdr light probes as well as material and texture reference. We also shot simultaneous sky condition hdrs from the top of our building which was not too far away from where the cyclops was shot, on the hour every hour, during the 2 weeks we were shooting the cyclops sequence. We also extensively lidar scanned in colour the locations.
How was simulated the Cyclops presence and interactions on-set?
We had some precanned behavioral animation which we were able to show to the cast and crew and we would then block out the beats with me on the end of 30’ pole and a tennis ball on the other. Old school. I would sometimes make it into shot to be removed later, but more often we shot without.
What references and indications did you received to design the Cyclops?
The cyclops were designed by Framestore Art department while in pre-prod and we had some clay sculpts from the production art department. But the feedback we got was taking it more and more towards a human, which in cg terms is a mixed blessing. It’s a tremendous challenge of course but also potentially a huge liability. But we were also asked to differentiate them with physically properties, meaning one was fit, the other fat, and the last needed to be their father so he needed to be aged.
How did you create them?
The cyclops were sculpted in Zbrush. They wore precious little clothing so we needed 3 anatomical humans which is quite an ask. Each muscle and it’s behaviour would be on show and in close up so there was really nowhere we could make economies.
Can you explain to us in detail the Cyclops rigging?
The cyclops was rigged in a number of different phases. Firstly we tried where possible to roll one rig onto the other two, but of course there are bespoke requirement for each one, so every update would usually have to replicated twice more. The body and face were handled by two different teams so they could be worked up along side each other, but the general principle was the same. We would rig until the animators broke it and generated he need for a bespoke shape which would then be modelled and worked back into the rig. For shot specific shapes we didn’t go back to rig at all and would back specific shapes onto the mesh giving us a granular approach to the level of detail required. After that we had a complex simulation procedure to generate fleshy jiggle and skin slide, made more complex by the nature of the 3 cyclops. Old cyclops and fat cyclops wobble in wholly different ways!
Can you tell us more about the mocap session for the Cyclops?
With a character that is so close to human as the cyclops mocap was for Nick and myself the only way forward. We have a state of the art mocap suite at Framestore which we were able to decamp to Shepperton for a week. We hired Martin Bayfield who, at nearly 7’ tall, was the closest thing we could get to a giant. He performed all three cyclops, and really brought three distinct performances. He threw himself around for a week and was really great and bringing energy and dynamism to the characters. We waited for the sequence to be cut, before tracking each shot and running the mocap live comped into the shots. We oriented the studio and placed trees and terrain in the mocap volume so that Martin could navigate the environment in the plates. We then sent 20 odd takes to the cutting room to make selects which could then sit in the cut. What we had in the can was essentially all we had so the cutting room treated the footage like any other rushes, and we had the sequence blocked in under a week. Then of course we had to clean up and finesse but it was a liberation to have that process locked down so early.
How did you manage the Cyclops faces?
These were all keyframed. The problem with facial capture is it’s great if your character has a face! Or at least one with 2 eyes. We took the view that the eye on a cyclops would require some creative work unlike what we could get from a facial performance capture. We constructed the eye in such a way as it could perform some of what two eyes would do. That is to say we through out symmetry and gave the eye more articulation. There was no need in the initial brief for the faces to do much otherwise so we shot reference of Martin Bayfield on the mocap stage to match to, but later in the day we got the call to animate the faces for dialogue. This meant a different and more complete rig especially for the mouth.
During the sequences, lots of trees are thrown and others exploded. Can you tell us more about the creation of those trees?
The exploding trees were houdini simulations of prebroken trees comped onto plate with practical dust and debris. This was then augmented with dust and smaller debris from Maya. The trick to wood is to get the bits to stick together rather than just topple, so we played with the glue parameters to try to get the pieces to adhere and splinter rather than just shatter.
Can you tell us more about the impressive tall tower?
This was a large scale modelling challenge. The real problem here was that it needed to rotate which meant the shadows would be constantly moving. There was no way round it but to model it. But the brief called for hundreds of doorways and entrances, built in the greek style out of the natural rock. It meant a kit of doorway elements stuck into a voxel sculpted tower until we had a monstrously huge poly count, but very accurate shadow play. We essentially matte painted a material onto it rather than attempting a texture, meaning we could be a little more liberal with our modelling style.
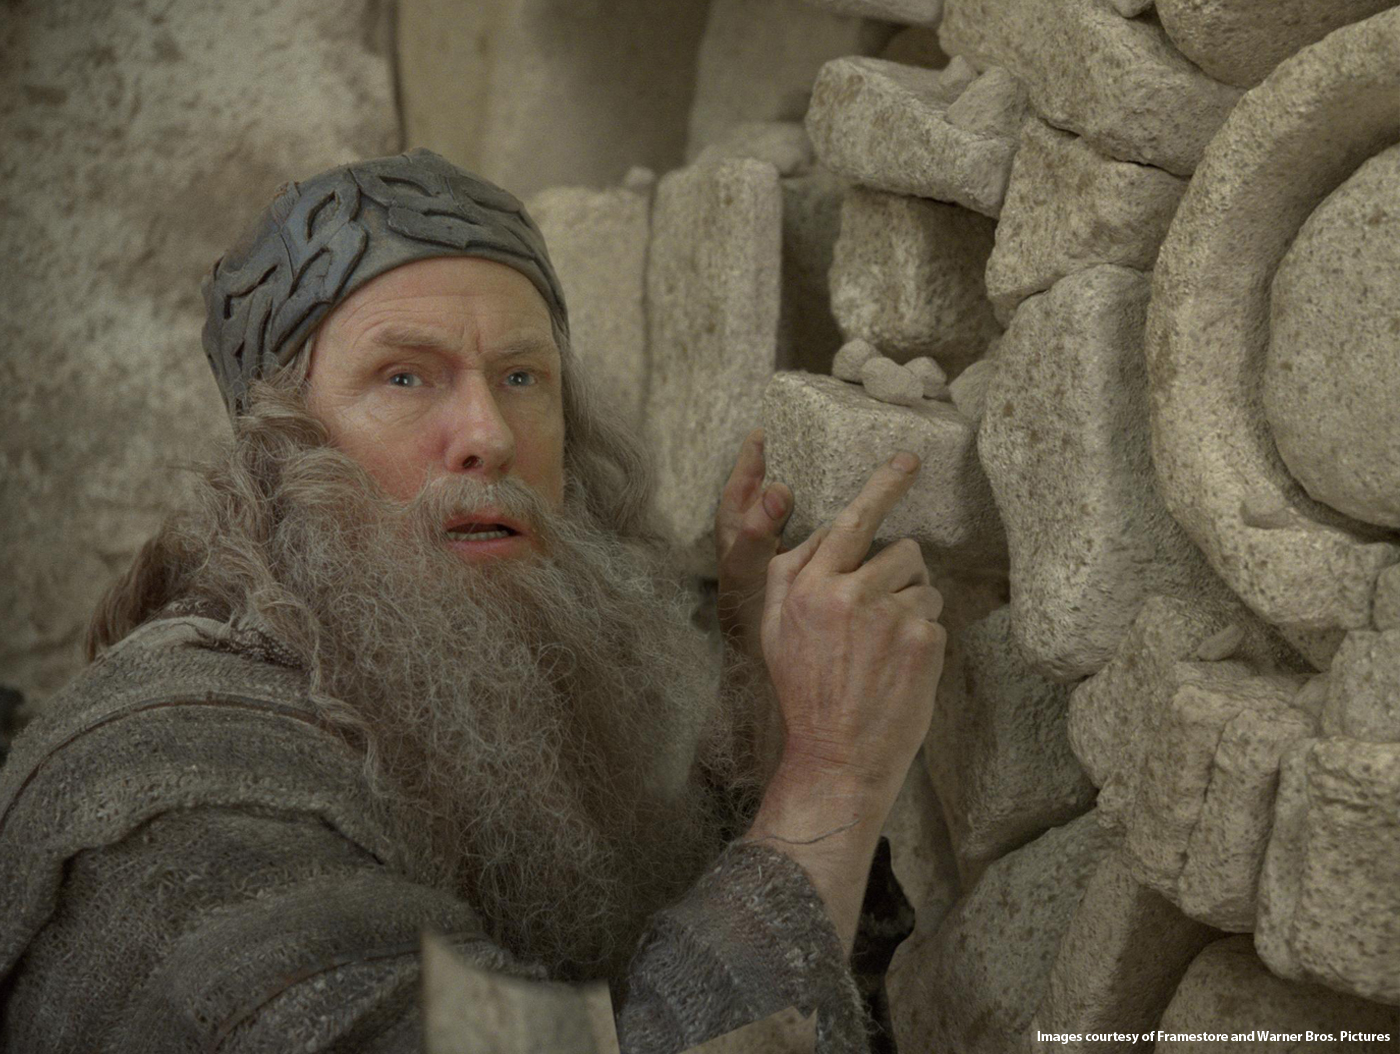
At a moment Hephaestus opens a magical door. Can you tell us more about it?
There were something like 200 pieces of stone in the door which were modeled and articulated. This was made to fit onto a greenscreen set piece which had some green moving parts. We were able to match the onset model and augmented the cg stones with a lot of smaller simulated rocks and dust. Key to it all was the ray traced global illumination that we employed across all the shots on WRATH. Really accurate shadows from the Hephaestus character and some judicious light placement, helped sell the shots.
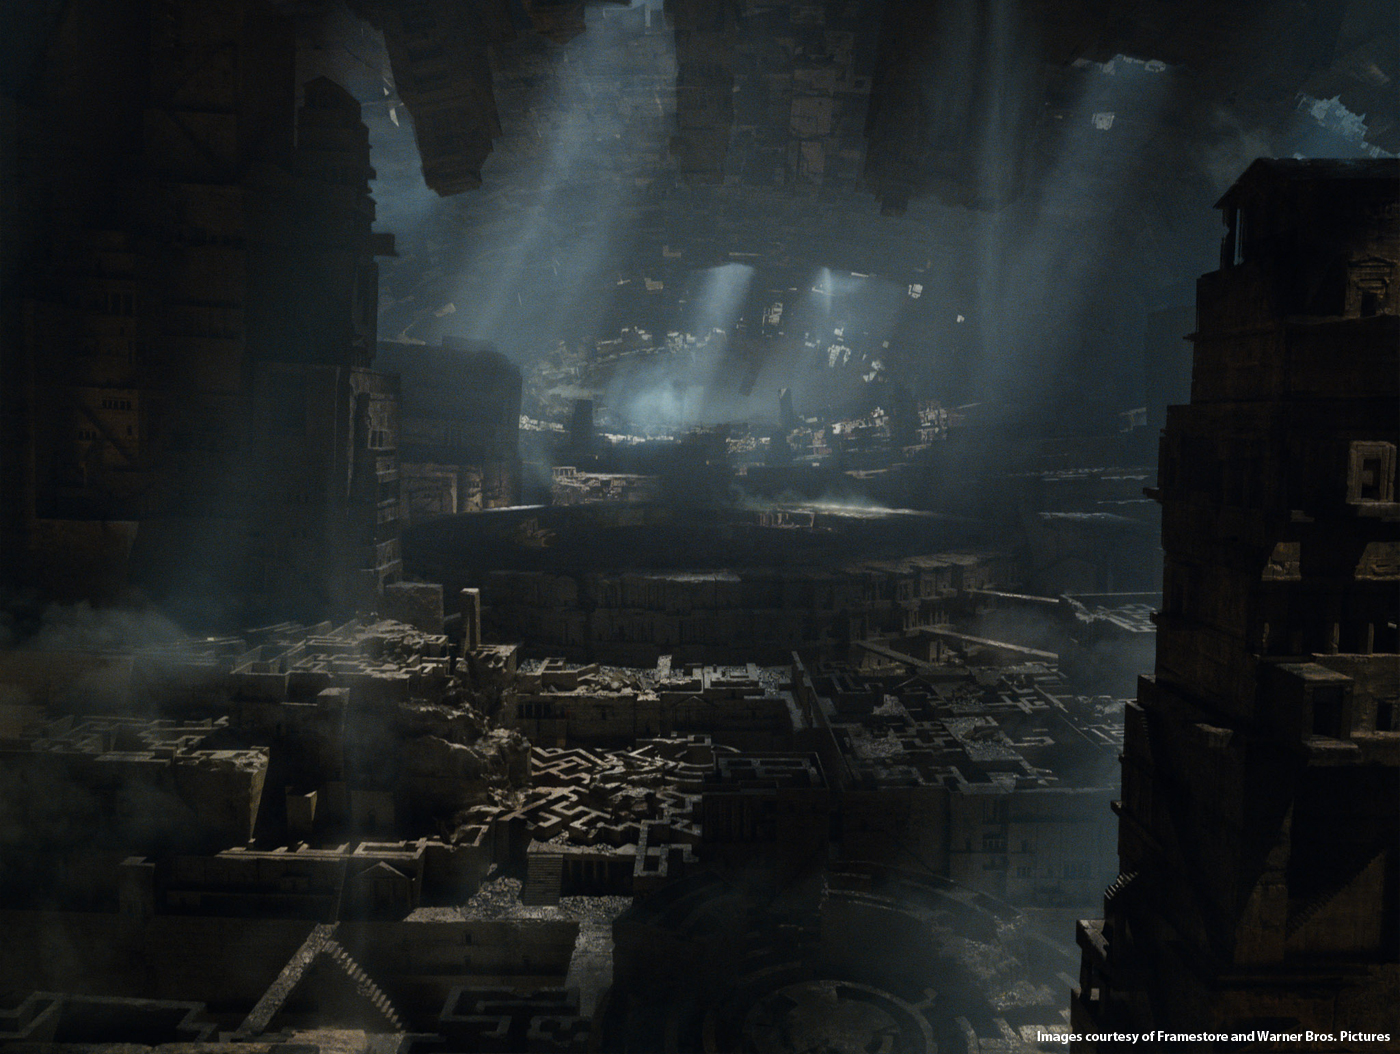
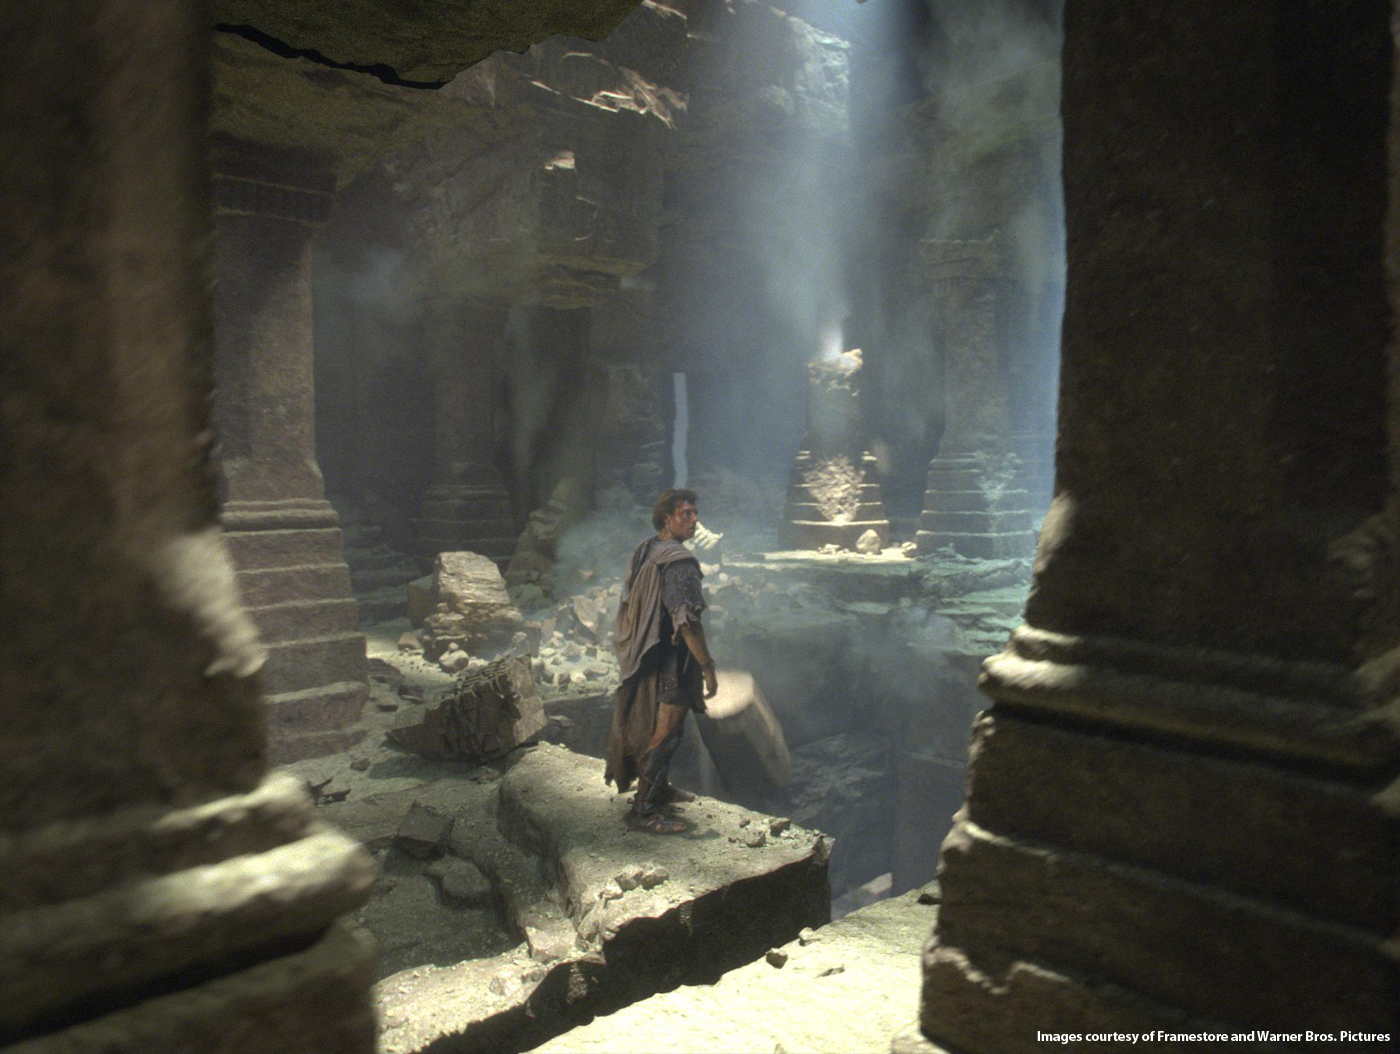
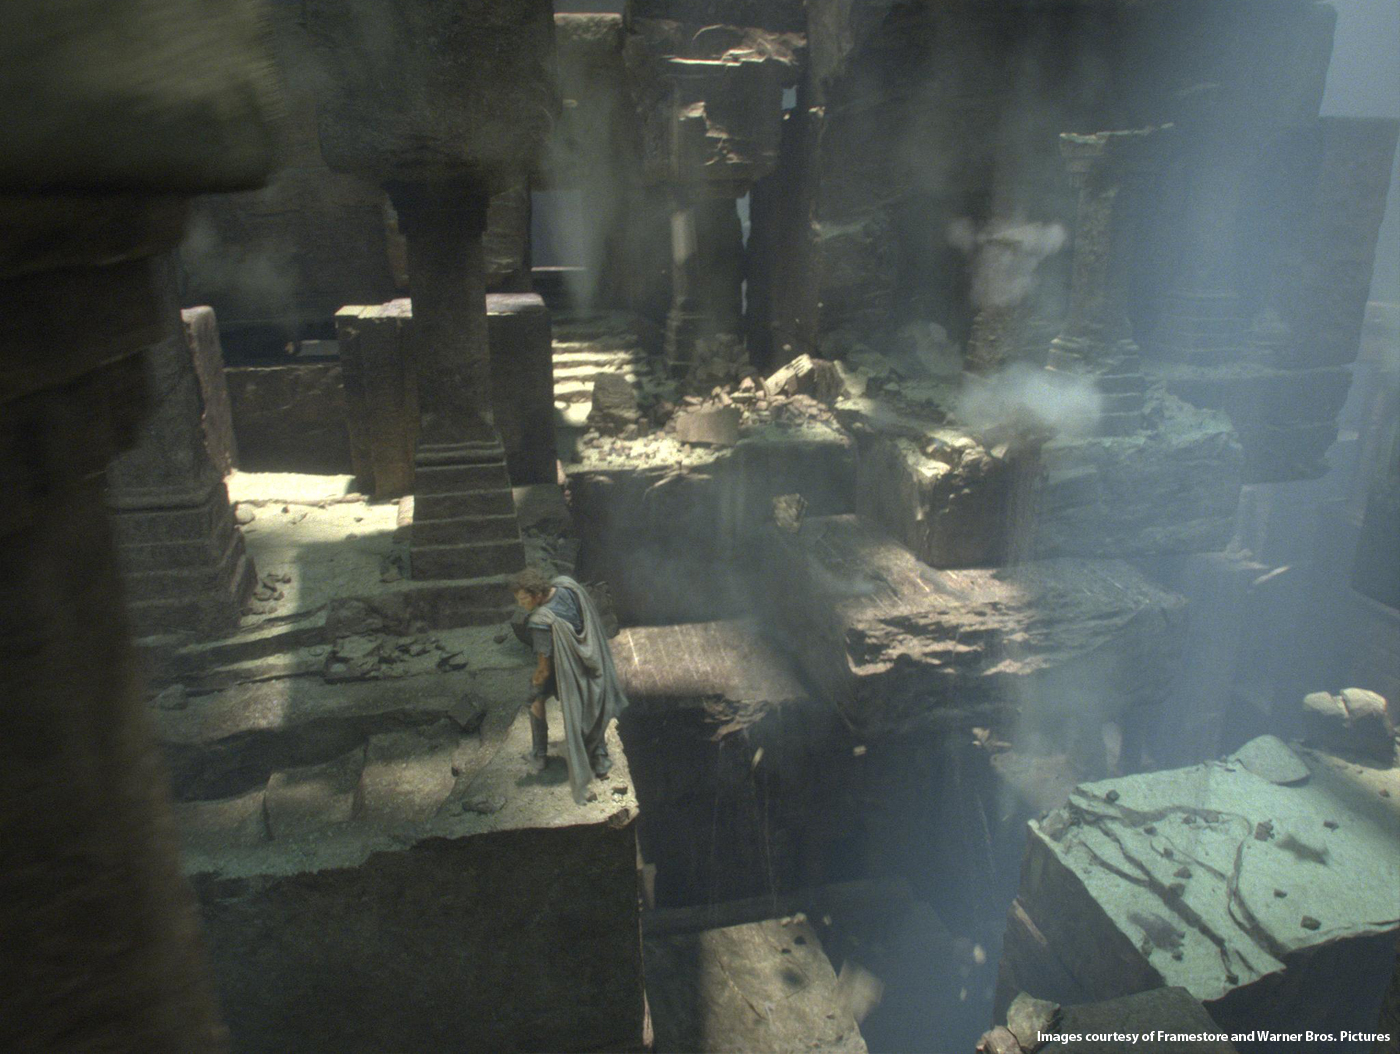
How did you proceed to model and create a so huge and complex environment for the Labyrinth?
Stone by bloody stone. I would have loved to have matte painted the Labyrinth but it was constantly moving so it really did need to be built. We built a kit of stones and architectural elements that we used extensively to construct a number of various doorways. We could then vary them relatively procedurally but there was no doubt there was a huge amount of geometry. Too much for maya which made the scenes pretty unwieldy. We then proceeded to light the sequence as if it was a giant studio. We got advice from the gaffer on the movie, and using the Arnold renderer and realistic light position we were able to match the look that the DoP had achieved on the stage for the non moving parts of the labyrinth. Arnold also gave us atmospheric volume so the td’s were not relying on comp to fill in the blanks as far as the the environment was concerned. Light positions were critical but when you hit a sweet spot the shading really sold it. The other key to it was having a cg proxy for the greenscreen people. When I saw the cg characters respond to the cg light like the actors on the plate then I knew we would have a comp we could believe.
Can you tell us more about the impressive reforming Labyrinth process?
This became the last shot out of the door. It is long at 1000 odd frames and constituted the culmination of the processes we developed thus far. We were able to model the labyrinth almost like lego by this stage, mixing in bits of lidar scan, and we tried to find moments that would respond to the performance on the set from Sam Worthington. We then lit the shot through a moving gobo to give an ever changing light stage. Then it was down to the fx team to throw everything they had at it. We simulated the whole lot in houdini and proprietary fBounce. Each sim got resimmed for volume and you can imagine there was a long pipeline. This was then comped with hundreds of 2d elements and the whole while, it was in stereo.
How did you manage the renders for so many elements?
We just split it into layers. That sounds easy, but it ended up being a very well executed shot. The key was the working relationship between the artists on the shot. By collaborating we were able to get the renders through, relying in the end of course on a lot of comp and work from matte painters to add extra detail, but there is no getting around it, it was a monster shot.
What was the biggest challenge on this project and how did you achieve it?
For me, the biggest challenge was the physical rendering that we employed. I was keen to push the plausibility of the lighting and in Arnold and Renderman we had two tools that could achieve it in production. Of course we needed to retool a lot of the shaders and methodologies that we have become reliant upon in our traditional Renderman pipeline, such that our skin and hair tools had to be rewritten so that we could ray trace them completely. We worked closely with the developers while these tools were in pre-release and it has meant a whole new approach for the lighting td’s certainly, but also for the whole crew as the repercussions of their work become more obvious in an unforgiving but wholly satisfying lighting environment.
Was there a shot or a sequence that prevented you from sleep?
No. I’m a good sleeper. I just didn’t get too much of it towards the end.
A big thanks for your time.
// WANT TO KNOW MORE?
– Framestore: Dedicated page about WRATH OF THE TITANS on Framestore website.
Grady Cofer is working in VFX for over 15 years. He participated in many projects at Digiscope as an Flame artist such as VOLCANO, TITANIC or GODZILLA. He then joined ILM and worked on films like PIRATES OF THE CARIBBEAN trilogy, STAR WARS EPISODE II and III as well as STAR TREK and AVATAR.
What is your background?
I have been working in the VFX industry for 15 years. My passion for filmmaking began when I saw STAR WARS as a young boy. Not only was I swept away by the imaginative story and fantastic imagery, but I became fascinated by the mechanics of how such imagery could be created. This fascination stuck with me through the years, as I gravitated towards anything having to do with computers and graphic design. I dabbled in various 3D applications, but my VFX career ultimately began when I became a Flame artist, compositing shots for movies like TITANIC and GODZILLA. Then joined Industrial Light & Magic, and worked on STAR WARS EPISODE 2 and EPISODE 3, THE PIRATES OF THE CARIBBEAN TRILOGY, STAR TREK, AVATAR and many others.
How was the collaboration with director Peter Berg?
I first heard that Peter Berg was planning to adapt BATTLESHIP for the screen back in 2009. I went to his office in Los Angeles to meet with him – intrigued but skeptical. When he walked in, he picked up a chair, set it down in the middle of the room, and proceeded to pitch the first thirty minutes of the movie. And I was hooked. That was the beginning of a three-year collaboration.
We knew that the scope of VFX in BATTLESHIP was going to be massive, and that a great deal of the movie was going to be created in post-production. My mission was to include Pete in every stage of the process, and to guide him through the long gestation times that accompany complicated FX work.
We at ILM were able to make many contributions to the film, from designing creatures and weapons to pitching story ideas, and Pete was always receptive. But the main vision was all Peter Berg. He is a creative madman — the ideas keep coming. The best thing I could do as his VFX supervisor was to listen to him, and then try to come up with new and interesting ways to bring his ideas to life.
What was his approach about the VFX?
Pete was cautious at first. Early in preproduction, on a scout of the battleship USS Missouri, he said he wanted to have a VFX meeting at the end of the day. We met dockside, with the Missouri looming beside us. He pointed at the ship and said: “That’s real. I get that. I feel that. Your effects have be just as real and powerful as that.”
BATTLESHIP is a mashup: one part classic naval warfare film, two parts blockbuster action/sci-fi. And this pairing of the familiar and the fantastic helps define our approach to the VFX, as we constantly strove to ground the sci-fi elements in reality, to make our work as “real and powerful” as it could be.
How did you split the work with VFX Supervisor Pablo Helman and you?
On location, I worked on first unit and Pablo worked on second. Back at ILM, Pablo and I divided the sequences categorically. For the most part, I supervised the water-work and battle sequences, while Pablo oversaw the creature work although there was some cross over.
How did you recreate the U.S. Navy and Japanese Naval ships?
Authenticity was Pete’s unequivocal mandate. One important aspect of that was filming on the open ocean. He wanted to capture actual naval ships at sea, and not just for visual effect reference, but to put real Navy Destroyers in this movie. Real aircraft carriers.
During the 2010 RIMPAC maritime exercises, we had unprecedented access to the fleet of gathered vessels – filming both from helicopter and a camera boat. I personally had the opportunity to embed with a camera crew on an Arleigh Burke class destroyer. On board, I filmed a number of ocean and ship plates, and captured live-action reference of firing weapons.
The Navy gave us access to a number of Destroyers, providing ILM’s modelers and painters the reference necessary to recreate the ships in great detail. The USS Missouri was comprehensively LIDAR scanned while it sat in dry-dock. The resulting point-cloud data captured precise imperfections, including the dents in the hull from a kamikaze attack.
Can you tell us more about the Hong Kong sequence?
During the invasion, one alien ship crashes down into Hong Kong, tearing through the Bank of China, and splashing into the channel. The sequence was carefully planned and prevized. Our film crew shot scenes in the crowded streets and on the Star Ferry, while an aerial unit captured plates of surrounding buildings and the Buddha statue.
Back in Los Angeles, production designer Neil Spisak created an interior greenscreen set of the office space. Special effects coordinator Burt Dalton devised a clever rig for ratcheting the desks and chairs across the room.
Did the falling tower of Transformers 3 helps you with the one in Hong Kong?
I enlisted the talented team at Scanline LA to execute the Hong Kong sequence. We concentrated on differentiating materials (metal, concrete, glass), and varying the physics of the destruction based on the characteristics of each material. Stephan Trojansky and his team added a number of creative details to their simulations (notice the trees breaking thru the atrium windows as the bank tower falls towards us).
How did you design and create the huge force shield?
The weather dome was an important narrative device to isolate the Navy and alien ships into a three-on-three battle (and thus pay homage to the boardgame). It’s design began in pre-production, with production designer Neil Spisak. His illustrators created concepts of a force field perimeter.
ILM’s art director, Aaron McBride, painted a progression of reference frames, representing the creation of the dome. Then Scanline LA created the effect, using fluid simulations to make the barrier organic.
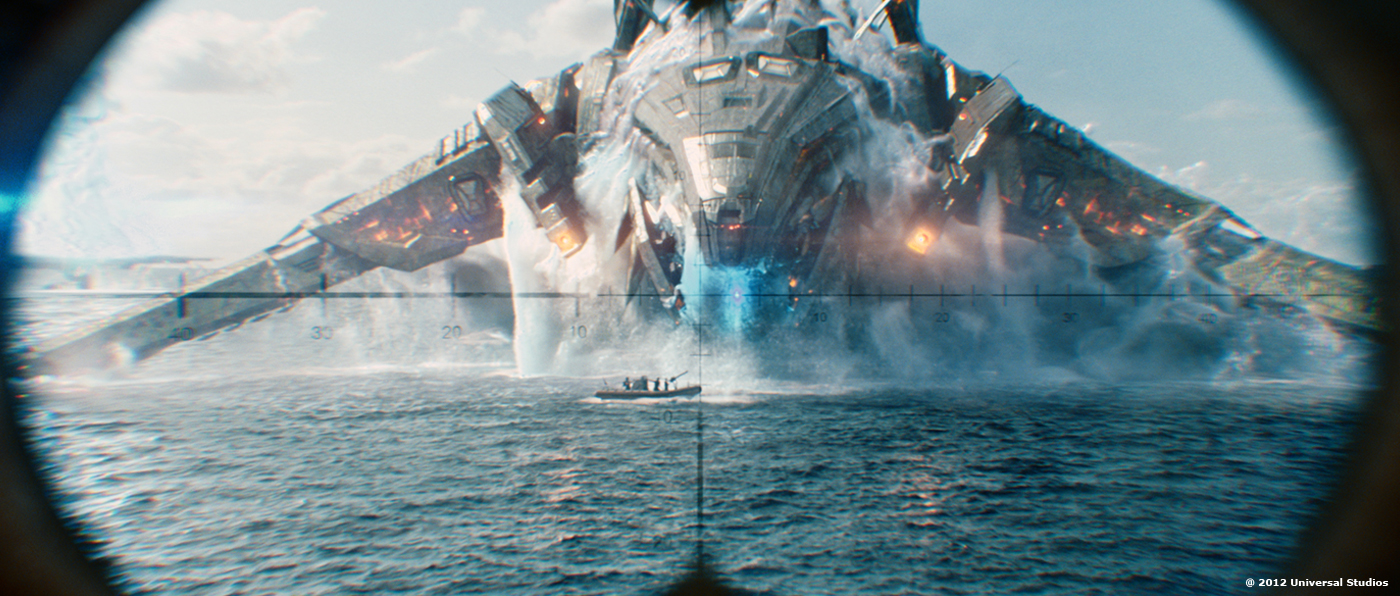
The aliens launch intelligent, destructive spheres at Hawaii that lay waste to everything in their path. Can you tell us more about their rigging and animation challenges?
Pete had conceived of the Shredders very early on – unstoppable weapons that can be programmed to take out specific targets. Design-wise, they are like a series of chainsaw blades wrapped around a sphere. Pete wanted them to exhibit an incredible amount of speed and energy. The challenge was to imbue them with a bit of character. The riggers provided controls to telescope the shape out and in. Then each individual tooth could animate outwards to create more menacing silhouettes.
How was created the various big environments such as the military base or the freeway?
The helicopter-shredding sequence was filmed on location at the military base in Kaneohe Bay. Second unit had access to one helicopter, which was replicated. The entire environment was then photomodeled and recreated digitally for some of the virtual camera shots.
The freeway was first shot on location in Hawaii. Then a matching section of it was rebuilt in Baton Rouge, at Celtic Studios. The greenscreen set-piece was constructed to be shredded from one side to the other, with various cars being ratcheted in the air along the way.
Can you tell us more about the shooting process and the benefits of using ILM’s grey suits?
I believe that some of the most effective motion capture can happen during principal photography, on location, with all of the filmmaking ingredients: the director, the DP, the lighting, everything. The suits are part of ILM’s Imocap system, our patented on set tracking system for this kind of performance capture.
How did you manage the difficult task for the tracking?
For this show we were able to streamline the process — recording data from set using a single HD witness camera offset from the motion picture camera. When combined with production plates, the other data the system captures during the performance and the witness camera footage Imocap provides very accurate 3D spacial data.
How did you collaborate with the previz teams?
BATTLESHIP made extensive use of both previs and postvis. Two companies, Halon and The Third Floor, provided Peter Berg with impressively quick scene visualizations, allowing him to investigate creative ideas. For planning such a complex film shoot, with its plethora of complicated action set-pieces, pre-visualization was mandatory.
As ILM developed the assets, we would supply the previz companies with models and textures. And likewise they would send camera animation back to ILM as a starting point for some shots. They also supplied technical camera data prior to the shoot, to help inform the capture of VFX plates.
Can you tell us more about the design of the various aliens ships and armors?
Production Designer Neil Spisak and Art Director Aaron Haye led a group of illustrators, generating pages and pages of concept art. The alien ships, called Stingers, were inspired by water bugs, which have the ability to stand and maneuver on top of a water surface. It was crucial to the Director that the alien technology feel practical, instead of merely ornamental. And for everything, Pete wanted a sense of age, of history – so when we encounter this alien race, the tools, the armor, and especially the ships feel used and worn.
Back at ILM, we created different silhouettes for each Stinger, varying aspects of their weaponry, defenses, and propulsion. And we customized each ship with its own color and lighting. We noticed how our own Navy ships tend to be simplistic below, along the hull, and more complex on the top surfaces, with clusters of towers and radars and antennae. So for the alien ships we inverted that ratio, simplifying the top surfaces, and then clustering detail — hoses, ports, cargo doors — onto the underside.
Another feature of the ships is their « intelligent surface ». We hypothesized that the alien technology allowed for data and energy to travel along the outer surfaces of their ships. This helped bring the ships to life.
Have you developed new tools for the water?
BATTLESHIP presented a host of CG water challenges. Not only do the alien ships breech up out of the ocean, and leap around the ocean surface, but they are designed to constantly recycle water — pulling fluid up via hoses, and then cascading it back out though water ports. This constant flow of water becomes a major component of the Stinger’s character. Further, since many of the ships get sunk, the destruction had to be coupled with our water simulations, so that fractured pieces of an exploding ship had to splash down into the surrounding CG water.
It became clear early on that we were going to have to take it to the next level. So, in 2010 we started the ‘Battleship Water Project’ — and over the course of a year we reengineered how we tackle large-scale fluid simulation and rendering at ILM. Considering our system at the time had been honored with a Sci-Tech Award from the Academy just a couple of years earlier, we didn’t make the decision lightly.
Our goal was to fully represent the lifespan of a water droplet. So if we are recreating a cascade or waterfall, the water begins as a simmed mesh, with all of the appropriate collisions as it bounces along various surfaces. And then the streams begin to break-up into smaller clusters, and then into tiny droplets, and finally into mist. And along that evolution from dense water to mist, the particles become progressively more influenced by airfields.
The movie features a large number of explosions. How did you create these and were they full CG or did you used some real elements?
For explosive ship destruction, we watched hours of naval war footage, and collected videos of Navy sink exercises, where decommissioned ships are used for target practice. Our research indicated how diverse practical explosions and smoke could be. We strove to emulate that diversity in our FX work, layering fast, popping explosions with slower gas burns; mixing pyroclastic black smoke with diffuse white wisps. We relied heavily on ILM’s proprietary Plume high-speed simulation and rendering tool for generating these effects, and employed our new Cell method for combining multiple Plume simulations into one combined volume.
How did you create the impressive explosion (with its shockwave) shot inside the boat?
When a Regent peg lands on the deck of a Destroyer and detonates, its energy travels downward, and through the corridors of the ship. During preproduction, Pete challenged us to find an interesting sci-fi spin for this shot. We theorized that a peg weapon was under such extreme pressure, that its inflationary blast could create a zero-gravity bubble, pushing and warping everything as it expanded. The in-and-out motion came from referencing underwater explosions, which tend to collapse inwards from extreme pressure.
To achieve the effect, we designed a vertical corridor, where the far end of the hallway rested on the floor of a soundstage, and the rest of the hallway rose up to the stage’s ceiling. Three stunt men, in Navy uniforms, were pulled quickly on wires up past the camera. We enhanced the shot with CG energy and debris.
The climax features a super long continuous shot. Can you tell us more about its design and creation?
There are a number of complex scenes in BATTLESHIP, but the biggest, most complicated VFX shot in the movie is one we nicknamed the “You Sunk My Battleship” shot. We planned the convoluted film shoot over the course of a year. In pre-production, we designed a set-piece representing the middeck of a sinking Destroyer. It was constructed on a floating barge anchored off the coast of Hawaii. The shot follows the journey of the movie’s heroes, Hopper and Nagata, as they climb to the stern of a sinking ship, while about fifty sailors jump off into the ocean. The resulting shot, lasting almost three minutes, is one of the most complex in ILM’s history.
There are other VFX vendors on this show. How did you distribute the work among them? Image Engine worked on some of the Thug sequences. Scanline LA destroyed Hong Kong, and provided the weather dome, and additional shots at sea. And The Embassy worked on many shredder sequences.
What was the biggest challenge on this project and how did you achieve it?
When ILM began this project, we realized that with the current state of our toolset, we would never be able to simulate and render all of the water scenes — there simply wasn’t enough time. So it was crucial that the Battleship Water Project provide some game-changing technologies. One of these turned out to be multi-threading – simulations that once took four days, we could now turn around in hours.
How long have you worked on this film?
Three years.
How many shots have you done?
Over a thousand.
What was the size of your team?
Roughly 350 spread across a number of facilities.
From 8 to 11th Mai took place the FMX 2012 with an impressive selection of high quality conferences. This was an great opportunity to meet many artists interviewed here and also make beautiful meetings. A big thanks to the FMX staffs!
Here is my report of this edition:
// FMX DAY ONE
The Devil in the Details: Virtual Humans and Complexity Dan Zelcs, Lead Rigger and Mathieu Assemat, Lead Technical Animator, MPC
Dan starts the presentation with a great reel of a full cg shot of HARRY POTTER AND THE HALF-BLOOD PRINCE explaining the challenges of creating the hair and clothes. He then details the creation of the impressive shot in HARRY POTTER AND THE DEATHLY HALLOWS PART 1 where we can see in a full continuous shot the transformation of 6 characters into 6 Harry Potter. He explains the whole process of building full CG head an body showing some great footages. Mathieu then take the stage and speaks about the challenge of creating human parts and cloths for the Beast transformation in X-MEN FIRST CLASS. The shot was filmed but ends to be a full cg shot in order to be more dynamic.
Gollum to Tintin: Building Creatures at Weta Wayne Stables, VFX Supervisor, Weta Digital
To begin the presentation, Wayne shows a impressive character reel and then talks about the importance of having a perfect skeleton before doing the next steps. He explains also the muscle importance for highly realistic characters but also for less real characters such as Tintin. He shows a lot of great materials for RISE OF THE PLANET OF THE APES and THE ADVENTURES OF TINTIN. A funny fact, is that Wayne’s brother is a pathologist and that he often calls him to have his advice! To reach a realistic aspect, he talks about this use of face lifecast made on volunteers at Weta that will then gives the skin details and also the use of Mari.
« Man, Chicks are just different » – DI and VFX Case Study The Chimney Pot
The Chimney Pot team shows a really good showreel of the studio and then focus on their work for a driving sequence for a feature film. Explaining in details the way they prepared and created the background footages with the DoP collaboration. They also speaks about the keying challenges such as the rough edges, they moved on the creation of the cg rain and windshield. Finally the talks about the way their studio has expanded around Europe.
Creating the world of « John Carter » Ken McGaugh, VFX Supervisor, Double Negative
Ken starts his presentation by showing a great proof of concept with Tars Tarkas. As Dneg haven’t made a lot of creature project at this time, the test reveals that they need to made major changes of pipeline and the work methodology to be able to handle the show needs. The anatomy of the Tarks with their four arms and their big size were quite a challenge and Ken shows to us how they approached it for the shooting process mainly for the interaction with other actors. That’s really helps to see the problem before the shooting and saves some production time. To simulate the size differences, they used many tricks like boxes, stilts and rough Tarks face on sticks. Ken shows to us some of the Tarks camp where the actors trains to move on stilts. The session ends by a shots compilation of creatures work on JOHN CARTER.
More informations:
Interview of Peter Chiang for JOHN CARTER.
Delivering « John Carter » to Mars and 3D Cinema Goers Sue Rowe, VFX Supervisor, Cinesite
Sue explains the task of a VFX supervisor and its interaction with other departments. She focus on the way she can explain the content of greenscreen and also help the DoP to light the stages with some previs especially for the ships docks. Sue then talks in details about the main challenges faced by Cinesite on this show. It’s the biggest project to date for the studio. She talks about the photogrammetry to help to create the Mars environment based on the materials she takes during the principal photography in Utah. Cinesite has also handled some artistic concept like the wing of the flyer. Sue ends by explaining one of main challenges on this show, the Thern effect and how they used of Houdini for it.
More informations:
Interview of Sue Rowe for JOHN CARTER.
« Witcher 2 Assassins of Kings » cinematics – Technical Challenges Platige Image
The Platige team starts by showing a cinematic collection of their work for THE WITCHER. They talks then about this new cinematic starting with a script and with the creation of a storyboard. After that they created a previs for the whole cinematic that will help to block the editing and allow to go on the mocap session. For this step, they recreated the stage with the boat dimension to help the actors. Many of them plays more than one character. They shows us great footages of the mocap session. After that they gives us an in-depth look on the cloth and destruction processes. They ends by showing an impressive “wheel of production” on a big poster.
More informations:
Interview of Platige Image team for THE WITCHER 2.
// FMX DAY TWO
The Visual Effects of « Bones » Christian Cardona, VFX Supervisor, LOOK Effects
Christian presents the work of Look Effects on BONES and the big challenge of a short schedule and delivery date for a single episode. Only 10 days from script to final shot! And all that was managed by a team of 5 artists including Christian. Really impressive! One of his tips: going old school like shooting models and live elements for water interaction to avoid the fluid sim time consuming. He then details his work with the creation of a twister for a specific episode and how he helps the story by augmenting the footages by adding a wood wheel.
The Visual Effects of « Borgia » Jonathan Weber, VFX Supervisor, RISE
After a brief presentation of Rise FX, Jonathan take place and explain in details the challenges of recreating Rome as it was at the Borgia time. Lots of elements and places were completely different like the ceiling of the Sistine chapel and the St. Peter place. One of the unusual challenge was the blue reflection on the set that affect too much the set after the despill process that turned the image almost in black and white. To deal with this, Rise needs to create unplanned parts of the sets and ends almost in some shots to recreate the whole set in CG. Rise also helps with previs for some specific shots. The presentation ends by a explaining the pipeline at Rise.
The Visual Effects of « Game of Thrones » Juri Stannosek, VFX Supervisor and Thilo Ewers, Environment Supervisor, PIXOMONDO
Juri and Thilo presents their work on the second season of GAME OF THRONES. Only a part of it in fact due to broadcast matters. Again, the main challenge on this tv show was the huge amount of work to be done on such a short timeline. Juri explains with lot of details the creation of the Shadow creature and the huge challenge of his particular aspect. Thilo then explains the challenge to deliver more than 300 different environment with three new major locations. Finally Juri speaks about the dragons and even if the most impressive comes for the final season, their little dragons are quite impressive.
« Ghost Recon Alpha »: Creative synergy and non-linear production: the challenges of making a game-related movie Nicolas Rey, Head of CG for Feature Films and Frédéric Groetschel, Executive Producer, Mikros Image
Fred Groetschel and Nicolas Rey explains the Mikros Image work on this Ghost Recon Alpha short film. The second live action feature by Ubisoft. Nicolas talks in details about the shooting process and the work on the various departments. We also have an in-depth presentation of the impressive location. Nicolas talks about shooting challenges such as managing the big changes of weather conditions and how they made some on-set interactions for the drone. One of the biggest un-planned challenge was the massive changes of design for the drone and the warhound after the shooting! Some live action shots have to be recreate in full CG!
// FMX DAY THREE
Montreal techno-creative ecosystem Alexandre Renaud, Director, Corporate Services, Research and Development, CentreNAD
Alexandre Renaud explains the Montreal city and economy. Showing the main key players in the entertainment industry. Mainly focus on game development and the future of this specific economy.
Strategies and thoughts on film & game convergence: Virtual concept or reality? Pierre Raymond, President & Head of Operations, Hybride
Pierre Reymond details the most important work done by Hybride on SPY KIDS serie, 300 and AVATAR with some impressive breakdown. And then speaks about fame and film convergence. And then speaks about game and film convergence. And explains in details the shooting of ASSASSIN CREED LINEAGE with a great idea, to project the building blueprint on the floor, that allows the team to shoot more than 40 shots per day! He also explain the asset exchange with Ubisoft and the way to put the city models directly from the game in Hybride pipeline.
More informations:
Interview of Daniel Leduc for AVATAR.
Looking into the past, present and future work of Modus FX : delivering digital effects for film, CGI animated features and creative imagery Marc Bourbonnais, President and Co-founder, Modus FX
Marc presents the three main activities of Modus FX: digital effects, full CG feature and documentaries. He then explains the challenges of being a multi-projects facility and talks about the future plans of the studio. Marc also talks about the production challenges of the different production domains with the help of simple but efficient curve lines.
FMX Trailer « Globosome » Sascha Geddert, Filmakademie
Interesting presentation about the creation of FMX trailer by its creator. He starts by explaining how he finds the idea and then creating some concepts. For each major parts such as concept, compositing or stereo aspect of his project, Sascha invites on stages his friends to explains their contributions.
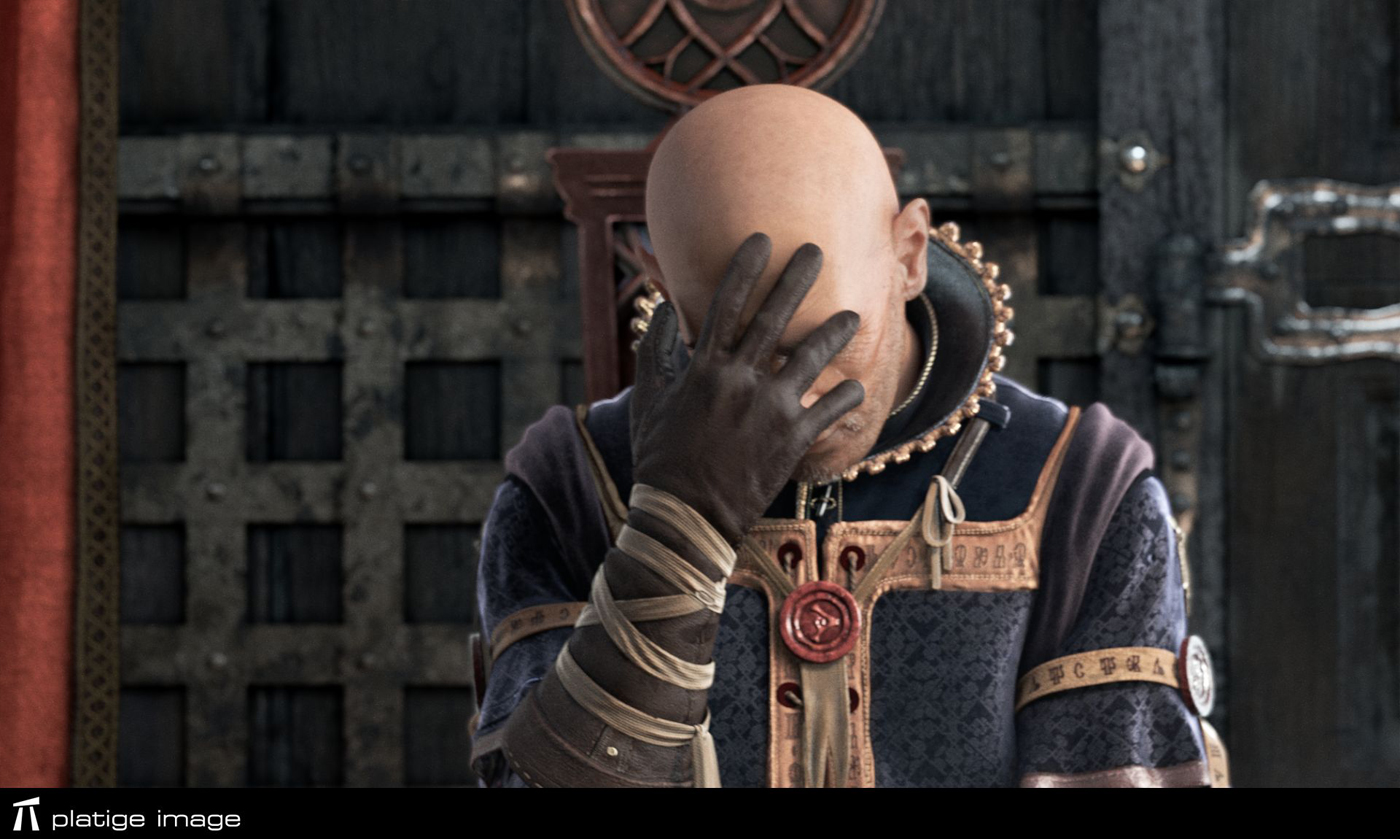
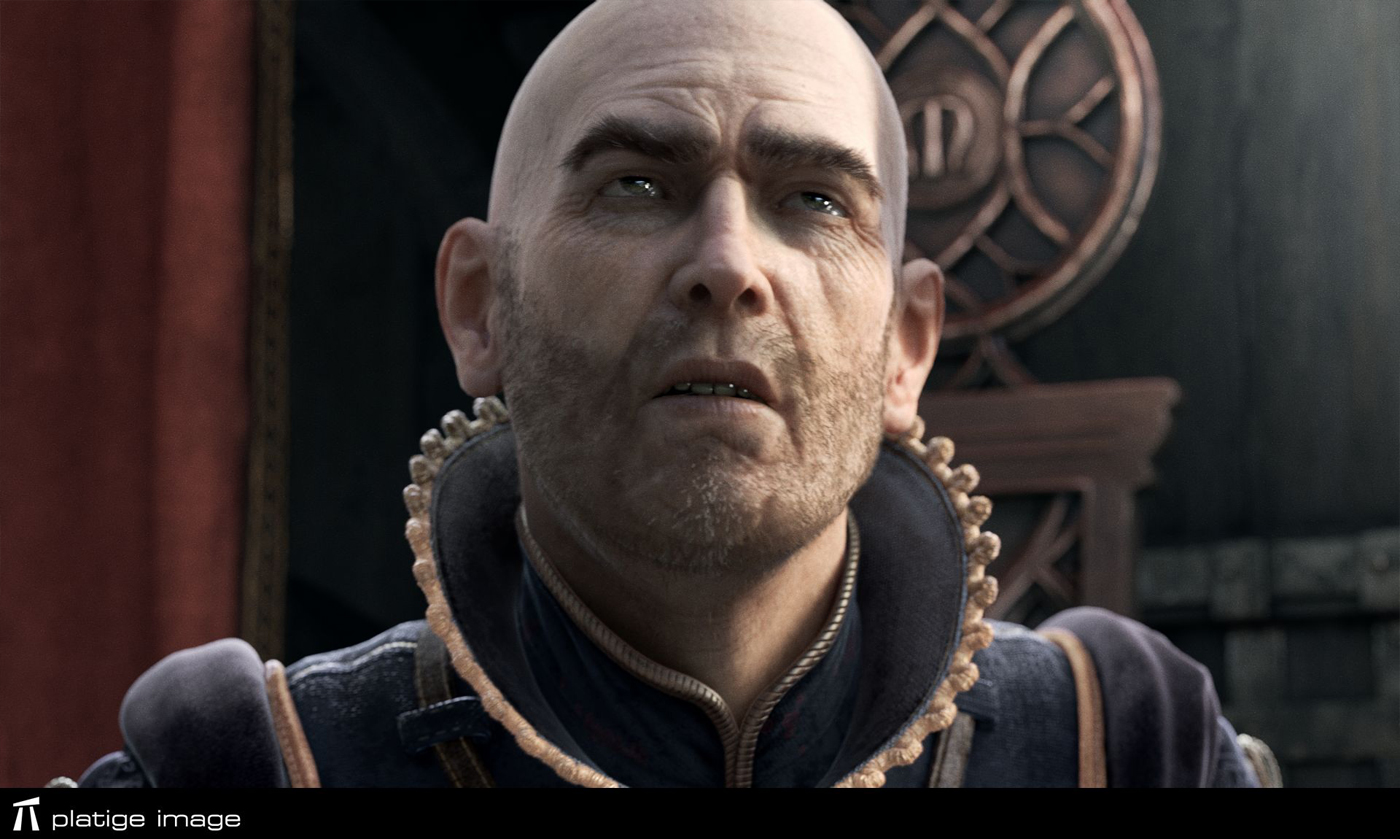
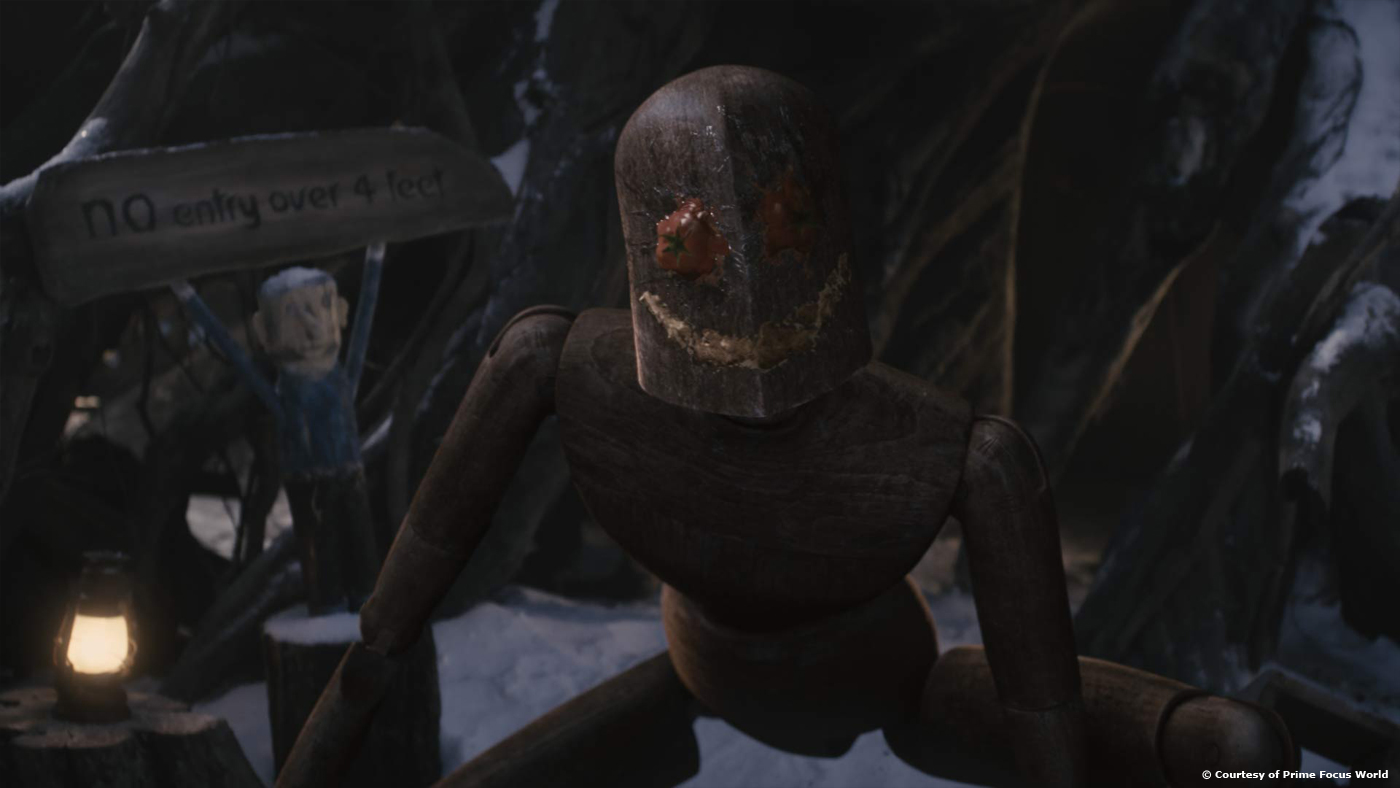
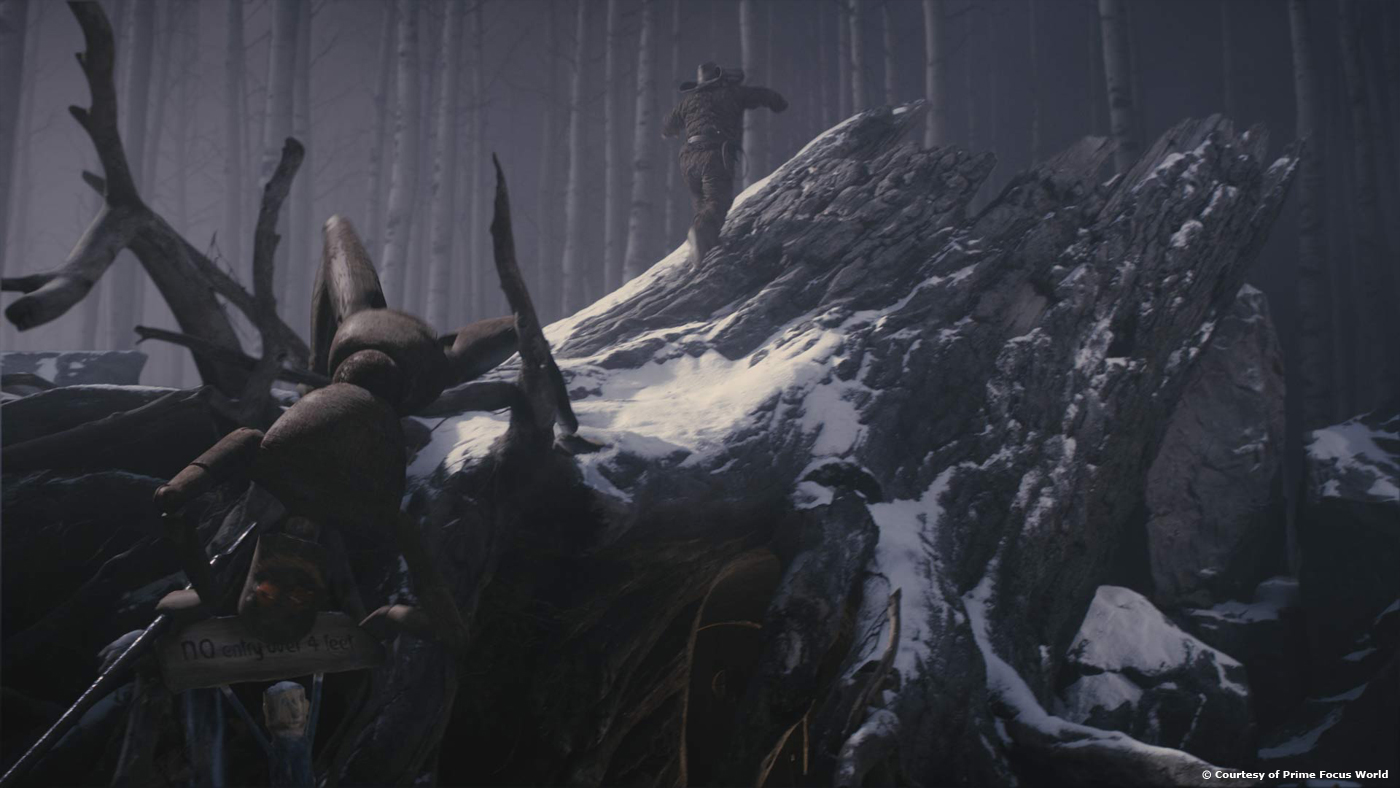
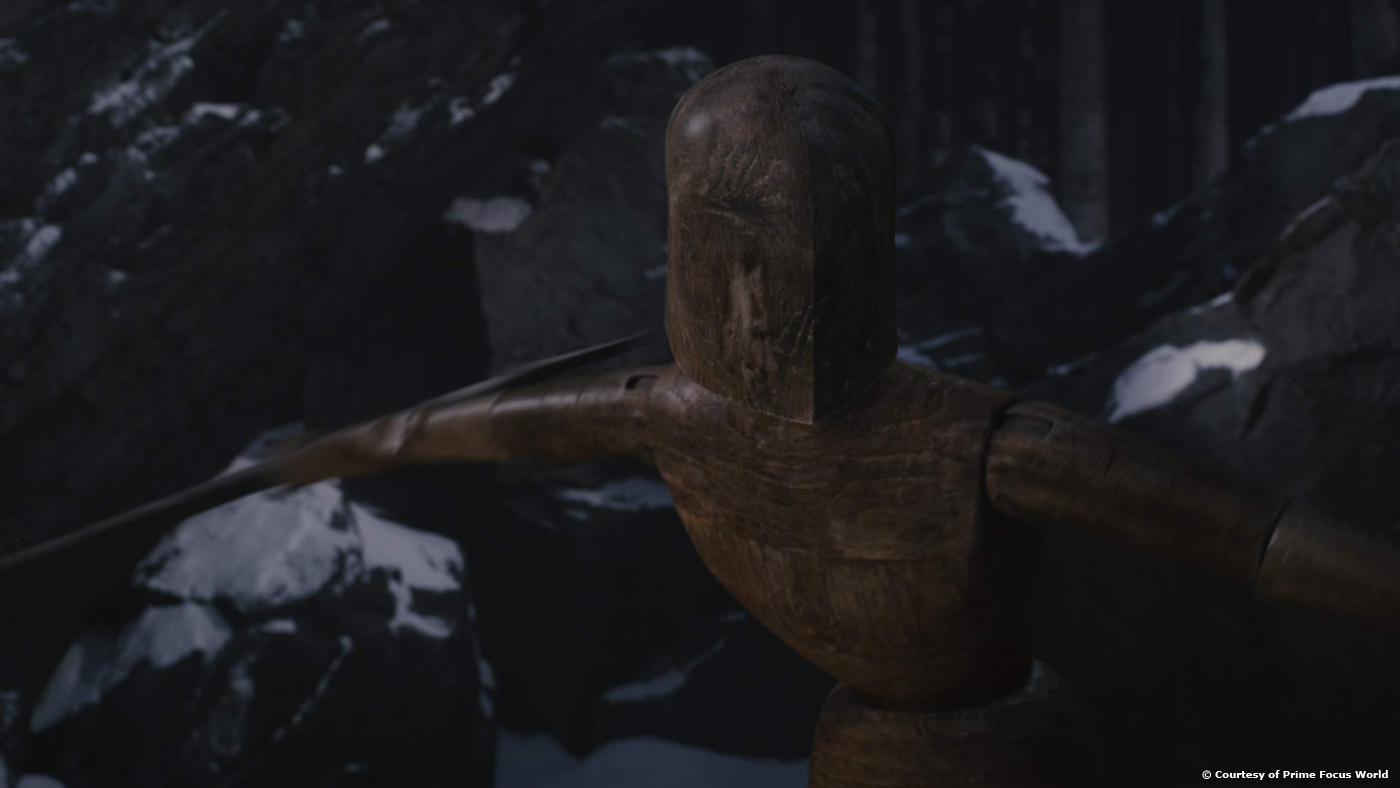
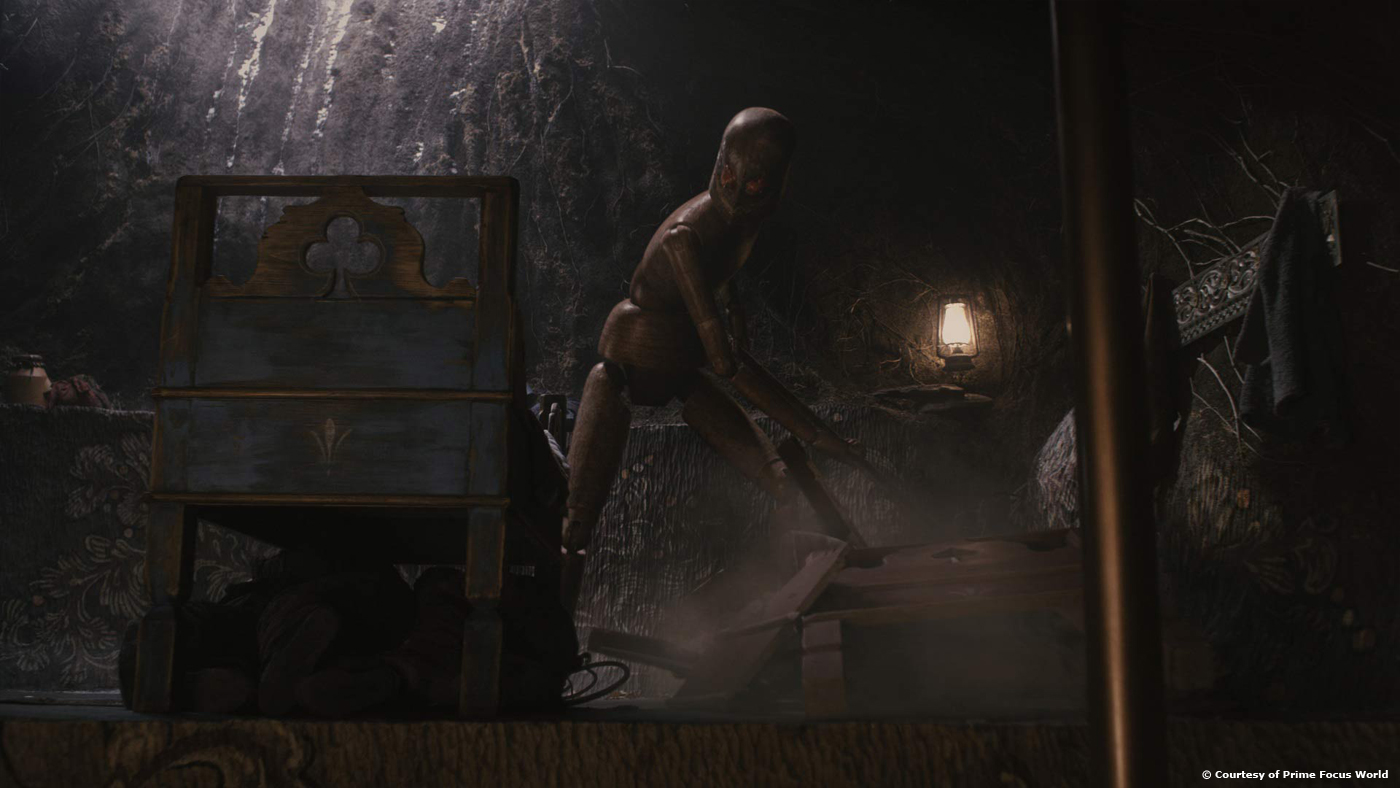
The Visual Effects of The Avengers Jeff White, VFX Supervisor, Industrial Light & Magic and Guy Williams, VFX Supervisor, Weta Digital
Here comes the biggest and most anticipated conference, the Gloria 1 hall was at his full capacity.
Guy Williams explains the work methodology of Weta on this show by showing to us footages of each steps from previz to final shot. He start with a Captain America shot when he jumps out the Quintjet by explaining why it was better to have a full cg Captain America in order to control more the movement and dynamic. Guy then talks about the sequence of the Mountain top with Thor and Loki and then with the huge fight in the Forest between Thor, Iron Man and Captain America. For a specific shot in which Iron Man is pushing Thor face on a cliff, Guy shows some of mocap footages and lots of layers to reach the final result. Finally Guy explain the Helicarrier sequence and how they did the engine destruction and the use of the deep compositing.
Jeff White then comes on stage and talks about the Aliens and the Leviathans. Some unusal references where used for the Leviathan flesh such as sushi. He then explains in details how they created New York in CG by taking more than 260’000 HDR photos on a two months shooting! He shows also lots of props and vehicles to fill the streets. Then Jeff talks about Hulk and the great use of Green Steve, a impressive stand-in full of muscles painted in green. They also created an amazing cg version of Mark Rufalo with a impressive amounts of details.
More informations:
Interview of Jeff White for THE AVENGERS (coming soon).
Interview of Guy Williams for THE AVENGERS (coming soon).
// FMX DAY FOUR
Virtual Production at ILM and Lucasfilm: Reinventing the Creative Process Steve Sullivan, Senior Technology Officer, Lucasfilm LTD and Michael Sanders, Digital Supervisor, Industrial Light & Magic
Truly amazing in-depth looks on the virtual production development and tools made at ILM. The line between previz and final result are more and more tiny especially for broadcast projects such as clone war. All the process tend to be really lighter and less invasive on the shooting sets. The previz tools such as Zvis and Gwiz are really impressive.
« Battleship »: Not just a Board Game Marshall Krasser, Compositing Supervisor, Industrial Light & Magic
Marshall explains the new water simulation approach to meet the specific needs of the show. He shows great simulations video of many shots. He then details the major step such as animation, lighting and rendering for the stingers and aliens. And then speaks about Nuke compositing and the tools developed for the show. Damn the beauty pass looks really great! He mentioned also one of the biggest challenge on the show, tracking ocean water, one other challenge was the rotoscoping process for the Missouri shots with actors because the Missouri was still in pearl harbor docks! The presentation end with an in-depth looks at the huge continuous shot of the sinking ship that take more than a year to finish! And one funny quotes, it will have taken 23 years to render on a single computer!
More informations:
Interview of Grady Cofer for BATTLESHIP (coming soon).
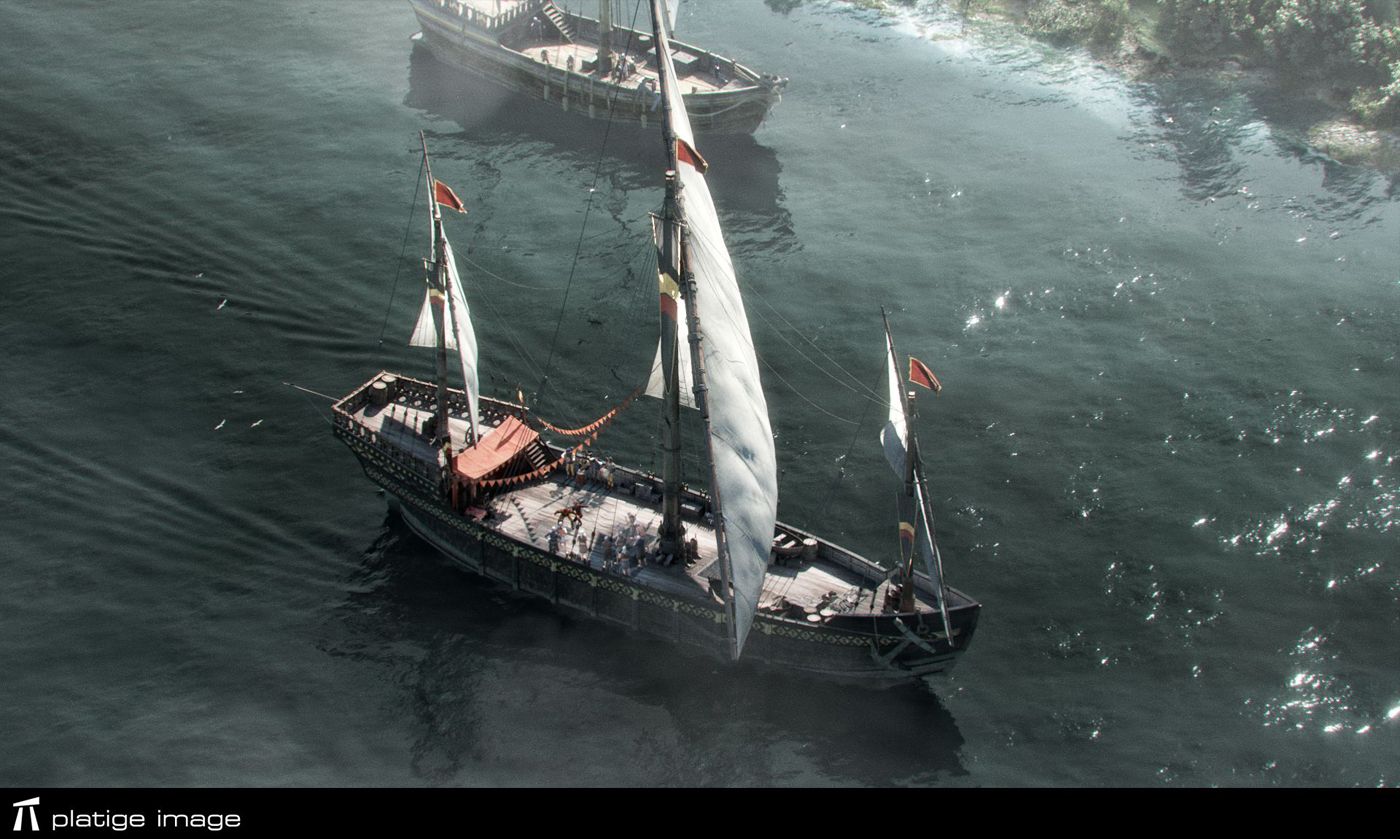
New game cinematic on The Art of VFX with THE WITCHER 2. Maciej Jackiewicz (Animation Director), Bartek Opatowiecki (Senior TD) and Lukasz Sobisz (FX TD) of Platige Image explain in details the creation process for this animation.
MACIEJ JACKIEWICZ // Animation Director
How did Platige Image got involved on this game cinematic?
Platige has already a long history with WITCHER. We made cinematics for the first part of the game in 2006. The game turned out to be quite a success. Our Intro and Outro were also well received by the gamers community, so when we were asked to create intro for the WITCHER 2 we knew that we shouldn’t miss it.
How did you collaborate with director Tomek Baginski?
I’ve been working with Tomek for a few years on various projects almost desk by desk so this was nothing new. He has very good knowledge of 3d animation which helps a lot during production. He also leaves a lot of freedom to artists.
Have you created previs to help the director and to block the animation?
Yes, a previs was very important. It was created by Damian Nenow and his layout team and took about two months.
Animatic was based mostly on mocap and was a draft but quite complete version of the film – cameras and shots were fixed, lowpoly simulations of the destruction of the ship were also created a this stage. Whole slowmo sequence is synchronised to the music so final simulations and destructions had to exactly match the timing designed in layout. All that made the previs much more than just a help, it was a base for all the later work.
We didn’t want to loose any animation work done in the layout stage so all character animations from layout were exported from 3dsmax to motionbuilder for final animation. That was a bit tricky workflow but allowed precise transition between layout and animation.
Can you tell us more about the mocap process?
First, we analyzed and divided script into individual scenes and actions.
We didn’t create precise storyboard since we wanted to capture as much as possible of the action on stage and have freedom later in the layout.
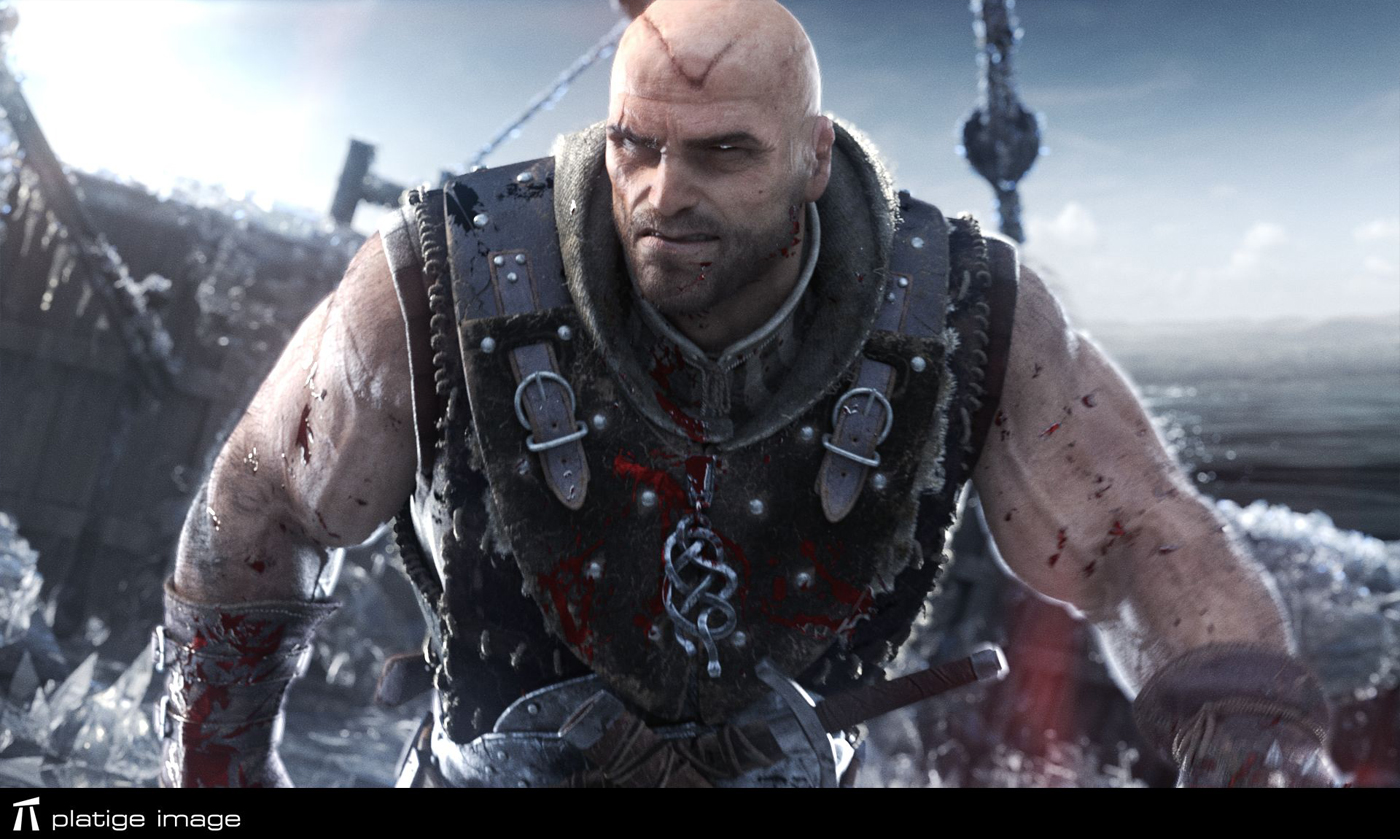
With three actors and three stunts acting simultaneously it was directed almost like a live action shoot. We didn’t have as many actors as characters in the film though, so there was some “juggling” involved. For example, the actor who played King Demawend also played Fat Jester, one of the spectators and even Assassin climbing the ship.
We tried to help actors “feel” the invisible scenography on the set. Luckily, dimensions of the mocap area were similar to the actual size of the ship deck, which allowed us to mark invisible boundaries etc. We also built wooden ramps to simulate the tilted deck which was very helpful, especially during the final fight.
How was choreographed the final fight?
The fight was choreographed by Maciek Kwiatkowski and Tomek Baginski. Maciek played Assassin. He has great stunt skills and is a master in using medieval weapons.
Final fight was divided into 6 or 7 scenes. Most of them were planned ahead, some improvised on the set. We’ve recorded several versions and made final choices at the layout stage. We’ve produced over one hour of the mocap material so there was a lot to choose from.
How did you created the various characters?
Characters were designed in close cooperation with Cd Project RED.
Some of them were based on concepts or models from the game but most appear only in the intro.
The only exception was Assassin who is an important antagonist in the game. He had to look exactly as he’s portrayed there. With all other characters we had much more freedom.
What we tried with all of them was to give each character a distinct personality. We wanted them to feel as individuals even if they don’t live too long.
From technical point of view the creation process was quite traditional. Zbrush sculptures were a base for every model. We tried to use as much as possible of the game assets still each model had to be recreated for the animation purposes.
Some shots are shown in extreme slow motion. How did you manage those and especially on the animation side?
Mocap was a rough guide to these shots. Some animation was based on retimed mocap but most of the shots had to be animated from the scratch. Especially shots with rapid time changes needed to be hand animated. These shots were also a challenge for the cloth simulation.
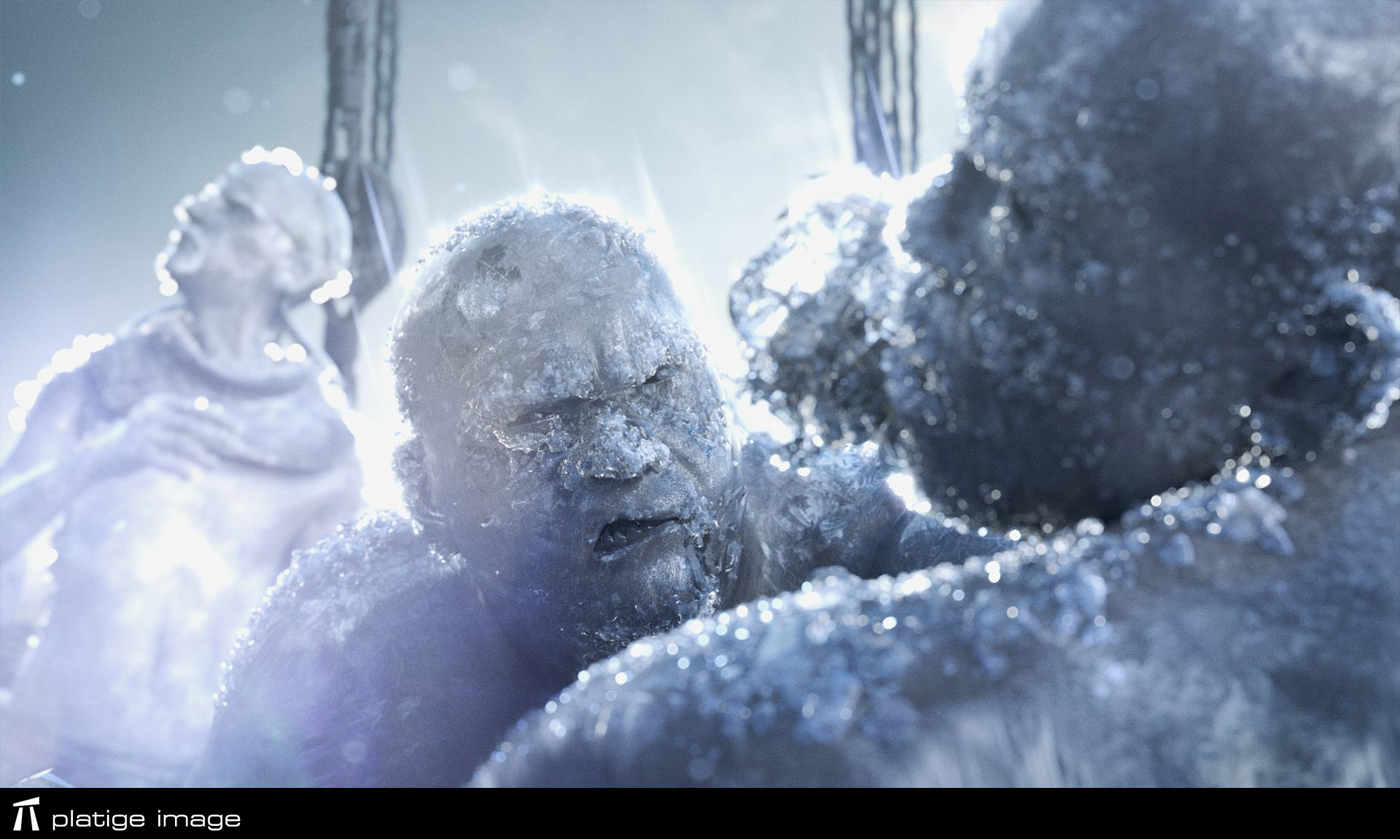
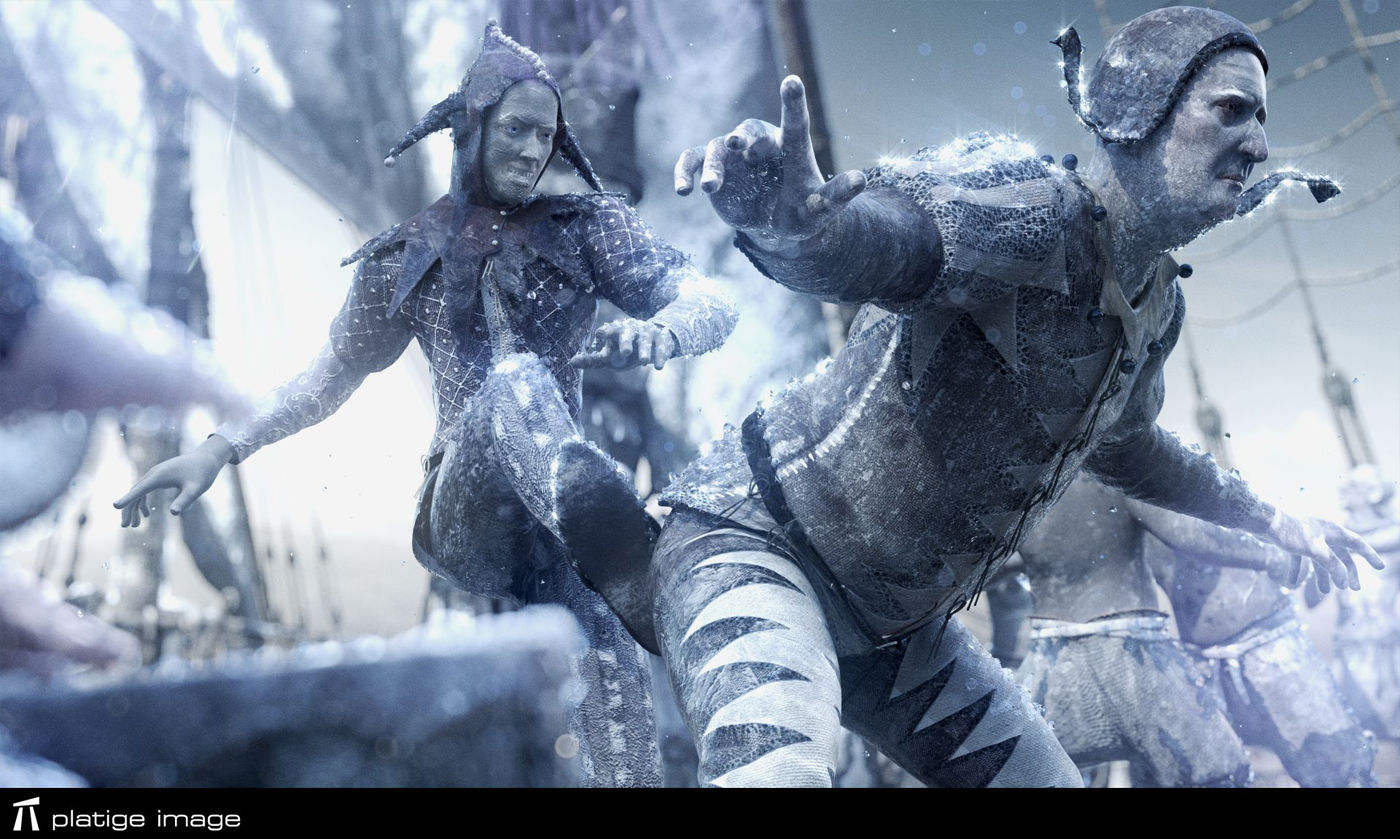
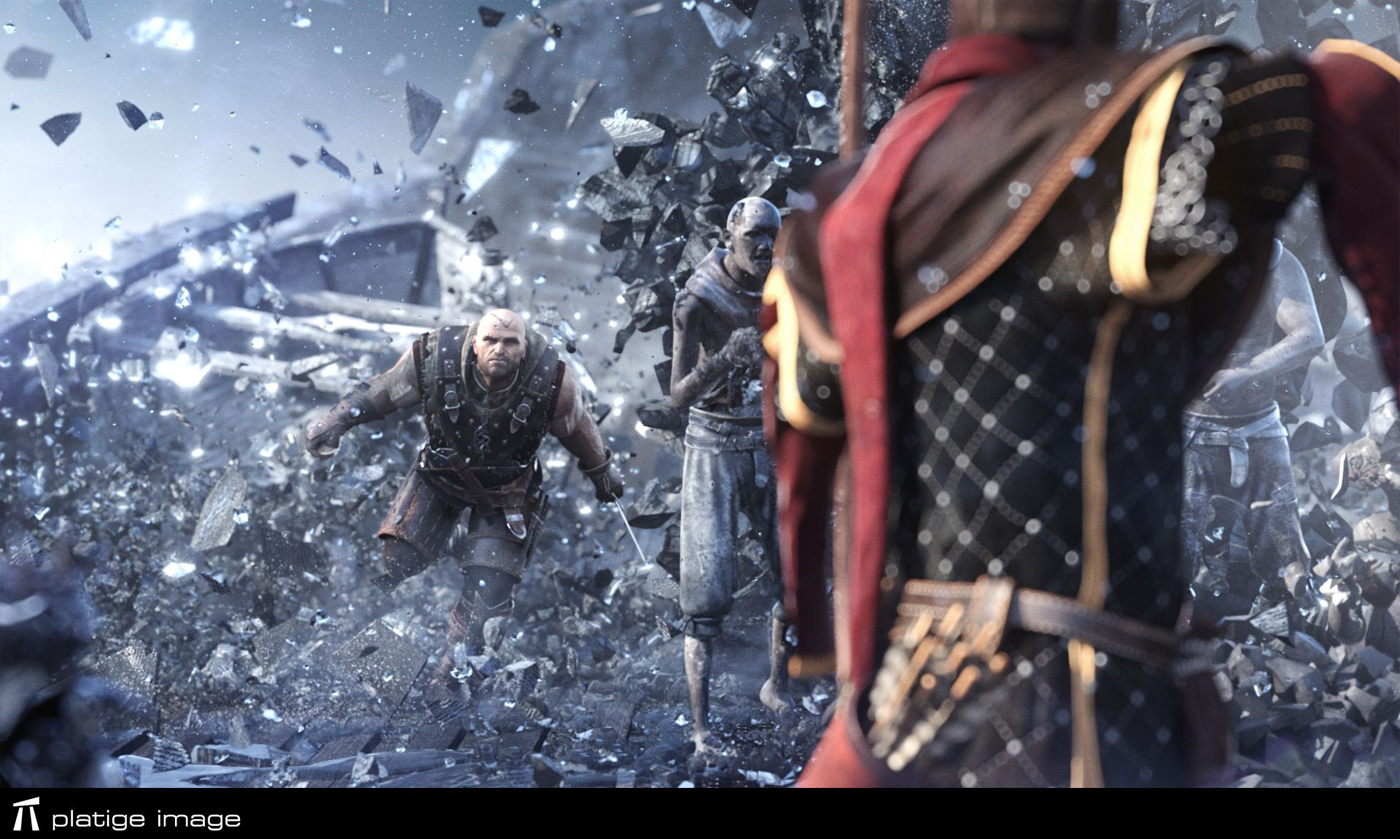
The people frozen in the ice and the ice itself looks great. How did you do to have this render?
Ice environments were developed and rendered by Marcin Stepien. He spent a lot of of time searching for the final look. We had to keep reasonable render times so finally it’s all a clever combination of geometry and shaders plus lots of particles that were scattered on geometry to imitate ice crystals.
Raw renderings looked really good so we didn’t even have to use a single mattepaint in this film.
Can you tell us more about the water element?
Even though we are on a ship there is actually very little water in the film.
We cheated a little and we don’t really show the sinking of the ship or waves breaking on the board.
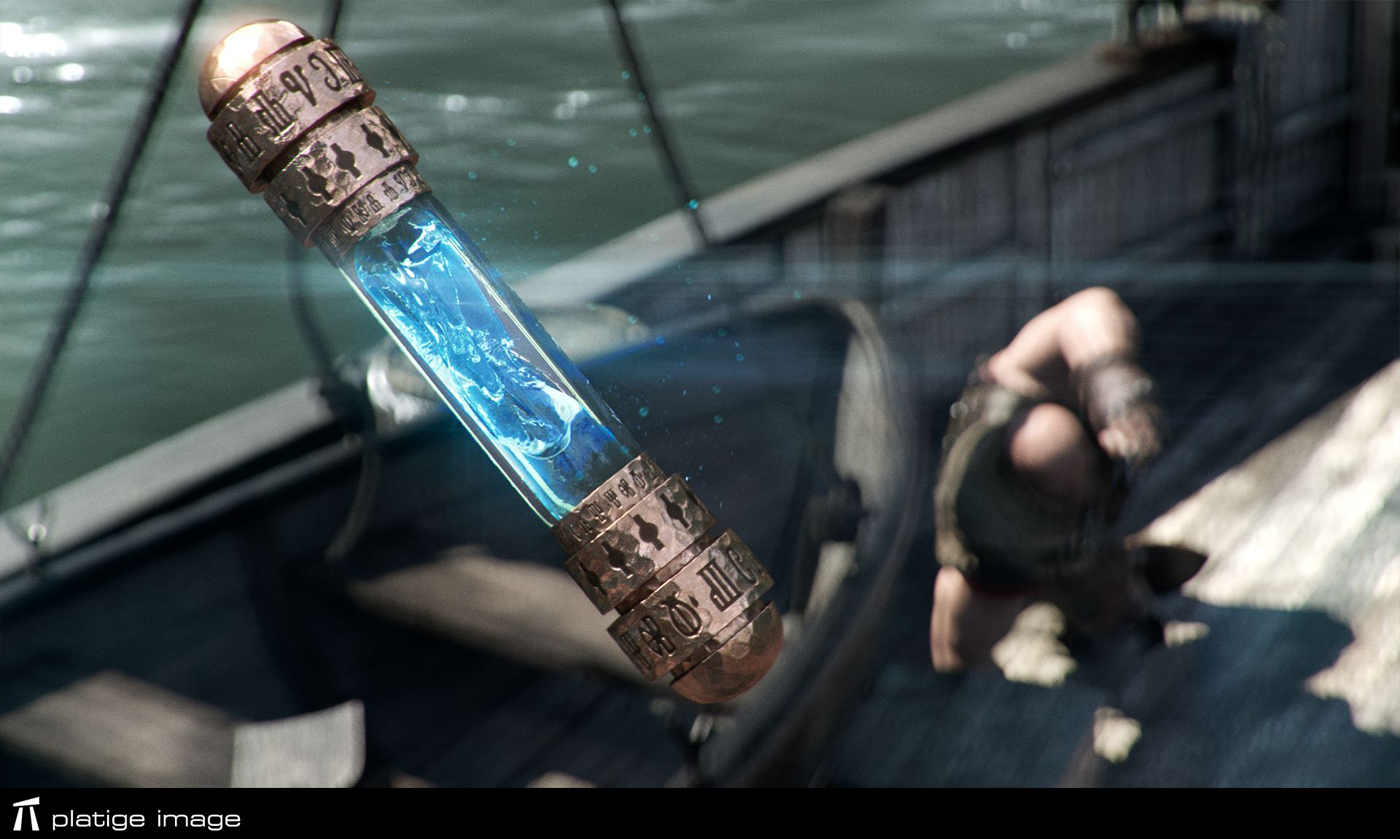
Most of the water outside ship is procedural displaced mesh rendered with mental ray. The only liquid simulation that was finally used was the magic liquid inside the ice bomb and blood.
Was there a shot or a sequence that prevented you from sleep?
I don’t recall any specific shot but we didn’t have much sleep on the last few weeks of production.
Simulations and renderings were polished until the last day. Personally I had all of the compositing work in my hands so I wasn’t bored too.
What do you keep from this experience?
This may be obvious but it’s never enough to remind that in a project like this team of talented and involved artists is a key element.
How long have you worked on this film?
That would be almost 9 months including all the preproduction and additional two trailers that were also created
How many shots have you done?
Over 100.
What was the size of your team?
Over 40 artists were involved. Core team was much smaller around ten artists
What are your softwares and pipeline at Platige Image?
We use a wide set of tools. WITCHER pipeline was based on 3dsmax – layout, rigging and pipeline tools, destruction simulations, rendering were all done in 3dsmax.
Additionally we used Motionbuilder for animation and Maya for cloth simulation. Now we are switching pipeline tools more towards Maya.
What is your next project?
Well, I’m involved in several smaller commercial projects right now. It’s a kind of change after almost one year spent on the cinematic.
What are the four movies that gives you the passion for the cinema?
I always enjoy quiet movies that don’t scream with vfx and remind what’s the most important in cinema too many to mention I guess.
On the other hand I’ve just swallowed all episodes of the GAME OF THRONES and enjoyed it as if I was thirteen again. There are also some classics that I’ve watched ten times.
Recently THE BIG LEBOWSKI which I consider a great life-philosophy guide or ROSEMARY’S BABY which I love for it’s atmosphere and Polanski’s dark sense of humor.
BARTEK OPATOWIECKI // Senior TD
Can you tell us more about the rigging process?
From the very beginning we knew that the animation layout will be done in 3dsmax and CAT. Motionbuilder was also the obvious choice for cleaning mocap data.
We just needed to write some tools to automate exchange of shots between the software we were using. « Shotbuilder » is a set of tools helping not only in that but also enables to automatically create scenes for artists working in next phases of production (simulation, lighting, rendering).
This way it was very easy to move animation from Motionbuilder to 3dsmax, load latest versions of rigs, animation, cameras’ settings and models with shaders, then cash whole shots and create scenes for artists working at next stages. One person could do it for around 20-40 shots per day.
Have you developed specific tools for this project?
Rigging of characters was based on iterations. Animators could use preliminary models with set proportions, practically in the beginning of modelling process.
Shotbuilder enabled almost automatic integration of the project in every moment of animation.
Background characters were created basing on two main types of rigs. Main characters like Mage, Assassin and fighters got their own setups. We used skinfx and psd method for the Fighters setups.
The main characters setups were basing on simple bone deformations and a lot of psd (pose space deformations).
LUKASZ SOBISZ // FX TD
The clothes looks really great. How did you achieve to this result?
Cloth simulation workflow has been evolving since we used Maya nucleus some time ago for THE KINEMATOGRAF (a shortfilm directed by Tomek Baginski).
Since our main application of choice is 3ds max we’ve developed a solid and reliable ways of moving the data between the two packages, so that it’s nearly transparent at the time speaking. It’s based on common *.fbx for geometry and *.mc format for deformations. Nothing fancy here – just a solution that works. All data exchanges is handled by dedicated set of scripts for simulation queuing on multiple computers and gathering it all together for final baking in Max.
One of the most important things for me, when doing cloth sims, is robust and stable collision handling. In terms of collisions, nucleus is the state-of-art technology.
Our setups are nearly always closed in multilayered, complete cloth-rigid structures, and without proper collisions we would have to split this into separate files. That would of course complicate the workflow. We also make heavy use of constraints. It’s the flexibility they give I consider a second big thing about Nucleus.
Can you tell us in detail the destruction process of the people and the ship?
Whole destruction process was simulated with Thinking Particles for 3ds Max.
It’s completely procedural and encourages to experiment and learn new ways of dealing with problems.
In case of the ship, everything had to match with the previsualization. Thanks to the great layering system in TP we could iterate through successive simulation layers and combine everything in the same simulation environment.
It was a real time-saver, especially considering the fact that we’ve started the simulation setup when there was still some ongoing development with the ice geometry covering the whole ship. Same goes for the characters, some of which had to consist of a few layers to get believable results.
For example Clowns cloth fragmentation was a separate piece of geometry. In another shot there was a frozen Marin, who got shot with an arrow causing him to fall apart uncovering layers of skin, flesh and bones.
Most shots were slowmotion so it became crucial to get stable and pleasant rigid body simulations.
There came some help from native ShapeCollision in ThinkingParticles. Very solid solution.
How did you create the beautiful particles effects of the two spells?
To achieve enough level of details and handle multi-milion particle sims we used famous Krakatoa renderer. Particles where driven with thinking particles system, which gives some unique workflows with Matterwaves node. It allowed us to control the emission with procedural maps and uv coordinates for maximum freedom.
The motion was enhanced with fumeFX, which integrates very well with TP and gives access to any voxel field stored within fume’s cache. Another feature that saved us a lot of time was MagmaFlow coming with Krakatoa. Editing particle channels after simulation is finished, streamlines render passes generation and gives additional control over the look of particles.
A big thanks for your time.
// WANT TO KNOW MORE?
– Platige Image: Dedicated page about THE WITCHER 2 on Platige Image website.
As well as, Jeff White (ILM) and Guy Williams (Weta Digital) for THE AVENGERS and Platige Image team for THE WITCHER 2 that will be on The Art of VFX in the days to come. Do not miss this opportunity to meet these great VFX artists and more.
The Art of VFX will also be present on site and would love to meet you.
Sebastien Moreau began his career in visual effects over 15 years ago. He worked in several studios such as Hybride, Weta or ILM and participated in projects such as MIMIC, STAR WARS EPISODE II, WAR OF THE WORLDS or THE LORD OF THE RINGS: THE RETURN OF THE KING. In 2006, he founded Rodeo FX with Mathieu Raynault and oversee the effects of movies like TERMINATOR SALVATION, SOURCE CODE or RED TAILS. In the following interview, he explains his second collaboration with director Tarsem.
What is your background?
I have worked in Canada, the US and New Zealand… most notably at ILM, Weta, Hybride and Buzz Image Group. However, I am most proud of where I am now at Rodeo FX as the company’s President and VFX Supervisor. We are a VFX company continually expanding our personnel with creative artists and executives that share a vision for the company’s growing future.
How was this new collaboration with director Tarsem Singh?
This was Rodeo FX’s second time working with Tarsem. Having worked on IMMORTALS with him, we were familiar with the scope of his vision… which was especially helpful this time since the post production schedule for MIRROR MIRROR was incredibly short. It was the first time working with VFX Supervisor Tom Wood. Tom was aware of our working with Tarsem on IMMORTALS and trusted us early on in the delivery process. Tarsem gave clear direction, carried out by the film’s VFX Supervisor, Tom Wood.
How have you worked with Production VFX Supervisor Tom Wood?
We met Tom Wood in person at the beginning of production on the MIRROR MIRROR set, here in Montreal. We then sent a great team of concept artists and modeler at Mel’s with Tom to get all the concepts, modeling and camera work he needed on a weekly basis. We also sent our camera match move team to do the data wrangling. We then met weekly via Cinesync and Skype.
Can you tell us what Rodeo FX did on this film?
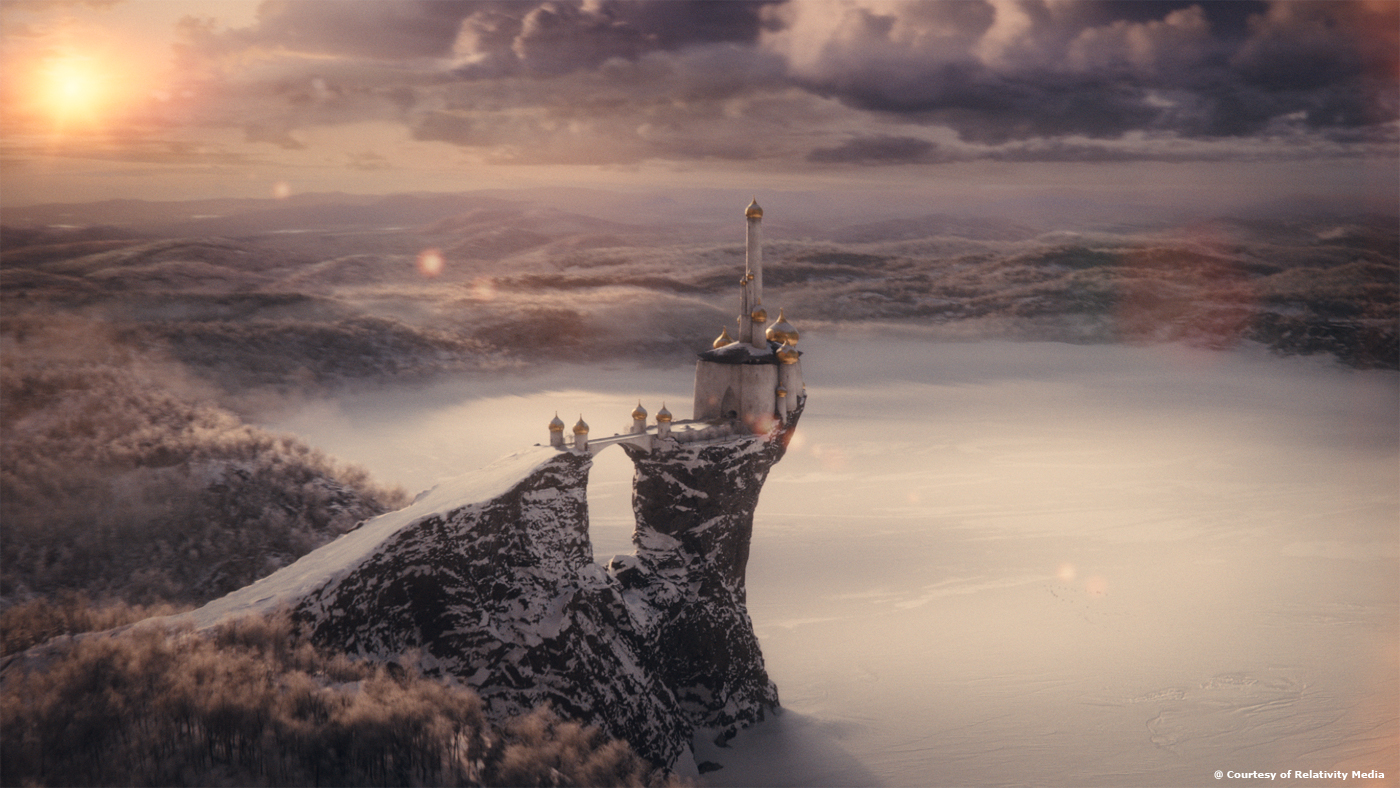
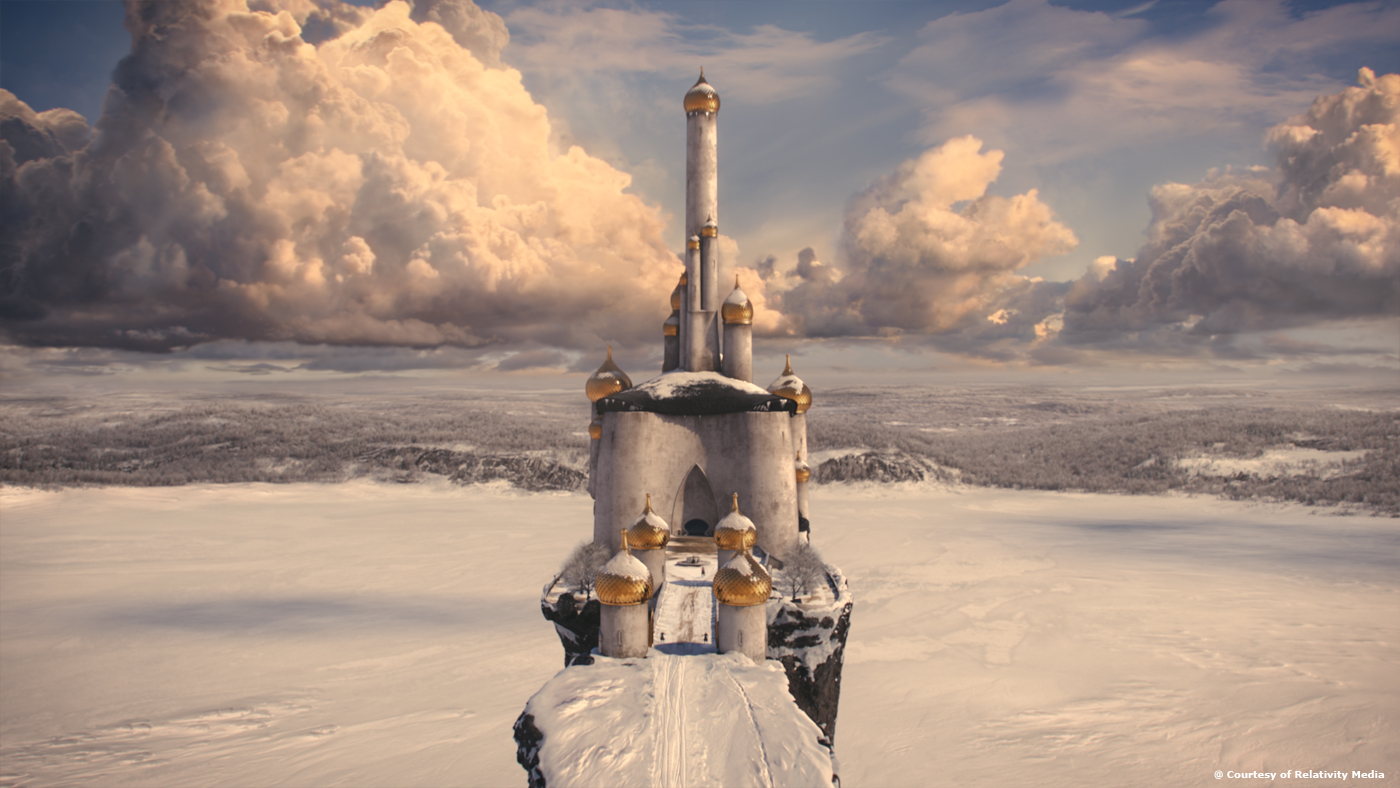
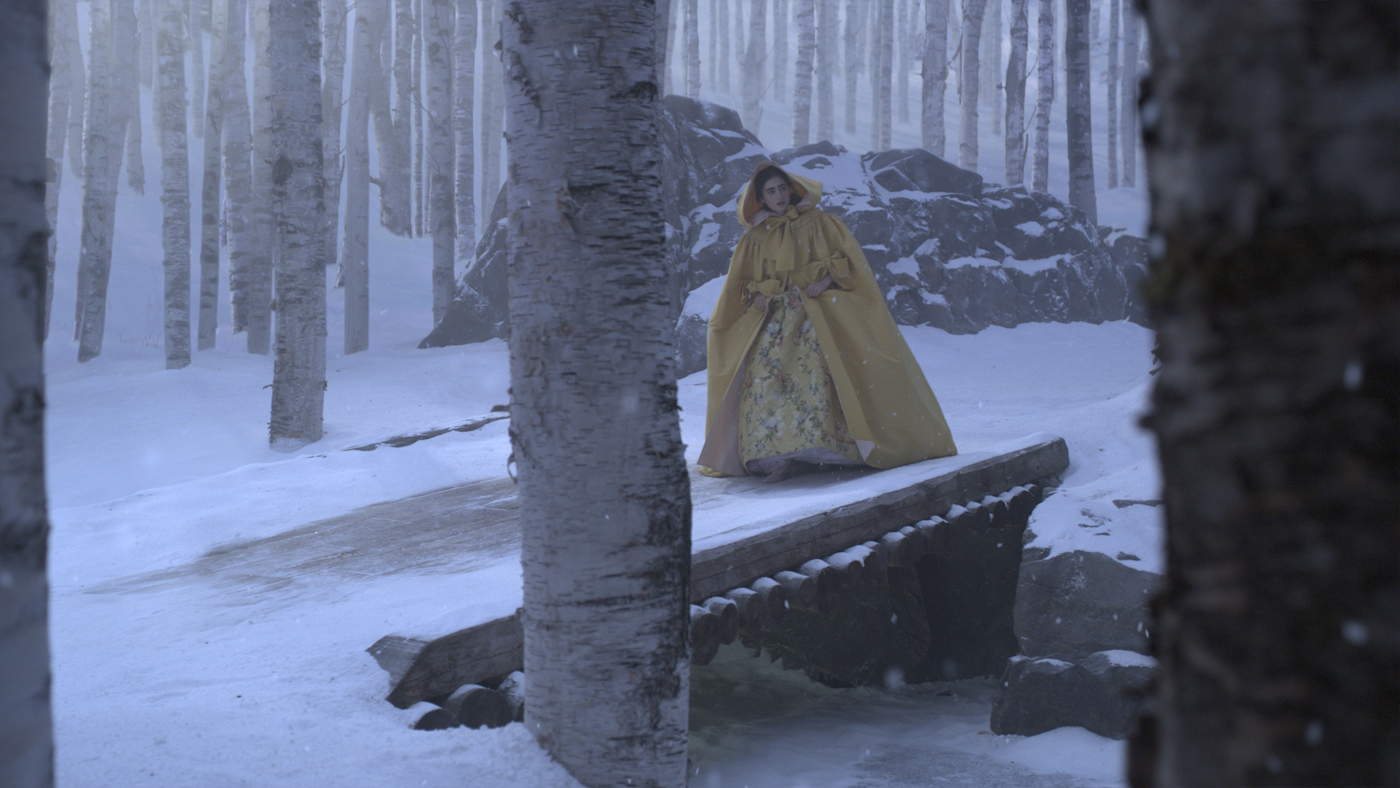
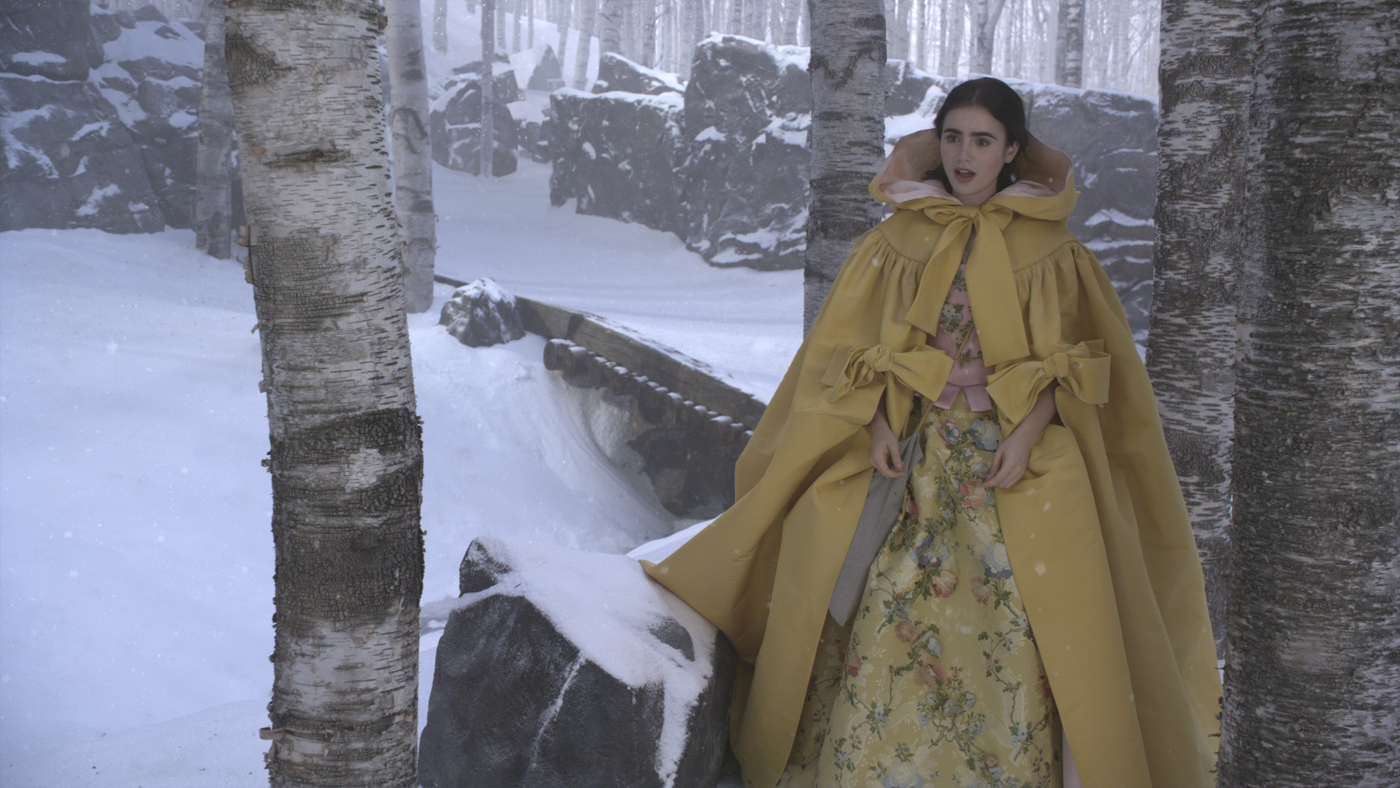
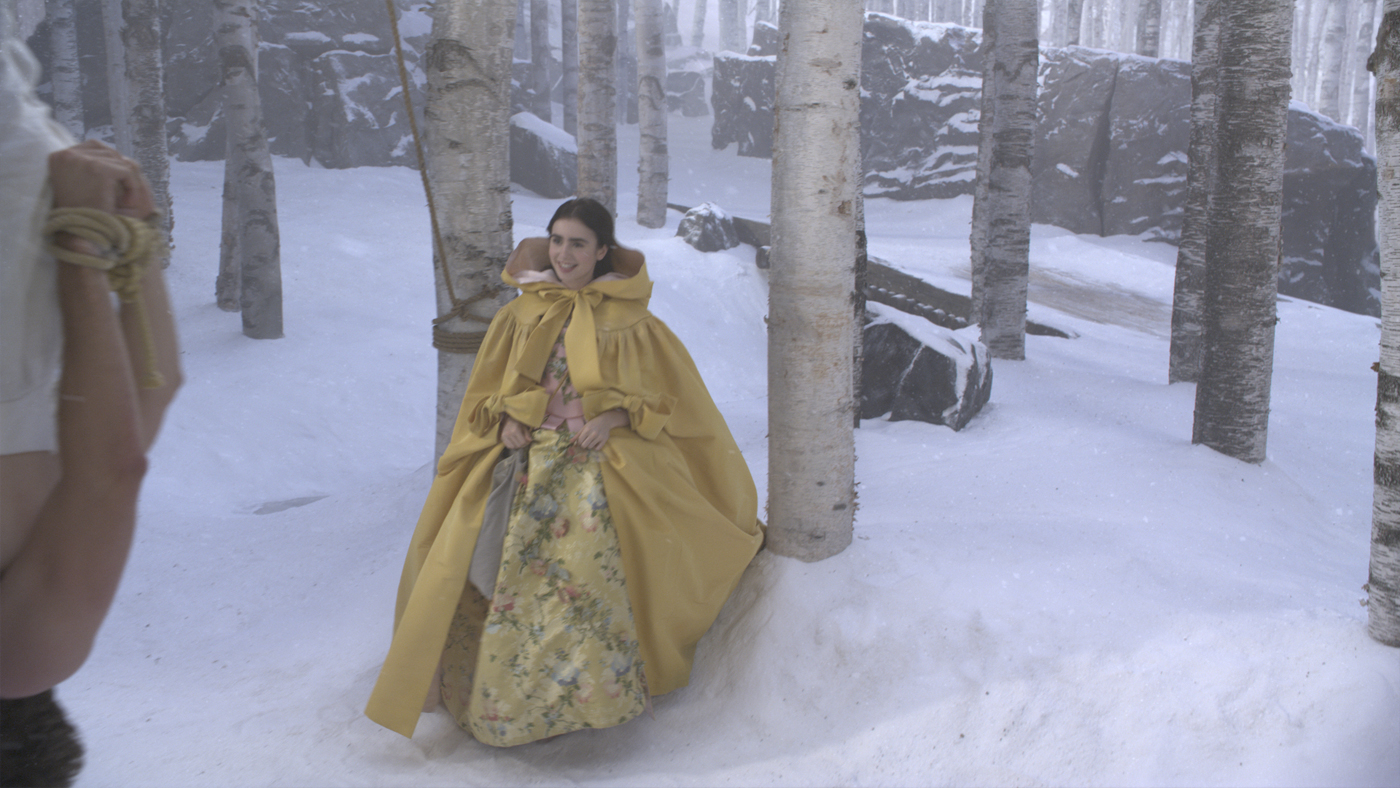
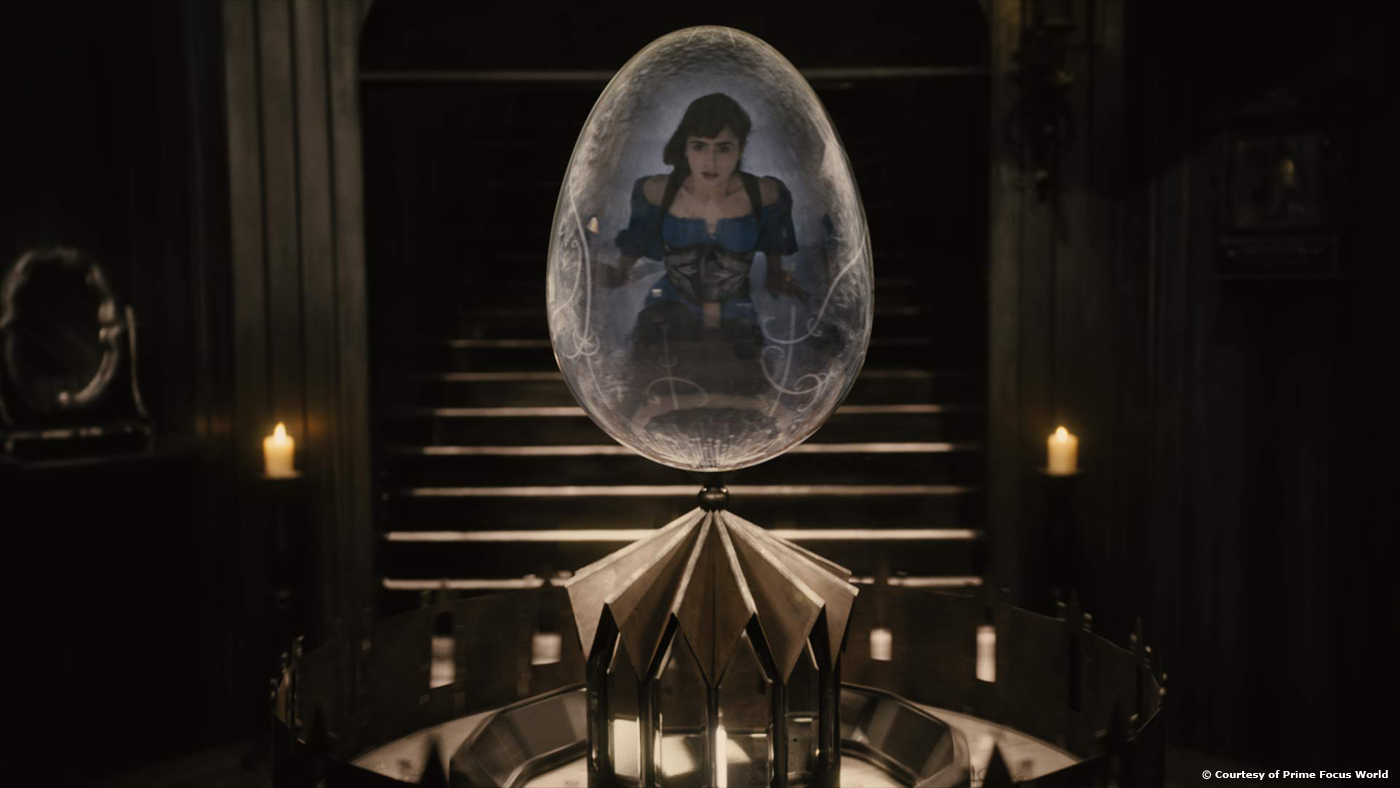
Rodeo FX sent a team to create the concept, starting with the castle. Tarsem told us he wanted the film to have a surreal look. The concept stage is truly important in the process of creating environments. Rodeo FX was brought in as part of the VFX production team to create over 160 VFX shots including: the film’s opening shot transitioning the seasons from summer to winter, the long shot of the Castle and the cliff on which it stood, the long distance shot with the approach leading to Snow White opening her bedroom doors, the interior of her bedroom, day and night sequences of the castle’s exterior, stormy skies, snow falling, computer generated (CG) crowds, Snow White’s courtyard and the interior and background of the Queen’s Chamber and the environment during the Queen’s wedding. Rodeo FX created all the Snow White castle establishing shots.
What indications and references have you received from Tarsem for the castle and its environment?
Tarsem and Tom Wood first planned realistic winter landscapes. Once that vision changed, they referenced the work of legendary illustrator Maxwell Parrish for the cumulus clouds. They also referenced the architect Gaudi for the castle and environment around it for inspiration for the look of the film.
How did you proceed to create the castle?
We started with concepts for the creation of the castle. We started creating the Hi-res model, textures and shading. We spent a good deal of time detailing the asset itself. To ensure being in sync with Tarsem’s vision, we had many discussions with the film’s Production Designer, Tom Foden, and with the VFX Supervisor Tom Wood for every aspect of the castle. We had several detailed discussions regarding textures, architecture, shape, materials, design and the overall look of the castle to be congruent with the Queen’s sense of style and opulence. The castle could be considered an integral part of the story. It’s the center of the Queen’s comfort zone.
Did you use procedural tools especially for trees?
Yes, we used XSI and Arnold.
Can you tell us more about the beautiful transitions between the seasons?
First of all, the snow was created with Nuke’s particle system. The challenge was to have the right timing from beginning to end. The Nuke’s particle system was fast and easy to play with. We rendered different depths and textures of snow… foreground snow, background snow and mid- ground snow. So the snowfall would become lighter and heavier at times for a real snowfall look and feel. We also had an all-winter look in CG, transitioning to a summer scene. We used textures, like an icy lake animating the transition from one season to another. Rather than just use a dissolve, we worked to create something that looked more like a time lapse from winter to summer. The transition we were going for was to be organic, so the audience would feel the sense of time passing with the seasons changing.
How did you handle the many different skies that we see in the room of the Queen?
A big challenge for us in creating the sky outside the Queen’s chamber was to create a fantasy sky with cumulus clouds… some in the subtle shapes of animals. We started by tracking the camera to have a reference for the placement. We then did a huge sky asset for all moods in the movie. We projected the MP in Nuke by loading all 3D cameras, making it fairly easy to have a quick comp for all scenes. The difficult part of the process wasn’t creating a quick comp for each scene. Then it was a matter of tweaking the sky by moving it around a bit and painting the part that showed the most. This part of the process was necessary to have a nice composition for the parts of the sky seen the most. The sky was sent to compositing with several layers making it a little easier for the compositors to animate the clouds on a fix frame, using a warp recipe we developed here at Rodeo FX.
The castle interior includes many digital set extensions. Can you further explain their design and creation?
For the castle’s courtyard conception we tried a lot of different looks to get a certain feel. It was not conceived immediately, but rather, it developed into a process until we got what we wanted. Tarsem and Tom [Wood] provided us with several references to convey what they were looking for. Creating scenes with their vision and our artistry took time, communication achieved over time.
What was your equipment to retrieve the necessary informations during the shooting?
We used excellent camera survey, photosurvey and lidar scans.
How did you handle the lighting challenge for your mattes-paintings?
Since the environment was an asset, the CG guys could easily provide trees and land layers already lit to the matte painters. It was a good base for them to add their magic touch and create those funky skies.
Can you explain in more detail the use of Nuke and Flame to create your shots?
Again the position passes were really handy for all the cg shots to tweak colors and create rough mattes. Most of the sky projection was done directly in Nuke and Flame to allow the compositor to animate the sky on a still frame. Both have their strengths and weaknesses. For example, Nuke is an asset because it can handle big resolution and it’s easy to test the animation because you have a big render farm. But we found the Genarts were a bit unstable in Nuke. Thanks to all the other tools it was easy to recreate the same thing. On the other hand, Flame is much more stable with Genarts plugin, but has some problems handling big resolution.
What was the biggest challenge on this film and how did you achieve it?
Time was a bit of a challenge having such a short post production schedule. However, I think one of the biggest challenges was creating the forest for two different seasons. The rendering time could go up quickly. Using Arnold really helped us achieve a good result with a short amount of rendering time.
What was the size of your team?
Rodeo FX now has close to 100 people covering every aspect of VFX. For MIRROR MIRROR, we used a team of 40 artists.
What is your next project?
Rodeo FX is presently working on THE TWILIGHT SAGA: PART 2 BREAKING DAWN, THE HOST, NOW YOU SEE ME, JACK THE GIANT KILLER and several other films and live production projects that we’ll soon be able to announce. It’s all very exciting… a lot of diverse work all on a large scale.
Martin Pelletier began his career in the VFX almost 10 years ago. Before joining the teams of Modus FX, Martin worked at Hybride and Buzz Image Group and participated in projects like ETERNAL SUNSHINE OF THE SPOTLESS MIND, SIN CITY or 300. At Modus, he oversaw the CG for project such as SUPER or SOURCE CODE.
Can you tell us about your background?
I finished my training in 3D computer graphics at Cyclone Arts and Technologies in September 2001, yes, just before the attacks in New York … So I had to be very patient to finally get my first job at Hybride Technologie as an tracking artist and render wrangler for 8 months! Thereafter, things have tumbled very quickly. I made the back and forth between Buzz Image Group and Hybride as an generalist artist to finally focus on the textures, lighting and matte painting. Then, I joined Modus FX in 2008, at the very beginning, as Artistic Director in charge of look development for the first 3 years of the company. I eventually decided to leave my machine to gradually take my current role as VFX Supervisor.
This is the second collaboration between Modus FX and Tarsem Singh. Can you tell us more?
Indeed, Modus was selected for the film IMMORTALS to work on two short sequences that allowed us to develop a trusting relationship and to prove our efficiency to Tarsem and his production team. So the door was wide open for a second consecutive collaboration on the film MIRROR MIRROR. The workload of more than 200 shots came to confirm the impression that Modus had left on the first collaboration.
How was the collaboration with Production VFX Supervisor Tom Wood?
Excellent. Tom Wood is a supervisor at once exceedingly accurate in his comments and conscious about the production time. We therefore referred so as to put the emphasis solely on which improved each shot.
Can you tell us what Modus did on this film?
Modus has delivered a total of 194 shots that are essentially 2D and 3D set extension, CG snow and some split screen shots.
What was the real size for the birch forest set?
The interior built by the production measuring approximately 82 feets by 236 feets.
Is the back of the set was a painting or a green screen?
Production first took up the challenge of making a painting of birch forest on black background. During the editing, they had to face the facts that a digital extension would be necessary.
What materials did you use on the set to retrieve all necessary information?
We were contacted by the production after filming was finished, so I have no information about it.
What references and informations have you received from Tarsem for the set?
Production has provided us with a 3D scan of the set and the size and multiple reference pictures. The indications for the choice of trees were used with birch branches at the top only.
How did you manage to recreate the trees and rocks?
The birches are pictures taken by Modus and applied on cards to ease the layout in both Softimage and Nuke. About the rocks, they have all been modeled in mid-rez and textured with pictures of rocks on the set. The 3D volume was more important to keep the rocks rather than the trees.
Can you explain in detail the creation of the set extensions?
Each extension was composed of 2D trees applied on cards, rocks modeled and textured in 3D, a 3D ground and a forest background with generic lighting and shadows generated by the matte painting department. The layout of trees and rocks on the ground was done by the 3D department, then an export to the Nuke of the same layout allowed compositors to make positioning adjustments of the assets until the very last minute to make the final shot. This procedure has also greatly helped us to avoid the back and forth between the various departments to apply the changes requested by Tom Wood.
How did you create the digital snow?
We used Maya to generate several sequences of generic snow at different scales to cover the foreground, the midground and background for the majority of the shots without parallax. For shots with more complex camera movement, we had to reuse the same snow recipe, but make it specifically for each shot.
Modus FX teams have completed nearly 200 shots in 2 months. How have you organized the studio to reach this deadline?
Using an approach that required no specific changes per shots. We divided the 194 shots in 8 groups. Each group was in fact a specific section of the forest. So we created 8 forest extensions that allowed us to cover all angles of a same group of shots.
Have you collaborated with other VFX studios?
Since Modus could not made entirely all the forest shots, other studios such as Rodeo FX and Mokko Studio have received a similar workload. It was therefore essential to have open communication between the three studios to get to create extensions to the same styles.
Have you developed specific tools for this project?
Nothing entirely new, but we adjusted our export tool from Softimage to Nuke to facilitate the transfer of layout scenes.
Except the very short time, what was the other challenge on this film and how did you achieve it?
Without hesitation, the biggest challenge was to build a pipeline that allowed us to quickly change the layout of any shot at the compositing when Tom Wood required to move or add trees at specific locations.
Were there a shot or a sequence that prevented you from sleeping?
A particular shot in which the camera rotates on itself 180 degrees (cork screw) gave us some trouble tracking since the truncated tops of the trees on the set was visible in the final frame which forced us to track real tree extensions.
How big was your team?
51 people in total including the artists and team coordination and supervision.
What is your next project?
Since the end of MIRROR MIRROR, I work on THE CHRONICLES OF RIDDICK: DEAD MAN STALKING.
What are the four films that gave you the passion for film?
BACK TO THE FUTURE, INDIANA JONES, THE MATRIX (only the first … like most people) and PULP FICTION. Yes, I know how I looks cliche on my choices.
A big thanks for your time.
// WANT TO KNOW MORE?
– Modus FX: Dedicated page about MIRROR MIRROR on Modus FX website.
Stuart Lashley began his career 10 years ago at MPC and works on projects such as TROY, SUNSHINE or WATCHMEN. In 2010, he joined Prime Focus teams.
What is your background?
I studied computer animation and visual effects at Bournemouth University. I started in the industry around 10 years ago as a compositor at MPC. I’ve been involved with Prime Focus in London since it came about in early 2010.
How did Prime Focus got involved on this show?
We were very keen to get involved with MIRROR MIRROR (then called UNTITLED SNOW WHITE). Prime Focus has a good relationship with the director and the production company, having just worked together on IMMORTALS, and the character animation work seemed ideal for our newly formed but highly experienced animation team to sink their teeth into. We approached the bid fairly aggressively with a great deal for concept and animation test pieces presented up front. Our animation tests went down extremely well and along with landing us the work on the mannequin sequence, helped influence how the eventual action in that sequence played out.
How was the collaboration with director Tarsem Singh and Production VFX Supervisor Tow Wood?
It was a fascinating and enjoyable experience. I’d worked with Tom in the past and it was useful to have that familiarity there at the outset. Tarsem works with an impressive fluidity on set and although there’s no doubt that he knows exactly the image he wants to create he was refreshingly sympathetic to the needs of visual effects and whenever possible gave us plates that would make our job as painless as possible. Naturally it was exciting for us to be working with a director who has such an incredible visual style to his films.
What have you done on this movie?
We created two 8 foot tall wooden mannequins that come to life and attack the seven dwarfs in their woodland home. We also worked on the Queens ‘cottage on a lake’ environment as well as the magic mirror transitions and a magical zoetrope.
Can you tell us more about the design and the creation of the Wooden Mannequins?
As usual the design started with collecting lots of reference. We had a few parameters to keep in mind whilst thinking about the design. Firstly they had to be similar enough to the real puppets that the Queen uses to control them. Their proportions had to work from an animation perspective and allow the full range of articulation required for the action. There were design elements favoured by production that needed to be worked to and of course the overall aesthetic had to both fit in with the MIRROR MIRROR world and look menacing enough without being too scary for younger viewers. We ended up designing a range of mannequin possibilities and went through a bit of a mix and match process with Tom before settling on the final design.
Building the final mannequin was fairly straight-forward as far as models go. Texturing was slightly more involved. During the sequence the camera gets extremely close to the mannequins so it was essential that the look of the wood held up. The texturing was done in stages allowing distant and mid shots to push through first while textures were up-res’d for the close and extreme close-ups.
How did you manage the on-set interaction for the Mannequins?
All the larger interactions like the smashing beds were done using a live action stand-in. The stand-in was then painted out and replaced with our mannequins. As a bonus this also gave us smaller more subtle interactions like the odd shadow or occlusion or even a reflection we could utilize to help the integration. Smaller iterations like the snow being kicked up were done in CG.
How did you rig them?
The rig setup was pretty basic with it being a rigid bodied character. In addition however the mannequins were setup in such a way that rigid body dynamics could be used for moments when they needed to fall limp and easily blended with keyframe animation.
Can you tell us more about the animation challenge with those Mannequins?
The main challenge was really in finding a good balance between involuntary puppet action and self-driven intent. They had to look like they were being controlled to a certain extent but you had to feel like these things were really alive and wanting to kill the dwarfs. The balance tilted in favour of more self-motivated action with hints of puppet like limpness.
The Queen has an impressive cottage on a lake. Can you tell us more about its creation?
This was an interesting if unusual design brief although perfectly in keeping with Tarsem’s style. The idea was that there’s this ‘mirror world’ that the queen gets transported to through the magical mirror. This world would consist of nothing but a wooden cottage in the middle of a very calm mirror-like lake. The elements of this world would be very simple in form but have an unnatural quality to them. The cottage itself had to be unusual in its shape but when viewed from certain angle would resolve to form the wings of an eagle totem pole.
We designed a few variations always starting with the wing shape and altering the model along the cameras perspective to preserve the illusion. Some of the designs were pretty wild but production designer Tom Foden eventually settled on a much simpler dual cottage shape. The modelling started with basic guide geometry onto which the individual wooden slats could be procedurally generated. This allowed us to easily make tweaks to the underlying shape without repositioning individual slats. Once we were happy with the slat layout our model and texture artists could then work up levels of variation and detail.
How did you create the lake and the skies?
The lake was a combination of shader-based displacement for the calm ripples and fluid fx for the interaction with the queen. Tom Wood asked us to look at examples of very long exposure photography and in particular the smoothing effect it has on rippling water. This was applied to the lake renders to give the shots that slightly ethereal look.
Similarly the skies had to have that real but not quite real feel to them. For this our matte painter referenced photos of real lenticular cloud forms that naturally have a very fairytale look.
At a moment the Queen goes through the Mirror and emerge from the lake in one continuous shot. How did you create this impressive shot?
The shot started out with a blocking process in order to figure out the camera. In this case the plates had already been shot by the time we started work so that very much dictated what the blended camera had to be. Once the position and timing of the plates was locked and the camera and of course the position of the lake surface worked between them, we could then start working in the CG shot elements and the water FX. In order to drive the water interaction we needed a pretty tight body track the queen all the way down to the deforming pleats of her dress.
Can you tell us in detail the destruction process for the cottage?
As soon as we had a version of the cottage with basic layout of slats we started work on the process of destroying it. We ran a number of early tests using physics based dynamics simulation. Our goal was to have this cottage go from fully standing to a pile of rubble and to do so in a way that was aesthetically interesting. Our effects TD came up with a system whereby an underlying skeleton would be used to control which slats gave way and when which allowed for great control over the shapes that were formed throughout the destruction. What we learnt from the FX tests fed back in to the modelling process where further tweaks had to be made.
While this was happening the shot was being blocked to work out event timings and camera movement. We passed these early versions which contained very rough representations of the destruction events to editorial who would return timing tweaks. Once the timing was more or less locked it was just a process of swapping in FX and environment iterations as they were developed.
The Queen had a beautiful zoetrope. Can you tell us more about it?
The Queen uses this zoetrope as kind of a magic crystal ball. Our job was to create the glass egg that sits on top of the zoetrope and the effect that happens within it. For the opening sequence we worked with post house One of Us who gave us the dying rose animation we see inside the egg and of course produced the beautifully animated sequence we are then led into. For that shot we had to build a full CG zoetrope because of how close we needed to get to it. For all other shots the zoetrope is real and the egg is CG.
What was the biggest challenge on this project and how did you achieve it?
Probably the limited amount of time and the huge amount of animation required, not only on finished shots but through an extensive postvis, blocking and editing phase. It was a pretty tight schedule with editorial changes happening right up to the end. We tried to have our teams work in parallel as much as possible.
Was there a shot or a sequence that prevented you from sleep?
Not really but I probably had one or two mannequin attack nightmares.
How did you manage the work between the different branches of Prime Focus?
The majority of work happened in London with some FX help from the guys in Vancouver. Management of this was fairly straightforward.
What do you keep from this experience?
Really pleased to have worked on a Tarsem film.
How long have you worked on this film?
4 months.
How many shots have you done?
98.
?What was the size of your team?
50.
What are the four movies that gave you the passion for cinema?
ALIENS, TERMINATOR, TERMINATOR 2 and JURASSIC PARK.
A big thanks for your time.
// WANT TO KNOW MORE?
– Prime Focus: Dedicated page about MIRROR MIRROR on Prime Focus website.
Pour offrir les meilleures expériences, nous utilisons des technologies telles que les cookies pour stocker et/ou accéder aux informations des appareils. Le fait de consentir à ces technologies nous permettra de traiter des données telles que le comportement de navigation ou les ID uniques sur ce site. Le fait de ne pas consentir ou de retirer son consentement peut avoir un effet négatif sur certaines caractéristiques et fonctions.
Fonctionnel
Toujours activé
L’accès ou le stockage technique est strictement nécessaire dans la finalité d’intérêt légitime de permettre l’utilisation d’un service spécifique explicitement demandé par l’abonné ou l’utilisateur, ou dans le seul but d’effectuer la transmission d’une communication sur un réseau de communications électroniques.
Préférences
L’accès ou le stockage technique est nécessaire dans la finalité d’intérêt légitime de stocker des préférences qui ne sont pas demandées par l’abonné ou l’internaute.
Statistiques
Le stockage ou l’accès technique qui est utilisé exclusivement à des fins statistiques.Le stockage ou l’accès technique qui est utilisé exclusivement dans des finalités statistiques anonymes. En l’absence d’une assignation à comparaître, d’une conformité volontaire de la part de votre fournisseur d’accès à internet ou d’enregistrements supplémentaires provenant d’une tierce partie, les informations stockées ou extraites à cette seule fin ne peuvent généralement pas être utilisées pour vous identifier.
Marketing
L’accès ou le stockage technique est nécessaire pour créer des profils d’internautes afin d’envoyer des publicités, ou pour suivre l’utilisateur sur un site web ou sur plusieurs sites web ayant des finalités marketing similaires.