WRATH OF THE TITANS: Gary Brozenich – VFX Supervisor – MPC

Gary Brozenich is a CG artist for over 25 years, he joined MPC while the studio only had a dozen artists. After working on numerous commercials, he joined the film division since its creation and will be in charge of CG on TROY and KINGDOM OF HEAVEN. He will be then VFX supervisor for films like THE DA VINCI CODE, THE WOLFMAN or CLASH OF THE TITANS. It is therefore natural that he talks about his work on the CLASH sequel: WRATH OF THE TITANS.

What is your background?
I studied traditional painting and illustration at The School of Visual Arts, NYC. I did further classical studies in New York before relocating to London. During this time I made a living as a modelmaker/sculptor/finisher. Through contacts in the traditional industries I became interested in 3D, it had so much potential. I started a company in London with a few others in the traditional modelmaking field to create photoreal CG imagery for advertising. We competed directly with photographers for all of our work. It was with Alias Wavefront software on Silicone Graphics machines in 1997 and I had never used a computer before, so it was a steep but brilliant learning curve. That company faded after 5-6 years and I went to work at MPC when we were about 12-15 people doing almost entirely commercials on the 3d side. Then film VFX hit London and me very hard at about the same time and I knew it was what I wanted to be doing. I have been a CG Supervisor and VFX Supervisor for MPC since then.

How was the collaboration with director Jonathan Liebesman?
Jonathan was great collaborator from the outset. He came into the show with very strong ideas of creature design and shooting style and methodology. We had seen his previous films and knew he had specific tastes and approaches that were going to create the base fabric of the film and that held true throughout. On our side I came into the project with strong ideas about what I wanted myself and MPC to bring and approaches I thought would help keep the big CG shots held within the grain of what he was trying to achieve. From the start both he and Nick Davis were open to our ideas would embrace them when they fit the bigger picture, and slam us with a tangential challenge when it didn’t. Which was great. « Whats a better idea? » was a phrase he would use often and he’d throw it to us to respond to, sometimes ours would stick and other times not, but it was a good environment. A lot of the crazier ideas came from Jonathan. The Makhai having two torso’s was his concept that took me a while to get my one head around, but once we had the plates and started animating I saw that it added a whole new layer to it. That same spirit of really pushing it and challenging us filtered into all the work.

What was his approach about visual effects?
Jonathan is very VFX savvy. I’ve never had a director ask me what tracking software I use before. He doesn’t overwhelm the process and lets us get on with our work, but he has a genuine hands on interest in the process and understands what he can do with it. Occasionally he’d do his own rough CG blockouts on plates-« postvis »-and sending it to me to save too much interpretation. Its something we are seeing a lot more with younger directors and it truly helps grease the wheels and lets you have a greater short hand both on set and in post.

How was the collaboration with Production VFX Supervisor Nick Davis?
Both myself and MPC have done many projects with Nick before. My first CG Sup role was with him on TROY so our working relationship has spanned a number of films and years. He is always fantastic at keeping the creative barriers open for myself, the artists and animators to contribute with and through him on every film. He brings a huge amount of experience to his projects creatively and technically. He also took on Second Unit directing so his imprint was significant on WRATH. Both he and Jonathan were open and receptive to our input, but would often counter with something bigger. A healthy balance for the show and to ensure their bigger picture was coherent.

What have you done on this movie?
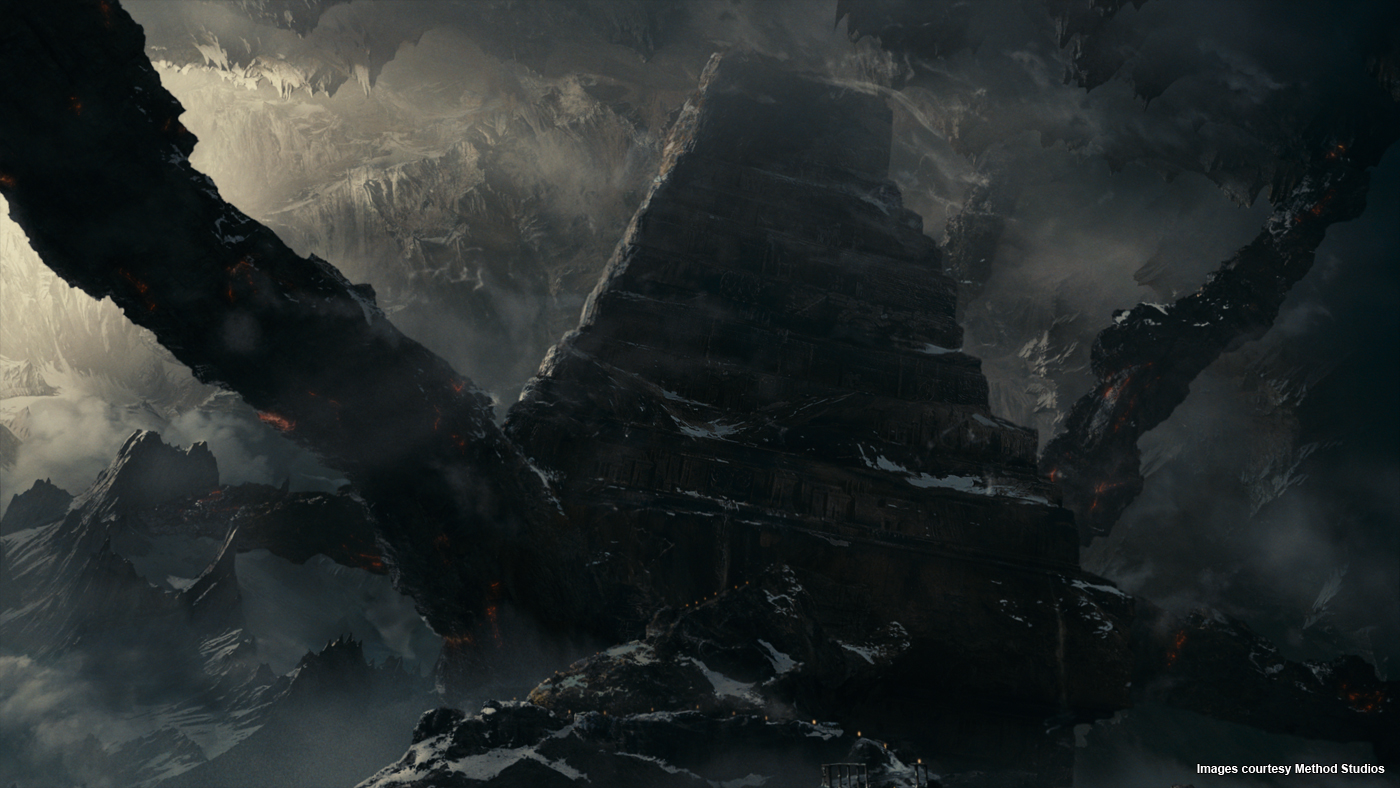
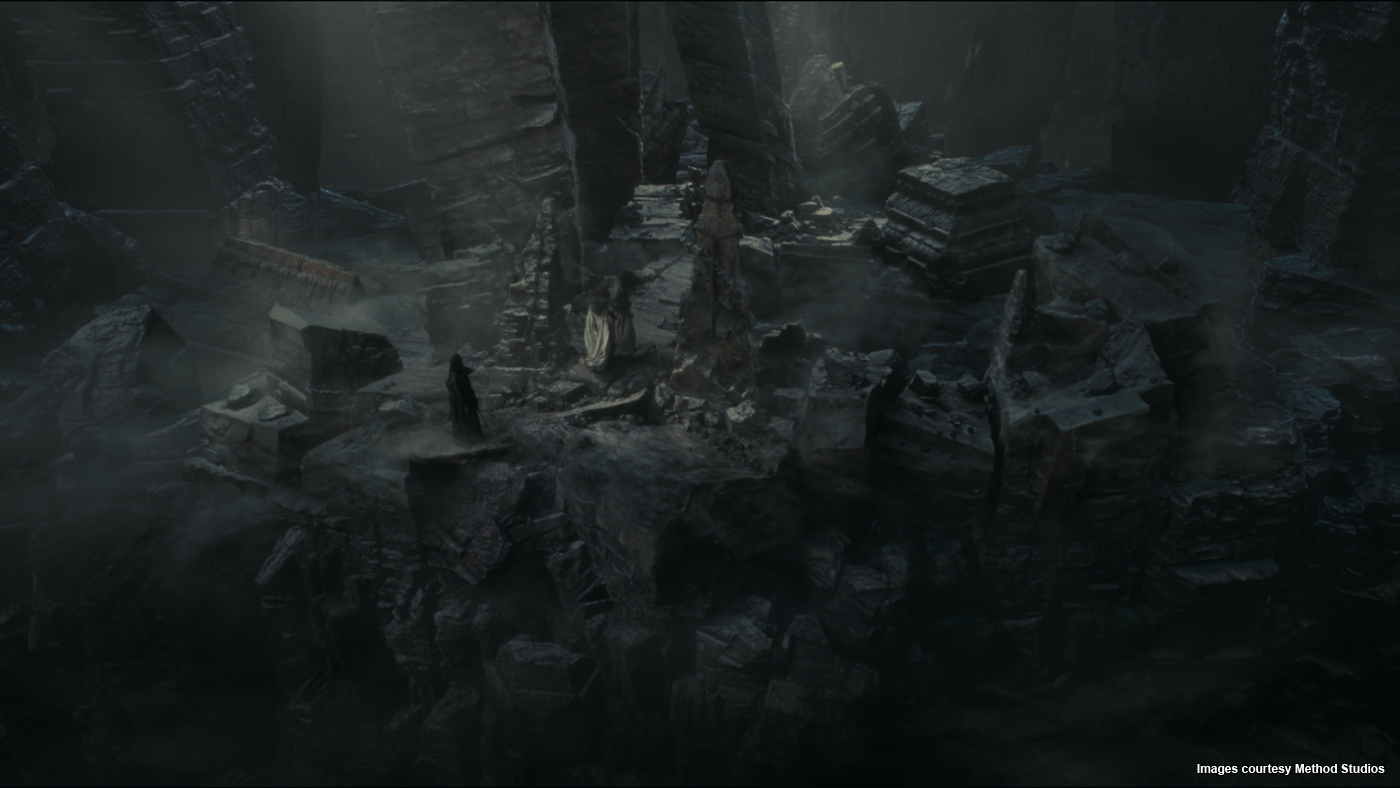
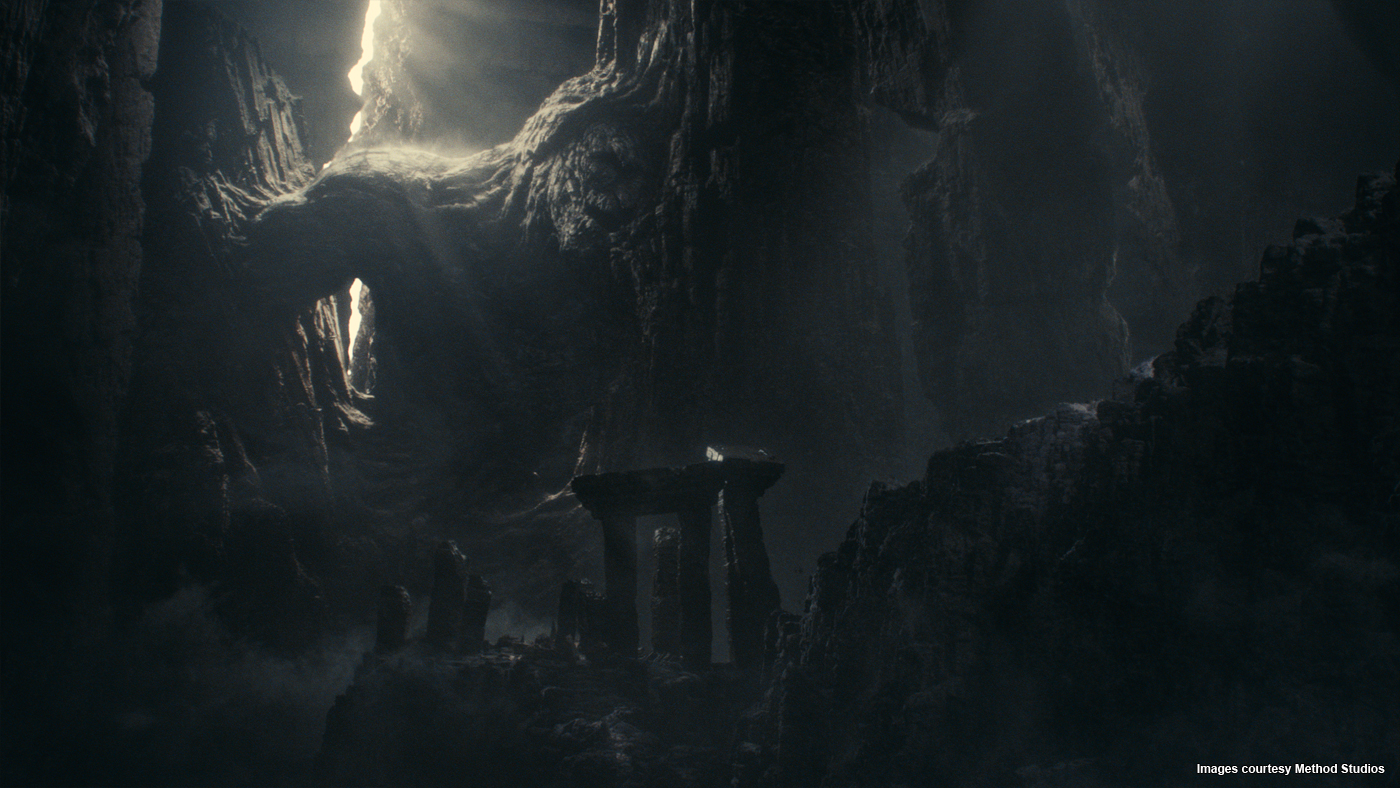
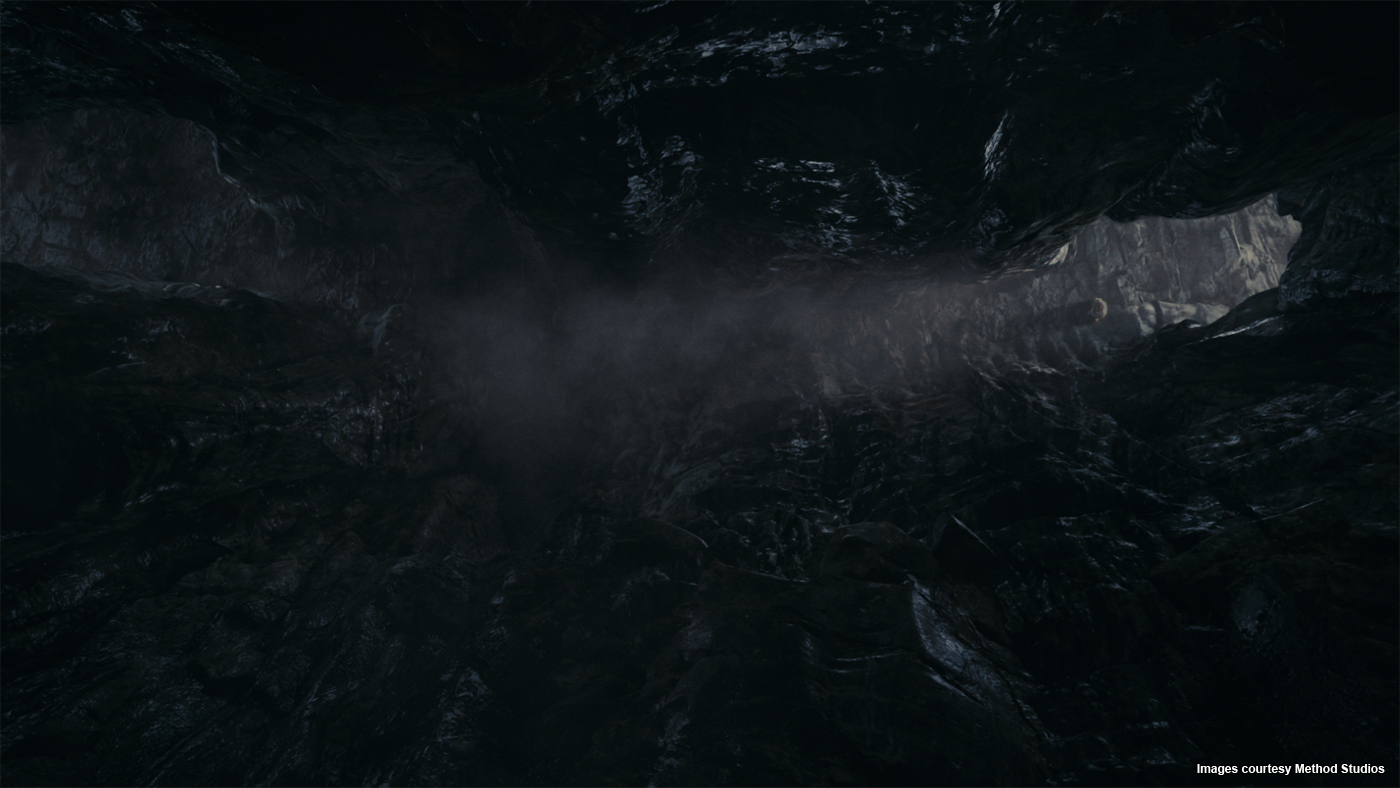
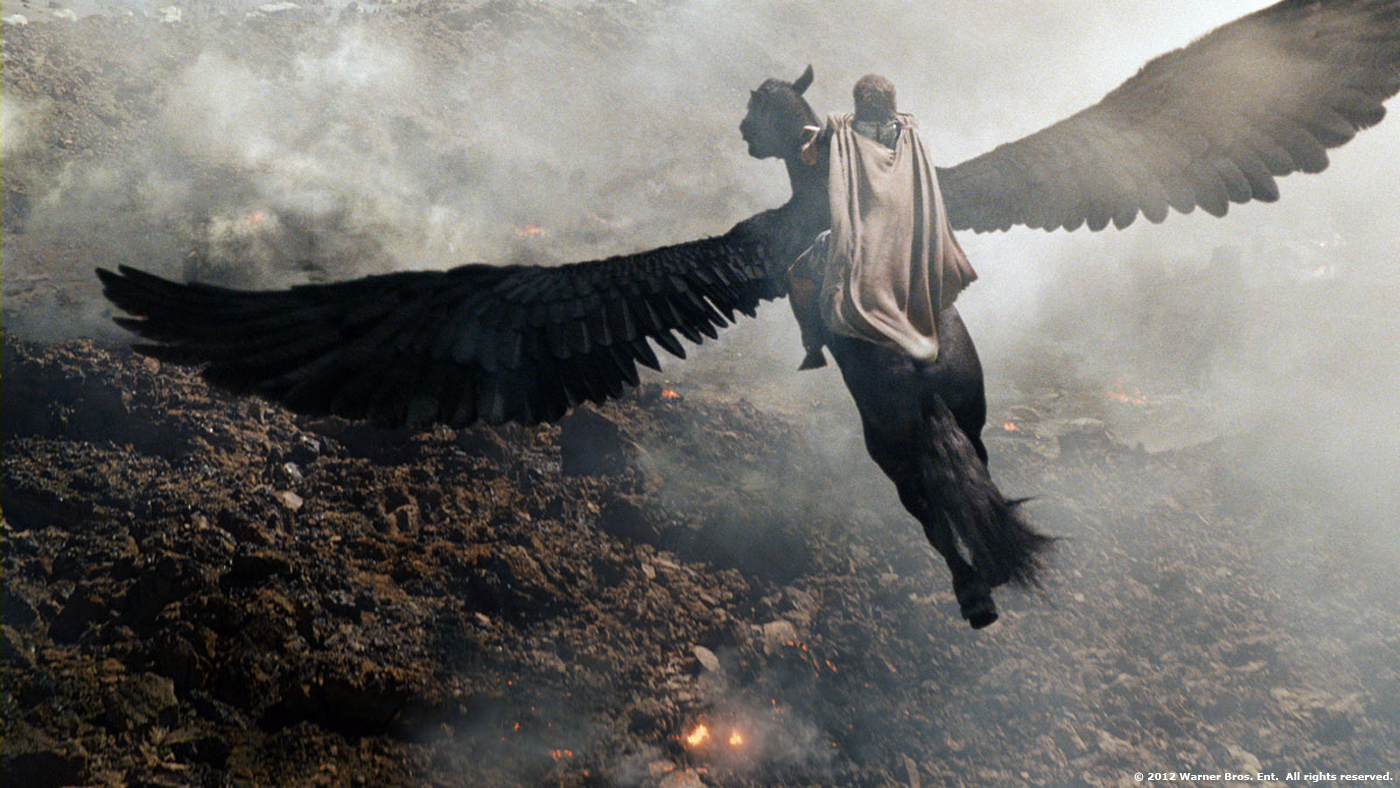
The primary creatures and sequences were the opening dream sequence, the Chimera attack, all of the Pegasus work (both wing additions and full CG) and the final battle after Kronos breaks from the earth, releases the Makhai to fight the humans on the ground and sees his demise. Mixed in there is a lot of one off work, like the gods dying and dissolving, full CG temples and set extensions and a number of DMP’s and others scattered throughout. A lot of creative challenges.

The movie features lots of creature. How did you proceed to manage their interactions with the locations and the actors?
Each one was handled in a different way and often differently on each set up. It was one of the first issues we started to tackle with Nick. Nick was aware in pre-production that JL had a style and a shooting approach that was going to be gritty, hand held and in the trenches. Charlie the production designer was creating an arena for these creatures that would force the actors and stunts to face each other- no matter what. Tight corridors that had to fit a Rhino size creature and ten humans was going to guarantee they would be thrown, trampled or killed.
So we started in pre-production discussing approaches with the stunts, SFX and Nick how to make this look as earthy and integrated as everything else Jonathan was aiming for. The Chimera was too big, fast and agile to have a proxy or « man in suit » to stand in on most occasions. We did have liberal use of SFX wall explosions and kickers positioned around set timed to go off on his path. At first I was unsure if this would cause trouble in post- that we would be too bound to these and it would inhibit the animation too much. On some shows I would opt for adding it all ourselves, but with Jonathans style in mind we would typically go for the plate with the most grit in frame.

The Chimera sequence is pretty intense. Have you create previz to help the filming and to block the animation?
Some of the key shots were heavily pre-vised for technical planning. There was a cable cam brought in for one particularly long shot and that required a significant amount of planning and rehearsal. This shot specifically « stuck to the plan » in terms of the shot by shot methodology of the sequence. There was a geographical layout for the sequence as a whole and the FX breakaway and destructible walls were layed out accordingly. The primary action events were established, but, largely the structure, framing and action was recreated through JL and Sam as the shooting progressed and unfolded.

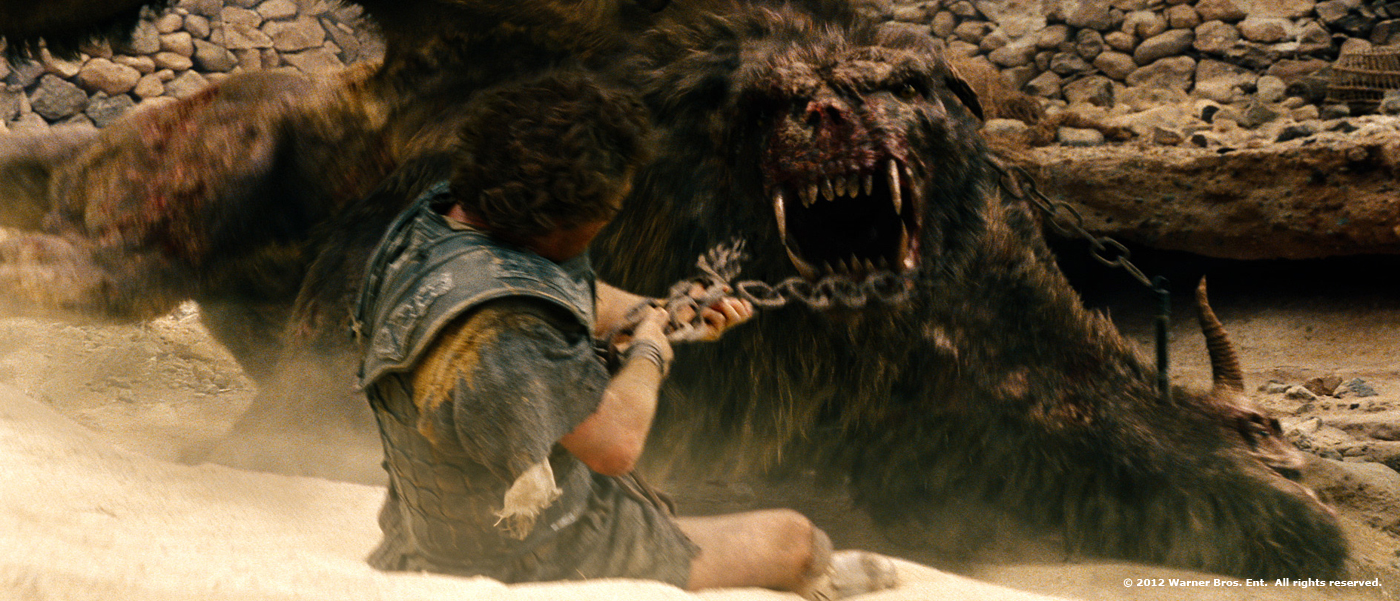
Can you tell us more about the Chimera creation and its rigging challenge?
The creature was largely designed in pre production before we picked up the sequence. There is a classical idea of the beast that the production stayed true to. The fleshing out of it was the biggest challenge to us. Making it belong not only in our world, but in the visual world that JL was creating for the film. Mangy, dirty and diseased were the major themes but preserving its power. It had to feel like a neglected and battered creature from the darkest wild. The challenges for Anders Langlands (CG Sup) and the rigging team was something we had to face a few times, an anatomical split in a creature that would need to be weight counter balanced by the rest of its body. The trickiest issues were where to place the split in the neck, how far back on his spine would feel natural, how to proportion the rest of the anatomy to compensate for this and how to gracefully handle the interpenetration issues arising from two heavily mobile portions occupying the same anatomical space. These issues were dealt with very effectively and very early on with range of motion studies with Greg Fischer and his animation team.

What were your references for the Chimera animation?
Lions. Particularly a few clips where they attack humans. Nearly every move he made was based on footage we could source.

How did you manage the fire thrown by the Chimera?
It was always a combination of FX and LA flame thrower elements. The creature actually emits an atomized spray from the goats head and a heated vapour from the lions head who’s combination creates the fire. We started each shot with FX elements created through both Maya and Flowline and detailed it or bulked it out with actual flame thrower material shot as elements.

What are the modifications about Pegasus between the previous movie and this one?
It was primarily upgrading existing assets to the latest versions of in house software. Primarily our groom tools that we call Furtility. Also, the horse was less kept looking than in the first so we added longer fur around the hooves and roughed him up a bit.

Can you tell us more about the Gods death that turns them into sand?
Originally it was only Poseidon that had this effect, but as shooting progressed it was applied to all of the gods. Shots were matchmoved and the actors were roto animated to their performances. We did not marker them up as we did not plan do so many or for them to be delivering dialogue during the transition between states. We created models to match the actors at the time of the shot, but obviously needed to deal with a more sculpturally designed version of their hair. The actual destructive process was created using Kali, which is an in house creation for shattering and rigid body simulation with a simultaneous geometry creation/extraction. Once the Kali effect, which gave us the gross collapsing effect, was approved it was the used to drive a more granular particle simulation that gave the sand like appearance. Likewise the initial model that was Kali’d was used to spawn a surface of particles that inherited its colour from the textured and dmp-projected geometry and that served as the rendered hard surface for the actor. This was then introduced in a patchwork across the performers face and clothing through judicious work in compositing using Nukes 3D and geometry capabilities. In some cases whole sections had to be retracked and warped to contend with the changing topology of their faces as the delivered lines.

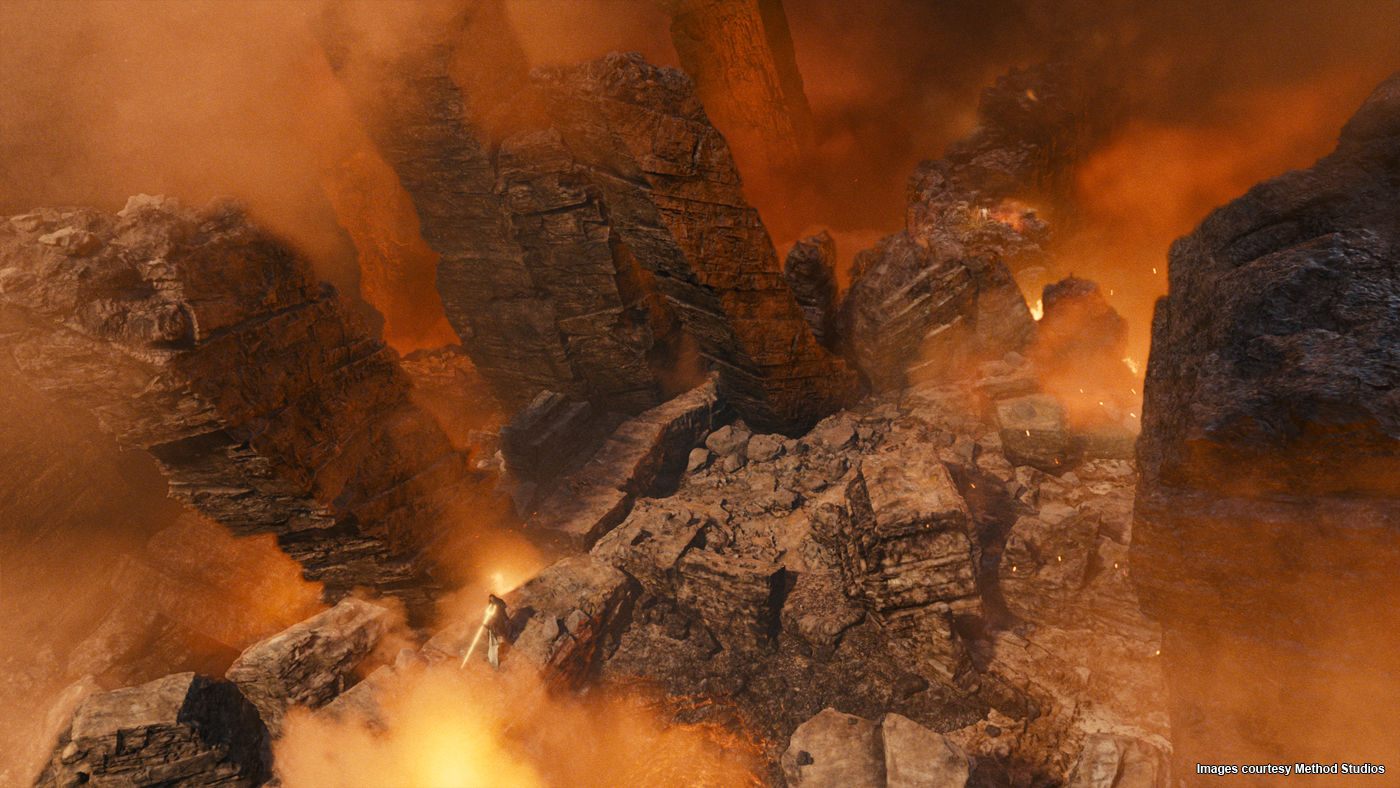
How did you create the huge environment for the final battle?
It was a combination of plates from two primary locations Tiede National Park in Tenerife and a very different looking battlefield specific location in south Wales. For the initial eruption and the path of destruction that Kronos lead I did several weeks of shot specific aerial photography over various volcanoes and lava created terrain in Tenerife. Nick Davis and I discussed the shots extensively and I shot a number of iteration of each in a few locations to give Nick and JL the material that they would need to cut with. So to answer your question specifically – we tried to shoot all of it, even if we knew it would be reprojected and altered significantly in post. I am a very big believer in having a plate to anchor work into whenever possible. Even if you deviate significantly from it in the final execution of each shot, which we did, it will give the editor, director, supervisor and all of the artists an inherently realistic core to spring from. Following the shoot Nick and I limited our suggested selects for JL and he and the editor cut with those. To aid the process I thumbnailed the storyboard or previs image onto the corner to remind them of the intended composition once Kronos was in the shot. This was sometimes taken on and often a better alternative or a new shot would rise through the cutting process.

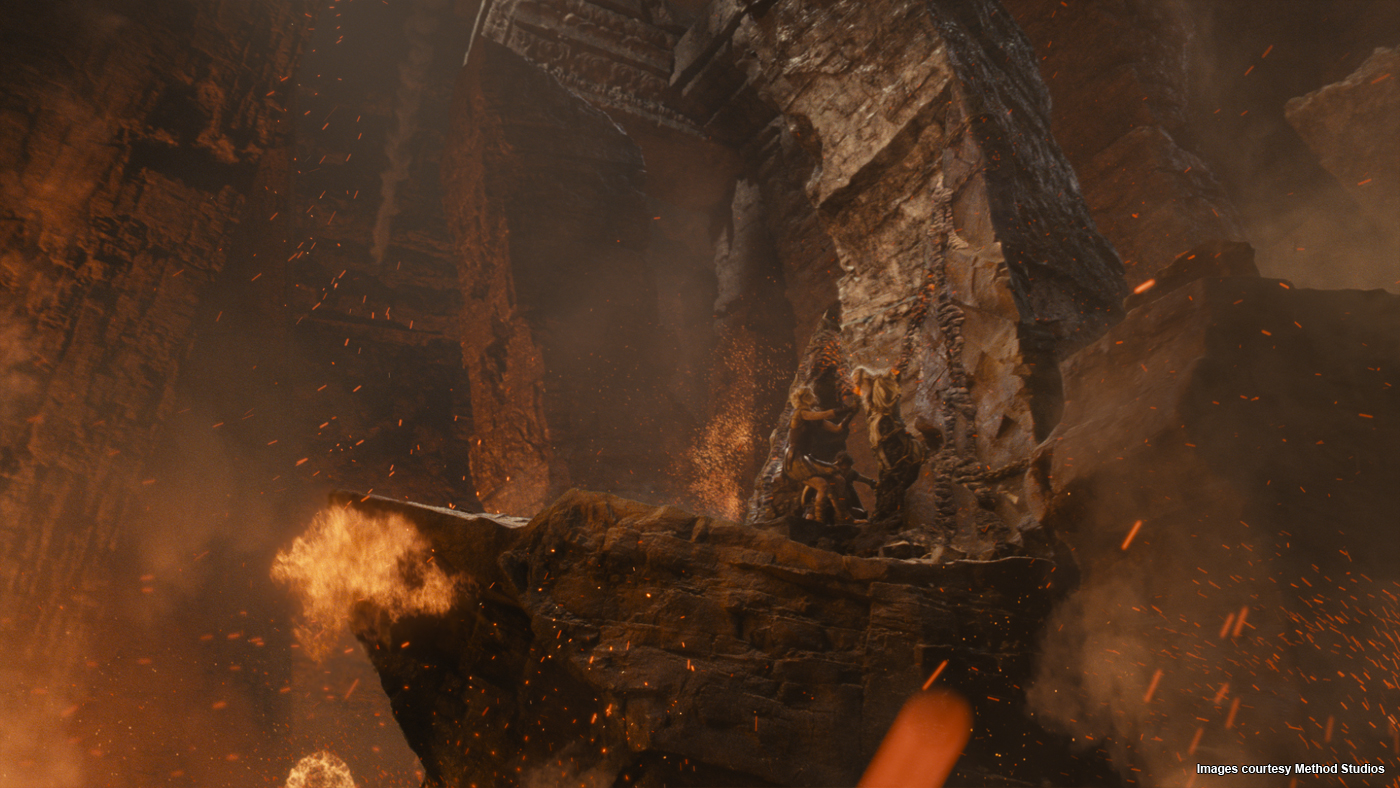
The Makhai are impressive creatures. Can you tell us more about their creation?
The design process began at MPC with Virginie Bourdin and our Art Department. Nick had given them an initial brief and we were entrenched in making these tortured creatures that had to have the size strength and presence to emerge from a volcanic rock, but not be too large that they could not fight hand to hand with a human and also be killed by them. The scale of Kronos precluded him as a viable option for a good punch up and Nick and JL needed a scaled opponent to keep the humans occupied and the action flowing in the scene while Kronos made his way to the location. We had a number of sessions and thought we were honing in on a solid design when JL threw us a total curve ball that he wanted them to have multiple arms and two distinct torso’s and heads. For a while we had a hard time getting the idea straight in our minds and how a character like this could fight, but more specifically how it would emerge, run and navigate very complex terrain on its way to the fight. We simultaneously worked it in concept and as a rough rigged model so that we could do motion studies as the design matured to ensure it would function all the way through the film.

Does their double body aspect causes you some troubles especially on the rigging side?
Absolutely, similiar to the Chimera but with much greater range of motion due to the anatomy and location of the split. It was a great challenge for Tom Reed our head of rigging and his team to confront. Many iterations and clever solutions to conceal and embrace the issues as features created the creature that’s on the screen now.

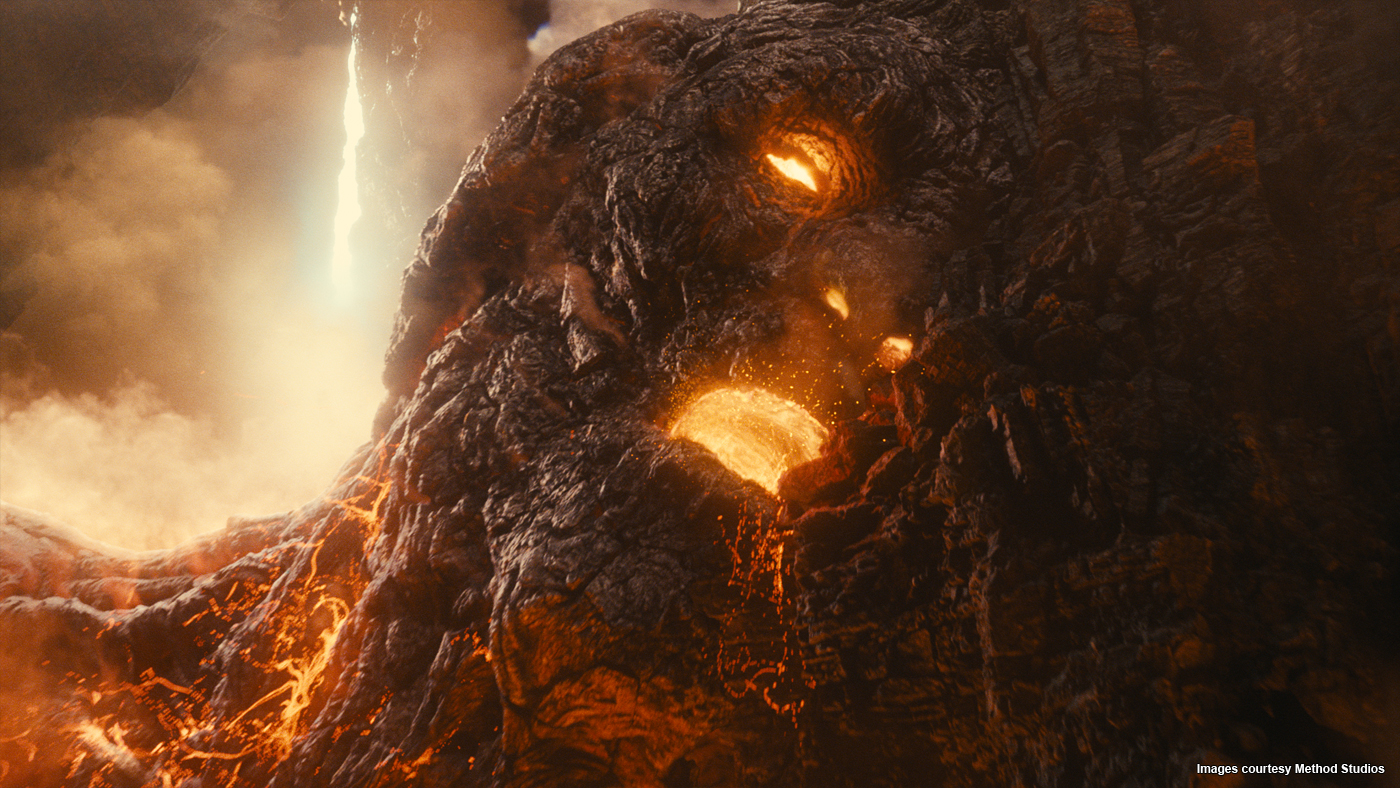
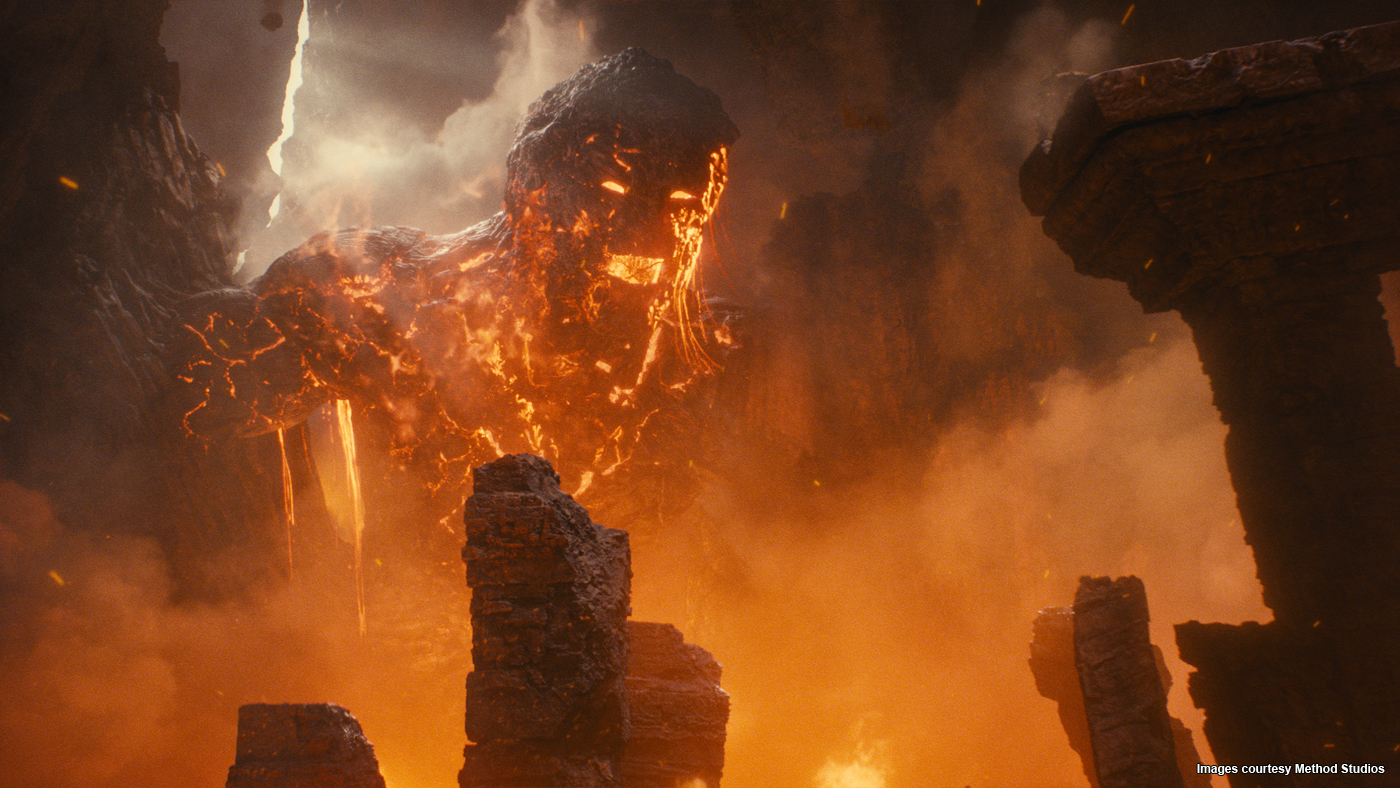
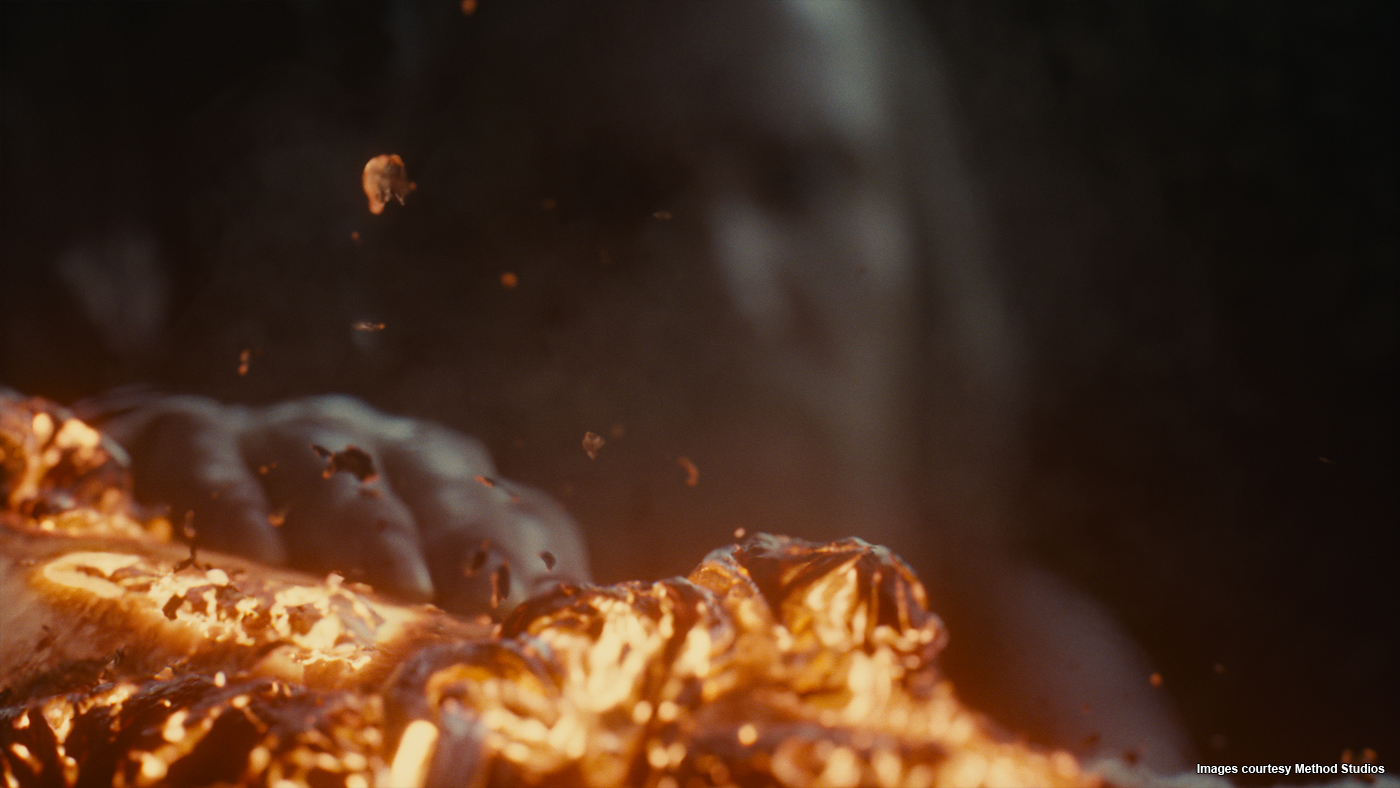
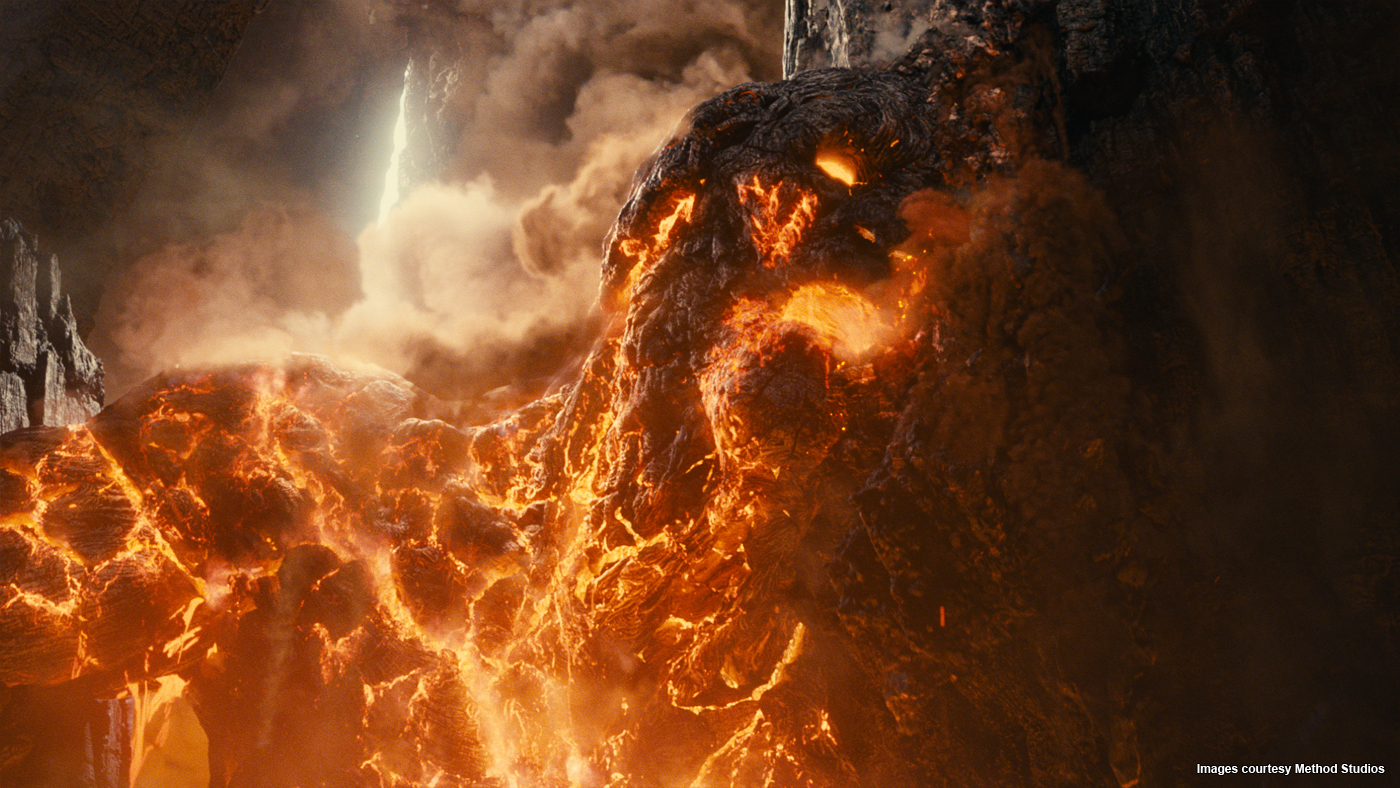
The Kraken was a huge challenge on the previous Clash. For this new Clash, Kronos is much more bigger and complex. How did you faced this new challenge with its amount of FX and particles?
The major difference between the two challenges was the variety of material required to bring Kronos up and move him forward. The Kraken emerged from water and was constantly dripping water which at that scale quite quickly turns to mist and streams.

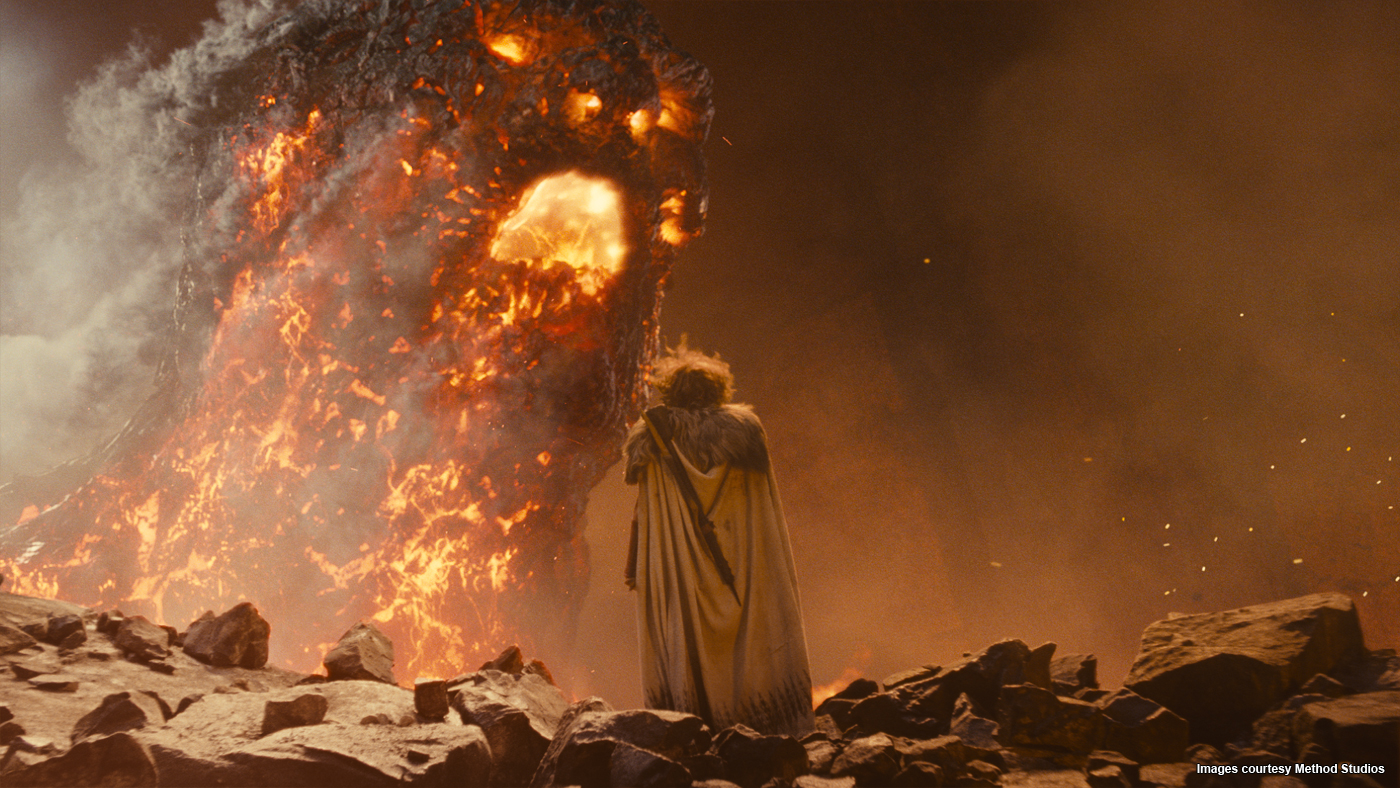
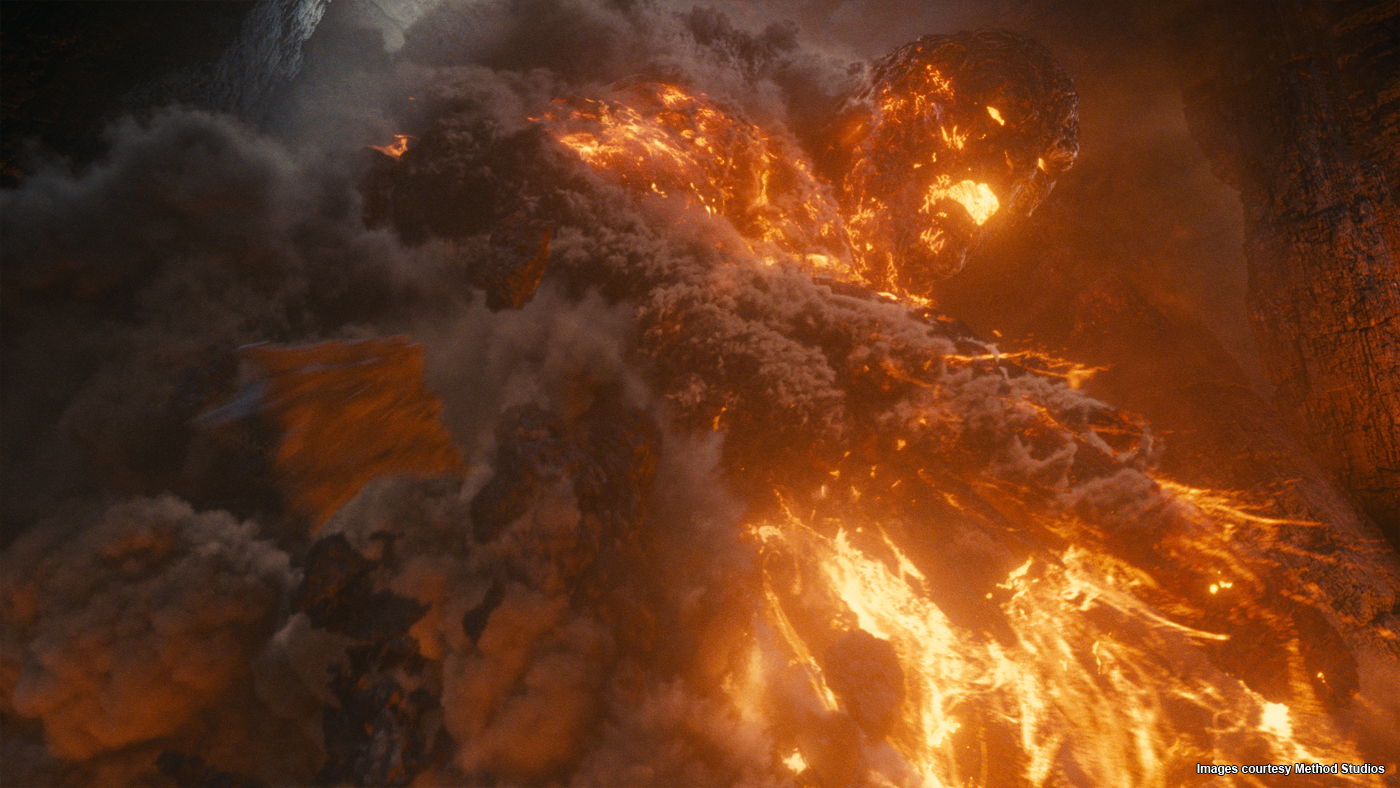
The step up in complexity for Kronos was huge. The most difficult part was probably the smoke plume that trails out behind him as he lays waste to the battlefield. We split the plume into two main sections: the main plume behind him, and what we called the « interaction plume », that was directly tied to his body. The main plume itself was simulated in 50 caches that were re-used from shot to shot. Each of those caches was several hundred gigabytes a frame. The interaction plume was simulated bespoke for every shot since it tied directly to Kronos’s animation. That consisted of a thick, dense plume coming from his back, and many smaller smoke trails coming from cracks in his surface. By carefully placing and layering these elements we could create the effect of a single, massive eruption of smoke. We then layered on lots of live-action smoke elements in comp to complete the effect.

All the fluid simulations for the smoke were done with Flowline, and in many shots totalled terabytes of data per frame. In order to handle this we wrote a new set of volume tools to allow us to manage and preview the scenes without running out of memory, then to stitch these all together efficiently at render time. Even so we had to split the smoke out into many render layers in order to be able to get it through prman.

As well as the smoke, Kronos is constantly streaming lava and breaking off chunks of rock from his surface. These were handled as separate particle simulations using Flowline for the lava, and PAPI, our rigid-body solver, for the rocks. Again, these effects were made up of many caches rather than being done in one for speed and flexibility.

In order to bring all these separated elements back together in comp we made heavy use of deep images rendered out of prman to generate holdout mattes so that we could layer everything up in the correct depth.

How did you manage the lava?
The lava was all generated as flowline fluid particle simulations. There was a base layer of ‘all over’ emission from an emission map based on the largest cracks on Kronos’s surface. This was then augmented with extra simulations to create specific streams and flicks as the shots required. These were typically of the order of 10 million particles or so for each simulation. The particles were then rendered as blobbies in prman, using a time-dependent blackbody emission shader to get the correct colours as the lava cooled.

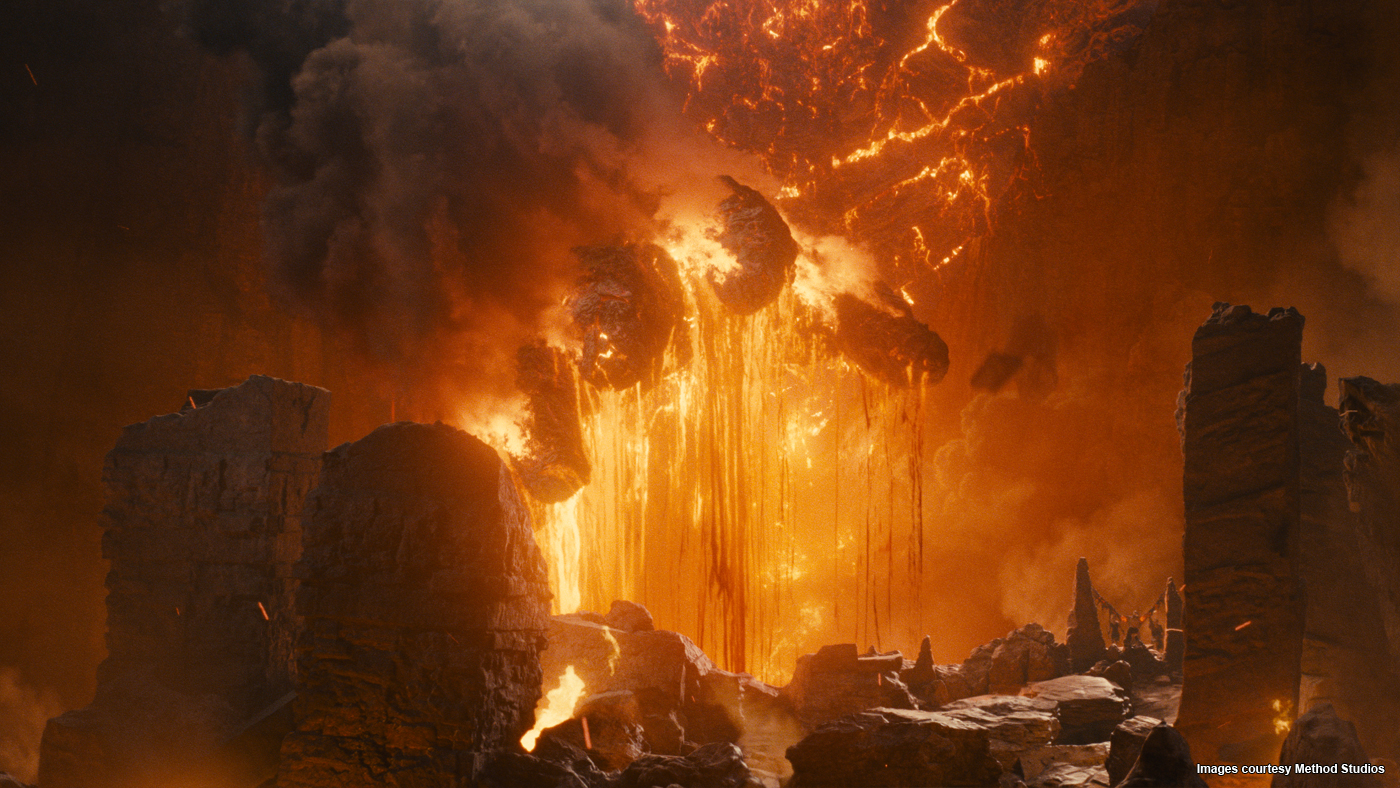
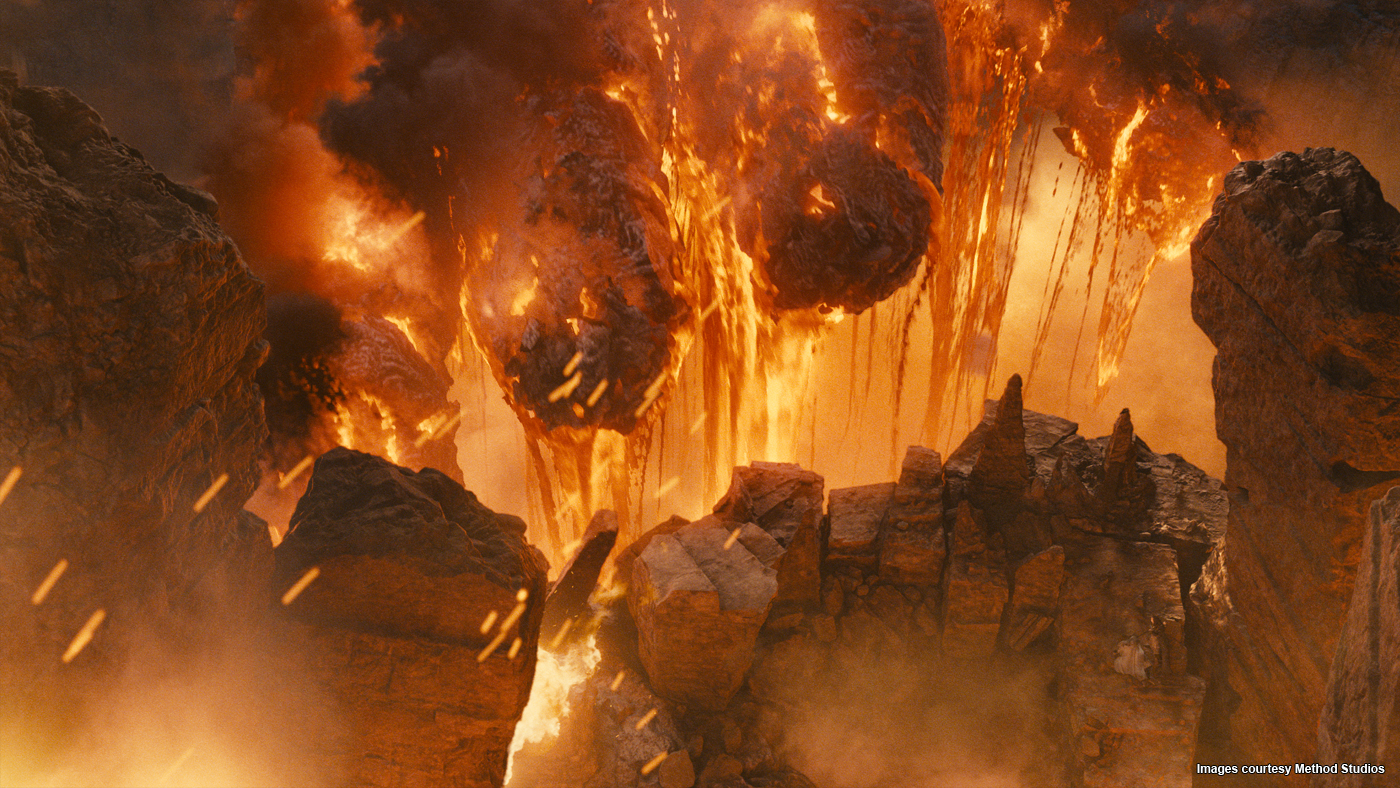
Can you tell us more about the use of Kali for the destruction made by Kronos?
Kali is our FEM destruction toolkit. It allows us to take any asset and shatter it at render time. It’s great for this kind of effect as it gives you a really nice recursive cracking effect – big chunks break into smaller chunks, and again into even smaller pieces. When you’re shattering or collapsing something it gives you a very natural breakup. Unfortunately when you’re breaking up something as big as a whole mountain it quickly generates an insane amount of geometry, so we augmented the base Kali sim by turning some pieces into groups of particles that tracked with their parent chunks then broke up into dust, as well as adding extra trailing particles coming from the chunks, fluid dust simulations and particle simulations with specifically modeled rock geometry. Then in composite we added even more layers of dust elements of top.

Have you developed specific tools for this show?
The main new tool we developed was the volume tools for handling huge numbers of large caches in Maya. As well as loading the Field3D volume caches on-demand it incorporates a GPU raymarcher so FX and Lighting artists can quickly preview changes to the shading of the volumes with basic lighting. The tool is scriptable as well in python so artists can combine and remap densities post-sim, as well as perform more advanced operations like displacement and advection, all in a programmable framework. It’s very cool.

What was the biggest challenge on this project and how did you achieve it?
Kronos and all of the enormous amount of destruction that comes with him. Achieved through a good core of FX TDs led by Michele Stocco and Kevin Mah. A great element shoot and some strong compositors led by Jonathan Knight and Richard Little.

Was there a shot or a sequence that prevented you from sleep?
Everything with Kronos and all of the enormous amount of destruction that comes with him.

What do you keep from this experience?
We all learned a lot by being fortunate enough to work on two of a franchise. Our approach from the shooting methodology, the liberal use of large scale aerial photography and always trying to obey the confines of what the real world film making environment allows, was all driven by our experiences on the first film. Then pushing that in small ways.

How long have you worked on this film?
I was on it for about 15 months.

How many shots have you done?
We completed about 280 but worked on close to 350.

What was the size of your team?
Between our offices in London and Bangalore we were around 200 artists.

What is your next project?
I am on Gore Verbinskis THE LONE RANGER. We are all pretty excited. Its a great chance to work with such a celebrated director that uses the VFX medium so well.

What are the four movies that gave you the passion for cinema?
There’s a lot! But here’s a few:
THE GODFATHER I and II, near to perfect.
EXCALIBUR. It burned into my childhood visual memories quite deeply.
DAYS OF HEAVEN was beautifully shot by Nestor Almendros.
Most everything That Chris Doyle has shot for Wong Kar Wai. He’s a great modern cinematographer.

A big thanks for your time.

// WANT TO KNOW MORE?

MPC: Dedicated page about WRATH OF THE TITANS on MPC website.


© Vincent Frei – The Art of VFX – 2012

THE PIRATES! BAND OF MISFITS: David Vickery – CG Supervisor – Double Negative

After explaining his work for HARRY POTTER AND THE DEATHLY HALLOWS: PART 2 for which he received a BAFTA Award, David Vickery is back on The Art of VFX. He talks about the participation of Double Negative on THE PIRATES! BAND OF MISFITS.

How did Double Negative got involved on this project?
Ben Lock originally approached us from Aardman and we jumped at the chance to work on the project. Everyone felt that the crew would very much like the idea of working on something that their children would enjoy!

What have you done on this movie?
Double Negative‘s work on the show ranged from compositing multiple GS layers, rendering CG hero characters and crowds, sky replacements, complex wire and rig removals, and painting out the cut lines on characters faces.

How did you split the work between Dneg London and Singapore?
The majority of the visual effects work was carried out by our Singapore office with Jody Johnson remote VFX supervising from London. However, we did a lot of the initial look development and pipeline set-up in London to make it easier for Jody to sign off on.


How did you organize the work feedback and reviews between those two place so far away?
Jody worked very closely with Aardman VFX supervisor Andrew Morley and would then relay briefs to Oli Atherton (our 2D supervisor in Singapore), via Polycom video conferences. It was really important to us that Aardman considered the Singapore crew to be part of Double Negative as a whole and not a separate facility on the other side of the world. Singapore lead 3D artists Cori Chan, Sonny Sy and Leah Low would take charge of hero sequences and give progress reports to London during daily Cinesync sessions. It all worked very smoothly, even the time difference worked to our advantage. When we got in first thing in the morning it would be midday in Singapore and their crew would be ready with loads of questions. The London team would pick up the baton and be working well after our Singapore crew had gone home for the night. Producer Clare Tinsley could schedule London to fix problems for Singapore whilst they were fast asleep and be ready for them when they returned to work the next day!


Can you tell us more about your work methodology for the cleanup and rig removal?
Aardman developed a new technique to create the facial expressions for their characters on PIRATES. They constructed their puppets as usual, with heads made from hand moulded plasticine. The lower sections of the head, including the mouth and all the required mouth poses were created with a series of interchangeable 3D printed parts. This approach not only sped up the animation turnover but also allowed the characters more diverse range of facial expressions than if the whole head had been plasticine. Rather than try to blend the join between the two head pieces before shooting, the removal of the seams (or ‘cut lines’ as we called them) was left to post production meaning that every shot in the movie required visual effects. Dneg’s first task for any shot was to remove these cut lines.

Did you create procedural tools for the cleanup or everything was done by hand?
Our 2D supervisor, Ian Simpson, wrote a Nuke tool that would sample pixels from either side of a cut line on a frame by frame basis and then use an average colour to patch over it. Artists could define the area that Nuke tool sampled from with roto shapes, giving them a precise control over the end result. Some characters also had joins where the head attached to the neck. Aardman were always very careful to disguise cut lines and joins behind beards, glasses, and clothing wherever possible but it was still rare to find a character that didn’t have some join or seam that we hadn’t come across before. It’s very rare in production to find a completely automated or procedural solution to a problem. The organic nature of Aardman’s stop motion animation and the sheer variety or rigs they used constantly provided us with new clean-up challenges. These had to be done by hand.


Can you tell us more about how you creates the audiences for sequences such as The Pirate of the Year Award and the Scientist Convention?
The Pirate of the year awards and the Scientists convention are great examples of our CG character work in PIRATES. Some of the shots feature hundreds of characters yet only one or two of them are practical puppets. To maintain consistency of style across the production all character animation was executed by Aardman, who would then export animated geometry caches and send them to Double Negative where we could rebuild their scenes using the assets we had prepared.


How did you get the informations from Aardman for those sequences?
Jody, Pete Jopling (2d supervisor) and myself would have regular meetings with Aardmans VFX supervisor Andrew Morley. He was incredibly helpful and was able to brief us very clearly on all the requirements of our sequences. We had a lot of creative freedom and were encouraged to develop a strong look for each sequence before presenting it to Aardman for feedback. If we ever had any questions we would just pick up the phone – Aardman were always available.

What kind of elements did you received from Aardman?
For each shot we would receive an hero animation plate containing the practical character animation. Aardman shot using DSLR’s mounted on miniature motion control rigs, so for clean up, rig removal, and set shifts we would get clean plates that would be a perfect repeat of each shot’s camera move. These were really helpful. If a shot required CG character work, Aardman could position the practical counterpart of the CG puppet in the set, under camera ready lighting and shoot a reference plate for our 3D artists to match to.

How did you manage the lighting challenge?
Aardman provided us with HDRI environments for each new sequence or set piece. Dneg London set up lighting rigs using a combination of the supplied HDRI maps placing additional area lights to simulate the diffusers and bounce cards used on set. Small point lights were added to replicate lamp or candle positions in the original plates. We had to work hard to match the qualities of light and shadow in the scans. Wherever CG characters needed to connect and interact we had to rebuild the practical sets in 3D to cast shadows and bounce light correctly onto our characters and help integrate them into the plates. The Pirate of the Year sequence provided a particular challenge in trying to create the feel of a large crowd in very dark lighting conditions. Oli Atherton’s team did a fantastic job at the compositing stage to craft the final look of these shots. It was great to see such a strong look created, picking out details and movement in the shadows with rim lights, letting the rest fall into the shadows to subtly establish each CG characters presence in the back corner of the tavern. The lighting ended up being as much of a 2D job as it was 3D.


Can you tell us more about the pipeline between Aardman and Dneg?
From a 3D perspective the largest pipeline challenge was the initial look development of the CG characters. Aardman provided us with their models and textures along with photographic turntables of the actual puppets against a neutral grey environment. Our CG characters needed to be carefully lookdev’d to match their practical puppets. The show provided a perfect scenario to production test Double Negative’s new ‘V4’ Renderman pipeline; a physically plausible shading system that relies almost entirely on ray-tracing. Initial render times were a little longer than we were used to but the results were fantastic. Small subtlety’s in the way the light flooded and bounced around the models provided a near perfect match to Aardmans practical puppets and we were even able to introduce tiny amounts of subsurface scattering into the plasticine to further perfect the look. We were so confident of the new shading system that we didn’t once need to refer to Aardmans own CG turntable renders.

How did you manage the stereo aspect of the show?
All of the work had to be completed in stereo, which meant that clean-up often had to be done twice – once for each eye. The stop motion really worked in our favour here though as all our clean passes were a perfect match for the hero plates which took some of the difficulty out of the work.


What was the biggest challenge on this project and how did you achieve it?
Details like the animators thumb prints on characters, quirky set shifts or random glue spots contaminated every shot. In order to retain the hand crafted soul of the work; Jody Johnson (Dneg’s vfx supervisor) would study each frame and decide which of these errors to selectively leave and which to remove. It was important to Aardman that the work was finished to an incredibly high standard but still retained the Aardman look and this was an incredibly simple yet time consuming part of the work.


Was there a shot or a sequence that prevented you from sleep?
No! Our Singapore team had everything under control. They did a great job.

What do you keep from this experience?
It was a pleasure to work on a film that obviously had so much soul and love poured into it. The beautifully hand crafted sets and characters in the PIRATES served as a constant reminder of how much work goes on before we even see anything! Its not always about visual effects!


How long have you worked on this film?
9 months.

How many shots have you done?
The final count was 393.

What was the size of your team?
25 artists in London and 57 in Singapore.

What is your next project?
I’m currently in pre-production on FAST AND THE FURIOUS 6 as the show’s Visual Effects Supervisor.

A big thanks for your time.

// WANT TO KNOW MORE?

Double Negative: Dedicated page about THE PIRATES! BAND OF MISFITS on Double Negative website.


© Vincent Frei – The Art of VFX – 2012

The Art of VFX Newsletter

Missed an interview this month? Thanks to my newsletter (that will begins at the end of April) you will no longer miss one.

Come register using the form on the right column.

Thanks for your interest.

Vincent

CLOCLO (MY WAY): Ronald Grauer – VFX Supervisor – Benuts

Ronald Grauer has over 10 years of experience in visual effects. He has worked in studios such as Duboi Duran, Victor or Grid VFX. Since 3 years, he worked as VFX supervisor at Benuts.

Can you explain your background?
A start in architecture studies gave me the taste for CG. After that, I started studying special effects in London.
Back in Brussels, I spent nearly a decade as a freelance compositor and supervisor in Belgium and in France. Since 3 years, I am in charge of supervising the visual effects in Benuts.

How did Benuts got involved on this film?
Our French partner Digital District and VFX producer at Benuts were approached by the French and Belgian production to take in charge the visual effects. Digital District had already created the visual effects of Florent Emilio Siri previous films, so we were at the forefront in participating in this project. In addition, funding was brought in Tax Shelter via GoWest, which is a Tax Shelter fund which includes Benuts. Spending should therefore be mandatory in Belgium.

How was the collaboration with Florent-Emilio Siri?
This was not the easiest, given the tight deadlines!
Florent is someone, rightly, very demanding. In general, he knows what he wants and he is not someone who lets go! You should know that we move to 250 shots at the start of production to nearly 750 at the end… All this in a deadline shortening of 30 days compared to what was originally planned.

What was his approach to visual effects?
Florent was post-producer in his « youth » and his projects (music, movies and some commercials) are all projects with effects. He is a filmmaker who loves to innovate and look for things that were never made.

What did you do on this film?
We created all kinds of visual effects, from simple shots to some very difficult shots! There was of course a lot of « cleaning », anachronisms removal, green key, the creation and compositing of 3D objects, a big job to match the archives footages, etc.

One impressive shot of the Suez Canal sequence shows the young Claude Francois on a dock watching a passing freighter. How did you create this shot?
The shot was filmed in Egypt with the young Cloclo. We created the freighter that was added behind rotoscoped young Cloclo. Much hesitation in pre-production about the way to create the eddies, CG or live? Finally we went for the live way. Passes of eddies and scum comes from a shooting pleasure boats on the Seine! I find the result pretty convincing.

The film features many continuous shots. How have you collaborated with Florent-Emilio Siri to design these shots?
We made lots of previz before the shooting mainly on the Olympia sequence and the Exelmans Boulevard sequence. Once the previz validated by Florent, each head of departments (cinematography, machinery, etc.) saw this previz and knew what they had to do.

Can you tell us more about the continuous shot for the party at the Moulin de Dannemois?
Finally this long shot wasn’t so difficult.
Some removals of film crew and camera crane in the reflections, the background (behind the garden wall) has been reworked. This is the only continuous shot of the film with a invisible join between two takes. I’ll let you find it!

Can you tell us more in detail about the impressive continuous shot that follows Claude Francois leaving his house to go to his office by car and surrounded by fans?
On the other side, this shot was a nightmare! One of the first shot started and one of the last completed. Once again a lot of crew removal, and a lot of anachronisms and people in the street to clean out.
Two major difficulties in this shot, first, the transition from « live » shooting inside the car to the shooting on a greenscreen placed on the street. And second, the camera movement inside the car when we turn to 90 degrees near the head of Cloclo. For reasons of timing problems during the filming, we had shot only the sideways plate. All the plates when the camera rotates have to be recreated in postproduction. A mixture of matte painting, 3D projection and CG moving vehicles in the street. We also had to replace most of the vinyl discs that were hold by the groupies at the beginning and the end of the shots. 2 of the discs they held were not from the good period!

At one moment, Claude Francois plays at the Royal Albert Hall in London. What was the real set for this sequence?
This sequence was filmed at the Theatre Royal in Brussels. The stage and the stalls were filmed live, everything else has been recreated in matte painting and CG. One difficulty with these shots is the tracking. A bright environment very dark and very fast camera movements, all this did not facilitate the work!

How did you populated and recreates the Royal Albert Hall?
The audience in the pit was rotoscoped and then duplicated. All the rest are CG avatars.

Is there any other invisible effects that you want to reveal to us?
Usually, we avoid saying too much! This is not Robert Knepper who was filmed in the scene where Cloclo sees Sinatra in the lobby of the Metropole Hotel in Brussels. We replaced the head of the actor by that of Robert filmed on a greenscreen.

The film mix true and false archive footages. How did you find the particular aspects of these images?
A research work and testing in collaboration with the DI team. What we liked about this exercise was the extreme resemblance of Jérémie Renier with Claude Francois. It was therefore imperative that the false archive footages blend perfectly with the real ones. During the dailies, we were able to reach this goal.

Is there a shot or a sequence that prevented you from sleeping?
Yes, one, the continuous shot of Cloclo going from home to his office.

What did you keep this project?
A very good experience.

How long have you worked on this film?
3 months without supervision on the set.

How big was your team?
We climbed to nearly 20 2D artists, 5 CG artists and the team was supervised as usual with a VFX coordinator, a VFX producer and myself for the supervision.

How many shots have you made?
We worked on nearly 750 shots. Which is a considerable volume for European cinema, apart from England and a few very large French productions.

What are your softwares in Benuts?
Maya and Nuke.

What is your next project?
Right now, we have four films in progress such as UN PLAN PARFAIT directed by Pascal Chaumeil, and PARADE’S END, a English TV serie about the 14-18 war produced by the BBC and HBO, directed by Susanna White.

What are the four movies that have given you a passion for cinema?
There are so many! The 70’s and 80’s have given some great movies which I have often nostalgia. And more recently on the job side, I was very impressed by GLADIATOR for its invisible effects.

A big thanks for your time.

// WANT TO KNOW MORE?

Benuts: Official website of Benuts.

//CLOCLO (MY WAY) – TRAILER


© Vincent Frei – The Art of VFX – 2012

SUR LA PISTE DU MARSUPILAMI: Olivier Cauwet – VFX Supervisor – BUF

Olivier Cauwet joined BUF Compagnie in 1998. He will work on projects like FIGHT CLUB, THE MATRIX RELOADED, ALEXANDER or BATMAN BEGINS. He is also overseeing projects like LES DEUX MONDES, CITY OF EMBER or ARTHUR 3: THE WAR OF THE TWO WORLDS.

Can you explain your background?
After a A3 High School Diploma (letters and arts), I joined SupInfoCom where I co-directed a short film at the end of my studies. I went to Duran for an internship, I worked some time at Mac Guff Ligne and the AFP (Agence France Presse) to participate in the development of a project to illustrate the news in 3D. And in 1998, I joined the teams of BUF Compagnie.

How do BUF got involved on this film?
Between Alain Chabat and BUF is an old story, several of his commercials were made in post-production at BUF. Alain was talking about this project about Marsupilami since long time to Pierre Buffin, BUF Compagnie creator. For 7 years, I have heard of the Marsu at BUF. All these years, tests, designs, pilots have been made to help Alain to realize his project. The experience of BUF for ambitious and risky projects is more to prove and Alain came there with tremendous confidence in Pierre. He felt that we were all very motivated and involved, we wanted to do this project. Alain was sure to find his Marsupilami with us.

How was the collaboration with Alain Chabat?
We met at the pre-production of the film, during which we discussed the character of Marsupilami, its character, its morphology, its coat, the way he moves and established our filming techniques to shoot it.
In most projects, everything is set and written in pre-production for vfx. But with Alain nothing is fixed, it is one minute, an idea. The staging changes, ideas fuse must always be attentive, and the plateau to adapt, it is often improvisation is what gives it its strength. It’s very rewarding.
It is important not to be heavy on the set, do not bother with the technical constraints. Let the choice, especially when you tell a story with a virtual character. Its action is never static, it can change with the narration, editing, etc.. So my relationship with Alain on the set was mostly listening to his intentions, and direct accordingly shots with the first assistant Fabien Vergez.
On the set I was a technical advisor, I recalled to the weight of Alain Marsu, size, tail length, etc., for action and the context.
Then during the period of the film editing, we started an intense exchange with Alain for the staging of the Marsu. With Bastien Laurent, head of the animation, we’ve ever offered him animations. A minimum of 3 to 4 versions by shot, each time with a different intention of action and rhythm. Alain appreciate to be surprised and is very receptive to any new idea.

What was your feeling to gives life to a well known character?
Great excitement, but with some apprehension. This is still the Marsupilami, a comic historical figure that affects several generations. This character is expected by all the people, how to ensure it would be appreciated, since it will be different from the classic design. We must ensure that after the discovery of Marsu the public will adopt it.
And then there’s the past, Alain has done research on the design for years, many people have already worked on it. So now it’s up to us to find this design, and at the same time as to work on the film. Alain wanted his Marsu to be close to the one of Franquin, less round than the one drawn by Batem. His motto was « cute », it is necessary that we have the envy to hug him. And conversely, when he gets angry, when it changes state, he need to be a ferocious animal.

How have you collaborated with Les Versaillais?
During pre-production, with the team of Yves Domenjoud and Olivier Gleyze we defined the types of actions for the Marsu and how we would simulate the interactions and other needs for the shoot.
They molded a flexible template of the Marsu according to the morphology I had established with Alain. It would serve to establish the staging and certain interactions.
For interactions, they are like « Gyro Gearloose, » a tennis ball gun for contacts in the trees, chains dragged on the ground for the passage of the Marsu in vegetation, air expelled, poles, pipes watering, etc. …
Alain explained to me the action of Marsu in the shot, then I speak with Les Versaillais about how we would simulate the large interactions.

How was simulated the Marsupilami presence on sets and its interaction with the characters?
For all the shots, we did a rehearsal with the template Marsu for the staging, the framing and lighting. For shots where the Marsu was alone, we filmed an empty plate after the rehearsal.
For shots with the actors I put markers for the eye line, like a tennis ball at the end of a rod, marks or even the template of Marsu.
When Marsu interacts with the set, Les Versaillais handle it, wind in the grass, hold-ups on a table, tennis balls in the trees, templates for transparencies interactions in water, etc.
When there was interaction with the actors, one member of Les Versaillais plays the Marsu, he made contacts by pressing with his hands, with his face for hugs, etc. The actors could interact with it.
When Marsu takes the actors with his tail, it was necessary that we feel his presence, that is to say, that the acting is forced by the tail. For this, we have surrounded them with links that we have tightened around them. It helps the credibility for the actors and also the interaction of the tail with the clothes that crease in its strength.
Of course all this is removed or covered later to include the Marsupilami.

What materials did you use to retrieve information during the filming?
The shooting lasted about four months, two months in Mexico, three weeks in Paris, and one month in Belgium.
I was accompanied by Christophe Bernard, with whom I was reporting the classic camera datas such as focal length, aperture, height, tilt, etc.
We fabricated a chrome ball and gray ball (photo gray) of 30 cm (a foot) each, they would serve us for all the vfx shots as reference for the light and the environment.
We took pictures of the camera setup, like wide shots of the set that encompass the Marsupilami, the camera and lights. That helps the artists working on shots to understand the light, the distances (camera, set, etc.).
So after each shot with the Marsupilami, we shot the ball on the assumed path of the animal.
And on the gray ball we can see the intensity of lights, reflections of the sky and the set with their color. The drop shadows on the ball are also very clear. With the chrome one reads precisely the lightning, and his entire environment.
We used the patella to bracketed the 360 degrees environment pictures and get a great materials for CG lighting. We took pictures of all the sets, actors, props, plants for the recreate them to be able to better manage the interactions with the Marsu, to be sure that he moves in the right environment, at the right scale. And for shadows, the lights, move the set etc. if necessary.
In short I came back with gigabytes of photos, which although classified, become a rich source of information for artists in addition to the reports of shooting.

Can you explain how did you find the final look of Marsupilami?
Once filming began, Pierre Buffin started the « design » department directed by Olivier Gilbert on Marsupilamis graphics research. There were hundreds of drawings, looks, studies on the head, proportions, hands, feet, stains, etc. We presented it as « Da Vinci » to Alain. We presented versions of Marsu with several variations to give us his feelings. Gradually, as the Marsu took shape, drawings were made with positions of the Marsu. We had a different reading of the character and we adjusted it from our discussions with Alain. What was important was to first validate the proportions of Marsupilami to begin its setup. For the design, we have ensured that Alain could evolve it during the production, even after the movie started.

Can you explain in detail the creation of Marsupilami and its rigging?
We only work on in-house softwares developed by the R & D department of BUF. Based on the design work with our 3D and animation software « bstudio », we modeled the anatomical skeleton of the Marsupilami we worked on the volume of the body. This is a critical step. We are going from drawing to 3D, we must rely on a coherent and realistic morphology.
Anguerran Lagallarde and Christophe Vasquez supervised by Yann de Cadoudal have set up the animation skeleton according to the anatomy of the animal and have been working on creating all the setups of the characters.
Our skinning is based on muscles, according to an anatomical study. The muscles contract, relax, have dynamics. A system is also put in place to manage the breathing for the Marsu. For expressions, we create a library of animated facial expressions by muscles.

How did you handle the Marsupilami fur?
We studied many animals, mostly cats and for the spots construction and the mix of shorthair – long hair. We took pictures of animals from different lighting to see how the hair dark, light, long, short react to light from different angles. We used our in-house software « bstudio » to manage hair on Marsupilami. We hair-dressed guides to the skin and all of the fur is interpolated. For maximum control we separated the hair long, short, yellow, black and white. Each model has its own settings hair according to its size and thickness.
Dynamics is applied to the hair to react to the movements of Marsu and external forces such as wind.
By adjusting the hair-dressing, the parameters and changing the shaders we are moving the Marsu from calm to edgy shaggy, from dry to wet. A setup has been developed for the animators to control the hair transition, as when the Marsu gets angry for example.

What references have you received from Alain Chabat for animating the Marsupilamis?
Many videos, but also all the boxes of Marsupilami comics classified per action. For Alain, the character of Marsu is well defined. He gave us videos of monkeys that illustrated the attitudes of the Marsu. Quiet walks, jumps, movements in the trees, facial expressions, sets of eyes. For the small Marsupilamis, it was videos of kittens, little fur balls, still clumsy and hesitant after birth.

Can you tell us more about the animation of Marsupilami?
As I said previously, the personality of Marsu was well defined for Alain. His game, his attitudes are described to us and even mimed. On some very specific action, like when the Marsu laugh, we filmed Alain, his game was explosive. He is a director that know really well in animation, he has the sensitivity and the concept of rhythm, he tapped the tempo often to describe the movement of Marsu.
At the very beginning of the project, we brought in our studio a female gibbon. An animal with long arms, whose proportions are close to Marsu. We studied and filmed while moving in a playground where she could hang on, hang and jump.
Bastien Laurent, animation director on the project, has raised his the team about the personality of Marsu, his behavior. He insisted to mix the realism of the behavior to the positions of the Marsupilami that Franquin has drawn. You should not lose the spirit of the animal.
We received a rough cut sequences where Marsupilami was shown in 2D by Piano.
On this basis, we start with a 3D animatic with the Marsu where we proposed several actions. The whole team was encouraged to give advice, make suggestions for the animations.
At this point was presented a brief animated sequence of positions with a Marsu at the right scale and in the right perspective. Once the action and rhythm got approved, we move to a step where the character animation is more smooth and clarified.
After validation, the animators refine every last detail of inters, contact, expressions. And finally, we adds the dynamics of the hair and ears.

The tail of Marsupilami is almost a character in itself. How have you approached it and animated it?
Indeed, the tail of Marsupilami is a character in itself. It should be as expressive as the animal. There are shots in the film where she stars, others in which she emphasizes the feelings of the Marsu.
It is also a great tool, a very good way to get around, hanging and defend themselves. But it had to be careful not to steal the show of the Marsu with its tail. He is always accompanied by 8 meters of hair behind him, it’s not nothing. For shots with the Marsu girl in the nest, it was necessary to ensure their tails are discrete.
The tail of Marsu is very complicated to animate, both on the artistic and technical side. As animation reference, we take Kaa the snake of JUNGLE BOOK.
On a technical level, it was necessary that the animator can do whatever he wanted without that manipulation is too heavy. It needs to retains its original length and especially that its animation can be modified easily. It was a real headache!

The Marsupilami eyes are beautiful. Can you further explain their creation?
The eyes are modeled based upon the human eye. The sclera is modeled, it is black for the Marsu. The transparent cornea takes only the reflection of the highlights. The iris is modeled slightly dished for better catch the light and make diffuse and specular maps to just add color and detail.
We made sure that the lids slide over the eye when it is animated, this kind of micro movements add realism to the face.

The shots in the nest with the Marsupilamis and their childs are very successful. Can you explain the creation of these shots from scratch to the final comp?
For this sequence, the album of the comic book « The Nest of Marsupilamis » was the reference. During filming, it is with the second crew that shot the plates inside the nest.
We received a rough cut of the sequence. We made an animatic to set up the narrative. After the validation of the action and the rhythm, the sequence is adjusted during editing.
Many chosen shots did not necessarily have the appropriate framing, so we reworked the scans, completed the missing parts. We recreate some camera movements to better fit the narrative.
The animators supervised by Bastien Laurent gave life to characters and animated the eggs that hatch. The little Marsu and eggs were on a bed of CG feathers, their interactions were handled by a calculation of collisions between the body and feathers. Then the characters have been lighted and integrated into shots.

Have you developed specific tools for this project?
Xavier Bec, head of R & D, and his team worked on the development of hair, styling, dynamics and management of maps styling. Xavier has developed a more advanced shader hair and worked on its optimization for our renderer « Brender ». It is a ray-tracer, we need to compute in reasonable time, millions of hairs with their shadows with the 3D motion.

Is there a shot or a sequence that prevented you from sleeping?
The design of the Marsupilami. And the sequence of the Marsupios, ultimately created in a very short time. These are our latest VFX shots delivered. Only 15 days before the deadline, the animation was validated after a new edit.

What do you keep from this experience?
It was a great adventure and a great chance to have participated in this project.
I keep many things, but mostly to have worked at BUF with an excellent team with Alain Chabat on side.

How long have you worked on this film?
A year and a half including pre-production, filming, and post-production.

How big was your team?
60 artists at the max.

How many shots have you made?
265 shots.

What is your next project?
Nothing definite yet.

What are the four films that gave you the passion for film?
Special effects in general, those that come immediately to my mind are: BLADE RUNNER, ENCOUNTERS OF THE THIRD KIND, STAR WARS and all Terry Gilliam’s films like BRAZIL. But today movies continues to drive my passion.

A big thanks for your time.

// WANT TO KNOW MORE?

BUF: Official website of Buf.


© Vincent Frei – The Art of VFX – 2012

WRATH OF THE TITANS: Olivier Dumont – VFX Supervisor – Method Studios

Olivier Dumont began his career in VFX there are over 10 years at Buf. He participated in projects such as HUMAN NATURE, MATRIX RELOADED, ALEXANDER or SPEED RACER. In 2009, he joined the teams of Method Studios and worked on films like THE SORCERER’S APPRENTICE, THE RITE or THE TREE OF LIFE.

What is your background?
I have always been passionate about drawing and creating visuals since I was a kid. I went to a technical art university (University of Provence) in the south of France back in 1993 after passing my exams at an electronic engineering school. There, I experimented with different media: photography, cinema and computer imagery. A Silicon Graphics computer was in the corner of a room filled with Macs, which were the main computers for the classes, and I didn’t know what it was at the time. This intriguing machine (with a lot of memory for that time, 32 MB, and a display of 256 colors) had this software installed: Softimage. I was discovering the CG world… After playing with it for little bit, no manual available of course, my friend and I decided to make a short movie. Skipping quite a few courses, we put together a short and won some little awards. It was enough, though, for the school to create a CG section adding more Silicon Graphics machines and allowing us to work for another year on a new short. This film won the school and university award at the 1997 Imagina convention and allowed us to be contacted by several American and French companies. I didn’t want to specialize, because to me CG allows you to be in control of everything and I wanted to learn all the different tasks in the making of vfx. I imagined that choosing a big American company would force me to do that so I chose Buf as I was very impressed with their work and I still am. I learned a lot there doing basically everything on shots (from modeling, animation to comp including roto) and worked on many commercials and features such as MATRIX RELOADED, HARRY POTTER, ALEXANDER, THE PRESTIGE and SPEED RACER. I used this on-set and post-production experience in both CG and compositing to make my way as a vfx supervisor. After 8 years in Paris, I came to Los Angeles, still working with Buf, which has an office here. After three years in LA, I decided to join Method Studios, again having the opportunity to work in a small company as it was a boutique shop then. And I enjoy it more and more as it grows and I love being part of its evolution!

How did Method Studios get involved on this show?
This came about after several meetings where we discussed proposals about the underworld and brought up visual ideas. And I guess we also had a good budget approach…

How was the collaboration with director Jonathan Liebesman and Production VFX Supervisor Nick Davis?
It was both very challenging and extremely interesting. Very challenging because nowadays productions have to adapt to a continuous evolving cut. This allows the director to really push the story telling as far as he can. And very interesting because we felt very much a part of the team thanks to Nick Davis (production’s Visual Effects Supervisor) and Rhonda Gunner (production’s Visual Effects Producer) as we had this constant free dialog about new ideas and designs to help the story. Not that Jonathan Liebesman, the director, didn’t have any, he had plenty! As an example, when we started the work on Kronos, he was supposed to stay pretty static. But I guess Jonathan thought this wasn’t bringing enough tension to the scene and wanted several full CG shots in which Kronos is brought to life and moving. This was work we didn’t anticipate but the design of those shots was so appealing that the challenge was totally worth it.

What were their approach about the VFX?
Jonathan wanted everything to feel grounded and realistic, avoiding for instance, the big glows that were in the previous movie when you are in the gods’ world. That was an important parameter because even if the gods were using some magical weapons, the effects were always grounded by real physics like gravity or by using elements we are familiar with like embers (with some exceptions of course needed for the story). But the word « Magic » was banished from our visual dictionary. I think it helps the audience identify more with the characters and care for them. Thanks to this point of view, you feel the gods are vulnerable somehow (still less so than humans obviously) and that they can be affected by the same physical laws as normal people.

What have you done on this movie?
We supervised the part in the underworld. This world appears several times throughout the movie, showing different aspects as the story evolves. Most of our work was to build environments, from simple extensions of the set to full CG shots. Adding to that, we did a lot of CG FX (atmospherics, fireballs, lightning bolts, explosions…). We also had some one-off shots where we see weapons extending when the gods and Perseus are about to use them. These sequences are split in two main locations, outside Tartarus which is the tower where Kronos is bound to and inside Tartarus which shows his awakening. The outside was mostly done with 3D matte paintings for the set extensions and the reveal of Tartarus, with the exception of one full CG shot linking the surface to the underworld through a big ride into the abyss of earth — very impressive, especially in stereo.

The inside required a different kind of work. We needed to entirely model and texture Tartarus’ interior in order to accommodate the different camera positions including Kronos (he was based on a low res model given to us by MPC) and digi-doubles (based on 3D scans). Some of those camera moves were extremely close and we had to keep increasing the level of detail until the end. We also had to show Kronos breaking free from the destruction and animate the digi-doubles in the full CG shots.

The main sequences shows three stages for Kronos in Tartarus: sleeping, awakening but still static and then moving with huge destruction happening around him. Two major FX where required besides the usual falling rocks, atmospheric and dust: lava for the draining fx and pyroclastic for the destruction of the Kronos wall.

Method was part of the pre-production process. Can you tell us more about it?
Method London was already hired to work on concepts before Method LA joined forces to be one of the main vendors. The show had a very strong art department and if the concepts evolved, as they do during the post-production, we had enough elements and references to make sure we would stay faithful to the director’s vision.

We worked on different concepts for Tartarus and did some tests to determine how to enhance the atmospherics on the set as it was tricky to have fog and green screen at the same time. We were shooting on a large set made up of pieces that could move and build the different locations. The realism of the rocks looked amazing and were very good references on which to build the extensions and the chamber itself. Other references were very useful when we went to shoot in Wales in the quarry. As usual, we were trying to be as invisible as possible in order to leave the director’s vision remain as intact as possible, but Jonathan very familiar with VFX as he is doing some himself and was always very understanding when the VFX department asked for something.

The Tartarus is an impressive environment. How did you create it especially for the establishing shots?
The outside establishment was mostly done with a 3D matte painting (matte painting projected onto CG models). We worked on dozens of concepts. Once they were approved we post-vized the shot adding basic shape to it to show how it would work with the camera move and then the models were refined and used to project the matte painting on. The fx layers were added and completed in the comp.

For the inside establishment, we used both textured and lit models and completed it by mixing the result with a matte painting of Kronos. The atmospherics were fx renders and 2D elements.

How did you create the fight between the Gods against the Makhais?
These were shared shots between MPC and us as they were doing the Makhais and lighting them based on the plate, and we were responsible for the final comp including the fireballs and interactions with the set and set extensions.

A lot of explosions and fires were created on-set and we had to match the timing, but in order to get the feel of them being surrounded, we also added more. We enhanced them by adding bits of lava and embers during the impact which fit more with the nature of the fireball, leaving itself a trail on the ground. We had at our disposal a Lidar scan that we used to track and create the proper shape for the impacts as well as for re-lighting the rocks when necessary. On the gods side, they were firing lightning bolts. That animate behavior was very well documented by Nick and Jonathan’s references to us that showed some kind of a shape memory fading out after they fire. It was like when you still see the shape of a light after directly looking at it. We used Houdini for the elements and we augmented them in Nuke.

Kronos and its underground environment are truly amazing. How did you face this big challenge?
As we had every angle possible in this chamber, the first approach was to build everything. We did it using blocks. We basically built and textured all the different kinds of blocks needed, arranged and rearranged them to get the proper shapes of the different elements in the chamber: background walls, the pathway that leads to the island where Zeus is chained, and the pillars which are big columns sustaining the walls. We then merged them in order to simplify the model and to be able to render. Over 7000 pieces were crafted. We also used matte paintings or texture projections for certain shots but most of them were lit and given directly to the compositors as we had enough details in the models and textures.

Kronos and the mountains in which he is embedded were modeled first in one piece in Zbrush but then split into multiple pieces in order to manage the high level of detail. The base was a low res model we received from MPC who were responsible for the main design of Kronos when he is on the surface. Because our shots were very different (Kronos stages of awakening and camera close-ups), we could add our own details on the model to fit our needs and visuals. We were using mainly Zbrush for the modeling and Mari for the texturing.

How did you manage so many amounts of fx elements?
That indeed was a lot – fire, embers, lava eruption, falling and breaking rocks, smoke, dust and clouds of any size and many others…

The first thing to do when you have that many elements to create is to know exactly how the key shots should look, and then start splitting the big problem into small ones…

The comp department on this had a big responsibility as I wanted to be able to get to an approval stage as quickly as possible before having to render hours and hours of atmospherics and other CG fx. Basically, we were mocking up all the fx in comp to get Nick’s approval on the quantity, the speed and the look of the shots using generic CG elements, and 2D elements from the shoot or from our library, and putting them on cards. Once the overall look was defined, we could then see which needed to be done in CG, either because of a strong camera move that cards wouldn’t handle or because of an element that needed very specific art direction (like embers passing by camera for instance).

We were therefore using 3 kinds of elements for the fx depending on the shots:
2D elements – We built specific libraries where it was very easy to choose from depending on the fx wanted.

CG generic elements – When we couldn’t find proper 2D elements because it was too complicated to shoot — like very big falling rocks — we rendered them with a locked off camera under different angles to use as 2D elements, which saved us a lot of time.

CG elements – Those were usually made specifically for the shots after knowing exactly where we were going.

We then had to make sure our pipeline was robust enough to keep track of all the published elements and to check that they were indeed used.

What were the real size of the sets for those underground sequences?
Tartarus Tower was 5600 meters tall (16800 feet) by 3300 meters wide (10826 feet), which is bigger than the highest mountain in France, Mont Blanc! Kronos is 525 meters tall (1722 feet).

Those sequence features extensive set extension. What was your methodology for those shots?
For the set extensions taking place outside Tartarus, we mixed CG blocks built from the 3D scan (lidar) of the set and a post-layer of matte paintings to make sure it was matching the lights on set. For the big extensions such as seeing Tartarus in a far distance, we used the opposite method which was a matte painting projected onto a CG model (3D matte painting).

Inside Tartarus, we pinpointed all the camera angles needed and we modeled everything in order to have CG assets that can be used in every shot. Occasionally, we had to project some additional textures where we needed more detail, or the opposite, to break the evenness of details.

How did you create the lava/fire on captured Zeus?
The lava was a very important part in the story as it is being drained from Zeus to awake Kronos. Different setups were build to be able to art direct the lava at different scales. This needed to be seen as small as a wound on Zeus’ arm and as big as a wide flow linking the main island in the chamber to Kronos. For most of the shots we could choose between the different setups depending on the size needed. But we had one shot that showed the full draining process from Zeus’ arms to Kronos body and for that we had to blend together all the different setups.

The setups, created in Houdini, were all based on a similar procedure but the speeds and looks were different matching references we gathered for each scale. Lava has indeed a very changing behavior depending on the size. Our approach was to be able to art direct as much as possible which is always difficult as you’re only simulating and it takes time to get the shape you want. So we decided to use minimal simulations to drive textured sculpts of the lava in a given situation. It allowed us to keep the necessary realism and to get the right shape as well as all the details we wanted and where we wanted them. It was making everything controllable and that gave room for changes to Nick and Jonathan without disturbing our delivery schedule.

When Kronos escapes the whole environment collapses. Can you tell us more about this huge destruction?
Pyroclastic effects were used when Kronos breaks free and the mountains he is embedded in collapse. We had to look for tons of references as no one has really ever witnessed a mountain falling apart entirely. After some research, we came to an agreement with Nick that the closest we felt was the collapsing of a glacier. The way it breaks is really specific and provides a great scale indication. It starts with big pieces that break into smaller ones and so on until it reaches a point where it looks like a fluid. The timing of it all is also very important to show the size.

We developed a setup in 3 phases. One tool fractured the mountain based on a map that delineated the outside shapes and because a CG model is like a empty shell, the tool was also creating the volumes inside. The main pieces were hand animated in order to art direct the collapse. This animation drove a simulation that used specific timings to break more and more of the falling rocks until it gets to the fluid part which was done using particles. On top of that was added the usual smoke, dust and debris fx that come with such a destruction. This setup was also used when a big pillar falls on the pathway at the end of the sequence.

Can you tell us more about the asset sharing between Method and MPC?
That stayed fairly simple as we ended up comping the final shots on our side so we didn’t have to go back and forth. MPC shared their low res Kronos model which we built upon but as our pipelines are different we had to make our own displacement and texture maps. They also shared their Makhais, underworld creatures they were using during the big ending battle.

The fact that we couldn’t share the final product for Kronos wasn’t so much of a problem. The sequences and states Kronos was supposed to be in (fighting for MPC and awakening for us) were different enough to let us have our own version. We just made sure that by the end of our sequences that our Kronos look was similar to MPC’s by getting their references. Luckily for us but surely difficult for them, they had big shots of Kronos included in the trailers so it was easy to see their progress and the direction they were taking without bothering them too much.

The approach for the Makhais was a bit different. Besides the models, MPC gave us a usable render with several extra layers that we mixed with our fireballs in the final comp during the battle with the gods. They were lit and treated based on the original plates as we were still working on the set extension. We just had to process them as if they were part of the plate lighting-wise.

What was the biggest challenge on this project and how did you achieve it?
I feel we really had 3 big challenges:
Setting up the lava and pyroclastic workflows in order to obtain a good mix between the simulation and the hand work that allowed a more controllable art direction were two of them.
The third was getting the scale to feel right which was an everyday struggle at all levels in the pipeline. Getting the right amount of detail in the textures and models, the right speed in the animation and the proper atmosphere in the comp was difficult as we didn’t have any references for something of that size…

Was there a shot or a sequence that prevented you from sleep?
I have to say that the shot where we followed the draining fx (lava) from Zeus to Kronos came a long ways. Although this shot didn’t seem difficult at first, it gathered all the technical difficulties we had throughout the other sequences but now it was all at once on a very large number of frames. We also knew that this shot would work only once we had all the setups working and running fx wise for the lava. It started at the beginning where we had to speed up the camera move on the live action plate with moving characters in it, which makes it tricky and a bit more difficult than just speeding up the frame rate. Doing so made the actors look like they were coming from a movie from the 20s. We eventually replaced the real set by a CG one (for tracking difficulty purposes) and re-projected the characters with their original frame rate. The second challenge was to blend together the different setups created for the lava based on its scale. And lastly, filling up everything with atmospheric elements that had to be CG in order to accommodate the camera move. Those were very long renders on that many frames…

This project seems to be the biggest project for Method London. How did you faced this challenge and what does it change on your pipeline?
Method London was indeed small at the time we started but became larger quite rapidly given the work we were facing. The pipeline developed rapidly and London can handle a lot on its own. Already known for concept and matte painting work, we had to show that we were as good as the other main London companies for other shots. One of their big shots was the ride through the cracks that leads to the underworld. It required all the talent needed in bigger facilities as it was a full CG shot dependent on all VFX departments — heavy models and textures, heavy fx and comps and it had to be done in stereo.

Luckily Method LA and London are working with the same pipeline which simplifies the exchanges. However, we shared very little on this show as London had their own shots. Also, as the client was in London, we were already accommodating the time difference by starting early to make sure we had enough time to discuss the shots which we did mostly through daily cineSync sessions.

What do you keep from this experience?
It was a really creative atmosphere and we were given a lot of freedom to bring up those shots on screen. Nick and Jonathan allowed us to discuss our own ideas and were always open to any dialogue making us feel we contributed a lot to the movie. That was really the biggest reward!

How long have you worked on this film?
About a year starting from the shoot.

How many shots have you done?
163 shots.

What was the size of your team?
110 people between London and LA.

What is your next project?
Several possibilities that I cannot really disclose yet unfortunately…

What are the four movies that gave you the passion for cinema?
I am not going to be very original I am afraid. I would say STAR WARS, INDIANA JONES, TRON (the first one obviously) and ALIEN for the movies. But I have always been a big fan of Japanese anime series and among them, COBRA THE SPACE PIRATE as well as GHOST IN THE SHELL are part of my visual and story telling references…

A big thanks for your time.

// WANT TO KNOW MORE?

Method Studios: Dedicated page about WRATH OF THE TITANS on Method Studios website.

// WRATH OF THE TITANS – VFX BREAKDOWN – METHOD STUDIOS


© Vincent Frei – The Art of VFX – 2012

L’ODYSSEE DE CARTIER: Benoit Revilliod – VFX Supervisor – Digital District

Benoit Revilliod has worked in many Parisians VFX studios such as Ex Machina, Def2Shoot or Wizz. Alongside his work as VFX supervisor, he is a professor at the school SupinfoCom.

Can you explain your background?
My background is that of a self-taught.
I started wanting to made computer graphic at my second class after meeting a passionate guy. We did our first movies with 3D Studio 2.0 under DOS. Two years later, we had an Silicone Graphics with Alias and then came the revelation!
Once I had enough pictures to present, my goal was to integrate a true VFX company to train myself professionally.
I did my best to enter at Ex Machina, where I stayed for about 3 years, it was an internship at the beginning then on nightshift and finally on dayshift. I kept great things of it, especially thanks to my mentors Jean Colas (who taught me to make a good 3 point lighting, before he worked on episode one of STAR WARS) and Jerome Gordon (in modeling).
At that time, the ancients had a real desire to pass the knowledge!

How did Digital District got involved in this film?
Very naturally, the films of Bruno are made at Digital District. Before, they were at La Maison. Now at Digital, he is at home.

How was the collaboration with director Bruno Aveillan?
Pretty good, we usually work together, we know our expectations.

What was his approach to visual effects?
Bruno works with the effects that a more 3D compositing, but he knows very well the possibilities. Bruno never imagined may not be able to integrate as many 3D in the film, but with the jewelry, leopard, airplane, etc. 3D mattes, the proportion has finally gained momentum.

What materials did you use on set to retrieve all necessary information?
On the set the more difficult is not to interfere with the teams. The guy in charge of the tracking, Fred Meyer, tried to get as much information as possible about the location filming: with photo, distances, our robot with HDRI map, map of all kinds, camera speed, …
We also made deformation grids for the lenses in anamorphic and spherical as well as a special model to help the tracking for the shooting with the elephant.

Can you explain the shots creation showing the release of the panther?
The elements shot did not allow to do these shots. It is not easy to put a real panther in the position of a statue.
The creation of the panther was a real challenge for the animation supervisor, Mathieu Royer. To make it truly feline, our lead setup Jerome Caperan has even gone as far as to recreate the muscles.
The basis of the explosion was also made in CG, because the elements filmed looks more powder than diamond. Once the basic 3D good enough, the compositing artists have done a tremendous job of integration.

How did you handle the particles and the shiny aspect of the diamonds?
Mathieu Negrel, the team fx supervisor, made the setups of the panther explosion.
The shiny aspect was achieved through a in-house diffraction shader that is very fast, in Mental Ray, which allowed us to made good render for the diamonds.

Have you created a digital version for the Panther for some shots or actions?
Yes, of course, for the explosion of the panther, but also on the plane and in Paris.
Many other shots were incorporated in the Director’s Cut version, to be released soon, I hope.

How have you recreated St Petersburg for this sequence?
For this sequence, the artists at Digital District used the Matte Painting technique, which is to recreate a scene that does not exist at the shooting and is painted in 2D.
After a phase of iconographic research to create a setting as close to reality, artists transforms the matte in 3D and cut it into several plans for effective interaction with parallax effect, which creates camera movement (the bridge, columns, statues and part of the background are previously modeled in 3D).
This specialization of space combines compositing in this sequence.
The matte painting has also been used for part of the Love sequence and also for « Head to head with the Celestial Dragon, » and for the scene set in Paris.
Three months of work were required just for this phase of matte painting.
The shots of St Petersburg are actually shot at an airport. All the sets are digital extensions. The artists which have made those mattes are doing a great job but the big difference between this film and another one is that all mattes were specialized either with compositing teams or CG teams with cammap, making them more alive.

Can you explain in more detail the creation of bracelets rolling in the snow?
Some of the bracelets are in full CG. Other are 1:4 scale models on which we put CG rings to add the reflections.

Can you explain in detail the design and creation of the beautiful Dragon?
To determine the aesthetic character of the Dragon, a drawn visual search is a prerequisite. After validation of the proportions, colors and physical features, the character designer gives way to the modelers, animators, setupers to finally ends with the usual phases of texturing, lighting, shading etc..
With this setup step, the components of the celestial character, such as scales reach an optimum level of independence movement of the general body, revealing a wonderful creature with an authentic look.
The design was created by Stephane Levalois. A number of back and forth between Bruno and Cartier were necessary to be sure that our creation embodies the spirit of jewelry brand.

How did you handle the interaction of the Dragon with the hill?
We shot a lot of element of rubble. But for better integration, it was also a lot of fx of rock falls, smoke, dust, etc..

What was the biggest challenge for you in the sequence with the elephant and the plane?
The hardest part of the sequence of the elephant was completely recreate his back to be sure that the palace can really be part of the back.

Can you tell us about the creation of the palace on the back of the elephant?
To integrate the palace on the elephant, we had to completely recreate his back and animate the deformation of the skin.

How did you handle the shots of the panther on the plane?
It is a mix of CG leopard and other shot on a greenscreen.

Can you explain the creation of Paris at night?
There is lot of matte painting and graphics research in compositing to find the look of this sequence. Strangely, it was a sequence more complicated than expected. The result takes us well in a Revisited Paris.

Have you developed new tools for this project?
One of the leads that I have not mentioned yet, my friend Marc Dubroi, who shared the supervision of the film, handled the layout and workflow tools of all kinds.
He has developed tools for cutting the shots to be very responsive when a new edit comes, pipeline tools in Maya and communication tools for artists to easily publish video in Shotgun. Excellent work, without which the film would not exist!
As supervisor of the studio, I was busy to oversees the render, I did the shave and the shading and then the rendering for the leopard… which kept me quite awake!

What do you keep from this experience?
A beautiful human experience. I have the chance to choose my team and I can say that there, it was my dream team.

How long have you worked on this film?
6 to 8 months with the pre-production but 2 harder months since the final edit.

How big was your team?
Over 50 people worked on the post-production for L’ODYSSEE DE CARTIER.
Seven months of post production work were necessary for this film. Three months for each phase of assembly.

How many shots have you made?
Personally about 35.

What is your next project?
I am currently on the new Bruno film, a Chanel film.

What are the four movies that have given you the passion for cinema?
Of course the first who gave me the passion of the special effects are TRON, BACK TO THE FUTURE, and other fantasy films.
But I have fairly eclectic tastes, I was very sensitive to films as diverse as NO COUNTRY FOR OLD MEN by the Coen Brothers, THERE WILL BE BLOOD by Paul Thomas Anderson or LA JETÉE by Chris Marker.

A big thanks for your time.

// WANT TO KNOW MORE?

Digital District: Dedicated page about L’ODYSSEE DE CARTIER on Digital District website.

// L’ODYSSEE DE CARTIER – BRUNO AVEILLAN

// L’ODYSSEE DE CARTIER – CREDITS

Post producteurs
NATALY AVEILLAN
MATTHIEU LAUXEROIS

Story board
Rough man
FRED REMUZAT

Designer dragin et panthère bijou
STEPHANE LEVALLOIS

Recherche graphique Saint-Petersbourg et Chine
FRANÇOIS PEYRANNE

Monteuses
CORALIE RUBIO
FRED OLSZAK

Monteur adjoint
ANTHONY ORNECQ

Assistant monteur
REMI NONNE,le bocal

Flame Superviseur
BRUNO MAILLARD

Flamistes
MICHAEL MARQUES
JONATHAN LAGACHE
ERIC ALCUVILLA
INGMAR RENOUARDIERE

Compositing Superviseur
VINCENT GUTTMAN

Graphistes
JOHANNES BELLAROSA
PENELOPE VAN DE CAVE
FREDERIQUE VAUTEY
MORGAN VANORA
JEANNE LOYER
MATHIEU GIRARD
MIKAEL LYNEN
SYLVETTE LAVERGNE
AURELIEN TEURLAI
FRANÇOIS POUPON

Matte-Painters
THIEN-CO PHAM KE
DELPHINE VAN BAY
JUSTINE GASQUET
ADRIEN ZEPPIERI

Conformation
JEAN_MATTHIEU SENECA

Tracking 3D Superviseur
FRED MAYER

Graphistes
XAVIER GOUBIN
PIERRE PILARD

Lead layout, Lead pipeline
MARC DUBROIS

Modeling / Layout Graphistes
MATHIEU BRIOLAT
BENOIT ROEKENS
PAULINE GIRAUDEL
JULIEN ROGUET
ROMAIN CARLIER
NICOLAS MARTIN

Lighting/Shading/Rendering Superviseur
BENOIT REVILLOD

Graphistes
NICOLAS BRUNEAU
OLIVIER OSOTIMEHIN
AXEL MORALES
CELESTIN SALOMON
ARNAUD JOLI

SETUP Superviseur
JEROME CAPERAN

Graphistes
SEBSTIEN DRUILHE
JEAN_BAPTISTE CAMPIER

Lead animation
MATTHIEU ROYER

Animation Superviseur
MATTHIEU ROYER

Graphistes
SEBASTIEN KUNERT
DAVID LAPIERRE
JULIEN BOUDOU
LAURENT PANDACCINI
GABRIEL GELADE

SFX Superviseur
MATHIEU NEGREL

Graphistes
LUCIE CASALE
THOMAS EID
NICOLAS ZVOROWSKA


© Vincent Frei – The Art of VFX – 2012

JOHN CARTER: Sue Rowe – VFX Supervisor – Cinesite

In 2010, Sue Rowe had told us about his work on PRINCE OF PERSIA. She then moved on the most ambitious project to date at Cinesite: JOHN CARTER. In the following interview, Sue presents in detail her work of more than two years on this film.

How was the collaboration with director Andrew Stanton?
It was a very open collaboration. I was onset with Andrew and his team in UK studios and in Utah and back at facility we would have daily video calls with him to discuss shots. I have to say that I’ve never worked with a director who was so hands-on when it comes to the visual effects, he was great to work with.

What was his approach about the VFX for his first live action movie?
He wanted to be very involved in all the creative decisions, and onset he was very involved in direction of the vfx. I thought his approach to his first live action film was brilliant, he’s a top director and I enjoyed every minute of being on set with him and his team.

Can you tell us what you have done on this show?
Cinesite created the majority of the film’s environments, including the opposing cities of Zodanga and Helium, and the Thern Sanctuary, as well as a big air battle and full-screen CG digi-doubles of John Carter and Princess Dejah. The environments were populated with CG crowds and hundreds of CG props.

John Carter is the biggest project in Cinesite history. Can you explain to us how you faced it and what were the major changes at Cinesite for it?
Yes, it’s fair to say that JOHN CARTER is our biggest and most complex project to date. One of the major challenges we faced was the shear volume of shots and of course the rendering. The shots were so complex that if we’d rendered them after every small adjustment they would have literally taken months to render! So we had to be smart about how we rendered and keep a flow of communications between the teams so weren’t all sending the shots off to the render farm at the same time.

How did you split the sequences amongst the different supervisors?
Due to the volume and complexity of the work we divided the shots between four additional visual effects supervisors. Jon Neill and his team worked on the travelling city of Zogdanda. Christian Irles oversaw the team that created Princess Dejah’s city, Helium. Ben Shepherd supervised the huge aerial battle between Zodanga and Helium and Simon Stanley-Clamp led our work on Thern. Artemis Oikonomopoulou was our overall 3D supervisor. These leads guided a team over 400 talented artists.

The film opens with an impressive long shot. Can you tell us in details its creation?
This is the minute-long fully-CG opening sequence of the film starting with a view of Mars from space, with the camera travelling through clouds to the surface of Mars and along a giant trail pitted with mining holes. The camera pans up to reveal a monstrous dark city marching along the planet’s surface – the city state of Zodanga – mercilessly consuming the planet’s resources. The camera travels through the enormous mechanical legs of the city and upwards to reveal the airfield deck and palace as an enormous flying machine takes off and whooshes past the camera.

We shot Aerial footage of the Utah desert from a helicopter. The path of the camera prevised based on GPS maps and Google earth. We prepped when to shoot to get the best lighting but the speed of the real camera was too slow for the Power of Ten idea. So we re mapped the live action plate on to geometry which gave us greater freedom for the camera move. Jon Neil and layout artist Thomas Mueller designed the shot starting in space through CG clouds to the surface of Mars ending with the camera rising up between the city’s moving legs.
From there we rise up to the airfield deck where one of the ships is taking off, we worked in layout to establish the camera move and general animation timings, before working on placement of key objects like major flags, leg animation and finessing ship animation. Dressing layout such as ships and props was then added.

For the wider part of the shot, the ground was created using the photogrammetry environment combined with a digital matte painting projected in Nuke. Then as the camera travels closer, the ground had to be fully 3D CG, including the giant trail and holes where the city has been mining. Rendering this shot was very challenging. Layout had to animate the LOD throughout the shot and hide objects when they were occluded.

A lot of effects elements were created using Houdini and Maya fluids for the sequence including a cloud element when the camera flies through the atmosphere, leg impact effects, a buffalo trail type fluid effect to give the impression of residual dust, and separate flag simulations for large-scale flags versus ships flags.

One important and impressive fight is when John Carter fights against the Zodanga soldiers in the airs. Can you tell us more about how you prepare and shoot this sequence?
This involved multiple CG airships in a chase sequence with cannon fire. It required interior green screen composites with CG ship deck extensions, CG wings for ships and digital matte painting backgrounds. An exterior sword fight sequence with a full CG Thark city combined with digital matte paintings re-projected over geometry to create terrain and the mountainous landscape of Mars. This also involved Thern effect shots including a Thern beam, gun, and cannon, as well as destruction of Thern, and Thern as a destructive force.

For both sequences, the giant airships also entailed creating models which could be seen in close proximity with a high level of detail as well as be used for wider shots. A challenge for look development was that they were required to be more like a 19th Century sailing ship, contemporary with the time of the film’s setting, than the type of spaceship which a modern-day audience might expect.

For Sab’s flagship corsair, a partial set was created for the bridge/cockpit and one deck of a single ship. This was lydar scanned and photographed for reference and recreated. The remaining areas were created as full CG models. Dejah’s ship and the flagship Helium ship, the Xavarian, were created in 3D also. Each ship had a full set of wings which were sized and laid out specifically for each ship. These were controlled by pulleys and ratchet-type controls to give a sailing look. Each of the wings was covered in hundreds of individual solar tiles which needed to be able to be controlled in animation.

How did you design and create the Thern effects?
The sequence starts with Carter and Dejah on a river boat, approaching the Thern Pyramid. Carter uses his Earth strength to leap hundreds of feet up in the air, carrying Dejah. They land on the surface of the pyramid itself. This part of the sequence was shared with Double Negative who produced the external view of the pyramid, mountains and river. Cinesite produced the pyramid activation effect. As soon as Carter and Dejah land, the surface of the pyramid starts to transform, with Thern (a living nano-technology matrix), glowing and growing beneath their feet, before running off across the flat surface of the pyramid in a Thern wave. As this happens, the surface breaks into sections of steps, which drop down. Carter and Dejah move forward to a blank wall which transforms as a Thern tunnel forms in it. A handful of wide shots in this sequence required Carter and Dejah digidoubles, which were hand animated.

The Thern technology was implemented as an advanced Houdini simulation, augmented by a considerable amount of custom software. Initially a model is generated of the required gross shape, and then a ‘scaffold’ pass is generated. From this pass, the Thern itself is ‘grown’ onto the matrix, before it is procedurally animated. Lastly the animated geometry is handed off to lighting where the required passes (including custom glow and internal light passes) are rendered for compositing.

As Carter and Dejah moved into the tunnel, it’s seen to be building around them, leading them deeper into the pyramid itself. These ‘growing Thern’ shots are some of the most complex we undertook, with detailed close-up views of the Thern growing and building the fabric of the tunnel.

As the tunnel itself ends, the main Thern Sanctuary room is seen to build itself, opening out within the Thern matrix of the pyramid interior. This shot required extensive Thern simulation and growing effects, blending multiple elements together in Nuke to build the shot up.

Once in the Sanctuary itself, Dejah puts the medallion on the floor, which ‘activates’ the Ninth Ray effects sequence. Carter and Dejah were shot on partial green screen, but standing on a self-illuminated white floor. The intent was for the floor to trigger lighting effects to match the desired Sanctuary illumination, but it required extensive rotoscope work to extract the lower parts of their bodies. When the Sanctuary is activated, nine fingers of Thern run across the floor. This required detailed Thern to be grown and animated to resolve the Thern fingers growing.

Once the animating Thern pattern is established on the floor, Carter and Dejah discuss the significance of the markings before a set of Thern writing reveals itself to them. The Thern writing was generated by using a Thern alphabet provided by production as a reference. The individual letters were modelled in Maya, before having Thern grown and animated onto them for the reveal effect.

All shots in the Sanctuary sequence had detailed camera tracks completed in 3DE, and a geometric Sanctuary layout was constructed using a green screen lidar scan so Simon Stanley-Clamp and his team were able to determine exactly what part of the Sanctuary should be seen in any given camera direction.

Once Carter and Dejah have established they need to revisit Helium city, a noise from outside startles them and they leave. Carter grabs the medallion on the way out, which causes the ninth ray effects to shut down. This was achieved using a Thern animation pass which reverse mirrors the growing effect seen earlier in the scene.

As Carter and Dejah run outside, we return to a shared scene with Double Negative, with Cinesite again providing the steps built into the Thern pyramid model provided to us. A wide shot shows Carter and Dejah running out of the Thern tunnel as CG digidoubles before a cut to a close-up shot showing a green screen Carter and Dejah running across a fully digital pyramid environment. This last shot is a seamless transition between Cinesite (at the head) and Double Negative (at the tail).

The entire Thern effect system was designed and built from scratch using a combination of Maya, Houdini and custom software developed in house. Based on the principles of nanotechnology, the system provided a semi-automated way to ‘grow’ Thern into any environment and geometry. It took a full year of development time to evolve and bring to the big screen.

Can you tell us in details the creation of the impressive city of Zodanga?
Zodanga city was based on an overall design concept by Ryan Church from the production’s art department. Jon Neill’s team had to interpret and build detail into the design to make it work for full-screen backgrounds. One of the technical challenges was making a full-size city for wide shots and also detailed areas to be seen in close ups.

There was a huge amount of work done on shader resource files, per frame asset visibility and prman XML stats analysis. This was what made it possible for us to render the city at all.

A handful of sets were built which were locations within the city, but these needed considerable extension work to give depth and scale to the city. Thousands of pieces of geometry were modeled for the city buildings. To dress the virtual locations, hundreds of props were also modeled, from tables, tents and cables to lamps, bottles and cases.

One of the major challenges of Zodanga is that it’s a city on legs – we had to work through how the legs would look and move, and how the city would be mounted on them. The design of the legs, scale, materials and rigging had to match the time period of the story, while the surfaces and weathering had to make it look like they’d seen years of service on the Mars landscape.

It wouldn’t have been practical to animate 674 legs individually, so we used lots of timed animation caches. Variations in movement and secondary animation such as cogs and cabling were used to create interest in the leg movement.

It would also have been impractical to texture all sections of the city in great detail, so decisions were made about which sections of the city would be seen close up. These included the Hangar Deck, the Airfield Deck, the Zodangan Streets, and the Palace and Towers. Different levels of detail were established for these scenes. The textures, surfaces and edges were detailed to give a dirty, industrial feel using a combination of Photoshop, Mari and Mudbox in tandem with bespoke shaders and lighting development.

Have you created some previs for the Flyer Chase sequence to help the shooting?
We did a technical previz for the shot, but the majority of previz on the film was done by a company called Halon. Tech previz is the next stage. We take into account the real Stage dimensions and actual locations and recreate the previz using these restrictions. It allows us to confidently advise the camera crews on the angles we need to shoot to cover the vfx work in post. Often the actors and camera crews are in 360 degrees of green. We need to provide visuals to them so they can see what the audiences will see later down the line.

Some shots of this chase sequence involved an impressive number of elements especially for the second part with the huge environment, Zodanga and all the dust. Can you explain to us the creation for one of those shot?
This was the first sequence we did on Zodanga. The challenge was how to render the large amount of props and set pieces used to dress the digital set. The scenes used a large amount of geometry which is very memory heavy. We used Cinesite’s proprietary geometry format called MeshCache for the geometry. MeshCache supports LOD files and between layout and lighting departments we managed to use mid and low-res models in the distance and high-res models in the foreground. The challenge was to make the shot as good and complex as possible while still fitting it into memory.

Since Zodanga is a very boxy, utilitarian-looking city we needed to break up a lot of the straight edges to show wear and tear on the concrete. This was done by modeling and texturing using Mudbox as well as other techniques.

Lighting of the hangar deck posed another challenge. We constructed large parts of the frame in CG (or the whole frame for fully-CG environment shots), so we had to try to mimic how real world lighting works. This was achieved using global illumination, a technique to calculate how light bounces around in the scene. This gave our shots a very natural look. We would normally start of by using only one light (the sun), then calculate the global illumination. But in a lot of shots we needed to add extra lights to meet the art direction from the vfx supervisor. A god ray pass was done using a volumetric shader to add more atmosphere and help sell the sunny and dusty environment.

Compositing used a template script in Nuke as a starting point for every shot. This was populated by around 60 layers to give compositing a very granular control to be able to tweak the lighting in Nuke.

In addition to the city backgrounds we had to add CG wings to the practical flyer that John Carter escapes on. The wings are made from a shiny, iridescent material. We provided the director with a few test shots using different settings. The wings had to be carefully lit in every shot to bring out the rich gold and purple tones we were looking for. The wing shader changed the color based on the angle between the wings and the camera and we could control the colors and the blending between them in real time in Maya using a CG shader.

For action shots, in addition to the wings, we also did a number of shots where the flyers are fully CG with digidoubles riding them. The digidoubles used subsurface scattering and our Cinesite skin shader. We also simulated movement for John Carter’s clothes and hair.

Later in the sequence we reach the city’s legs and a breathtaking chase takes place. The amount of geometry per leg was very challenging and in some shots we see hundreds of them. We also go from an inside environment (the hangar deck) to an outside environment so we had to change our lighting setup somewhat.

We also had to layout the impact effects when the legs hit the ground. An impact effect element was provided by the effects department as well as a layout that would analyze the movement of the leg and place the particle and fluid effects at the exact position of the ground impact. We also did quite a lot of manual effects layout to make the shots more dynamic and dusty. The legs effect was rendered in several layers, to deal with the scene complexity and give compositing more control.

Can you tell us more about the creation of Helium?
Our models of Helium City were inspired by the art department concept stills. This was easy enough to do in matte painting but very time-consuming and render heavy to get actual full 3D renders. Photogrammetry Projections were created for the terrain based on the High res stills we took on location in Utah. These were then worked up in matte painting to achieve the effect that it could almost be a real environment but with a hint of Martian.

The shots presented the city as a whole with both Helium Major and Helium Minor visible, amount of texture maps and shaders. Render time was very high for these shots and all layers, such as crowds, terrain, etc were rendered separately.

Due to the sheer volume of assets needed for JOHN CARTER, we had to develop a proprietary hierarchical caching system. This allowed us to group and duplicate individual models within larger structures and being able to work more efficiently in terms of time and file sizes. For example a prop box would be cached as one asset, then the duplication and positioning of that asset would be cached as part of a city’s props, then that in turn as part of the larger city group along with buildings, etc.

The difficult part was accessing each different stage of this hierarchy, which was possible to do through various filtering options. Each asset also had its own lighting and shading file which would be easily adjustable even from the top node of the hierarchy. We also developed level of detail files for modeling and texturing which could be manually adjusted or calculated automatically through a shot camera.


What was the real size of the Helium sets for the final battle and how did you extend them?
This sequence was held in the Palace of Light, which is in Helium City. The real size of the set was only 30ft high extended 150 ft on the ground. The 3D model of the palace needed to be able to be viewed from the exterior as full CG and also used as a set extension for live-action shot on an interior set. It was a cathedral-like structure with solid vertical ribs supporting glass ‘feather’ wall panels – with mirrors and a lens mounted at the top of the structure. This needed to have the small amount of set translated and extended hundreds of feet.

Since the glass needed to be transparent, the exterior environment also needed to be rendered in the scene, along with reflections and refractions of CG and the live action. The interior was a night scene, lit with hundreds of flambeaux and moonlight. The complexity of the model, textures, shaders and look of the glass was quite a challenge. This was also combined with a ship crashing through the glass walls, so we built some panels with additional geometry which would work better for shattering in effects.

The glass itself was also a huge challenge. It needed to look like the frosty glass that had been on set inside the palace, while also keeping the palace looking beautiful. This took a lot of time and many tests. Raytracing Glass is traditionally computationally expensive. We knew we would need to be smart about how we rendered these shots but still make sure they did the design justice. Nikos Gatos and his team decided to find a more efficient way to render the 300 shots in the Final Battle Sequence. They cherry picked the hero shots and raytraced them, but the other shots were pre-cached, then raytraced, into various point clouds.

How did you create the soldiers for the battle between the two armies?
Both the city of Helium and Zodanga are populated by red skinned Humans. When aggressors Zodanga storm Helium we needed an army of 50,000 to populate the outskirts of the city! In every shot if you look closely you will see all manner of human life, from soldiers to civilians, men, women and children. Jane Rotolo our Massive TD supervised the mocap shoots with the On set stunt team and built Cinesite a library of moves. In some cases the actions were so believable we were able to add crowds to scenes that we would previously have not been able to do! In one case we replaced real actors as they looked like they were props!

The people in the cities were derived from a few basic characters on set. We photographed about 8 hero Zodangan 8 hero Heliumites and then our texture team mix and match the clothes and the heads to great the diversity needed for the crowd shots. Each of the air ships had a crew of about 70 so these were all textured and motion captured with specific actions suitable for the environment.

How was the collaboration between the different vendors?
Because we were responsible for the majority of the environmental shots we shared a lot of assets with Double Negative, and a few with MPC. We had a great relationship with them and when you’re sharing shots you have to have that element of trust with your neighbours. Even though we’re technically competitors we all work together to get the job done. The production managers on both sides did an amazing job at planning and managing the assets being moved between each facility. It was a huge task and my hat goes off to them for making it work so smoothly.

Can you tell us more about the stereo conversion process?
Scott Willman was our stereo visual effects supervisor. For the stereo conversion of John Carter, we built an all-new pipeline from the ground up. We’d never done a 3D conversion film before and we saw this ‘clean slate’ as a great opportunity to really try something new.

The conversion technique in popular use involves separating layers using roto and then pushing or pulling them to certain depths by grading a depth map. Once this is in place, a series of filters are used to simulate the shape and internal dimension of an object. We believed this prevents artists from quickly achieving correct spatial relationships and natural dimension in their scenes.

To overcome this limitation, we decided that instead of manually placing objects in space, it made more sense to use animated geometry that we could track and position in the scene and render through virtual stereo cameras. This allowed us to ensure that if John Carter was running from the foreground to the background he appropriately diminished in scale and that his footfalls were always meeting the ground. Elements that he ran pass would also be at an appropriate scale relative to him. It allowed us to place all of the objects in the set in their proper location in 3D space so that correct scale perception was maintained.

By having the scene laid out in 3D space, ‘shooting’ it also became very natural. We could use the same cameras, lens data, and animation from the actual set. When we then dialed our stereo interaxial distance (the distance between the cameras) it was in measurements that made sense to the scale of the physical set.

Another major benefit from using the tracked VFX cameras was that we were able to render CG layers in stereo and have them fit seamlessly into the converted plate elements. This was particularly important when Carter physically interacts with four-armed Tharks. In typical 2D visual effects, holdouts would suffice. But in 3D, the position of each CG limb must be correctly placed in depth relative to the converted plate element.


What was the biggest challenge on this project and how did you achieve it?
The biggest challenge was simply the variety of work that we needed to do. We split the film into four main sequences with their own VFX supervisor, each supervisor then had to feedback from me before we showed it to the Director. This kept it consistent and manageable. The other issue was how much work was shared between the vendors; we supplied over 400 backgrounds to Dneg for example. This in itself was a logistics challenge. We had an army of brilliant producers and coordinators who made sure that communication was efficient and open. Its one of the strengths of working in London, all the big houses are within walking distance of each other so we meet and discuss what we need informally too.

Was there a shot or a sequence that prevented you from sleep?
Yes, too many. With 800 shots to final it becomes a juggling act. But I had a great team of producers and coordinators so I always had support from my producers, I never felt that I was on my own, my team ‘had my back’ all the way through the shoot and the post.

What do you keep from this experience?
I learned a lot on this film, which is the only reason I stuck at it every day. I felt honoured to be surrounded by artists of this calibre. From the on set data wranglers to the MD everyone shared the same goal to make this movie be as good as it could – Andrew Stanton’s enthusiasm is infectious you know! I also saw some incredible sights in Utah, what a memories. I love to travel and if you can combine that with filming it’s an awesome road.

How long have you worked on this film?
I was on the film for about two and a half years, it was a labour of love. If Andrew Stanton picked up the phone and said lets do it all again I would be there like a shot, and in this industry loyalty like that speaks volumes.

How many shots have you done?
We created 831 visual effects shots for the final film and converted 87 minutes into 3D.

What was the size of your team?
At the height of the project we had 400 artists working on it.

What is your next project?
After a long two and a half years of JOHN CARTER, I’m having a bit of time off. But it won’t be long until I get bored and start looking for the next one!

A big thanks for your time.

// WANT TO KNOW MORE?

Cinesite: Dedicated page about JOHN CARTER on Cinesite website.


© Vincent Frei – The Art of VFX – 2012

THIS MEANS WAR: Mitchell Drain – VFX Supervisor – Method Studios

Mitchell Drain began his career in 1985 as a roto artist at Robert Abel and Associates. Subsequently, he worked on the Flame and Inferno systems. He has participated in projects such as JUDGE DREDD, INDEPENDENCE DAY, BLACK HAWK DOWN or MINORITY REPORT. In 2004, he joined Asylum and became VFX Supervisor and will handle films like MASTER AND COMMANDER, NATIONAL TREASURE: BOOK OF SECRETS, THE UNBORN or G-FORCE.

What is your background?
I studied Art at the Art Institute of Chicago. I came to LA in 1985, and found work as a roto artist at Robert Abel and Associates. There I learned about old school opticals and the emerging digital effects techniques. I then became a Paintbox/Harry artist which led me to film compositing on the Quantel Domino system. I then moved to Flame/Inferno. Soon I was supervising shoots for Cinema Research Corp and subsequent jobs, while continuing to composite. I’ve been supervising « full-time » since 2004.

Can you tell us how Method Studios got involved on this show?
The show was originally awarded to Asylum, however they closed during production. Fox has a good track record with Method so it was an easy decision to move the show here.

How was the collaboration with director McG?
McG is an extraordinarily collaborative director. Right from pre-production he gave vfx a seat at the table, so to speak. He was open to ideas and solutions to achieve the vfx most efficiently within time and budget and his requests were mostly reasonable!

What have you done on this movie?
We had about 400 shots. Most of the heavy lifting was in the action sequences – the opening fight on the Asian city rooftop and the climax on the unfinished L.A. freeway. There were also many one or two-off type shots which involved replacing backgrounds. Some wire work, breath removals and monitor composites. Almost every sequence utilized some sort of digital enhancement such as speed ramps or small vfx to enhance the action or the comedy. We created digital buildings to build out the opening cityscape, created a CG drone, a CG freeway end, environments for the climax among other things.

About the opening sequence in the Asian City, how was the shooting and the real size of the set?
We were fortunate to have an excellent full size rooftop set with 180 degrees of bluescreen. The facade of the building was created digitally. The helicopter was a practical set piece however, the rotor blades had to be created because of noise and safety issues.

Can you tell us in detail the creation of the huge environment and the city?
Originally the city was to be comprised of practical plates shot in Shanghai. As post production evolved, there was discussion about having the city be more generic. When sending a crew to Shanghai didn’t materialize, we contacted a location scout and photographer to go to the top of the highest possible building, and they shot bracketed stills and footage on the Canon 5d. We shot with a 50mm lens to minimize lens distortion and allowed for about a 20% overlap of the plates. Since the city was to be generic, we painted out any landmarks that were too identifiable. Those plates were then projected onto a sphere and tracked into the bluescreen plates. Much color correction and tweaking was necessary to match the film and video elements.

How did you take the materials from the set to recreate the city?
The set itself was only the rooftop. The Art Department provided architectural plans of the set. We created a model in Maya for tracking and also to use as a basis for the CG building extension. We tried to design a building that would match the architecture of the set but still look as though it existed within the generic Asian city.

Does the night aspect cause you some troubles to take the reference materials for the city?
The difficulty with the night mostly arose from the fact that the dynamic range needed to be higher than what we were able to capture with the video from the 5d. This is where the bracketed stills came in. Those images had detail in the blacks that the matte painter could use to fill in the negative space. The photography from the bluescreen shoot was rather bright. We lifted the background exposures so that in the DI they would have plenty of leverage to color correct the scenes darker and not clip in the blacks.

Are you involved on the shots showing the fall of Tuck and JDR on a table in the restaurant?
Yes, that was a 2-pass composite of stunt doubles falling into a greenscreen pad, and a lock-off plate of the restaurant floor below. In composting, we created a slight camera move with 2d parallax to give the shot some added excitement.

The final sequence happens on a unfinished freeway bridge. How did you approach this sequence?
This is the 110 south to the 105 west freeway interchange. This was selected because of the height and the great view of LA. The freeway is, of course, fully complete. Our job was to create the illusion that it is incomplete. We needed to create a section of the freeway in CG to represent the unfinished freeway edge. We went to the location and took measurements and texture reference. It was also necessary to make the two lane freeway appear to be one lane for the illusion of danger. Plates of the freeway below were taken from another location to be used as tiles, much like the city in the opening sequence.

Can you tell us more about the challenge for the creation of the environment?
Since the environment was to be stitched together from the plates, we needed to remove the moving cars because, if they were to cross a stitch point, they would disappear. This meant that we needed to replace the moving vehicles. There was no time left for CG cars so, the artists used stills and moved them 2 dimensionally, added shadows, lighting changes and motion blur to complete the effect. There was also the issue of lighting direction. Since the plates were shot at a different location, and at a different time of day, lighting direction was inconsistent with the first unit photography. This was solved by the compositors painting the shadows into the right direction.

What was the real size for the freeway sequence?
The width of the freeway was actually 52+ feet. This had to be reduced to about half to give the illusion of a single lane freeway ramp. The sequence was comprised of about 66 shots.

Some shots are in super slow-motion. How did you manage them and did have you some troubles with those shots?
Those shots were shot at 150 fps. The purpose here was to give the editor the latitude to change the speeds for dramatic effect. This did not really cause any issues. Editorial would provide us with the frame rate that they wanted and we would re-time the plates to that speed and composite from there. In some cases we needed to re-time our composite elements to match the final frame rates. For shots that were returned to 24fps, it was necessary to add motion blur to the final composites to avoid ‘strobing’.

How did you create the final cars fall? Is it full CG or did you used some real elements?
The SUV is a practical element. Special effects built a catapult to launch the car over the side if a structure in Long Beach and composited into a plate generated by photos and other elements. Production did not launch the jeep but it became clear in editing that we would need to see the jeep as well. There was no time left to create a CG jeep from scratch. The compositor (Scott Balkolm) imported an obj file of a matching jeep into Flame, where he textured, lit, and animated the jeep per McG’s direction.

You have used Flame intensively on this show. What were the advantages for the it?
Both Flame and Nuke were used extensively on this show. Certainly both have their strengths. Flame was particularly useful because of the quick turnaround of iterations of shots that needed to have elements created for one-off shots. The jeep explained above is a great example. There is also a sequence in a dog pound where the Chris Pine character wrestles with a dog. This was a stuffed prop with no animatronics. In post, McG asked what could be done to animate the prop. 3d was not an option. The intuitive nature of Flame allowed for experimentation and many iterations in a very quick turnaround. These are two of many examples where the Flame workflow allowed us to get a lot of production value.

Were there a shot or a sequence that prevented you from sleep?
In truth, I tend to lose sleep over any effect until I have a solution that I believe in 100%! On THIS MEANS WAR, the opening and closing sequences created the same amount of headaches not only because of the scale of the vfx, but also due to some of the limitations placed upon the production with budget and time. The movie is, at its core, a romantic comedy but the action sequences needed to be on par with much larger budgeted films.

What do you keep from this experience?
I had a great, great experience on this show, mostly due to the crew, McG and the team at Fox. We were given a lot of freedom to take the work to a higher level and the faith that the director showed in us was rare and appreciated. It wasn’t all smiles and rainbows, but in the end, we were all working together and that spirit of collaboration was very rewarding.

How long have you worked on this film?
From pre-production to final delivery was about 16 months. This was mostly due to re-shoots.

How many shots have you done?
Final shot count was around 400 shots.

What was the size of your team?
We had a relatively small team. In the neighborhood of 50. Additional shots were contracted to Method Studios NY, Digiscope, Shade and With a Twist Studios.

What is your next project?
I am presently doing a television pilot for Fox.

What are the four movies that gave you the passion for cinema?
What a great question! It is difficult to name only four. When I was young I became fascinated with classic horror films. FRANKENSTEIN, DRACULA, WOLFMAN etc. AN AMERICAN WEREWOLF IN LONDON and BLADE RUNNER both had a profound impact on my desire to work in film. Since I began my career in non-digital visual effects, opticals, special make-up and miniatures were my focus. With the advent of digital vfx, I became only more passionate about vfx.

A big thanks for your time.

// WANT TO KNOW MORE?

Method Studios: Official website of Method Studios.


© Vincent Frei – The Art of VFX – 2012

THE GREY: Christian Garcia – CG Supervisor – Digital Dimension

Christian Garcia has worked on a various number of projects such as HEAVY METAL 2000, PINOCCHIO 3000 or the TV series CHARLIE JADE. Subsequently, he joined the teams of Digital Dimension where he will oversee the CG on films like RED CLIFF, THE PINK PANTHER 2 or THE SPIRIT. In the following interview, he talks about the CG wolves for THE GREY.

What is your background?
I was born in Perpignan, a small town in southern France. From my 12 years, I wanted to make films in particular with special effects, so armed with my super8 camera and friends I began to write and filmed. The years passed and the will to make FX has become a dream, the famous American dream. My professional life led me to another branch more accessible and movies made me dream while I have fun with 3D software of the time trying to keep dreaming, but I always looked for ways to go to Uncle Sam and it’s on my 27 years that began the adventure, a magazine « How to move to Quebec » was the front door, but nothing was gained, a year after I get my steps on Canadian soil, my job at the time did not allow me to work despite the promises that I had made, a little job to another person I met who would become my inspiration, my future wife. Discussions after discussions, I found a 3D private school, after an interview, a bank loan and a scholarship, I proudly returned to school and there I do not want to miss my luck … 6 months of study and all-nighters to complete my demo, I was able to find work in the business, just one day after finishing. What a joy!

Final shot

Like any young ending his studies, I start as a junior to do what others do not want to do, it was not bad because I was about to learn, so over the years I began to lead a team of three people, then for a 2D/3D movie (HEAVY METAL FAKK2) I supervised a staff of 15, during a year, I animate, light, made a few visual effects. Then it was the turn of PINOCCHIO 3000 (in 2004) where I find myself at the head of 120 people as CG supervisor. During 18 months, I was doing less shots, too busy, but I try to stay in the game by making debugging of 3D scene by staying on the night.
Subsequently, I am involved on my first VFX, for TV series and then a series (CHARLIE JADE) which earn me a Gemini Award nomination for « Best visuals fx on a serie », it’s a kind of evening of the Oscars, but in Canada.

After a while I get approached by Digital Dimension in Montreal and agree to be CG Supervisor on PINK PANTHER 2, and then it will be THE SPIRIT, the last 3 years were marked by close collaboration with Warner Games to exclusively do their highrez game cinematic, mainly LORD OF THE RING, the MORTAL KOMBAT and FEAR 3. We have simultaneously made some shots on several films.
And then came THE GREY on which Digital Dimension have made 90% of the VFX. The dream became reality …

Original plate

How was the collaboration with director Joe Carnahan?
Good, Joe has an explosive character, he said loudly whenever he likes, but also the opposite (laughs). We have with him two weekly sessions on Cinesync and Skype, to show him our work and have approvals, the last 2 months it was each day.

What was his approach to VFX?
He was very reluctant to them, so at first we had to do the wolves seen far away. But during a shot, for our quality animation and compositing, we managed to convince Joe that he would need our CG wolves. Then over the shots, Joe asked more and more for CG wolves.

What did you do on this show?
I supervised about 80 artists, approved the shots before sending them to the customer, find solutions with my leads and ensure that everything happens for the best. So with 80 artists you have to forget to make shots, so in the evening hours I was doing I forced myself to have some fun to clean shots and debugging, find out why a 3D scene does not render, I love it.

Tracking

Can you tell us about the filming of wolves sequences?
On set, although wolves are « tame », they decided to do what they want and then we see them primarily run through the forest. One scene where the wolves lurking around the body of a character has been possible thanks to the trainer of the wolves that put meat in the body of a model, one of the wolves began to play instead of pulling the body outside the frame, so they need to have a shorter cut of the shot and in order to hide the cheating we added CG snow and clear footprints in post. In fact the wolves live we have served more references than anything else.

How did you collaborate with KNB teams?
They were responsible for animatronics, on set they brought real monsters. The close-up attacks were done with puppets wolves. For shots of the Alpha wolf, we add in post, shaking their lip, blinking, swelling the pupil …

Can you explain in detail the creation of wolves?
At the beginning we had no idea of what the Alpha and other animatronics will look like, we only knew they would be big, so we started to model a large wolf, but with the characteristics of a real wolf, then when the first pictures that were sent to us KNB, it was necessary to revise our wolf, as he was not yet rigged, one could adjust without too much difficulty, modeled in Softimage, he then made a short tour by ZBrush has the Hair was designed in Softimage, and the rest of the pipeline, the rendering was done in 3Delight, we had a close collaboration with them, the renderer is very fast, allowing us to put the hair, with displacement, motion blur and the depth of field, all with very reasonable rendering times.
From the Alpha wolf was born on the wolf gray/white who is shot down at the beginning of the movie. We made 5 variations to create the other wolves in backgrounds with some modifications.

How did you rig them?
We used Softimage with our proprietary tools, we adapted our facial rig to that of an animal, our TD artists worked very well, and we made some very specific shapes for certain situations in the film. Our rig was scalable so we could easily adapt it to the smaller wolves. Our rig setup allowed us to easily transfer animations of big wolves on little wolves and saved a lot of time.

Lighting

Can you explain the creation of the Wolves’ fur?
A beautiful headache when you create hair, always in Softimage, our hair expert had with him samples of hair from the Alpha (animatronic), based on reals pictures of wolf, he created a base texture to create the Hair system. After that a long process of Hair creation started, we made several touch up especially for closeup shots increasing the number of hairs or restyling.

FX snow

How did you animated the wolves and the big alpha male in particular?
No motion capture in this film, only keyframe animation, we have an excellent team of animators, some of them have worked on KING KONG, PIRATES OF THE CARIBBEAN and ICE AGE. With the help of references of real wolf shot in the studio with the trainer, the animators had a period of R&D in order to control the animal.

Animation

Can you tell us more about the breaths of the characters?
There was a combination of live assets photographed on set on a black background and CG breath with which our compers played in Nuke.

How did you create CG snow?
It was a little puzzle, because each sequence and sometimes every shot had a quality and a different amount of snow. We had to play with, because this was a problem of continuity. So we created about 10 snow CG assets that have been given to the compositing department, the compers have placed on grids in Nuke with our 3D cameras. In other cases where the camera had great movement, we used full CG snow scenes.

What was the biggest challenge and how did you achieve it?
The tracking of certain difficult shots filled with snow and without markers.

Final shot

How long have you worked on this film?
About 6 months.

How many shots have you made?
220.

How big was your team?
We were around 25 artists.

What is your next project?
A game cinematic for Warner Games, a IMAX stereoscopic film and other projects to start this summer, including a full CG feature.

What are the four movies that have given you the passion for cinema?
The first three Star Wars (Episodes 4-5-6).
SUPERMAN 1 and 2 (with Christopher Reeves).
RAIDERS OF THE LOST ARK.
JURASSIC PARK.
FIELD OF DREAMS and all the ROCKY movies for their determination to believe in their dreams and that nothing is impossible.

A big thanks for your time.

// WANT TO KNOW MORE?

Digital Dimension: Official website of Digital Dimension.


© Vincent Frei – The Art of VFX – 2012