JOHN CARTER: Adam Valdez – VFX Supervisor – MPC

Last year, Adam Valdez speaks to us about the effects of MPC for THE CHRONICLES OF NARNIA: THE VOYAGE OF THE DAWN TREADER. This time, he explains his work on JOHN CARTER.

How did MPC got involved on this show?
We were asked to come in midway through post, to help finish a scene that needed a boost. Typically this is called « 911 » work, but in this case the decision was made in good time and that meant we had a nice schedule to work on what turned out to be some tricky work.

How was the collaboration with director Andrew Stanton?
Andrew is one of those guys who is genuinely making movies for his love of movies as an audience member, and his love of the process as a film-maker. For someone who is so involved in the day to day of animated films, I was curious if he would be a micro-manager, but on the contrary I found him to be very trusting and collaborative. I think he is used to the reality that a film by nature is the product of all the people who work on it. Some film-makers fight that, others manage it, and that’s what Andrew does. He will give you space to bring ideas, and will riff on your ideas if they are good, but is not shy about sticking to his vision when he is confident about it. One of my responsibilities is creating a rhythm to how we review work – that large enough pieces of the film are reviewed in time intervals which maintain creative momentum. A group of people, no matter how experienced, will lose momentum, even forget what we were trying to achieve, if we don’t see work progressing regularly. Andrew responded really well to this, and it allowed us to keep tuning shots all along the way to final, which he also appreciated. Andrew has an intensity about him but is always respectful and puts the movie first, not politics or ego. I have a lot of respect for that, and so it was a satisfying and fun experience to work with Andrew, DOP Dan Mindel, VFX consultant Eric Brevig, editor Eric Zumbrunnen, and producers Lindsey Collins and Jim Morris. The whole team were a genuine pleasure.

What have you done on this movie?
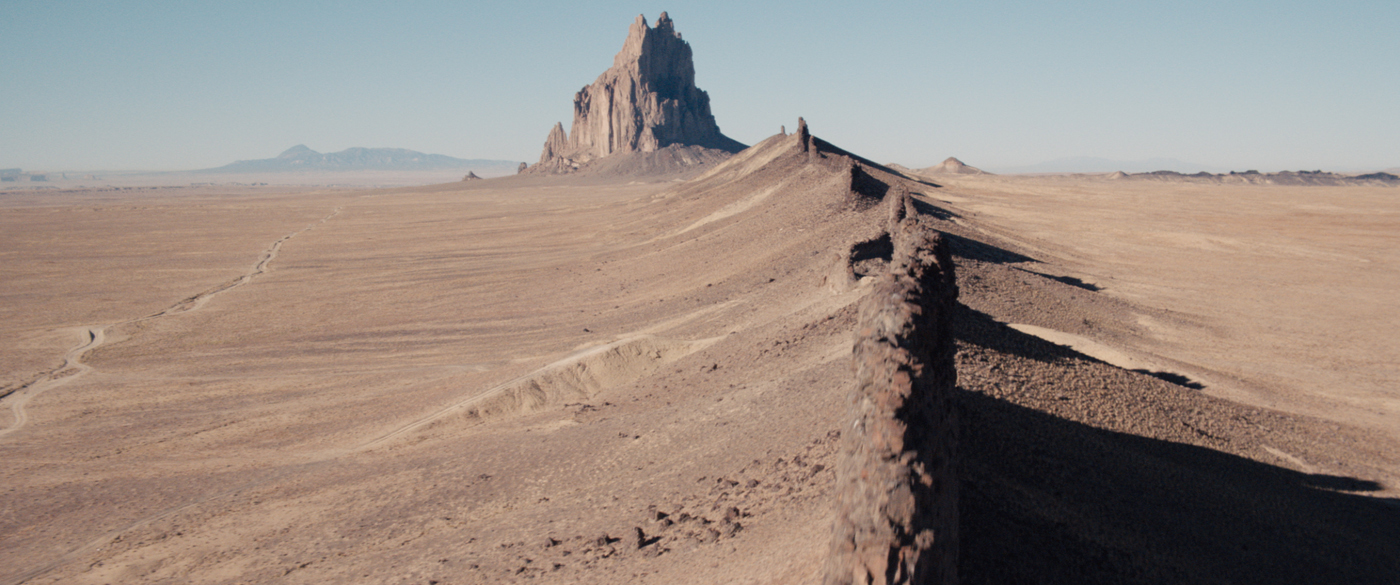
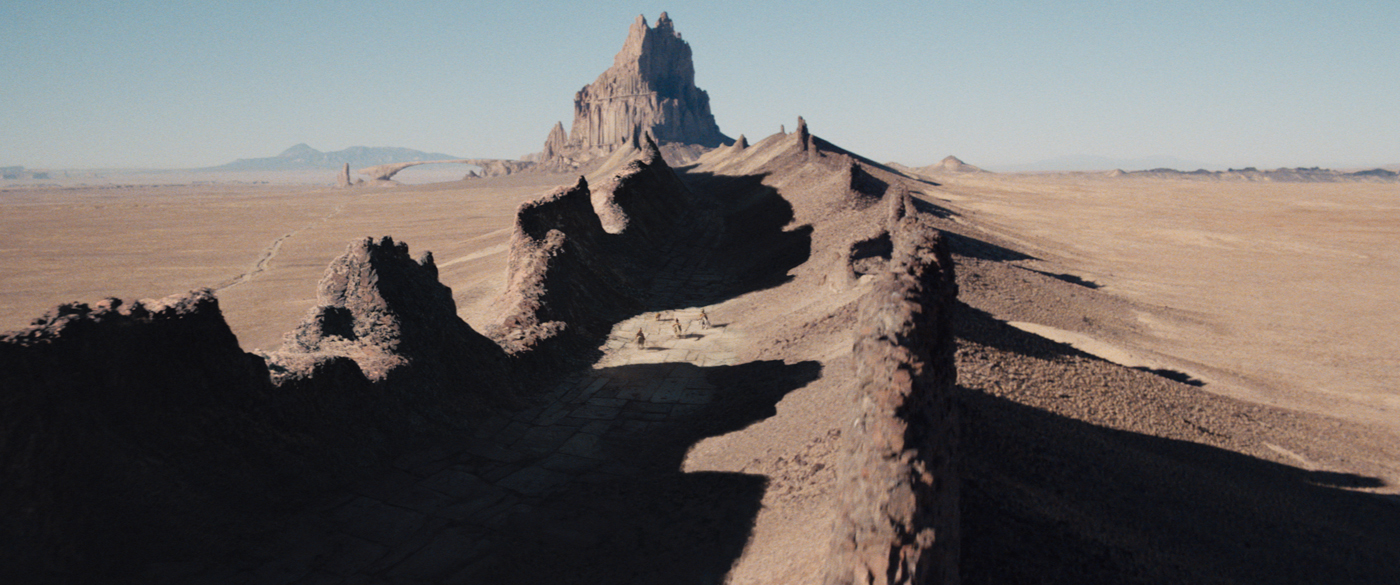
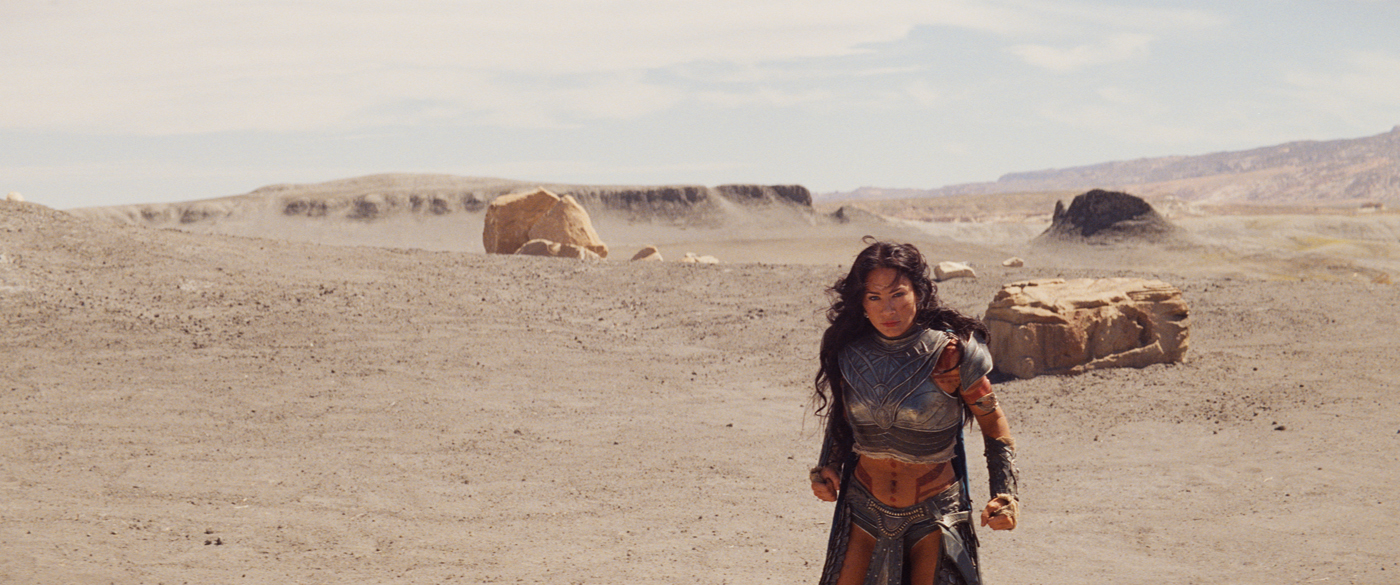
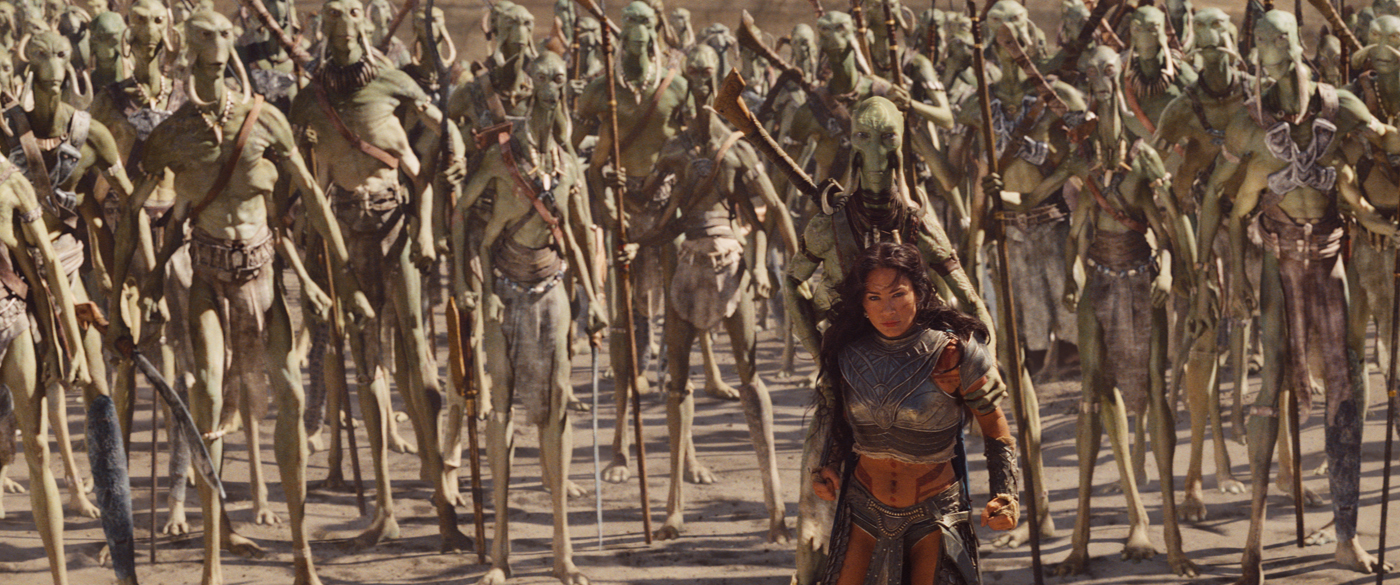
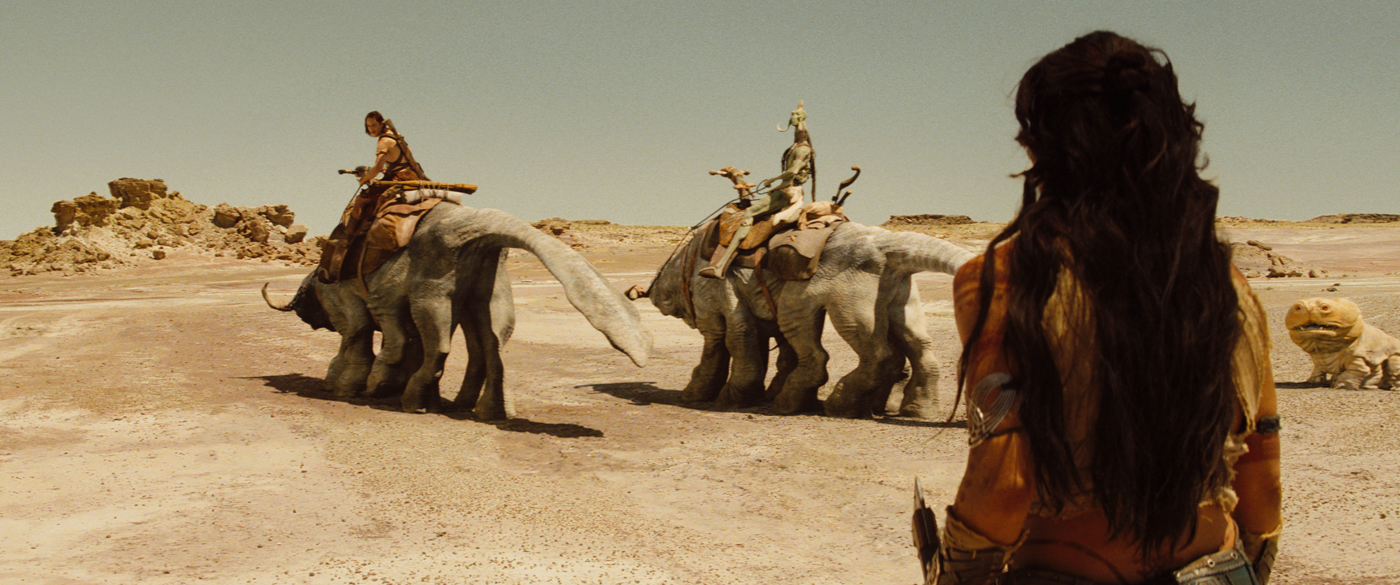
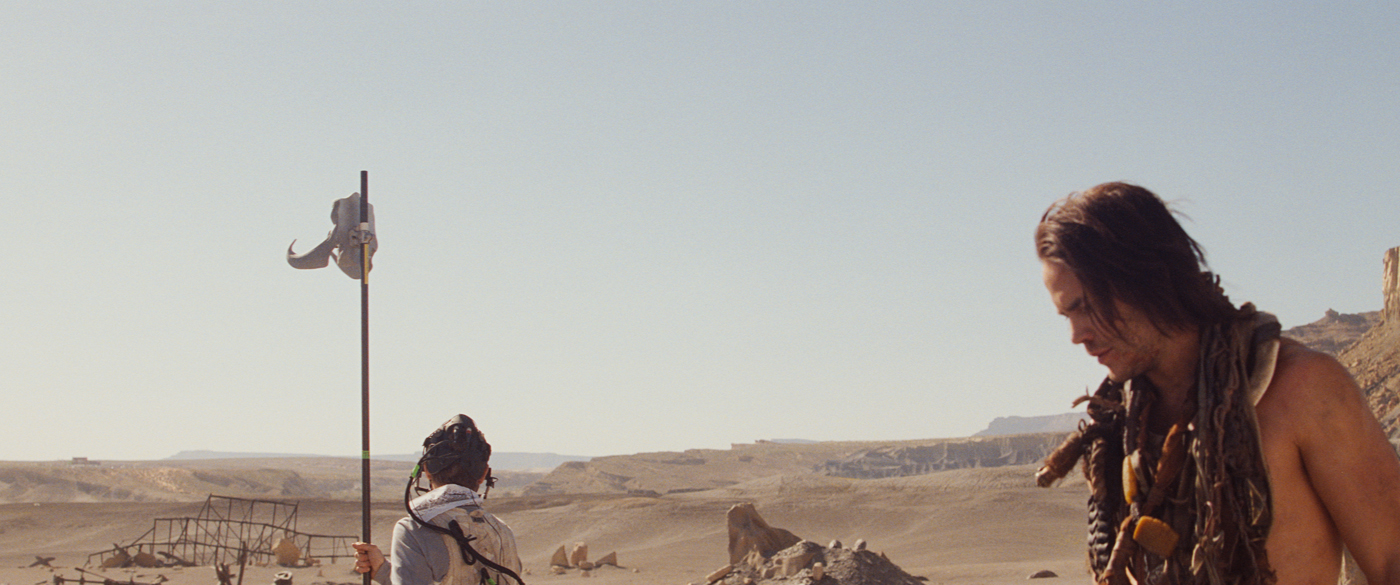
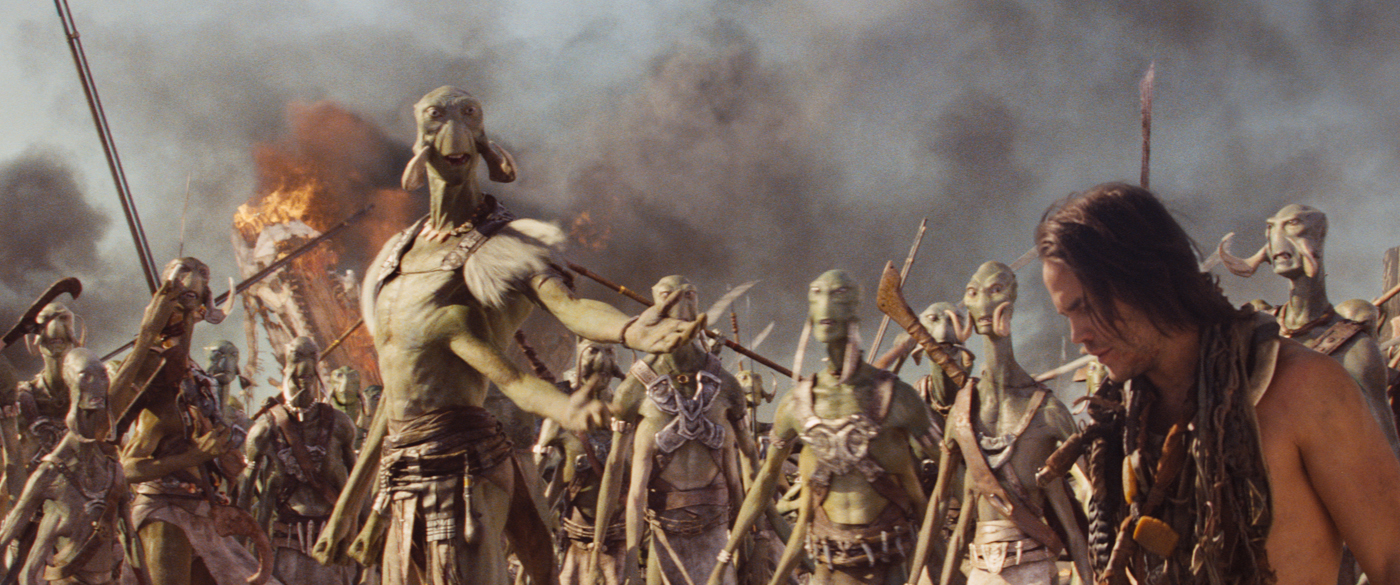
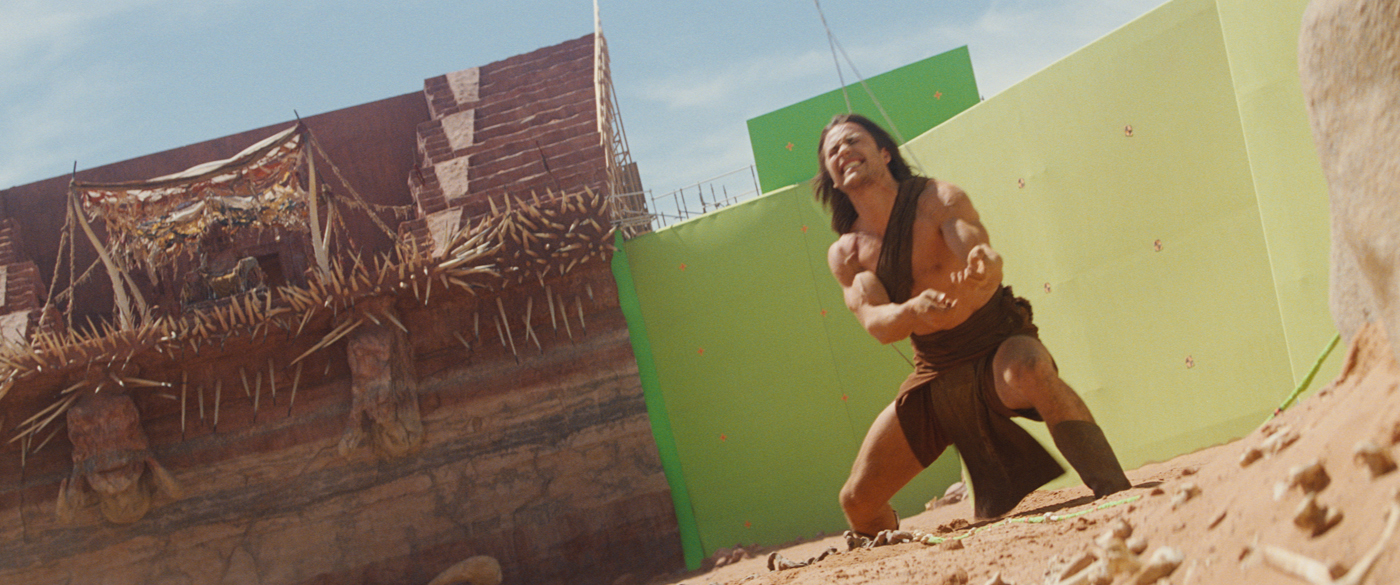
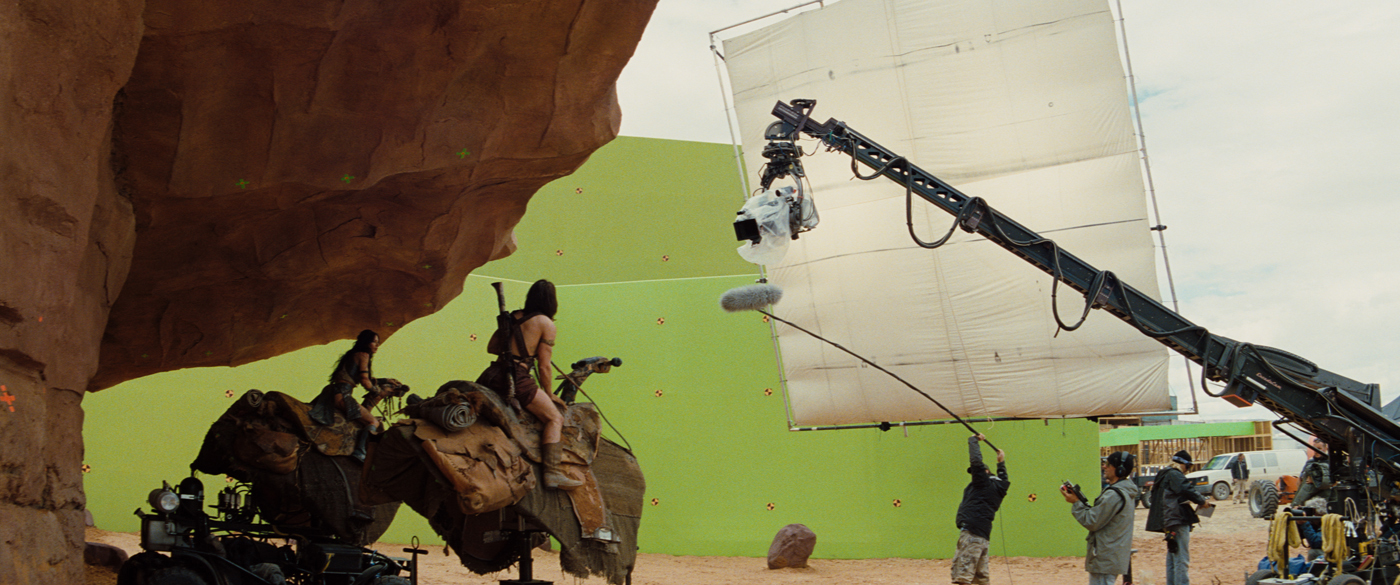
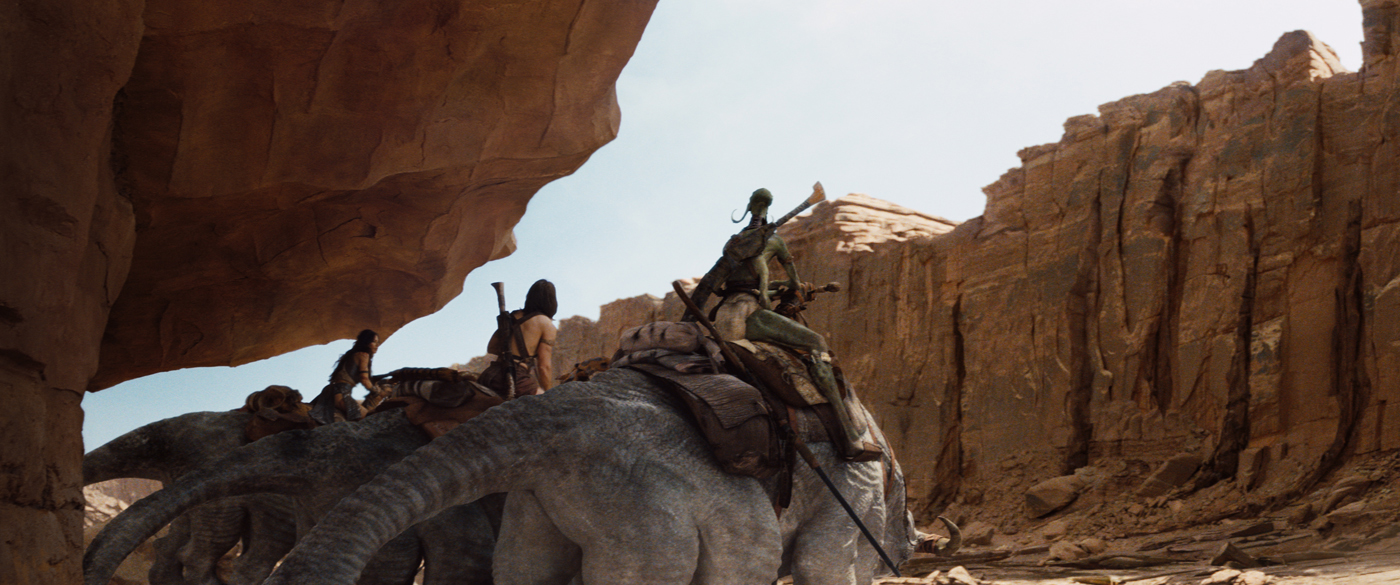
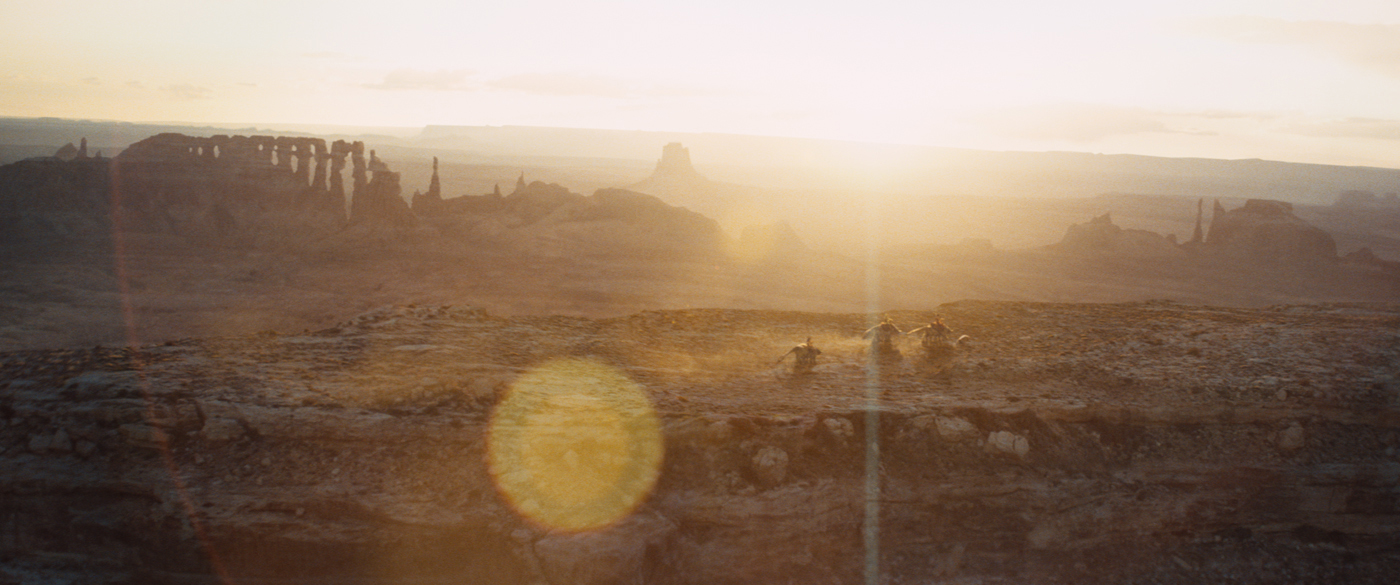
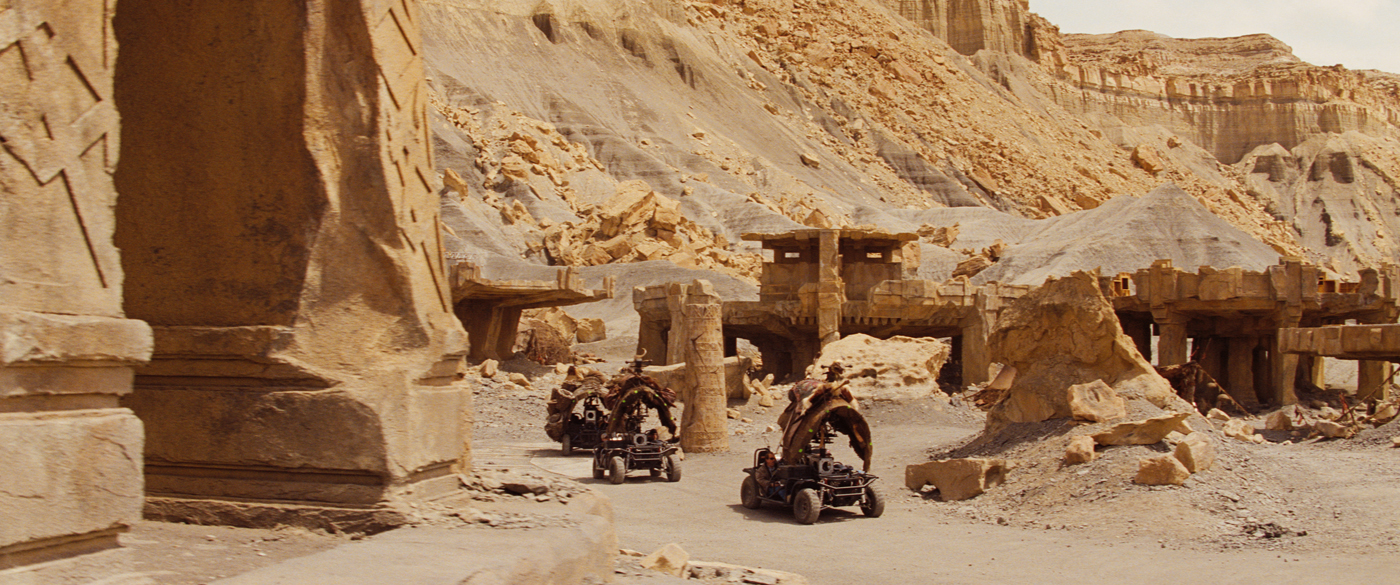
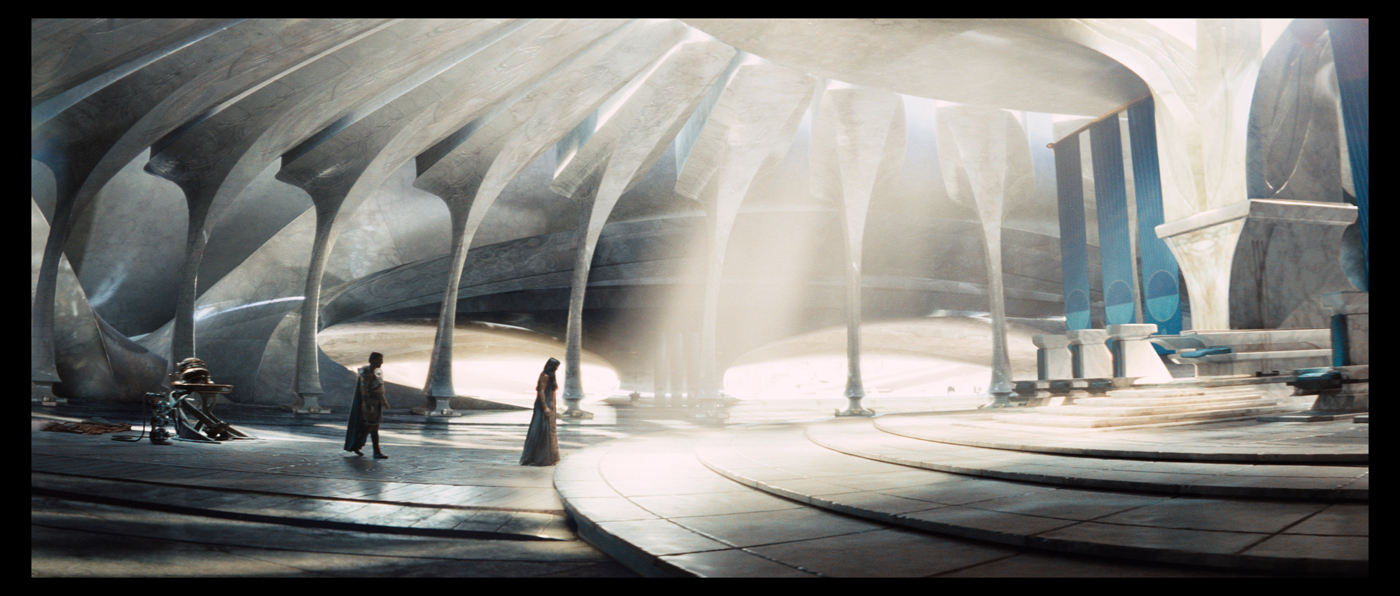
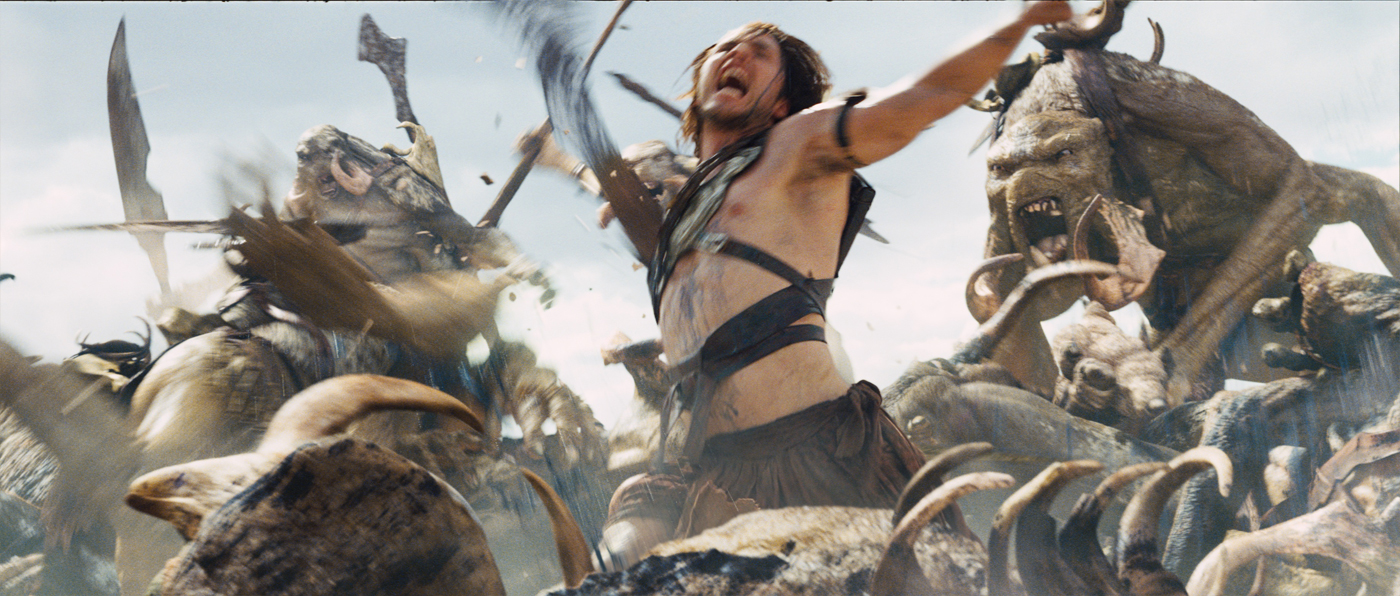
Our first big scene was the « Warhoon Attack » – when a couple thousand warrior aliens attack the heroes on the plains of Barsoom. Second was « Dejah’s speech » – a scene held in the throne room of Helium City, where a pivotal political decision is made by the King, or Jeddak, of Helium.

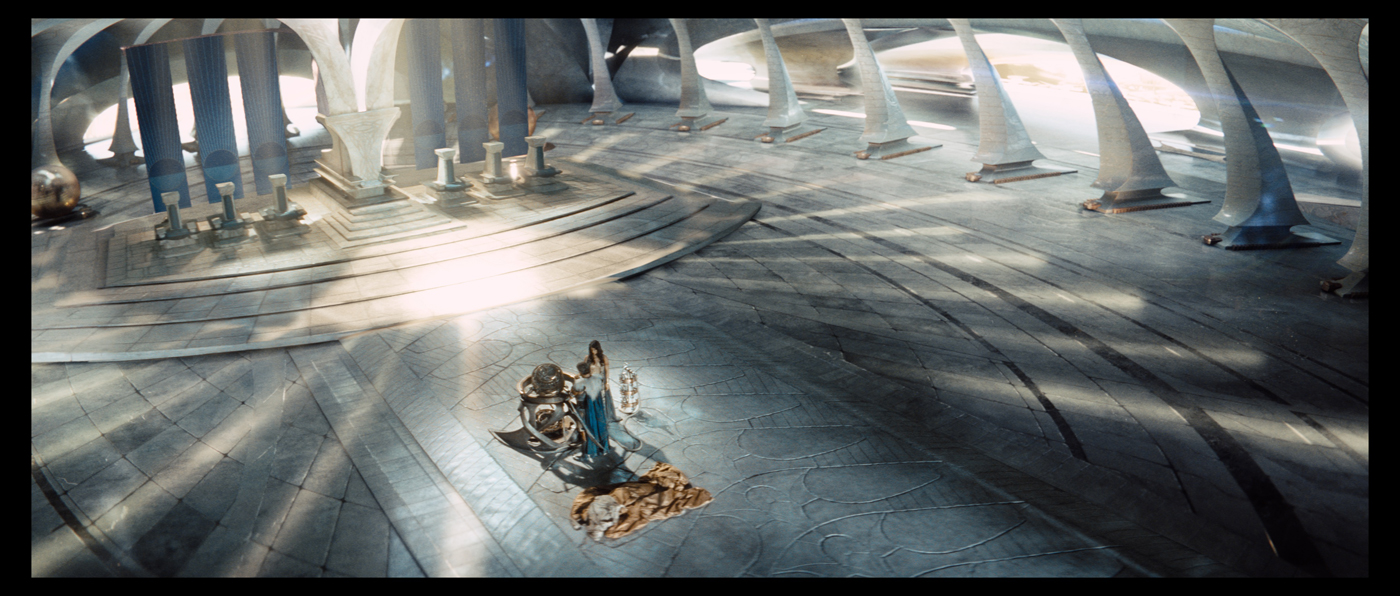
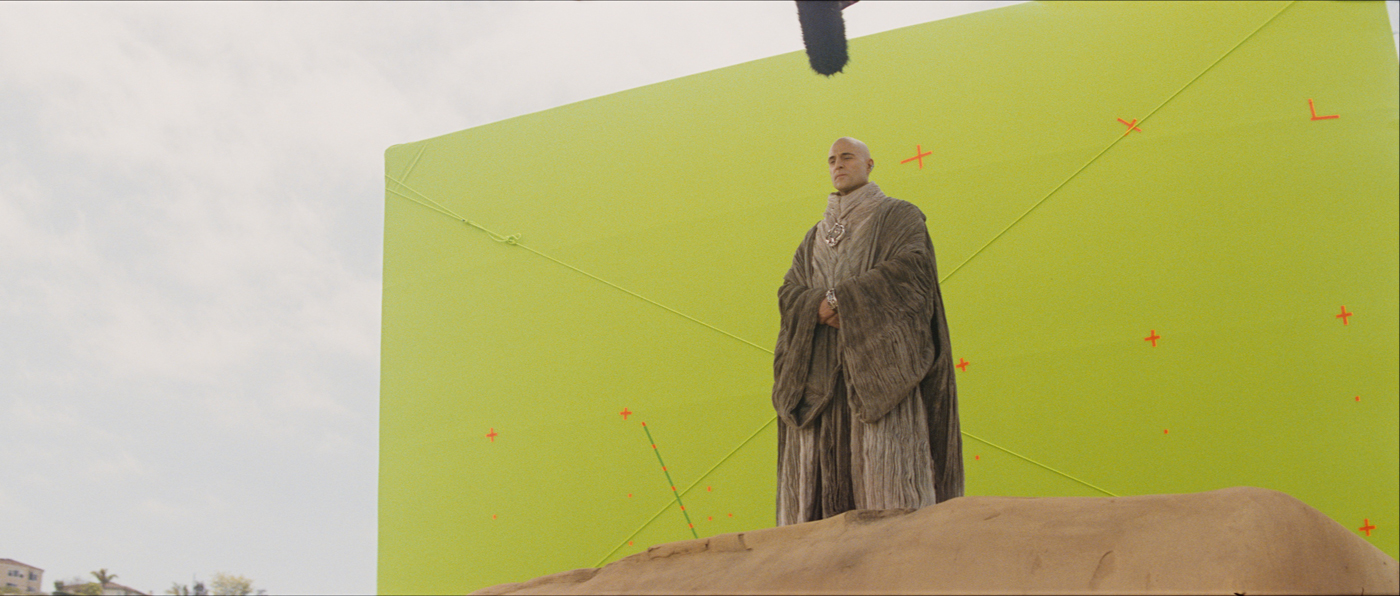
What was the real size of the set for the big hall in Helium?
The throne room set was rather big, but about 80% green screen. Dan Mindel lit for atmosphere and mood, and we later had to create extensions for the floor, walls and ceiling of this enormous room and the antechambers beyond it. The design came from Ryan Church, including a basic maya model which we imported and rebuilt. We presented a few design modifications to Andrew which helped improve composition for the actual camera angles, and from there it was all about getting the right mood and feel for this room. It was harder than I thought it would be. I hadn’t done a lot of architectural work in my career – and I knew we all wanted a fairly naturalistic look to the light bounce and sheen off the stone/marble material Andrew was after. But like many virtual sets, a further constraint is the live action footage. So the trick was bringing subtle 2d manipulations of the foreground characters toward the lighting of the room – for instance reducing certain colors from their hair and armor. Then, we used mental ray renders to produce bounce for the room, and combined this with renderman renders for texture and displacement. The compositors then took all of this and created the final look with several weeks of delicate re-balancing of shader outputs. It was an angle-by-angle thing, trying to create a certain beauty to the room without it becoming too stylized. This room was supposed to both evoke a respect of Helium’s artistic and technical prowess, while hinting that the city was very very old, and a bit worn. Ultimately when you have a beautifully lit face like the princess Dejah filling your frame, the total look has to frame around that subject. The room shouldn’t upstage her. Yet the room was a presence in the scene – a context. Finding that balance was tricky, but i think it comes across quite well in the end.


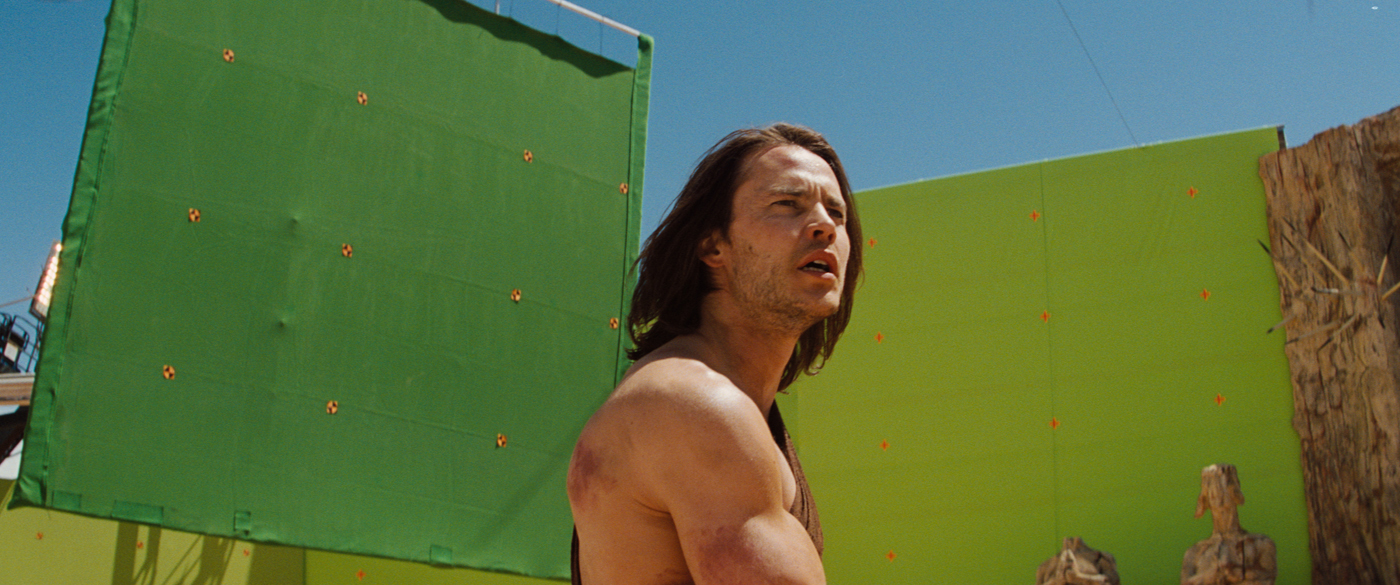
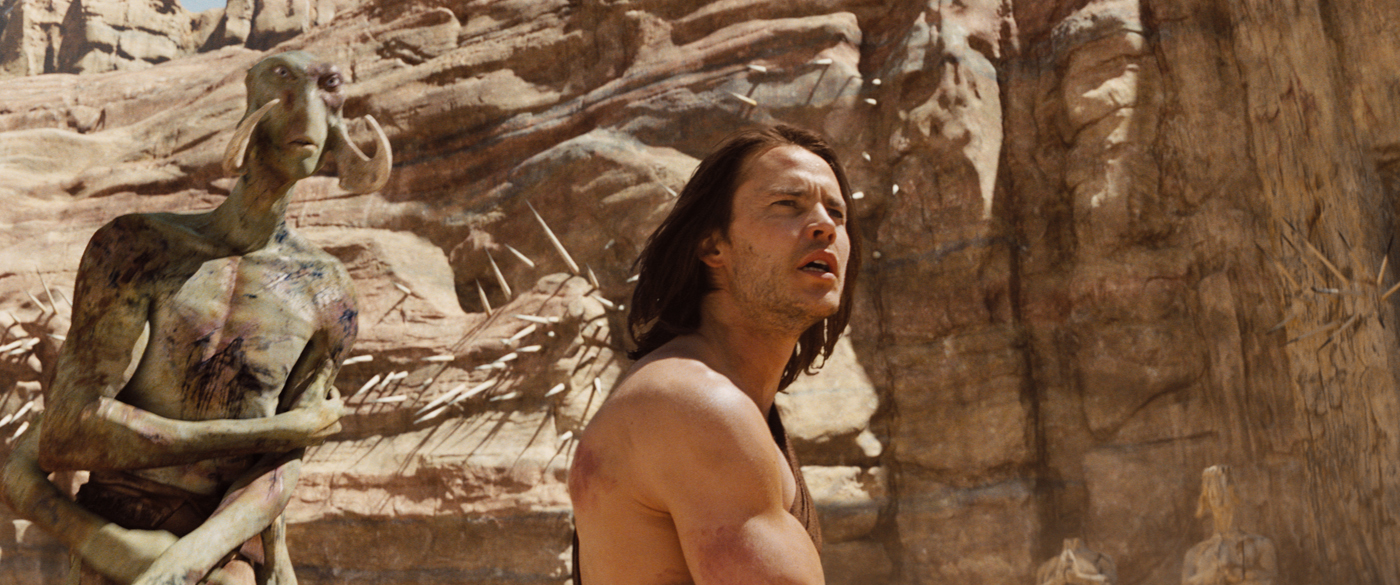
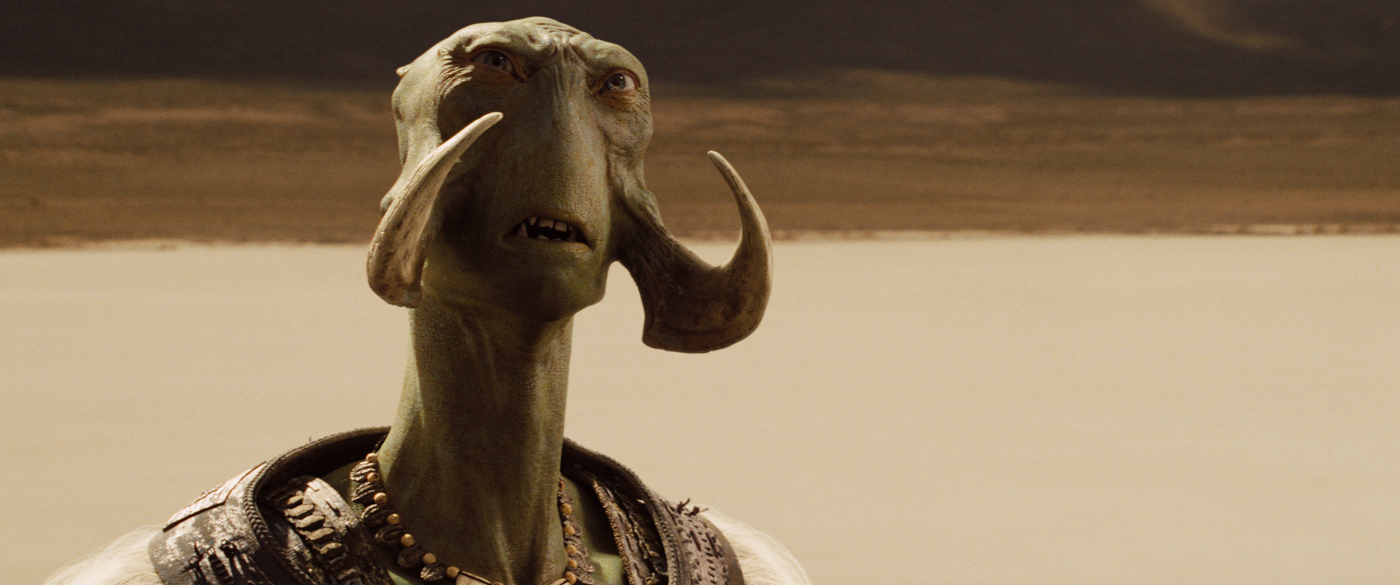
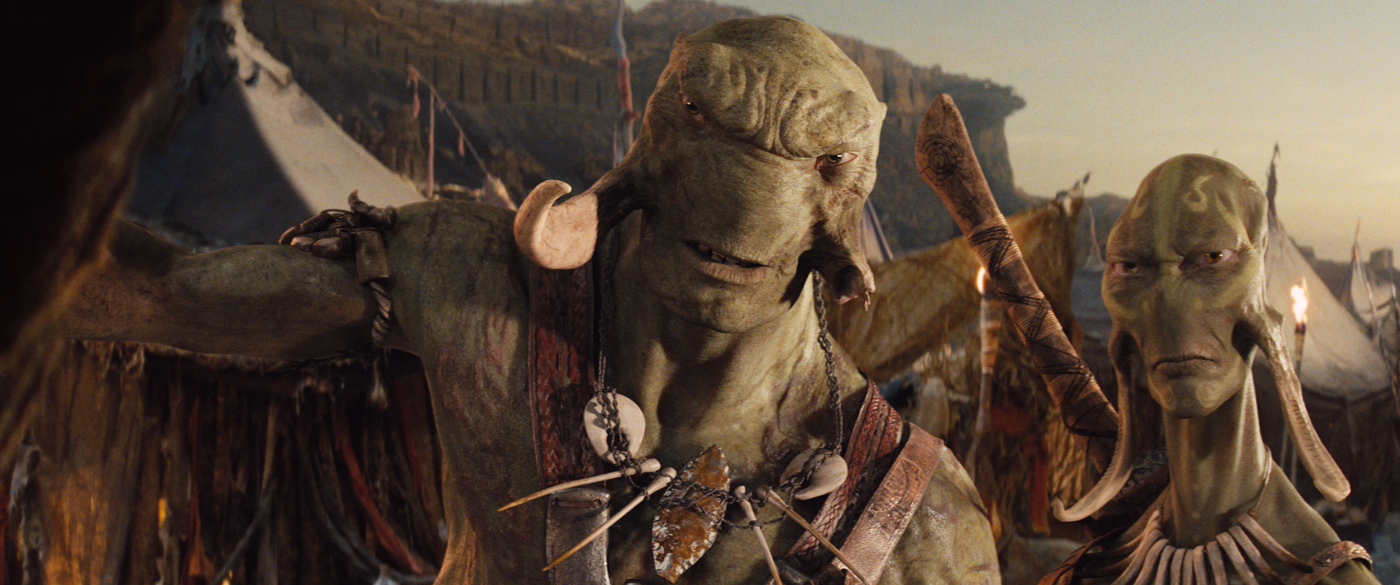
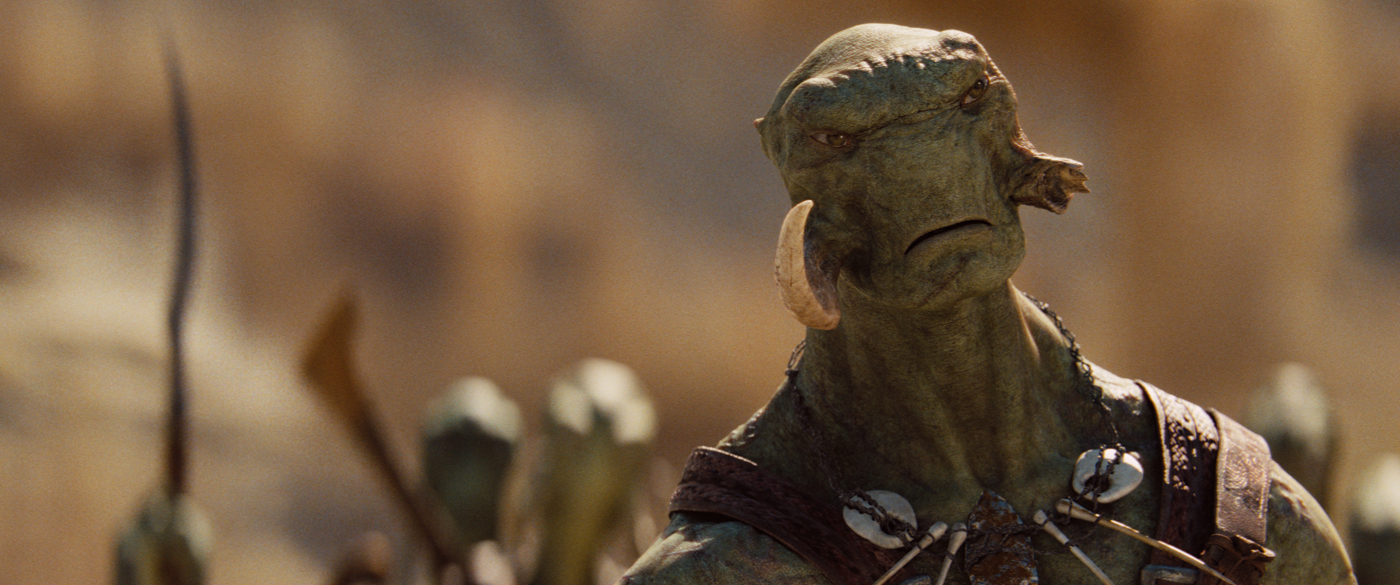
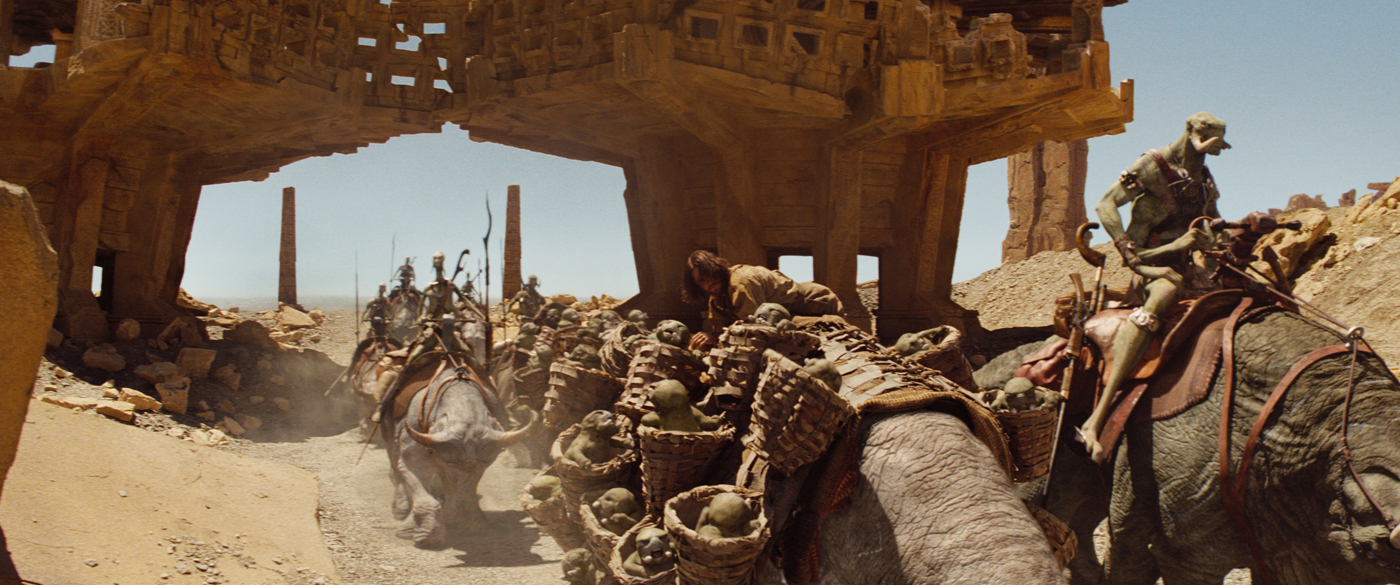
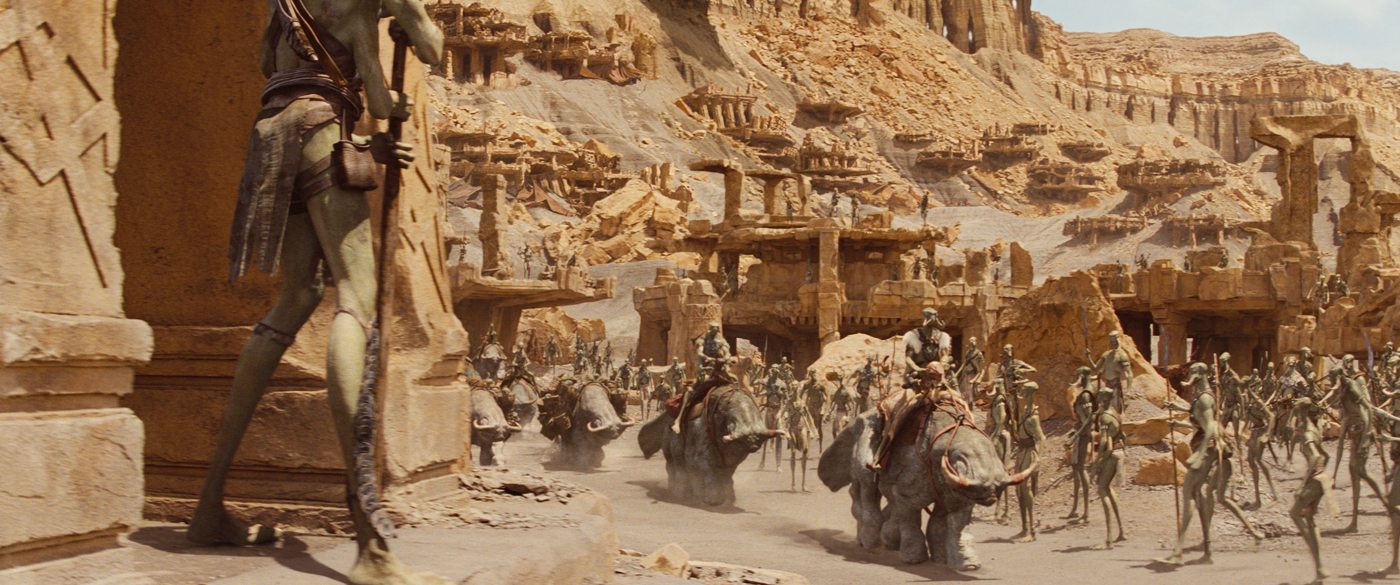
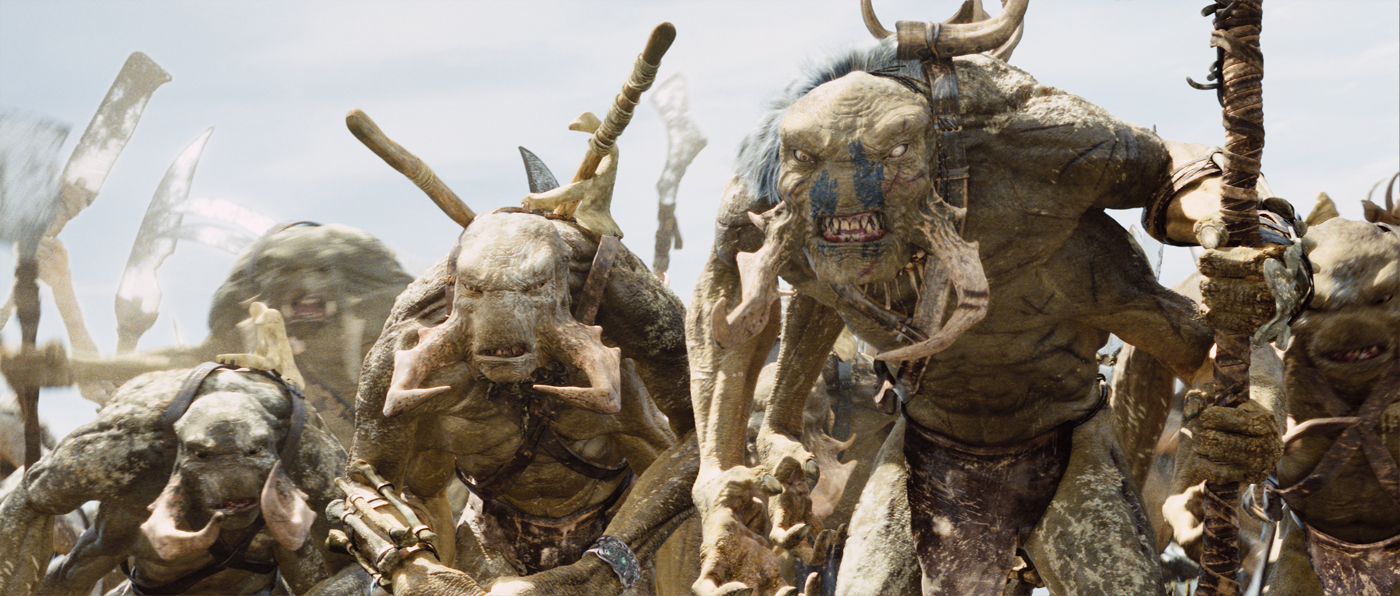
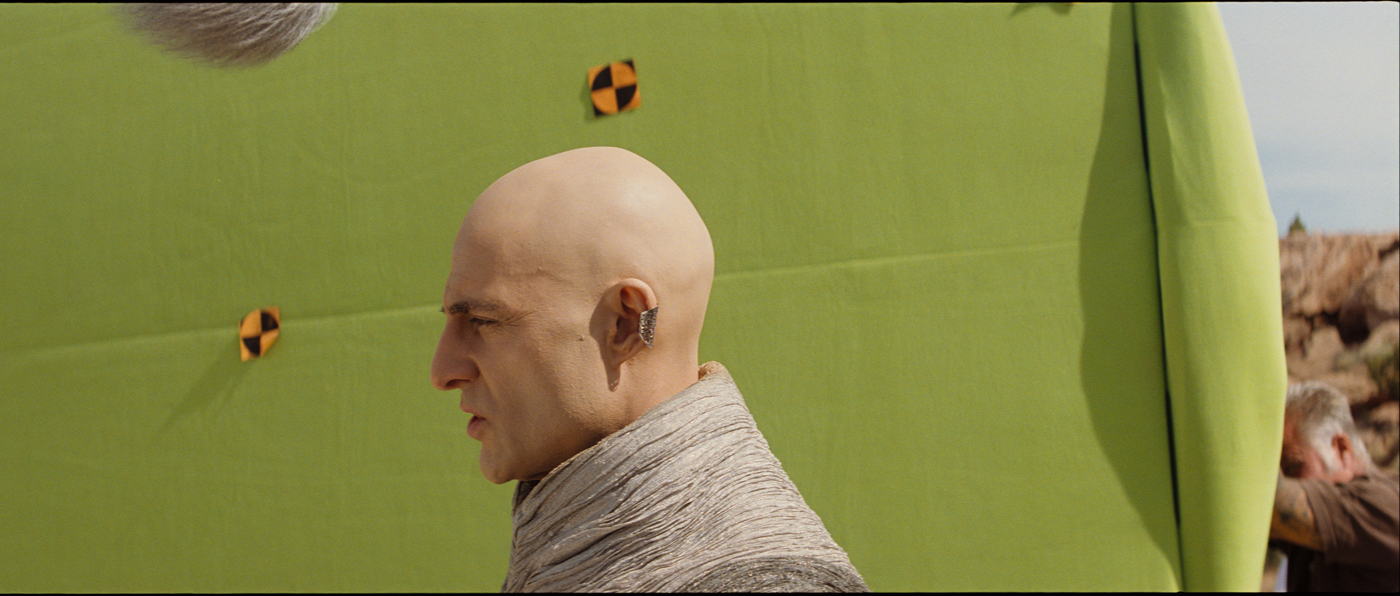
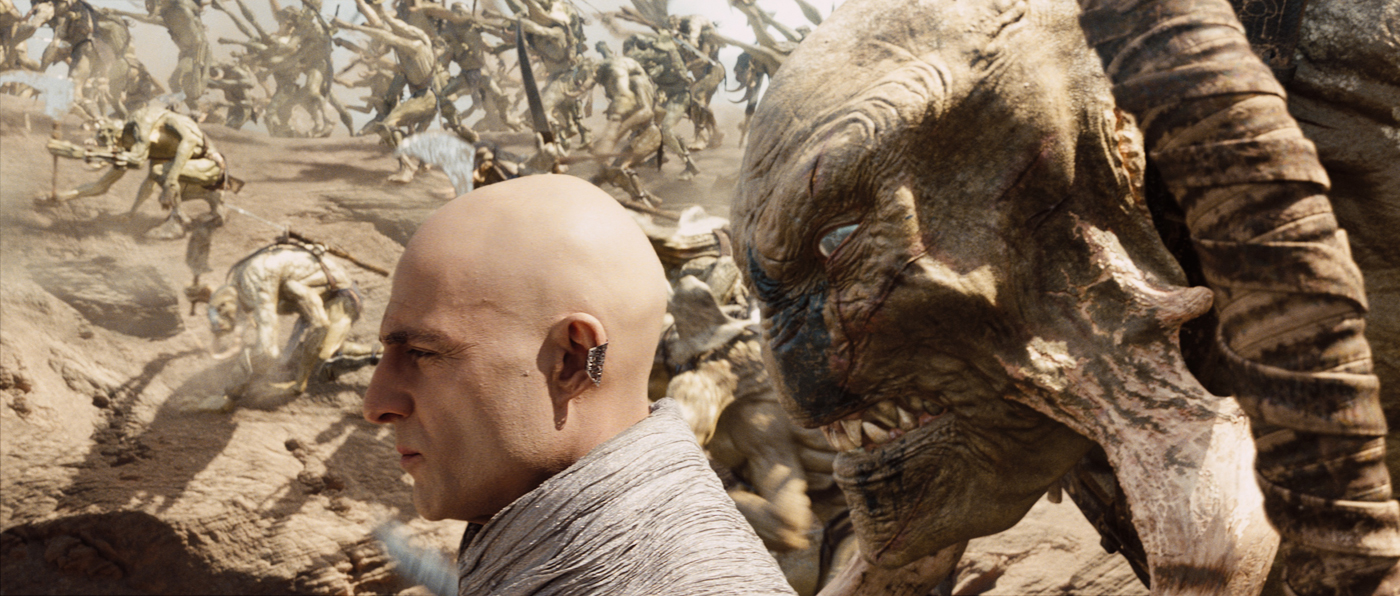
Can you tell us in details the creation of the Warhoon?
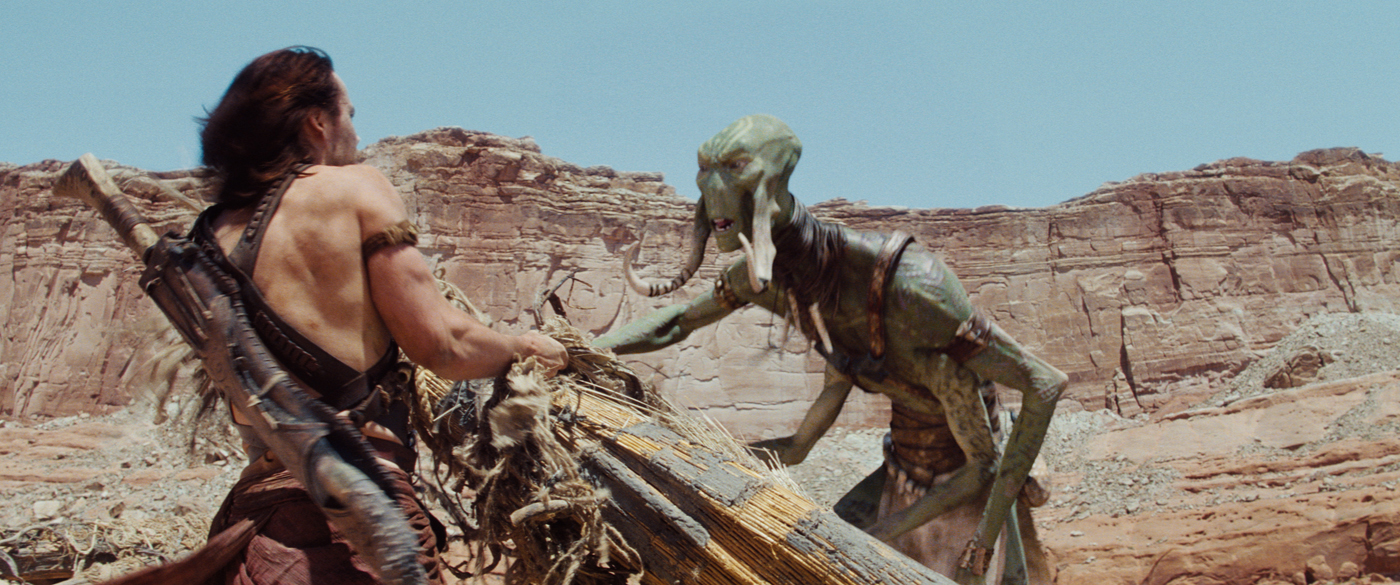
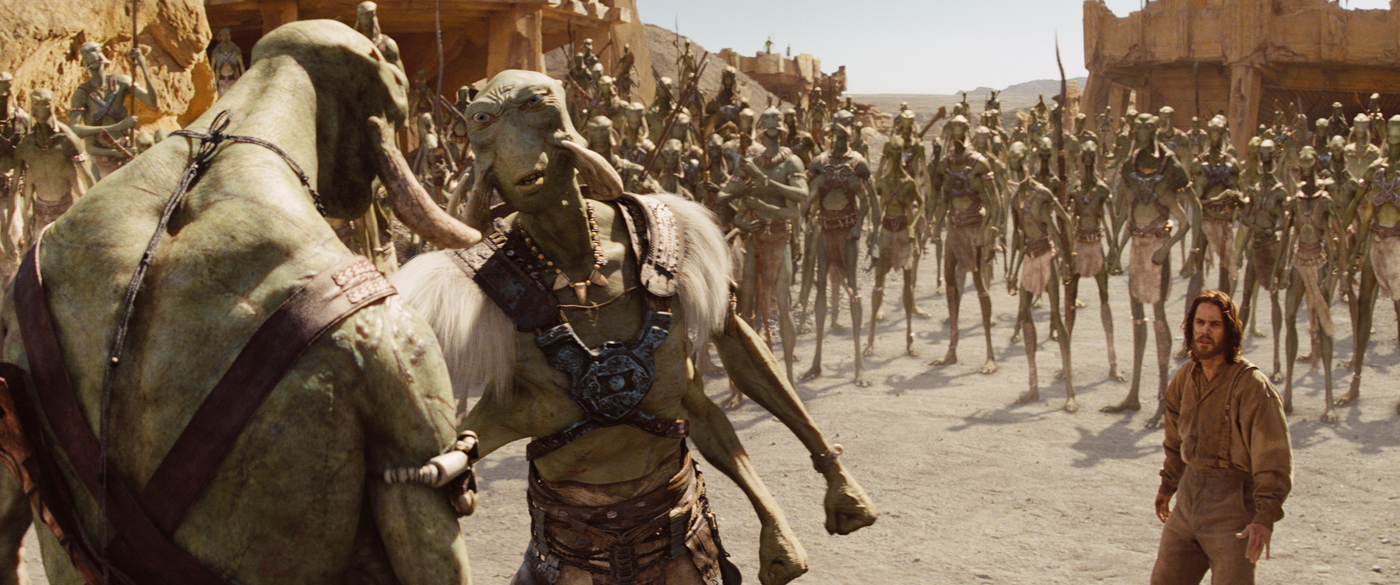
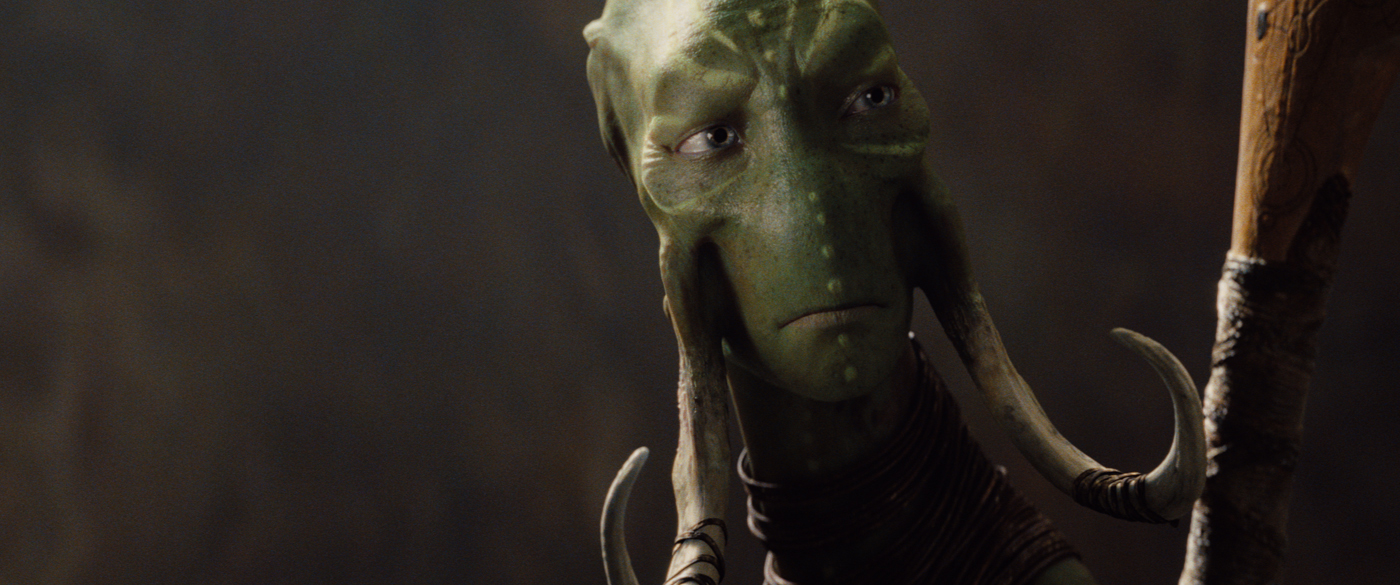
The Warhoons were originally modelled and textured at Double Negative, here in London. When we came on to help, they delivered all of that hard work to us, and we went through a few steps to get it all into our tools and pipeline. We did modify textures quite a bit as we commenced look development. This was the normal kind of stuff – increasing variation, rebalancing some of the weathering and distress to their skin and clothing. Andrew had a strong opinion that this kind of stuff needs to be fairly heavy handed to show up in the final film. That is, variation and detail which looks great in a slow moving turntable, often blurs out or is simply not seen when the characters are animated. So we made sure to increase the amount of mud and sun-bleached skin so there was greater contrast on their skin. We also boosted displacement maps to create more texture, crust and wrinkle to their skin. The chief Warhoon got special treatment, as he was featured in a few closeups.


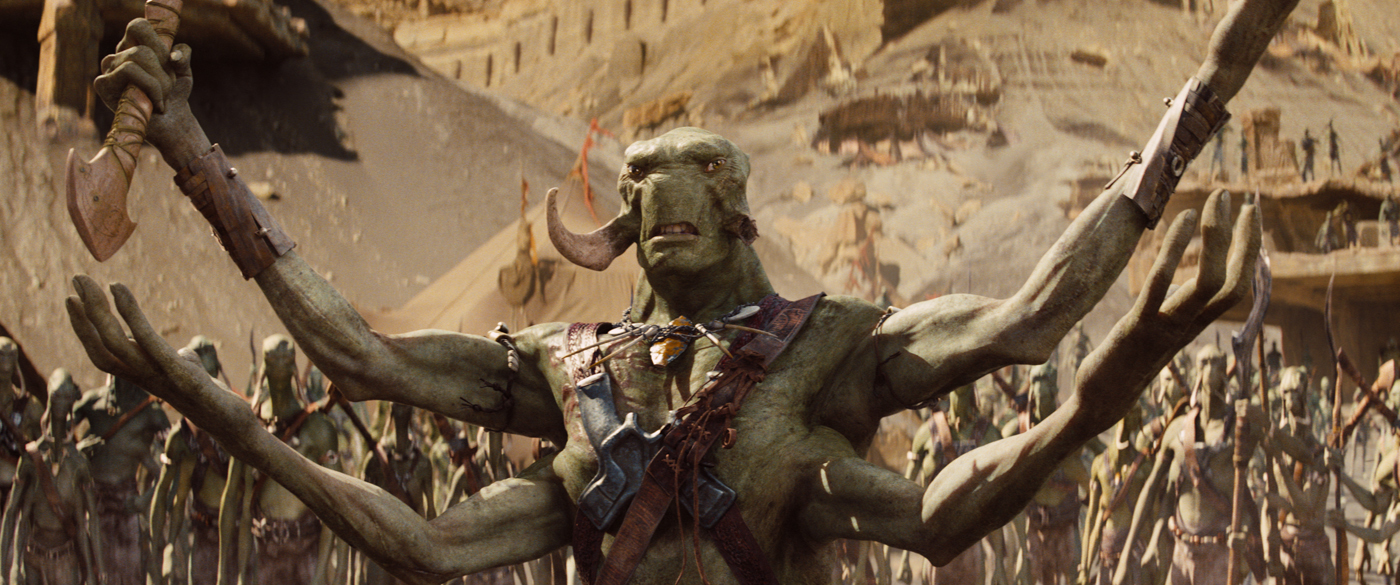
Rigging these creatures was more straight forward than I expected. I thought the extra limbs would cause trouble. The riggers at Dneg had us over to discuss how they had solved some of these issues, and Dneg animation director Eamonn Butler was very generous with his time, getting us up to speed. Our rigging team worked out the idiosyncrasies of extra limbs quickly, and created puppets for the animation team, using a now very established set of tools, giving the animators a familiar set of controls. The crowd department, using our own Alice simulation and motion synthesis framework, had already worked out « horse and rider » workflows, and so having Warhoons which ride on « Thoats » – 6 legged running creatures, worked out really well.

An important part of rigging was dynamics for muscle, leather straps, and cloth. The Warhoons wear elaborate costumes which needed to behave under extreme battle conditions! Our riggers and cloth TDs did a lot of work in shots to tame this stuff.


What were your references for their animation?
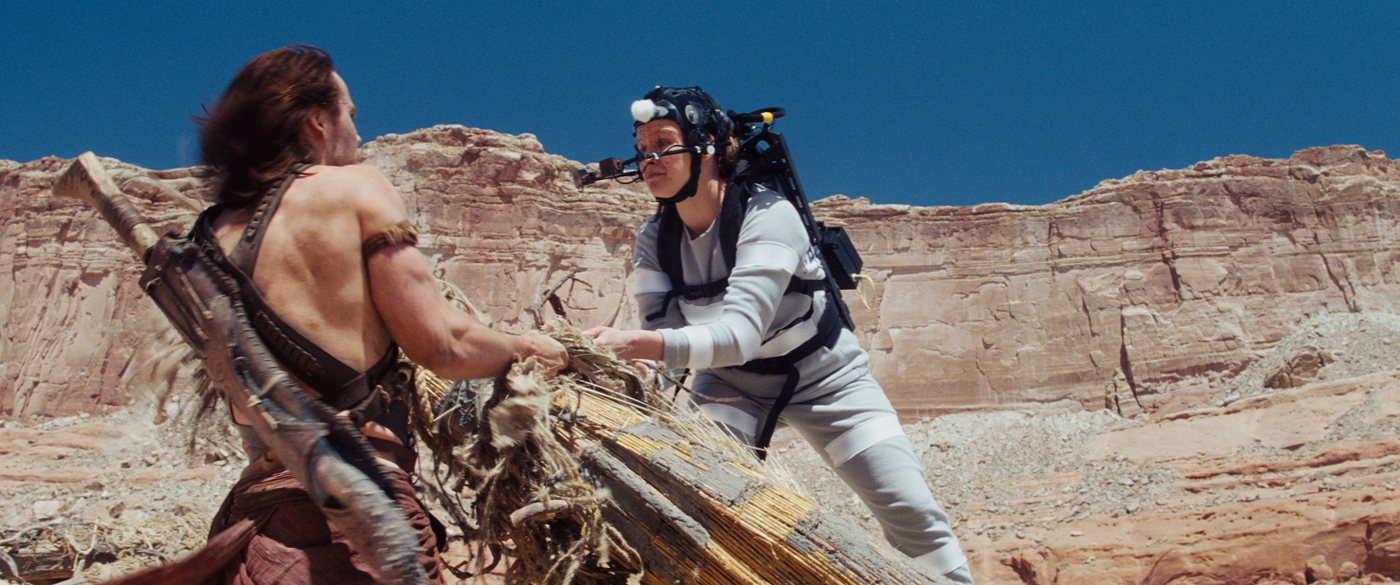
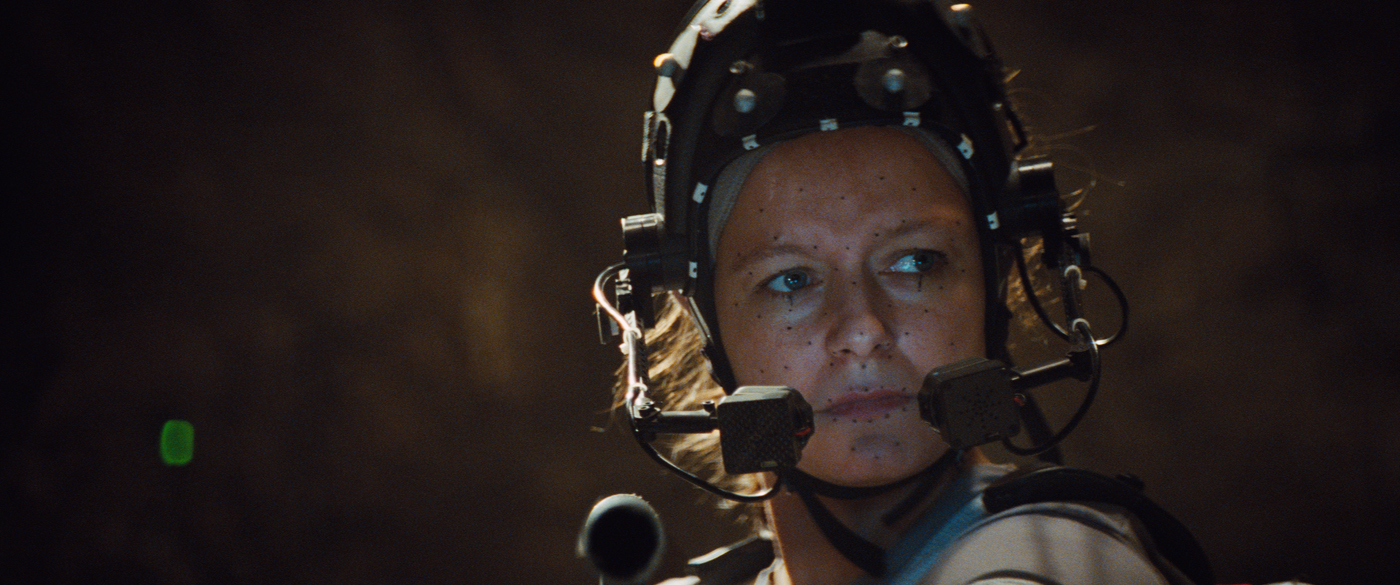
Andrew kept prodding us to make the Warhoons more and more amped up. The Warhoons are kind of like day players – they arrive in the movie, and we don’t see them again. So they needed to make an impression quickly. The horde of Warhoons was in some shots as much impressionistic texture as animation. There is an ape-like quality to them, but you wouldn’t want the audience thinking of them that way – so we had to be careful we didn’t add too much shaking and stamping and hooting. The animators did film themselves doing certain moves, and we did use motion capture to create some clips to work from. But 95% of the scenes are built on keyframed work. Cycles were made for the Alice crowd system, and many of the big fighting shots were fully delivered by animators.


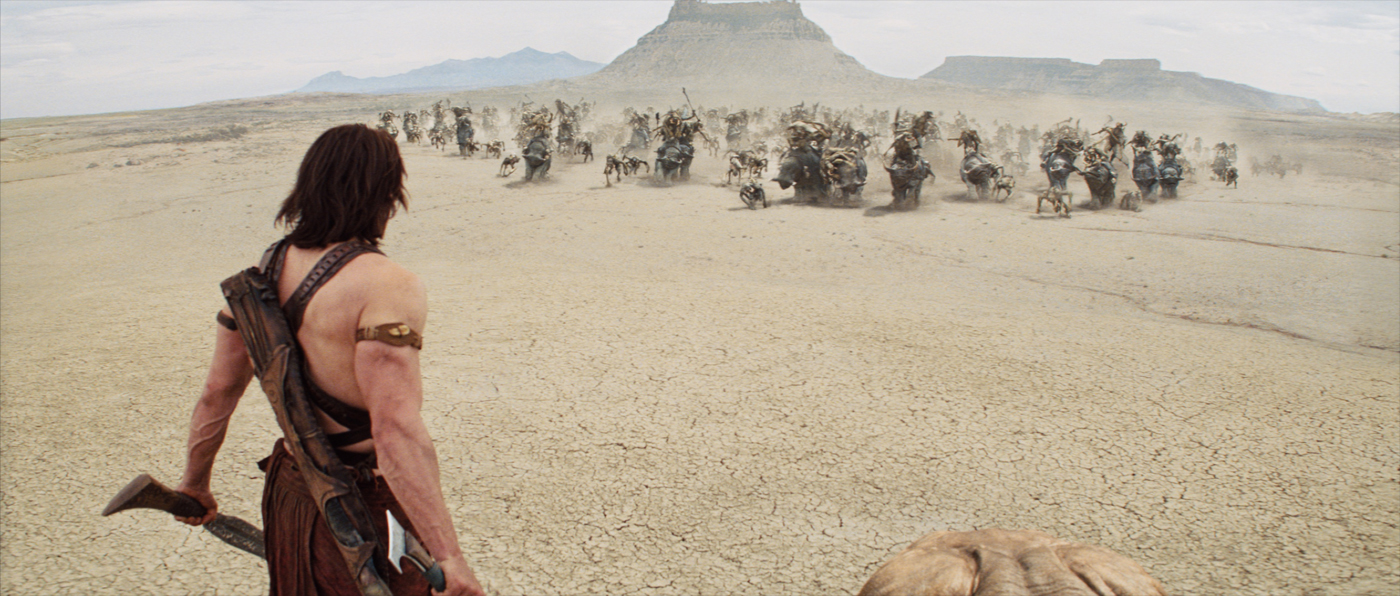
John Carter confronts the Warhoon army in an impressive fight. How did you choreograph it?
Andrew and Eric’s cut was already a strongly designed pattern. There was a piece of music providing a cut rhythm, and the fight was always planned to be inter-cut with a flashback scene. This scene was very dire, as John Carter discovers and buries his dead family. Carter’s emotion is what ties the scenes together – a desperation which drives him through the battle. So the basic design, screen direction, and screen-space flow of each shot had been story boarded over the background plates, and we started laying out the shots in our layout department to those boards. Almost all of the choreography was locked in at this stage. Of course it was tuned as we went, but our layout guys added lots of detail and specific action to each shot, so that Andrew knew it would work. As usual this process included many occasions where the drawn boards wouldn’t work, once the realities of actual camera lens and « stage space » in the maya scenes. This is where layout shines – working through these issues, adding creative ideas, and helping lock down a cut so the other departments at MPC can spend their time most effectively. When animation and crowd got into the scene, we had a great base, and shot by shot we referred back to layout, and changed as necessary, to make sure the audience’s eye could follow the flow of this fast, intercutting action.

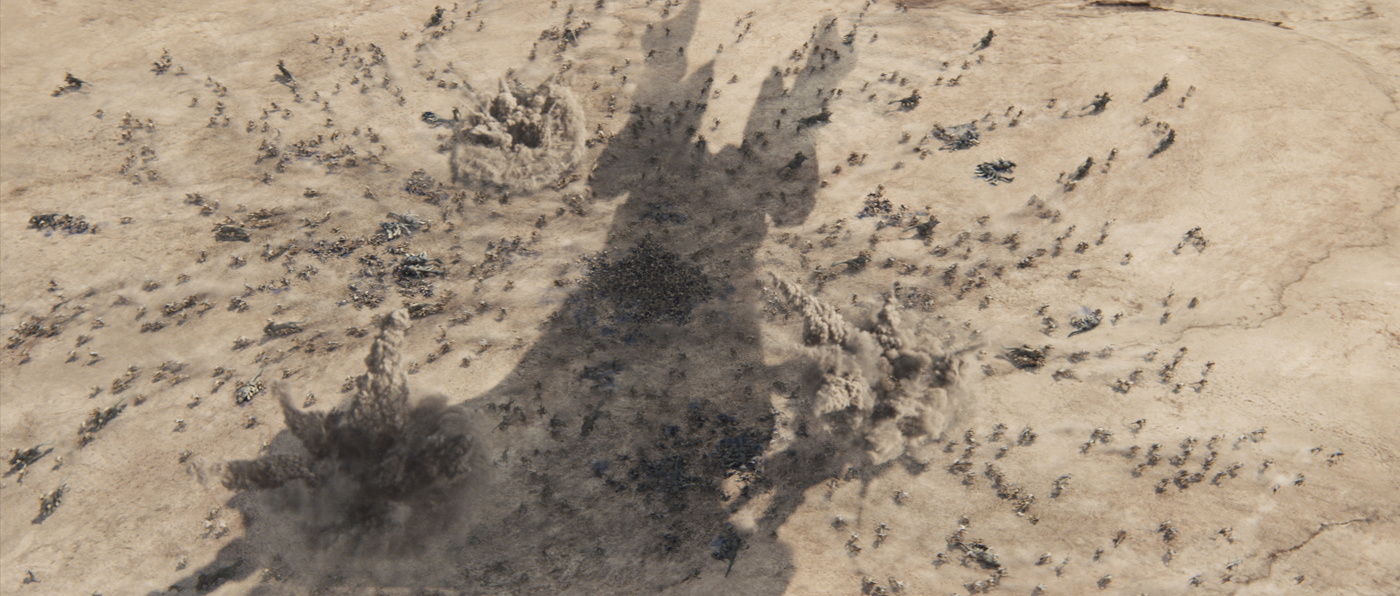
Can you tell us more about the use of Alice for this fight?
Alice was used all over the fight scene. From shots of the Warhoons running across the desert, to the biggest fight shots, and ultimately when the Xavarian airship barrages the Warhoons with cannon fire. Dynamics are built into Alice, and came in handy as Andrew wanted lots of crashing and mayhem in the crowds. The crowd TDs added dynamics in-shot, on top of the blended animation cycles, to create a more integrated physical feel to the choreography. The crowd team has become very good at developing shots within a simulation tool. In fact the tools have been designed to give them lots of creative control – which ends up being better than full-on simulation by a brain network or games style engine. The TDs can build up work, share choreography, or modify choreography based on specific direction. It’s not easy! But ultimately it allows for naturalism, choreography, and the ability for animators to add any detail in a final step.


How did you collaborates with the other vendors?
We worked with both Dneg and Cinesite on this show – sharing shots and assets with both. We did some airship blocking for the Cinesite shots, which they then polished in their animation team, and sent back to us for the final lineup of the cannon fire raining down on the Warhoons. Quite a few shots overlapped with Dneg, wherein we had to choreograph scene terrain and composition. We do this more and more. It can be quite painful technically, but our relationships with other facilities is very good, and many of us are friends, so it always works out well.

Was there a shot or a sequence that prevented you from sleep?
No. I never worried we wouldn’t make it on this show. Every show is a challenge for one reason or another. Here it was ramping up on a show, trying to participate with a group who had already gone through the shoot and other learning experiences together. When you miss that, you miss out on what was tried and ruled out – so sometimes you make mis-steps. We had a couple of those, but nothing big. I’d say the throne room was my biggest personal challenge – expanding my understanding of architectural rendering to achieve it.

What do you keep from this experience?
The take away for me is that when we provide a good working rhythm for a director, they will give us the most useful notes, and will feel confident we are working with them.

How long have you worked on this film?
I think we were on the project for about 9 months all together.

How many shots have you done?
180 shots.

What was the size of your team?
160 globally.

What is your next project?
I’m currently the VFX supervisor at MPC for WORLD WAR Z.

A big thanks for your time.

// WANT TO KNOW MORE?

MPC: Dedicated page about JOHN CARTER on MPC website.


© Vincent Frei – The Art of VFX – 2012

JOHN CARTER: Peter Chiang – VFX Supervisor & Co-founder – Double Negative

Peter Chiang started working in visual effects at the opticals period on projects such as HIGHLANDER, LABYRINTH, or BATMAN. In 1998 he is one of the founders of Double Negative. He has since overseen an impressive number of projects such as PITCH BLACK, ENEMY AT THE GATES, THE CHRONICLES OF RIDDICK, THE BOURNE ULTIMATUM or GREEN ZONE. In the following interview, he discusses his work on JOHN CARTER.

What is your background?
Started in the optical days with Derek Meddings, miniatures and Roy Field, optical and have been working in the field of Visual Effects for 30 years. Double Negative was started in 1998.


How did Double Negative got involved on this show?
We had initial meetings with Andrew Stanton, Jim Morris, Lindsey Collins and Colin Wilson to talk through concepts and methodology. Walt Disney Studios and the film makers awarded us the show in May 2009 and we started a « Proof of Concept » test to illustrate our methodology.


How was the collaboration with director Andrew Stanton?
A truly wonderful experience. Working with a director who is very creative and approaches ideas from a story point of view meant that we had clear direction while working on the shots.


Can you tell us what Double Negative have done on this show?
Double Negative created 960 creature and environment shots for the film. The film totalled around 1900 and was split with two other companies, Cinesite creating Zodanga and Helium and all the air ships, MPC creating the Warhoon sequence.


It’s the first live action movie for Andrew Stanton, was his approach for animation different from his Pixar way-to-do?
No, he continued to apply his work methods from his Pixar films which served us well as he is so use to signing off final animation when it was simply rendered so that the more complicated processes could begin. Andrew was so conscious of the delivery schedule he knew where to put the energy and where to let go.


This show is the most ambitious in term of animation at Double Negative. How did you faced this big challenge?
The whole project meant we needed to rewrite our creature pipeline and delve into animation on a more serious level. Eamonn Butler and Steve Aplin were the animation supervisors that led a team of, on average 70 animators. Everything in the creature pipeline was adjusted for the volume of shots to come. A facial animation system was developed, rigging and muscle systems, textures and lighting, cloth and creature fx, crowd were all updated and further developed. We broke the film into three mini films each unit headed by a brilliant VFX Supervisor, Ken McGaugh, Paul Riddle and Ryan Cook. The production crew led by Matthew Plummer kept us on track and were able to foresee problem areas well ahead of time and credit must go to them for an amazing job, for despite its size it has been the most relaxed delivery of any film in my entire career.


Can you tell us more about the shooting and how you take the animation references on set?
The principle photography was a hard shoot. Andrew’s idea was to ensure that the eye lines of the all the characters were in the right 3D space. This meant that for a nine foot Thark, the actors playing the part either had to be on stilts, on decking or boxes or wearing a back pack with a Thark head at the correct height. The actors wore helmets that had two video cameras to capture their facial performance. We took very accurate HDRI images of each scene and also images for photogrammetry to recreate the geometry of the set. Witness cameras viewed each take from a different perspective so that we could provide more data for tracking. We would always try to use the clean plate shot with one of the humans to avoid as much clean up as possible but in post Andrew sometimes preferred the take with the actors so we painted them out.


How did you design and create the Tharks?
Andrew and Legacy designed the Tharks a year before we were awarded the film. Legacy provided us with Z-Brush models to begin our build. A few alterations were necessary once we started look development. The Tharks became more human with human eyes and muscle structure to protect as much of the translation from the actors as possible.


Does the four arms of the Tharks causes you some trouble for the animation?
Andrew always wanted the second set of arms to be as natural as possible. We would rehearse with the actors and an additional set of arms tucked underneath dressed in a green suit. Sometimes arm extensions were used to represent the exact dimensions of the Thark.


Can you tell us more about the rigging and the animation of Woola?
We drew a lot of reference for Woola from a British Bulldog and Andrew always described him as a road runner with ten legs.

Some shots involved a huge numbers of characters. How did you manage those crowd scene?
We developed our crowd system « Mob » to handle the large crowd scenes. Up to a certain point or depending on the demands of the scene the foreground characters were always key framed. Mocap from an optical system and a Moven suit provide the distant action.


The Tharks facial animation are impressive. Can you tell us in detail how you manage this part of animation?
The facial system took about a year to develop and we spent a long time translating the actors to the Thark faces. There physiology differed and so a lot of work went into retaining as much of the performance as possible. For instance the Thark nostrils are on their tops of their heads and so their noses are not in the centre of their faces.


What were your references for the animation of the White Apes?
Andrew wanted them to be wild blind creatures with rage.


How did you manage the fur aspect for them?
We developed new grooming tools.

Can you tell us more about the collaboration and the asset sharing between the different vendors?
We developed the Warhoons with Andrew before handing over the models and textures to MPC. The set extension were shared models and textures between companies.


Was there a shot or a sequence that prevented you from sleep?
Most shots.

What do you keep from this experience?
How tough the business is and that you never stop learning.


How long have you worked on this film?
I started in May 2009 and ended December 2011.

How many shots have you done?
960.

What was the size of your team?
We had 850 people working on the film at one time or another.


What is your next project?
I’m currently supervising TOTAL RECALL.

What are the four movies that gave you the passion for cinema?
STAR WARS, BLADE RUNNER, ALIEN and JURASSIC PARK.

A big thanks for your time.

// WANT TO KNOW MORE?

Double Negative: Dedicated page about JOHN CARTER on Double Negative website.


© Vincent Frei – The Art of VFX – 2012

TINKER TAYLOR SOLDIER SPY: Sirio Quintavalle – VFX Supervisor – Framestore

After speaking with us about the effects of SHERLOCK HOLMES: A GAME OF SHADOWS, Sirio Quintavalle is back to reveal the invisible effects of Framestore for the spy movie TINKER TAYLOR SOLDIER SPY.

How did Framestore got involved on this show?
We have a good history with Working Title, the production company, having worked on films including NOTTING HILL, LOVE ACTUALLY, NANNY MCPHEE and JOHNNY ENGLISH REBORN and although Framestore is known for its high end, big budget visual effects work, we are also interested in smaller non effects driven films especially when they have such a strong cast and script.

How was the collaboration with director Tomas Alfredson?
Tomas was a real pleasure to work with, he has a quiet authority on set and a very clear vision coupled with his inimitable, dry, Swedish sense of humour.

What was his approach about VFX?
The VFX were always going to play a background role in the film and where possible Tomas tried to achieve everything in camera. There were however certain period details or scenes which needed a bit of assistance and Framestore were able to send Christian Kaestner as our on set supervisor to cover the shoots in England and Istanbul.

What have you done on this movie?
Recreating the MI6 building, some green screen driving shots through London, a burning owl and a bullet wound with a tear drop of blood as well as a few incidental effects to help set the scene and the period of the film.

Can you tell us your work on MI6 Headquarters?
Tomas wanted a sixties, concrete, institutional style building hidden behind a more ornate facade. Blythe House in London was chosen for the exterior shell and we worked up some concepts for the design of the main headquarters. One of the issues that we immediately came up against was that the courtyard of Blythe house wasn’t big enough so we had to open it up, push the far walls back and reproject the various layers to give the correct parallax as we track across the rooftops.

How did you create the shot inside the MI6 in which we can see the activity through a hole?
This was a fairly straightforward effect but a good example of adding production value in a cost effective way. We shot two passes with the camera angles matched up to give us the correct perspective and were then able to add a lower floor and the illusion of a much bigger environment. We also added some cg communication cables to help tie the two sections together.

Can you tell us more about the flaming owl?
During the middle of a lesson in a small country school a burning owl flies out from the fireplace, flies around the classroom and is eventually put out of its misery in a decisive blow by the teacher.
As a plot point it is quite important in revealing Jim Prideaux’s (played by Mark Strong) former training and killer instincts to the class room of dumbfounded school children. We shot multiple passes of the class room with and without children, the owl in flight to and from camera and Mark Strong’s performance where he hits a stuffed owl. During the takes we used guides for the performer’s eyelines and so were able to match the various elements together cohesively. We tracked flames to the owl’s wings, used a sim for the trailing smoke and added embers for the final impact. To get the owl’s performance just right we ended up changing some of the wing beat animation and even added some facial features to make it look more startled.
I only found out later that this was based on a real life event in John Le Carre’s life which he incorporated into his novel.

How did you help to change locations and time period?
Tomas was keen to use subtle imagery to tell the viewer where we were so for a few shots we added reflections of iconic landmarks like Battersea Power Station or 1960’s Picaddily Circus into some of the shots. The DOP Hoyte Van Hoytema was also very keen to get the period feel with the use of vintage style film stock and grain and to that end all our work was scanned at 4k to preserve the grain structure.

Did you need to use intensive clean-up work?
Everything was shot pretty well so there wasn’t much clean up required.

How did you create the various backgrounds for car shots?
For the car shots Tomas wanted the freedom to be able to move the camera smoothly around the car and so to be able to see the actor’s expressions. To achieve this we shot the car in a controlled studio environment on a green screen. We then shot the moving background plates with overlapping cameras mounted to the back of a camera car and drove round various London landmarks being careful not to include any anachronisms. We were then able to stitch together a panorama to cover the camera movement and we modelled a replica of the car to add moving reflections to the bodywork and windscreens.

Are there another invisible effects you want to reveal to us?
We recreated Paddington Station, made a hotel in Istanbul and added a few mig jets and a stray bee to a couple of shots.

How was dispatch the work between London and Reykjavik?
We divided the work between London and Iceland to take advantage of the talent that we had in our offices at the time. Iceland did the animation and compositing with London doing matte paintings, modelling and additional compositing.

What was the biggest challenge on this project and how did you achieve it?
The three car shots were the most challenging. It was important that the effects went unnoticed so that the viewer wasn’t distracted from the complex storyline and tense atmosphere of the drama so these shots had to be spot on.

Was there a shot or a sequence that prevented you from sleep?
Not on this film.

What do you keep from this experience?
It’s not often in our industry that we get to work on films with such a strong cast, story and direction so even though it’s not a big effects film it was still great to be involved.

How long have you worked on this film?
A few months all in all although it was spread over a longer period as there was a gap between shooting and post.

How many shots have you done?
About twenty.

What was the size of your team?
We had a team of twenty six.

A big thanks for your time.

// WANT TO KNOW MORE?

Framestore: Dedicated page about TINKER TAYLOR SOLDIER SPY on Framestore website.

© Vincent Frei – The Art of VFX – 2012

SAFE HOUSE: Simon Hughes – VFX Supervisor – Image Engine

After speaking with us about the effects for IMMORTALS, Simon Hughes returns to The Art of VFX. In the following interview, he talks of the many invisible effects for SAFE HOUSE.

How did Image Engine get involved with this show?
Image Engine is known primarily for creature effects – DISTRICT 9, and THE THING for example – or digital environments, for instance on IMMORTALS. However, we’ve also been building up a good roster of invisible effects work over the past few years (for example LAW ABIDING CITIZEN and various projects for Dark Castle) – and we have an excellent working relationship with Universal Studios, which all contributed to us handling the show. We were the sole vendor for the production, and output over 370 visual effects shots. Steve Garrad was the Visual Effects Executive Producer, Geoff Anderson was the producer and I was the overall Visual Effects Supervisor for the production.

How was the collaboration with Daniel Espinosa?
Working with Daniel Espinosa was a great experience; he gave us a huge amount of creative freedom and trusted us to come up with the goods. His directing style required VFX to be able to adapt and improvise to satisfy and improve upon what was being shot whilst staying unobtrusive, which was a real challenge for both myself, and Jeremy Hattingh, the on-set supervisor in Cape Town. The style of the film was intended to be documentary style, and very much handheld.

Image Engine was involved very early on the show. Can you tell us how it’s improved your work?
From the outset, we were asked to be present for the entire shoot. This was to cover eventualities and improvisation on set, and to oversee green screen driving sequences and co-ordinate a crowd shoot.

The way the show worked for us was that once an initial edit was confirmed we were given the edit and I was asked to review the film to see how we could augment the sense of danger in what was shot and to look for ways to make things more exciting, whilst also looking for technical fixes that needed to be done to handle oversights that come about from documentary style shooting.

As the edit went through changes it was important for us to remain fluid and mindful of the requirements of production. This was a challenge for both Geoff Anderson (VFX Producer) and myself, working in combination with VFX editors Kevin Hickman and Derrick Mitchell, and Image Engine coordinators Eva Abramycheva and Crystal Choo to stay on top of.
This proved to be an incredibly rewarding experience, not only for the work completed, but also to have been so involved in the narrative filmmaking process. The biggest improvement this show made to our work would probably be dealing with crowds. The crowd sequence was the largest sequence dealt with by Image Engine, and it was a great lesson in how far to go in 2d before moving into 3d, and where the line is.

Can you tell us more about the work on this show?
Our work was a mix of CG car crashes, green screens, face replacements, gore additions, matte painting set extensions, car crash augmentation, crowd additions, explosions and muzzle flashes and squibs and sparks all over the place.
This was all completed in a tight schedule matching the high energy pace of the film itself. In other words a lot of VFX fun!

How did you enhance the car chase sequence?
Throughout the car chases we looked for opportunities to turn the volume up on crashes and impacts to help convey the overall sense of danger and excitement. This included adding more debris on impacts, adding smoke from wheel skids and skid marks, to ripping off bumpers and replacing with CG bumpers flying off towards camera, and finally to a complete removal of an existing vehicle and replacing with an entirely CG version, colliding into a CG wall with all the debris that would come with such a collision.

As well as CG bumpers, we also did the same with a selection of shots where a VW Jetta is rear ended by a Jeep causing the trunk door to fly up, hit the window and ultimately come off.
Generally speaking, the biggest challenges with these shots started with matchmoving. We had a real problem with these as there was no lens information and the cameras were handheld and zooming. So coming up with decent cameras that Animation and FX could use was a real challenge that Derek Stevenson and Luke Byrd handled with great calmness and patience.
For animation there was some flexibility, but for FX these needed to be solid. For compositing, as there was a lot of removal of the original features that were replaced with the CG versions, this was also a challenge for the same reason that Matchmove was a challenge.
Lighting was, again, a case of matching the source, which Yuta Shimizu and Kyle Botha did meticulously.
All in, these shots go relatively unnoticed in the context of the scene as they needed to appear natural, but the amount of work involved in these kinds of shots is a real challenge for all involved.

Can you tell us more about the CG car for the collision?
This shot started with Janeen Elliot the Senior Compositor for the show removing the existing van, cleaning up the plate and replacing moving cars in the background underneath where the real van existed.
In parallel with this Rhys Claringbull (asset supervisor) and Ryan Calloway set about making a CG version of this van. This had a handful of challenges – the main one being that as the shot was not planned for from day one (not considered a VFX shot) there was a need to source decent photography of the vehicle and a model had to be built from scratch, not from a scan for example.
We used plates from shots either side in the cut and outtakes to source decent reference textures, but then went about sourcing new textures from our own photography. Then it was a case of Ryan matching the overall look.
The luxury with a shot like this is it is a takeover shot so we have decent real world images to match to, so once the asset was complete, Yuta Shimizu, one of our two main lighters on the show set about look-deving the Van to match the real one to a degree, reflections and lighting direction primarily, then a lot of work in matching shadows.
This was all handed back to Janeen who, in combination with the clean plate she had prepped, set about further matching the van to the original, adding shattered windscreen glass from real photography, adding the drivers taken from the original plate, and layering debris and dust to convey the impact.
The red Polo that collides with the van was augmented to appear to be colliding from a sharper angle with more of a bounce back into place.
With all the elements in place and looking good we started presenting animation versions to Daniel, starting with grey shaded renders but quickly realizing that a shot like this is all about seeing it in context, so as we progressed the lighting and compositing. We showed animation iterations in edit context to get approval on the overall move of the van.
Ken Steel, the senior animator on the show was in charge of this and offered several suggestions for different speeds, angles and distances traveled and different versions of impact with the wall. Ultimately we opted for pulling the van farther back in frames at the start, coming in faster, with amplified bump and roll prior to hitting the Polo. On hitting the Polo, we have it swing round and brought the wall farther into frame so that the collision happens sooner and more violently.
Generally we keep the overall trajectories the same for a few reasons, the main one being budget, to make this work we needed to reuse as much of the plate as we could, namely the Polo and the people, by keeping this overall move we were able to just replace the van and wall as CG pieces and cleaned the rest up in comp.

As we moved forward with the animation we took the shot into FX, where the team set about coming up with debris from the van, and debris from the wall. Aleksander Szkudlarek and Nik Slotiuk supplied these to Janeen, again offering various different amounts until we came to a level that felt good.
Overall we were all really happy with the shot. This is one of those kinds of shots that shouldn’t be underestimated – 80% of it was replaced, all close to camera, and all needing to appear as real as the original scene.

How were the backgrounds created for the shots inside the car?
There were two main driving sequences in the film, the BMW car chase from Safe House 1, through the streets of Cape Town at break neck speed through to the final crash inside the parking garage.
The sequence itself was largely shot in camera, with about 15 shots on green screen and the plates shot on two separate plate shoots.
The camera configurations covered the correct angles on film looking front, back depending on what was needed and side to side, ¾ angle if needed, and reflection and mirror plates were shot on Canon EOS 7D’s. So multiple passes were taken at the actual location to cover the footage needed.
Once it was all in place, it became a compositing task to match in to the real photography, which made the sequence smooth – yet difficult in other ways, the problem being, how to deal with the shoots happening at different times of day. The shots often change in appearance throughout the sequence, so matching actually became relatively difficult, but we always had a solid foundation in real world photography.
The second of the sequences was far easier to deal with for two reasons: there wasn’t any in-camera footage, it was at night and it was looking through dirty and broken glass.
This sequence follows Tobin Frost (Washington) and Matt Weston (Reynolds) driving from the Langa Township through the streets at night, where they are ultimately t-boned by the mercenary’s car.
The sequence was relatively straightforward once we had isolated good reflection plates and defined a look for looking through glass.

How was the shooting for the Green Point Stadium sequence?
For the main crowd shots where we see inside the stadium, the production was aiming to keep it handheld over the shoulder and they wanted to see as much of the interior as a pan.
We went to the location and walked up and down the stairwells filming each version with 7D’s, always with the goal of keeping the pans nodal. We tried from the front looking back at Weston, fixed in position and a single nodal move etc, but finally landing on an over the shoulder shot following Weston to a mid point down the stadium staircase where it does a handheld nodal pan.
On the day of shooting, 500 extras were placed directly either side of Reynolds as he walked down the staircase.
Once the shot was taken, Jeremy Hattingh and I supervised a separate VFX shoot with 500 extras, which essentially filled one block, out of about 200.
There were two film cameras used, one in the mid point position to cover the nodal move, and one directly across the stadium in the main corridor looking straight across.
The second film camera was to cover a handful of shots where we are inside the stadium looking across to the other side as Weston and Frost are taken away by Security guards.

In addition to the 2 film cameras we set up 3 more 7D cameras at each opposing side of the stadium.
This meant that instead of having to shoot a tile for each block of the stadium we only needed to shoot along one half and reuse the opposing camera to fill the other side of the stadium.
The biggest challenge was coordinating the extras on a cold night running from 6pm to midnight, while the fog was rolling in and, for one hour of the shoot, completely covering the opposite side of the stadium.
In addition to this shoot on the night, we had to coordinate and a create one more completely new helicopter establishing shot, which also used the same extras walking in groups outside the stadium. They needed to be seen to be filling the streets and upper concourse outside.
This was incredibly difficult for a handful of reasons. There was only an hour to do it in, as the locals around the stadium had complained of previous helicopter shoots, the fog was rolling in off the sea and due to freezing conditions in the air, the zoom on the camera had broken and had to be controlled by a camera man hanging half out of the helicopter. Meanwhile, I coordinated the pilot, operator and the AD and crowds down on the ground via radio, whilst coming up with two variations of the shot plus crowd tiles for each variation.

Once this was complete, the crowd was moved inside and the interior tile shoot was begun. The shoot was a challenge but incredibly successful, as it enabled all the stadium crowd shots to be handled entirely in 2D with camera projections onto geometry which was derived from a lidar scan of the stadium.

To cover the game play, Jeremy shot several games at both Greenpoint and Newlands stadium in Cape Town. The reason for the multiple shoots was because we were supposed to see Ajax vs. Pirates playing, but there weren’t any games scheduled for both teams together at Greenpoint. However, there were at Newlands, which is a completely different stadium. Eventually the footage from Newlands of the two correct teams was used, and again was shot from a similar angle from the mid point down the staircase prior to the nodal move.

What was your approach to populate the Green Point Stadium?
Once in post, we initially setup tiles and projected onto the geo, by selecting still frames in position first. This was handed to Evelyne Lebond the comp supervisor for the show, who took the shots to final.
She set up the game play and tested the cameras and it all worked, so it then became a case of selecting footage of the crowds moving as much as possible, in some cases retiming the footage so the flag waving could be seen easily.
Finally it was then a solid job of keying and rotoscoping all the foreground objects and integration of the footage within the stadium, matching lighting, atmospherics and generally keeping things consistent. No mean feat when dealing with such a large projection. All compositing was completed in Nuke.

For the exterior helicopter shot where we follow the Landrover into the car park, there was a selection of tiles shot of the crowd in position from a rough mid point in the helicopter move. The biggest issue was that these were all handheld from a helicopter, so they needed to be repositioned, stabilized and all in place so that they could handle the push in, and hold up as far as resolution was concerned.
In addition to this we had to fill the car park full of cars, add more cars coming up and down the street, remove rigging, cranes and lights.
Again, once initially designed and laid out this was up to Evelyne to complete.

For the first exterior Stadium shot, where we see a helicopter move screen left to right, establishing the stadium in full, we again had to add a crowd both outside and inside.
For the interior we were able to reuse the projection setup from the interior shot already completed, and for the exterior we did a second crowd element shoot in Vancouver.
We shot multiple passes of 20 crew members in outfits waving flags, on a green screen in daylight. The crowd was shot from one camera position on a 7D again.
Once keyed and prepped, these groups were projected onto tiles throughout the front of the set. We were able to accurately position the crowd, as the stadium geometry was available and the camera was supplied via matchmove, the setups were all done in Nuke. There were roughly 20 groups of crowd retimed and repeated another 111 times, projected in different positions until the outer concourse was filled. This gave us several thousand extras in place.

To work out the tiling setup and the crowd shoot, we actually initially setup with a crowd shoot from another previous show. What this enabled us to do was work out numbers, position and whether or not the actual approach would hold up to 2D only.
This setup did save time but was an incredibly complex nuke setup, which took a lot of time and patience to pull together.

In addition to these shoots and setups, to cover our bases we shot 7D and film footage at two actual games at both stadiums from as many vantage points as could be arranged. This also worked out for us as late in the day several new shots of actual game play came about without crowds. We got lucky and had the angles in camera from this footage, with a combination of tiling the footage and matchmoving and rotoscoping we easily managed to bring these shots together.

Can you tell us more about the chase on the roofs in Langa?
About mid way through the film, Frost arrives at the Langa Township in Cape Town where he meets his old friend Carlos Villars.
Throughout the scene which starts with an establisher of the Township from above, and culminates in several cranes shots above the Township where we see the chase happen, we had to set about extending the Township and closing gaps in the road to help get across the overall claustrophobic feeling of the location.
The cars were crammed into tiny ramshackle roads, and the mercenaries and the heroes are seen jumping between similarly ramshackle buildings.
We took a huge amount of photographs of the location both in the daytime and on the night of shooting, getting up on roofs and cranes to see as much from above, and running round the streets getting as many variations and angles as possible.
Again, the work wasn’t initially considered, but once we all saw the edit there was a feeling that the areas were not full enough, and that there was a risk of them feeling staged and not real, even though they were.
So Mitchell Stuart, the matte painter on the show, working in combination with Jesus Lavin, the lead compositor for the sequence, set about wading through the mountains of stills photography to find similar lighting scenarios and angles that could be used, and then daylight versions that could be relit if needed.
Jesus, working with the matchmove team, set up geometry in Nuke so that Mitch’s matte painting could be set up and tested in the comps to see how things were working. Again this was a relatively smooth extension that took patience and accuracy to set up.

Are there other invisible effects that you want to reveal to us?
Explosions also played a pretty big role. There is one key explosion sequence in the film, which takes place at Safe House 2 in the countryside, where Barlow (Brendan Gleeson) comes out of the house and stands in front of a burning car, which ultimately explodes, sending him flying.

To augment the scale of these explosions we opted to digitally blow the hood up and throw out engine parts, one of which narrowly misses Barlow’s head. This set up was seen from 3 shots, and the fourth seeing the other side where we also digitally blew out the passenger door.
The engine parts were an FX simulation by FX artist Nik Slotiuk, the pieces were all designed and textured by Jamie Gigot.
Jamie essentially supplied a collection of pieces that could be positioned in different ways and with several options and variations, some large some small.
The simulations took a few iterations, playing with amounts and scale, and little extras like glass towards camera and bumpers flying off, over time as the shots progressed I asked for more and more pieces from Nik, which we think he enjoyed doing, what FX artist in his/her right mind wouldn’t want to blow stuff up!

A handful of pieces were isolated for animation to take and manually animate, for example flying towards Barlow or the hood bouncing up and down, and finally the door flying off. These animations were created by senior animator, Chris Derochie.

All of these pieces were composited in combination with practical elements by Eric Ponton and Virginie Goulet in Nuke, which also entailed rig removals, adding an interior to the passenger side and inside the engine block.

All the four shots played out well together, making a larger seamless explosion seen from multiple angles.

Also – with films of this nature there is a body of fairly standard VFX work that shouldn’t go unnoticed.
For safety reasons throughout the filming process stunt doubles are used, and practical SFX cannot be used or doesn’t quite work out, and finally all these deaths need some gore! So throughout the film Image Engine’s compositing team tackled face replacements, added muzzle flashes to guns, and squib hits and sparks to walls from gunfire, and finally peppered the deaths within the gun battles with gore/blood seen flying from exit wounds. This was always aiming to be relatively subtle and well integrated, which was the biggest challenge. This was a considerable body of work that came off without a hitch.

What was the biggest challenge on this project and how did you achieve it?
Really there were two big challenges, which were the fully CG van crash into the wall and the crowds sequences.
The biggest challenges being how to manage the shoots, how to maintain the quality of the CG, and come up with a conceivable yet violent enough move, and finally how to integrate all these elements seamlessly.

Was there a shot or a sequence that prevented you from sleep?
I hate to say it, this was a really smooth show, so I got all my beauty sleep! But needless to say there were challenges, and again these really came down to the crowd work and the main crash, but it was also a considerable challenge to come up with the whole body of VFX work and maintain this within budget and keep everyone happy.

What do you keep from this experience?
I think the biggest lesson on a show like this was how to improvise and manage expectations at the same time.
Also how important it is to have a close working relationship with production.
A show like this changes by the minute and if you don’t have a solid foundation in place you will miss the changes and pay the price later!

How long have you worked on this film?
Just over a year. We started preplanning at the end of 2010 and finished up just after Christmas 2011.

How many shots have you done?
378.

Any final thoughts?
SAFE HOUSE was a lot of fun from day one – it was just one of those projects that had such solid foundations behind it, with DOP Oliver Wood and Editor Rick Pearson on board. I can’t say enough how awesome the crew was at IE, and how everyone just got on board, worked fast and enjoyed the ride.

A big thanks for your time.

// WANT TO KNOW MORE?

Image Engine: Dedicated Page about SAFE HOUSE on Image Engine website.

© Vincent Frei – The Art of VFX – 2012

Media partnership between FMX and The Art of VFX

FMX Logo

I am pleased to announce the media partnership between FMX 2012 and The Art of VFX!

FMX runs from May 8 to 11 in Stuttgart in Germany and I would love to meet you there on this occasion.

Best regards,

WAR HORSE: Mike Mulholland – CG Supervisor – Framestore

Before joining Framestore, Mike Mulholland worked at Cinesite on projects such as LARA CROFT: TOMB RAIDER and the TV series BAND OF BROTHERS then at ESC Entertainment for CATWOMAN. At Framestore, Mike has participated on films like AVATAR, CLASH OF THE TITANTS or WHERE THE WILD THINGS ARE. In the following interview, Mike accompanied by Ben Morris (VFX Supervisor) and Duncan Burbidge (VFX Producer) talk about their work on WAR HORSE.

What is your background?
I’m a CG supervisor at Framestore. I’ve supervised for the last 5 years before that working in the lighting, rigging and pipe departments. At Framestore I’ve worked on may films including AVATAR, CLASH OF THE TITANS, AUSTRALIA, PRINCE CASPIAN, WHERE THE WILD THINGS ARE.

How did Framestore got involved on this show?
Ben Morris, Framestore’s and the Overall VFX Supervisor on the project, recalls, “Kathleen Kennedy (Spielberg’s long-time producer) and his Production Designer, Rick Carter, came to meet us. It went really well, I think, because they quickly recognized that we could deliver everything they needed, from the mundane, to state of the art CG animation. I should emphasize that the film Steven wanted to make had no place for self-conscious VFX shots – it was to be as real as possible, with any digital elements integrated invisibly in the service of that sensibility.” Ben Morris

How was the collaboration with director Steven Spielberg?
With Spielberg’s team having minutely prepared the ground, the director arrived in the UK for the 53 day shoot in August 2010 and, Morris recalls, wasted not a second. “As a VFX person, you often find yourself waiting around on set a certain amount, but Steven and his team were undoubtedly the most professional filmmakers I’ve ever worked with – we sped from one set up to the next with everyone knowing what they were doing and Steven knowing exactly what he wanted from each shot. And he was doing cutting work as he went.”

The genuinely collaborative nature of Spielberg’s work ethic was further demonstrated later on during the shoot when Morris was given the opportunity to shoot a sequence with an additional camera team. “We went to do a few pick-up shots and showed them, a little sheepishly, to Steven on our iPads. He just said ‘Great – can you go and shoot the rest of the scene?” So – with a mixture of trepidation and glee – we did so.” This was a sequence in which Joey (the film’s equine hero) is cornered by a tank and which culminates in his vaulting onto and over it to escape. It took a couple of weeks to shoot, and was one of the very few points at which a CG horse would turn out to be necessary.

Continues Morris, “Christian Kaestner and I also collaborated on creating another shot for Steven, one involving a cavalry brigade – some 300 horses strong – newly arrived in France. We found a suitable location on the Duke of Wellington’s estate in Hampshire, and used a Canon 5D to shoot test replication passes which we comped together and presented to Steven. For the final shot we managed to get a great sunset view of the horses. Throughout, we all felt privileged to be involved and trusted at this level.”

The trust continued during the five month post production period, with Spielberg’s on-set ability to make lightning fast decisions – yes, that works; no, I don’t want to do that –also a vital element of the process. Says Morris, “In post, we soon realised we’d get immediate (and generally positive) feedback from Steven.” Spielberg remained adamantly opposed to the use of digital horses until the aforementioned tank-jump sequence. The shot as captured in camera simply wasn’t working, a fact remarked on a couple of times by Spielberg during reviews. Drawing on all his supplies of gumption, Morris put his team on it, and shortly after presented Spielberg with a new steed. Impressed, the director asked where the footage had come from and Morris finally revealed its digital lineage. With a shot that finally worked, the purist gave way to the pragmatist and Spielberg okayed it, to the team’s relief and pride. Ben Morris

What have you done on this movie?
Framestore provided all the VFX work for WAR HORSE – working on over 200 shots in total.
It was a mixture of work including CG horses, CG barbwire, trainer/rider removal and matte paintings.

How did you manage the various clean-up work?
We had a wide range of cleanups to do. Various safety equipment for horses and stunt people, anachronisms in the landscape or horse trainers, to name a few. Whilst cleanup work for the environment often times works as a patch that can be tracked in, cleanups on horses for example are often times frame-by-frame paint jobs that need a lot of time and care.

Can you tell us more about the rider removal work?
The rider removals were some of the trickier shots we had to do since removing a rider involves putting in parts of a running horse that were hidden from view. So we had to create some parts of the horse in cg to patch them over the rider. This sometimes included simulated reins, stirrups, bridle and saddle that needed to match the ones that were in the plate. The rest was again a matter of frame by frame paintwork.

Some shots involved very graphical backgrounds. What indications did you received from Steven Spielberg and how did you create them?
Art Director Kevin Jenkins, “After the initial meeting with Spielberg’s team, I got in touch with Rick Carter via a mutual acquaintance. After seeing some preliminary paintings I’d done for the project, Rick invited me too join his Art Department for the summer leading up to the shoot, which I delightedly did. Rick initially wanted me to concentrate on material that would help give a flavour of the time. I went for a sort of raw, muted, Paul Nash sort of look to those pieces, pretty grim in essence. But I ended up doing all sorts of work with them. Janusz (Kaminski, WAR HORSE’s Cinematographer) had an idea for a shot involving a pair of horses walking in front of flames. I painted this up, Steven saw it and suddenly it became part of the film, which was very gratifying, though the shot didn’t make the final cut.” Looking back, Jenkins says admiringly, “Rick pushed me to use different media for my work, and showed me new approaches to inspire the looks I was after. The whole three month process was an invaluable education for me, and it’s no exaggeration to say that it has changed the whole way we think about and present our work here at Framestore.” Ben Morris

How did you created the shots with many soldiers in the field of reeds?
The vfx work reeds sequence was mainly about crowd multiplication and background extension. The soldiers were shot as multiple passes in different positions so they could be recombined to give the impression of a larger army. Also the reeds had to be extended quite a way back into the distance. We used separately shot reed elements (green screen) and matte paintings to fill up the landscape all the way into depth.

Can you tell us more about the set extension for the battlefield?
For us, no man’s land – the big battlefield – was mostly about removing anything that looked out of place or too healthy. Like trees that were too green or modern buildings in the background. It was also extended into depth in some cases by painting in more dead trees and crumbled structures.
We also did one shot with a big matte painting of the entire battlefield and various ones that needed clean up work.

Are you involved on the shot in which Joey is running and jumping on a german tank?
These shots feature our CG Joey. The crew shot footage of a real horse jumping over a static tank – but these didn’t offer the performance Steven Spielberg was after so they made the decision to use a digital horse. After we had camera tracked the plate one of our animators Stuart Ellis painstakingly created a dynamic but natural animation of a horse jumping the track. Secondary animation of the bridal and other straps was carried out by Carl Bianco using ncloth in maya. Using onset reference plate one of our lighting TDs Rachel Williams matched the lighting of the real horse. Finally the whole shot was brought together and composited by our comp lead Chris Zeh.

How was filmed the impressive race of Joey in the trenches?
The real horse was only able to run riderless in a couple of the shots – so a large proportion of the shots featured a stunt rider dressed in a body tight grey gimp suit who would have to be removed later. The horse was also filmed without barbed wire as even fake wire would have been to restrictive and endangered the horse – this meant we were adding CG barbed wire to all the shots in the sequence. The most complex shot was the ‘Trench Jump’ that involved using multiple camera takes, multiple horses and then stitching the plate together in CG to create a single flowing shot.

Can you tell us in details your work on this sequence?
The trench sequence was some of Framestore hero work on WAR HORSE. From the moment Joey jumps the tank to his final collapse in no-mans land we were adding CG elements that had to be invisible and not distract the audience from the drama and emotion of the film.
The tank jump was a ‘pure’ cg digital character whereas the trench jump was a lot more involved. During the course of the trench jump shot we go from a CG horse as Joey first jumps over, then a live action horse as he runs alongside the trench. We then took over from the live action by blending back to the CG – once CG we were able to animate him jumping, mislanding on the sandbags and falling into the trench. Once on the trench floor we blended back to a live action horse that gets up and runs out of shot.
After the trench jump we were adding CG barbed wire to the real horse to give the effect of him dragging wire and wood through the scene. After he flips we covered him with the web of CG wire that pins him to the floor.

How was created the Joey’s fall in the barbed wires?
Framestore were responsible for adding in trailing CG barbed wire and wooden beams during the race and then a web of barbed wire entangling Joey after he’d fallen. The CG barbed wire was achieved by first tracking the camera and horse in CG so we had a virtual matchmove of Joey to which we then attached CG barbed wire. The wire was procedurally modelled to create the twisted wire and barbs and then simulated in Maya by Framestore FX team of Noah Taylor, Daniele Fernandez and Julian Hutchens using nCloth. The barbed wire was rendered using prman by Ben Loch and comped by a team led by Ben Aickin and Kate Windibank.

How did you create a so realistic CG Horse?
We carried out a photoshoot with the hero Joey horse before filming started. We set up a camera array with multiple synced cameras and were able to capture the horse from multiple viewpoints in the same pose. This enabled our lead modeller Scott Eaton to sculpt a very accurate version of Joey that was the basis for all our work.
As we had a lot of photoreference so were always able to work against lineups of the real horse to check our accuracy and detail were correct. This was essential in creating a believable version of Joey as he needed to be interchangeable within shots.
Texturing was handled by Michael Borhi and our horse was rigged by Mauro Giacomazzo and Matthieu Gouette using Framestore inhouse suite of rigging tools. Lookdev for the horse was lead by Stefan Putz.
Finally animation was supervised by Kevin Spruce and carried out by Laurent Benhamo and Stuart Ellis.

Can you tell us more about your collaboration with The Third Floor?
The Third Floor worked directly with Steven to previs some of the key sequences in the film – namely the Cavalry Charge, Tank Jump and Joey in No Mans Land. Having such detailed previs during pre-production was extremely helpful – each department knew exactly what they were contributing and problems and concerns could be aired and agreed ahead of the shoot. It made for a very organised and cohesive unit and allowed everyone to accurately budget their part of the production. They also provided us with detailed scene files which enabled us to accurately plan some of the key shots Steven wanted to shoot. Duncan Burbidge (VFX Producer)

What was the biggest challenge on this project and how did you achieve it?
The biggest challenge for me was creating a convincing enough CG horse to be able to pull off the trench jump shot.

Was there a shot or a sequence that prevented you from sleep?
It was a fairly relaxing production as we had a fantastic team and a good schedule to work to.
But the Trench Jump shot was always the key shot.

What do you keep from this experience?
The satisfaction of working on a smaller scale VFX show that needed some really high end work. WAR HORSE was immensely satisfying to work on and one of the most enjoyable films I’ve worked on in my career.

How long have you worked on this film?
I worked on WAR HORSE for around 6 months in total.

How many shots have you done?
200+. The shots ranged from removing anachronisms and extending and augmenting sets to creating several exciting sequences with Joey.

What was the size of your team?
90 at it’s peak.

What is your next project?
Currently I’m working on 47 RONIN.

What are the four movies that gave you the passion for cinema?
DUNE, GOODFELLAS, BLADE RUNNER and 2001: A SPACE ODYSSEY.

A big thanks for your time.

// WANT TO KNOW MORE?

Framestore: Dedicated page about WAR HORSE on Framestore website.

© Vincent Frei – The Art of VFX – 2012

THE DARKEST HOUR: Hans Uhlig – VFX Supervisor – Polygon Entertainment

Hans Uhlig has worked for over 9 years at ILM on such films as STAR WARS EPISODE 1: THE PHANTOM MENACE, THE PERFECT STORM or MASTER AND COMMANDER. Then in 2007 he founded Polygon Entertainment. In the following interview, Hans discusses his work on THE DARKEST HOUR.

What is your background?
Before I founded Polygon Entertainment in 2007, I was giving the game industry a try. Before that I worked at ILM for about 9 Years, starting in 1996. Prior to that, I was doing commercials and an animated feature in Germany.

How did Polygon Entertainment got involved on this show?
We’ve worked with Stefen Fangmeier in the past.

How was the collaboration with director Chris Gorak?
We spent just a couple of times talking about shots during our cineSync sessions. He seems like a down to earth kinda guy with a clear vision. Even during those stressful weeks in post he had a great sense of humor. I would love to work for him again in the future.

How was the collaboration with Production VFX Supervisor Stefen Fangmeier?
I’ve known Stefen now for about 16 years. I worked with him during my ILM days on films like MASTER AND COMMANDER and PERFECT STORM. I like to work with Stefen a lot. He get’s things done and leaves you enough room to be creative. He knows what is important in a shot and where to spend the budget, but still tries to get the best out of it.

What have you done on this show?
We worked on 430 shots in the movie. Most of these shots were shots with smoke in the atmosphere and/or smoke in one of the cameras. Since the movie was shot in stereo, we had to make the left and right eyes match. It required some fairly sophisticated colorspace and contrast matching between the left and right eye. Also, since Moscow was supposed to be deserted, a lot of these shots also required painting out people, reflections, or other objects (e.g. moving cars) that weren’t supposed to be there.

A lot of shots also required various rig removals and such, and a lot of screen replacements (e.g. the content on the cell phone screens).

We did 12 shots in the opening « alien landing » sequence where the orbs descend upon Moscow. We created and animated the CG orbs that were entirely made of particles.

We did 18 shots in the « boat flip » sequence that was primarily background replacements. Some of that sequence was shot in a water tank, and the rest in a lake, so we had to replace the backgrounds to make it look like the Moscow River. Also, the stereoscopic camera rigs could not be used in or under water, so this sequence was not shot it stereo and had to be converted from 2D to 3D in post-production.


We dimensionalized (2D to 3D) the New Regency logo at the beginning of the film, and also did the final all-CG shot of the submarine sailing off into the sunset.

Can you tell us in details the creation of the aliens?
Other houses created the actual aliens, as well as the towering smokestacks, the alien POV shots, etc. In many cases, we needed these houses to provide their finished elements to us to put into our final composites.

The most challenging « alien » shots for us were the CG orbs in the Alien Landing sequence. Whenever you are creating something completely from scratch, something that’s never been seen before, and something that’s entirely made out of particles, you have to do a lot of experimentation to make sure you have the action, mood, timing, and overall look that the director is looking for.

How did you recreate Moscow for the alien landing?
We didn’t. The plates were shot in Moscow and we were provided with all of the elements except for the CG orbs that we created.

Can you tell us more about the CG water? How did you create it?
Polygon developed it’s own proprietary water pipeline for the Korean blockbuster HAEUNDAE (aka TIDAL WAVE) and we used that for all of the shots requiring CG water.

How did you create the final shot?
The shot with the Sub going out on the ocean? Well, that was a funny one. We did not even have that one on the list (shortlist) but Ivy Agregan (the VFX Producer) poked us and asked us if we could crank out a shot like that (in stereo) in a week or so. We got the basic layout and length of the shot, and at one point we even considered using stock footage of the ocean that we would have to convert to stereo. Time was running out and at some point you just have to say, « No way. », but we had our own water pipeline that allowed us to create pretty much any type of ocean: stormy, calm, or even a Tsunami. So we said, « let’s do this thing all CGI ». Stefen and I bounced the camera file back and forth for two days until we found the right angle. We did an ocean-sim with the sub in it, created a multi-layered sky, rendered all the elements in stereo, composted them, and got the final shot all within a week.

How did you approach the stereo challenge?
We did a lot of stereoscopic conversion on movies like THE GREEN HORNET and GLEE, and we have developed a number of in-house tools to facilitate that kind of work, so the conversion of the Boat Flip sequence was relatively easy for us. The rest of the film was actually shot in stereo so that was a piece of cake compared to stereoscopic conversion.

What was the biggest challenge on this project and how did you achieve it?
The biggest challenge was the « one eye blind » footage. When they where shooting in Moscow, there had been big turf fires around the city, so everything was pretty much hazed up. On top of that, one of the lenses of the stereo rig was not sealing properly and the image sensor got all smoked. We called it « one eye blind » and there were about 200 shots like this. On top of that the lenses did not match and the image sensors had a hue shift. We came up with a pixel-math based de-haze method and used the « good » eye to fix the blind eye. That included also a contrast and a couple of color calls for the high, mids and lows. We found that the biggest problem were things like reflections in car windows. they just started to have to much contrast compared to the « good » eye after the fix. It turned into one of those situations where you fix one problem that then leads to another bigger one. It made you sick watching it in stereo. So, we spend a lot of time balancing.

The final shots turned out so well that we got another 150 shots of the Red Square sequence that looked like foggy London but should’ve looked like « happy blue sky ».

Were there a shot or a sequence that prevented you from sleep?
Not really. I have fun with what I’m doing.

What do you keep from this experience?
Always check your stereo rig.

How long have you worked on this film?
We began work on this project in October of 2010. The final shots were delivered in June of 2011.

How many shots have you done?
430.

What was the size of your team?
At our peak, we had about 25-30 people, artists and production personnel.

What is your next project?
There are many! We have to finish the post production on a stop motion film. We are also working on a music-related television show, and because we frequently develop our own software we have a couple of projects in the works that would make our software available to the industry. Well, it never stops.

What are the four movies that gave you the passion for cinema?
Ah, the classic question. The first one that hit me over the head when I was 10 or so, was a French film about a boy and a girl falling in love during a summer vacation in the Carmarque in the south of France. I’ve tried to find the title of that movie for the past 37 years. It’s still driving me nuts. Other then that, I would say 2001: A SPACE ODYSSEY, BLADE RUNNER, CITY OF THE LOST CHILDREN, and THE BIG BLUE just to name a couple.

A big thanks for your time.

// WANT TO KNOW MORE?

Polygon Entertainment: Official website of Polygon Entertainment.

© Vincent Frei – The Art of VFX – 2012

UNDERWORLD AWAKENING: Jeff Campbell – VFX Supervisor – Spin VFX

Jeff Campbell returned to The Art of VFX to tell us about Spin VFX work for UNDERWORLD AWAKENING. He is joined by George Macri, VFX Producer, and Ahmed Shehata, CG Supervisor. They explain in detail their work on this film.

How did Spin VFX got involved on this show?
Jeff Campbell, VFX Supervisor // We got involved quite late in the game and had only 12 weeks to do some huge shots in Stereo!

How was the collaboration with Production VFX Supervisor James McQuaide?
George Macri, VFX Producer // We dealt exclusively with James McQuaide who was both an Executive Producer and the Visual Effects Supervisor. The initial discussions centered on the opening shot of the film which needed to set the tone. The humans are essentially « exterminating » the vampires and the lycans from the old city. In the opening shot we needed to see humans executing lycans & vampires, dragging them out of buildings and throwing them from the balconies and setting fire to these « body piles ». In addition, it needed to be clear that there was a new city surrounding the old city, which was burning.

The subsequent shots would be various types of city extensions, whether burning old city, new city or a combination of both. In terms of the building styles, the old city look was on the gothic side, which the new city required extensive buildings in the Brutalist style of architecture for a much more visually aesthetic than just your typical skyscraper.

What have you done on this movie?
Jeff Campbell, VFX Supervisor // SPIN supplied the opening and the closing sequences, the Eve Vampire face shots and the city set environment extensions.
The biggest task was to build the city that the movie takes place in, to look like Budapest but surrounded by newer buildings, a Brutalist style of architecture.
We had one shot where Selene is running across a bridge between two buildings that required a digi-double. A laser scan of her was provided in which we rigged, textured and animated her in Autodesk Maya. Joe Alters Shave and Haircut was used for hair.
We ended up doing 66 city shots and 54 Eve shots. The Eve shots (or Subject 2), involved vampire face augmentations and transitions from and to human.
The plates were shot in stereo with a couple of Red Epic’s. We received and delivered 2.5K. It was really nice clean footage to work with. There were the expected anomalies you get from shooting through a mirror in one eye but all in all, the Epic footage was really good to work with. Typically you would build mono versions for creative approval but, to save time, even first versions were in stereo so we could address any stereo issues first hand. There weren’t too many plates that needed Ocula.

Can you tell us more about the impressive opening shot and the closing shot?
Jeff Campbell, VFX Supervisor // The opening sequence is so important to the story. There is so much going on in it, we really did not have the time to get any second chances to get it right so it had to be planned extremely well.
Production provided a previs of the opening sequence for timing and expectations. It was very ambitious with an extreme camera move starting out straight down at ground level and pulling back up over a building to reveal Selene examining all of the devastation around her. We added cg body pile fires, cg guards with flamethrowers, cg lycans and vampires being tossed out of windows, cg victims being executed in the streets and cg helicopters searching the city; all in an extremely heavy cg environment. We brought as much geometry into Nuke as possible but the composite was taking 16 hrs to render at one time. Fire fluid sims were done in Maya and rendered in 3ds Max using FumeFX. City models were built in Maya and rendered in V-Ray. Not the ideal shots you’d want to deal with on a 12 week schedule. The old bag of tricks you’d usually use to speed things up is not available because you can’t get away with much in stereo.

How did you create the city addition?
Ahmed Shehata, CG Supervisor // UNDERWORLD AWAKENING cities required a specific style of buildings and street layouts for stereo. SPIN used a mapping system for the city sections that divided each area into 6 zones organized by type such as old and new building styles. Designing a custom pipeline and proper asset workflow was essential to connect all departments from art to 3D to compositing. You still had to design all those buildings individually and our team developed several tools to manage the city assets. This ranged from collecting textures based the structure to generating projection camera shaders based on city sections. Techniques were applied to split matte paintings into separate street part maps in order to overcome parallax shift in projections, accommodate the different shot angles and look development needs.

What references did you receive for those buildings?
Jeff Campbell, VFX Supervisor // To make the city look unique to the movie and not similar to Vancouver where it was shot, we were required to add our Brutalist buildings as much as possible. We had quite a few built but the client had a hero building that is in almost every shot. The great thing about Brutalist architecture is that the building’s tend to look different from every side so in order to get more variations we would just rotate the buildings as needed. For the shots that had a slight camera move, we rendered a lit frame from Maya, sent this render to a matte painter to add all the details and then re-projected back onto the same geometry in Nuke. We would also provide all matte passes needed to isolate areas in Nuke such as window reflections, glows, key, fill lights as well as street level lighting like store fronts, street lights and cars. Having control of lighting and textures in Nuke’s 3D space has many creative advantages.

Can you tell us more about the Eve enhancements? Was there some makeup involved or is it full CG makeup?
Jeff Campbell, VFX Supervisor // Eve was required to have a combination of vampire features like her mother (Selene) and lycan features like her father (Michael). During look development our goal was to sort out a hybrid look that was menacing yet attractive. The shots where Eve transforms are where you see more of the Michael influence as her face momentarily takes on a more animalistic shape. We used 3 blend shapes during her human to lycan to vampire transformation. Veins were also added to signify an increased blood flow that initiated her transformation. The veins and her face were projected on to a geometry .obj sequence that was fed into Nuke.

Most of the shots involved manipulating her live action makeup by tracking a series of mesh warps in order to shape her eyes and brow. We also gave Eve new irises, changed her skin tone and added cg fingernails.

The movie was shot in stereo. How did you manage this aspect?
George Macri, VFX Producer // We were concerned before starting that there wouldn’t be enough time to deal with the typical color and position offsets that you’d see with stereo plates. Going through heroic efforts to deal with plate corrections was something we thought would be a schedule-killer. When the plates were turned over however, we immediately did a stereo spotting session and we were all pleasantly surprised to see just how great the footage looked. In the end, we did some plate corrections using Occula on a VERY small number of shots.

As far as the rest of the pipeline, a stereo camera was used in CG to create all of the elements and the comps were setup in stereo within Nuke. First pass blocking and comps were approved as a mono quicktime and subsequent comp renders were stereo from that point forward. I think the compositors took the brunt of the stereo aspect in all honesty because some of the tricks you can do in 2D just plain don’t work in a stereo comp!

What was the biggest challenge on this project and how did you achieve it?
George Macri, VFX Producer // The timeframe and stereo requirement without a doubt were the most challenging. The shots themselves were difficult enough, but it was a huge exercise in pipeline and resource management. We were lucky enough to have a very talented and seasoned crew on both the CG and compositing end. Almost everyone had extensive experience in stereo feature vfx projects.

Was there a shot or a sequence that prevented you from sleep?
Jeff Campbell, VFX Supervisor // I would say the opening shot. It was a so huge and important to the story. We never stopped working on it from start to end in our short 12-week schedule.

How long have you worked on this film?
George Macri, VFX Producer // We started late September and delivered everything mid December.

How many shots have you done?
George Macri // In the end it was about 66 city shots and 54 Eve augmentation shots.

What is your next project?
TWILIGHT SAGA: BREAKING DAWN – PART 2.

A big thanks for your time.

// WANT TO KNOW MORE?

Spin VFX: Official website of Spin VFX.

// UNDERWORLD: AWAKENING – VFX BREAKDOWN – SPIN VFX
Don’t miss the great vfx breakdown from Spin VFX about UNDERWORLD: AWAKENING.

© Vincent Frei – The Art of VFX – 2012

THE GIRL WITH THE DRAGON TATTOO: Charlie Iturriaga – VFX Supervisor – Ollin Studio

Charlie Iturriaga is back on The Art of VFX. THE GIRL WITH THE DRAGON TATTOO is the fourth collaboration between David Fincher and Ollin Studio.

How did Ollin Studio got involved on this show?
Ollin got contacted by post Supervisor Peter Mavromates in August 2011 to check availability of the studio for the project. The job need to be done was more about volume than complexity. He mention that there was plenty of VFX shots, and the time was short.

This project is your fourth collaboration with director David Fincher. Can you tell us more about it?
It’s amazing as a supervisor to be recurrent with a director, and being recurrent with David Fincher is a dream. Every time you start a new production, there is a learning curve, from technical/management to creative decisions. When you are lucky enough to get called several times by the same creative team, you already know what is the salt and spice that is adequate for whatever you are doing. If it’s a digimatte, Green Screen comp, or even a cleanup, there is a specific quality that you hit sooner (Not talking only in consideration the technical quality, but look/creative quality)

David Fincher is a very precise Director (and all his team), and precision is what defines our work in this movie. It needed a very precise delivery date from us, precise look, precise track and not that many iterations on each shot.

How was the collaboration with Production VFX Supervisor Ruslan Ogorodnik?
Unfortunately I never got to meet him. Our work was during the post production part of the movie and working directly with David Fincher, Peter Mavromates and Tyler Nelson from Post.

What have you done on this show?
We did more than 230 monitor comps, from computers, TVs and monitors. Also blood, wire removals, and something quite peculiar that we are finding more and more in movies: « Fancy Splits »

Fancy Splits is what I call to the comps that are called from editorial that need to join different takes to enhance interaction of characters in screen. Sometimes Director and Editor likes one take of one of the actors, and another take of another actor (most of the times with moving camera or different perspectives) then, is the job of the compositors to put them seamless in a single take. Sometimes at the end we design a camera move. It’s funny how much work something that seems not complicated, and how much a difference make in the context of the sequence!

Can you tell us in detail the creation of the various screen?
A lot of the storytelling of the movie is based on the interaction of the characters with their computers. Lizbeth and Blomkvist are constantly doing research on their computers, and those screens have significant screen time. As David Fincher mention in one of the meetings/screenings we had, this movie relies heavily in monitor comps, it’s interaction and imaginary is very important for telling the story.

On the other side of the spectrum, there was a technical aspect of having the source material (camera) in 4k and 5k. After doing some analysis of the images, I found that because of the high resolution of the capture media, you can even see the sub pixels on the monitors when there is a perfect focus on the computer/screen plane, and « moire » patterns are generated, which are different from camera to camera.

Knowing that we have more than two hundreds shots to solve, we decided to go for a 3D CG solution for the project, instead of doing only a 2D comp of the monitors. That gave me and my team a way to « divide and conquer » doing QT dependent on the technique, and not in a single comp artist solving the shot. Also it gave me the possibility of having an homogeneous look across the movie without having to worry of doing full sequence checkups too often to evaluate consistency.

That being said, we developed a very simple Renderman shader that replicated, depending on the brand and type of monitor, the exact pixel resolution and sub pixel pattern. Then we compare different shading rates, and anti-alias algorithms to match what was closer to the sampling of the real world camera, to replicate patterns, moire and softness of the original images. Also, flicker patterns were reproduced taking in account both the original plate, shooter speed of the camera and refresh rate of the computer being shoot (sometimes the computer was turned off in the original camera material).

That gave an element to the compositors that was very close to real life light source, and they can just focus on color balance (which was also based on computer model/type of monitor, as a Sony Vaio has a different « tint » than a Mac monitor) and bright and dark levels as well as light bounce and other finishing details.

The split of tasks let us evaluate and approve every step independently, and have tracking team doing and perfecting the tracks, TDs doing the look and compers doing the final assembly and delivery. If the monitors were far from camera, the compers had a 3D camera in Nuke, which was already approved in track from the tracking team.

I need to mention another amazing work that falls outside the realm of our VFX team, and that was the element creation or content creation. This heavy lifting was prepared and setup by Production’s editorial.

What references did you received from Production and David Fincher for the screens?
This was the first time we did that many monitors for a David Fincher movie, but from other projects we worked for him where we did a couple of screen replacements, one of the directions was always « It have to be like it was shoot in camera ». That was again a note in our first look presentations for Tattoo. David Fincher said… « if that is the way it should be in reality, then that’s it. ». Sometimes on a review he mentioned… « it looks like crap, so it’s perfect! », referring to the high amount of flicker, moire and texture of the screen.

Why did you used such high resolution (4K and 5K)?
David Fincher is always very cautions about camera stabilize and composition… I can tell you, but I might be in an error, that it was one of the reasons why he and production decided to go for the 4k-5k route. From the beginning, the framing that was used in the final release of the movie, was a subtract of the full frame of the camera sensor, giving headroom for repo, without loosing and resolution and quality!

The reason of using different 4k and 5k was because they shoot with 2 different RED cameras, one of which was the Epic in 5k. I decided to preserve the full resolution of the images for the VFX as the look of the monitors changed when created/rendered in 5k than doing it from the beginning in a lower resolution.

Which softwares did you used for the motion graphics?
As I mention earlier, it was Renderman and Maya, 3D equalizer for the tracking, Nuke for the compositing.

How did you achieve so many shots in such a short time?
I think the trick was to have as perfect as possible the shot the moment you present it to the director. To achieve that, divide the tasks and have a tough Quality Check of each of them, let us almost never have kickbacks from the director because of technical fails, and also let us parallel all work in a lot of artists, keeping the consistency across the board… even in something as straight forward as monitor comps.

Also we setup a server in editorial at production, when after reviewing and signing internally by Ollin, we transfer overnight directly. That way editorial would have in the morning as many shots as possible ready in the different formats (DPX, Qts, etc). While we were reviewing in the morning with the director, editorial was already checking that everything was fine with the files to conform the movie.

Can you tell us more about your work on the Basement torture?
In Basement sequences, most of the work was blood enhancement, which was done through paint work, also wire removal which was done through the regular techniques, and bag enhancement for Blomkvist face. Sometimes part of his neck rig was different from take to take, so we cleaned up to make it look consistent, also the bag had at some moments space that would give some air to the actor, which David Fincher was very precise in retouch.

This was mainly a 2D sequence, with the exception of the monitor comp which was done doing the technique previously mentioned.

What was the biggest challenge on this project and how did you achieve it?
I think more than a VFX technique problem, was a production streamline challenge. We had only 4 or so weeks to turnover around 250 shots in a higher resolution that we normally use. Our facility is in Mexico City, and creating a comfortable pipeline where transfer/presentation of the material was one of the first aspects that I wanted to make sure was not consuming time… or at least not too much.

Was there a shot or a sequence that prevented you from sleep?
I can tell you that this project was very satisfactory in that almost no one had problems sleeping (laughs). There were a couple of shots that had very difficult and extensive roto tasks (like changing an actor from one place to another for composition/continuity reasons) but the only hard part was inspecting frame by frame in 5k those shots… as we don’t have (and as far as I know there is not commercially available) 5k projector to screen the material.

What do you keep from this experience?
I think in different levels, and as in any project, you take a lot from it for the future.
I can tell you that all Ollin team really give a great execution, and I feel very lucky of working with them. Also, lucky of working again with the Post team of David Fincher, which are super Pros!
On the technical side, spending some time at the beginning of the project to decide the best pipeline really had benefits, so that is something I will always do!

How long have you worked on this film?
It was about 5 weeks.

How many shots have you done?
248 shots.

What was the size of your team?
28.

What is your next project?
Need to check if I can disclose! (laughs)

A big thanks for your time.

// WANT TO KNOW MORE?

Ollin Studio: Website of Ollin Studio.

// THE GIRL WITH THE DRAGON TATTOO – SHOT BREAKDOWN – OLLIN STUDIO

© Vincent Frei – The Art of VFX – 2012

MISSION IMPOSSIBLE GHOST PROTOCOL: Dave Morley – VFX Supervisor – Fuel VFX

After explaining his work on CAPTAIN AMERICA, Dave Morley is back on The Art of VFX. In this new interview, he tells us his work on MISSION IMPOSSIBLE: GHOST PROTOCOL. This film is the second collaboration of Fuel VFX with ILM.

How did Fuel VFX got involved on this show?
We met with the team at ILM a few years back to speak to them about the potential of doing outsourcing work for them. Our first job in this capacity was COWBOYS & ALIENS, followed quickly with GHOST PROTOCOL.

How was the collaboration with director Brad Bird?
We dealt only with the in house VFX team at ILM.

How was the collaboration with Production VFX Supervisor John Knoll?
John was great to work with. What was important for him was making sure we maintained the integrity of the original negative and making sure any CG being integrated sat within the latitude of the neg. Creatively he was very open to ideas and solutions we had for shots which made for a fun journey. Lindy DeQuatrro was also a VFX supervisor on the show that we dealt with a lot. We had the same great collaborative relationship with her as well.

What have you done on this show?
Our main body of work was the Burj Tower sequence. As Tom did a lot of the stunts in camera, either on stage or on the actual building, we had quite a bit of wire/rig removal and digital plate extension of set photography. We also did smashing glass for Tom breaking into the server room, and the Mask Maker shots.

We also created the Budapest establishers of the clock tower, train station and adjacent building roof and did some bluescreen shots of a fight sequence in a train.

How did you create the establishing shots of Budapest?
We created a full digital clock tower that buried into the plate photography. We also changed the roof of the train station as well as the roof top of the adjacent building that the actors burst out of.
It was tracked in Equalizer, modeling was done as a combination of Maya and Mudbox. All comp was in Nuke.

Can you tell us more about the CG buildings in those shots?
We based the clock tower from several reference images that we sourced. They wanted it roughly based on a clock tower that existed, but we embellished it to be a bit more sympathetic to the surrounding buildings in the plate. We had quite a bit of creative freedom on designing the tower, so we went to town with tonnes of detail including statues, gargoyles etc…

What did you received from the production as background plates for the train fight?
The BG plates were shot on RED by ILM I believe. They matched the angles well, so it was just really a technical comp exercise to make it sit well.

How did you create the mask maker?
The mask maker was a combination of Houdini-driven animation and skin with rendering in Maya with Mental Ray. The particles of the plastic being shaved off was done as a Maya particles sim. We had perfect on-set reference of a real practical mask that was built. This became the basis of the look development to match to. We were able to control the rate and position of the face changing so we could art direct exactly what part of the face we needed to read in order to sell the shot.

Can you tell us more about the impressive sequence with Ethan Hunt climbing the Burj Tower?
This was a huge challenge. The tower is essentially a mirror and at every intersection, a glass pane was met by a « vortex generator » which is a fin-shaped rib that runs the entire vertical length of the building. This was also essentially a mirror, so what that meant was that for every wire you see, you saw it reflecting on at least one other plane. Sometimes that wire was reflected up to 4 times. This is then complicated even more by the fact that as it’s a mirror you couldn’t just grab a still, paint out the wire and track it back in, because the parallax of the BG reflection in the face moved independently. So we had to render CG portions of the building to replace wires. By far our most challenging shot was one of Ethan climbing up the building with the camera looking down and he climbs towards us. This shot was in IMAX at 4k and took a team of 4 compositors on and off about 3 months to clean it up.

Sometimes Ethan was shot on a set piece that we had to digitally extend the tower above and below him or beyond where he was hanging. After dropping his cutter, Ethan is forced to break the window in order to get into the server room. We had to build the continuity and journey of him kicking the glass and the cracks appearing through to when he finally breaks through. The break through shot was enhancing the in-camera breakaway glass with augmented CG glass that was simmed in Maya as a rigid body with a rotomatted Ethan.

All the BGs that we needed to add were supplied to us as a 18k cyc generated and painted from ILM. We had to augment the frame by adding digital cars to give the city of Dubai some life. We were supplied two cycs for the floor where Ethan leaves the room and one for the server room.

The layouts for the shots were all done relative to each other so we could make sure we were being correct geographically across the sequence. The cameras were passed off to the Nuke team who dropped them into the shots for the rendering of the cyc on a sphere.

Was Tom Cruise really doing the climbing? How was filmed those amazing shots?
Yes!! Without a doubt these were truly amazing stunts for anyone to do, let alone the main actor. Luckily they were able to remove windows from the building, allowing them to rig either cameras or rope and pulley rigs outside the building.

Did you do some face replacements on specific shots?
All Tom!!! Ironically the « easier » looking shots of Tom just hanging outside a window kicking it was the set piece, but all the OMG shots of him either running down the side of the building climbing up, swinging of the side, was all Tom.

How did you create the shot in which Ethan Hunt entering the server room? How did you create the background?
The glass was done in Maya using DMM, we rotomatted a proxy of Tom so we had his movements tracked spatially. This animation drove the simulation, with other proxy bits of geo being used as collision objects. ie, floor, servers etc… The cyc, was as above.

Can you tell us more the big jump of Ethan Hunt going back on his room?
This was an ILM shot.

What was the biggest challenge on this project and how did you achieve it?
Biggest challenge would have been the wire removals, dealing with reflections and inter-reflections meant for some tricky work that needed a lot of CG to help patch. It wasn’t « hard » it was just very labour intensive and time consuming, but well worth the methodology on how they shot it. The final shots on a big screen do make you skip a beat.

Was there a shot or a sequence that prevented you from sleep?
When we first started seeing the plates at 4k it was a little intimidating in the realization that what we’d been seeing on the quicktime was about 40% of what was actually there. That made for some interesting scheduling challenges!

What do you keep from this experience?
That it’s sometimes easier to take the hard road, especially realizing it early enough and committing to it.

How long have you worked on this film?
April to October 2011.

How many shots have you done?
92 shots.

What was the size of your team?
About 50.

What is your next project?
We currently have in the pipeline, Ridley Scott’s PROMETHEUS and Marvel’s THE AVENGERS.

What are the four movies that gave you the passion for cinema?
Way too hard to answer. But the filmmakers that inspire/d me the most would be Alfred Hitchcock, David Fincher and Steven Spielberg.

A big thanks for your time.

// WANT TO KNOW MORE?

Fuel VFX: Dedicated Page about MISSION IMPOSSIBLE: GHOST PROTOCOL on Fuel VFX website.

© Vincent Frei – The Art of VFX – 2012