GREEN LANTERN: Karen Goulekas – Production VFX Supervisor

Karen Goulekas has over 25 years of experience in visual effects. She has worked in many studios such as Boss Film or Digital Domain. She has worked on such films as TRUE LIES, THE FIFTH ELEMENT or TITANIC. In 1998, she seized the opportunity to be Production VFX Supervisor on GODZILLA. She has since overseen the effects of movies like THE DAY AFTER TOMORROW or 10,000 BC.

What is your background?
I got my start in VFX in 1984 on the Dubner CBG II! I was hired at a TV station in Providence, RI to do camera and chyron. I had never touched a computer before, but when the Dubner walked through the door I was drawn to it like a magnet and got totally enthralled that I could make pretty pictures animating things around the screen!

So it was then that I decided I wanted to be a computer artist – spent the next 8 years freelancing around Boston and NY and then after seeing TERMINATOR 2 – I knew I had to get out to the west coast and work on movies.

I landed first a Boss Film and then at Digital Domain where I spent four years getting an amazing education on how to make films and how to be a VFX supervisor. I left there to do my first production side gig on GODZILLA and the rest is history – bouncing around from film to film ever since!

How did you get involved on this project?
Warner Brothers called me and said they wanted to send me in for an interview and I guess the interview went well because I got hired!

Can you explain your approach on a so huge project in terms of visual effects?
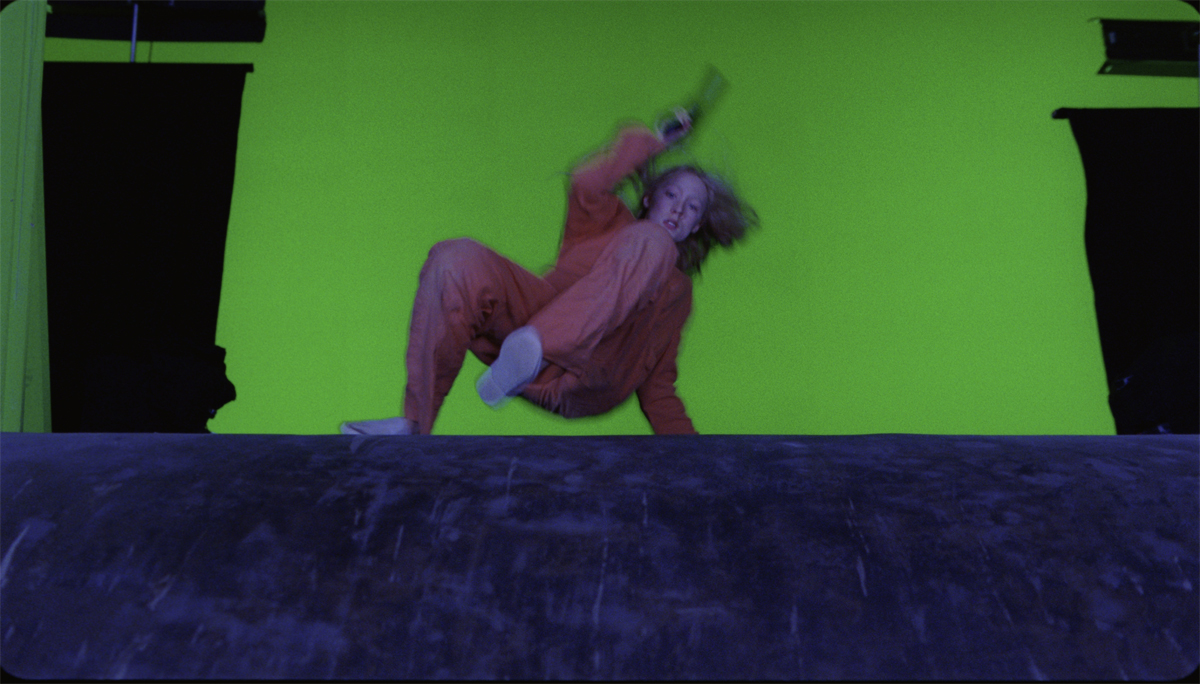
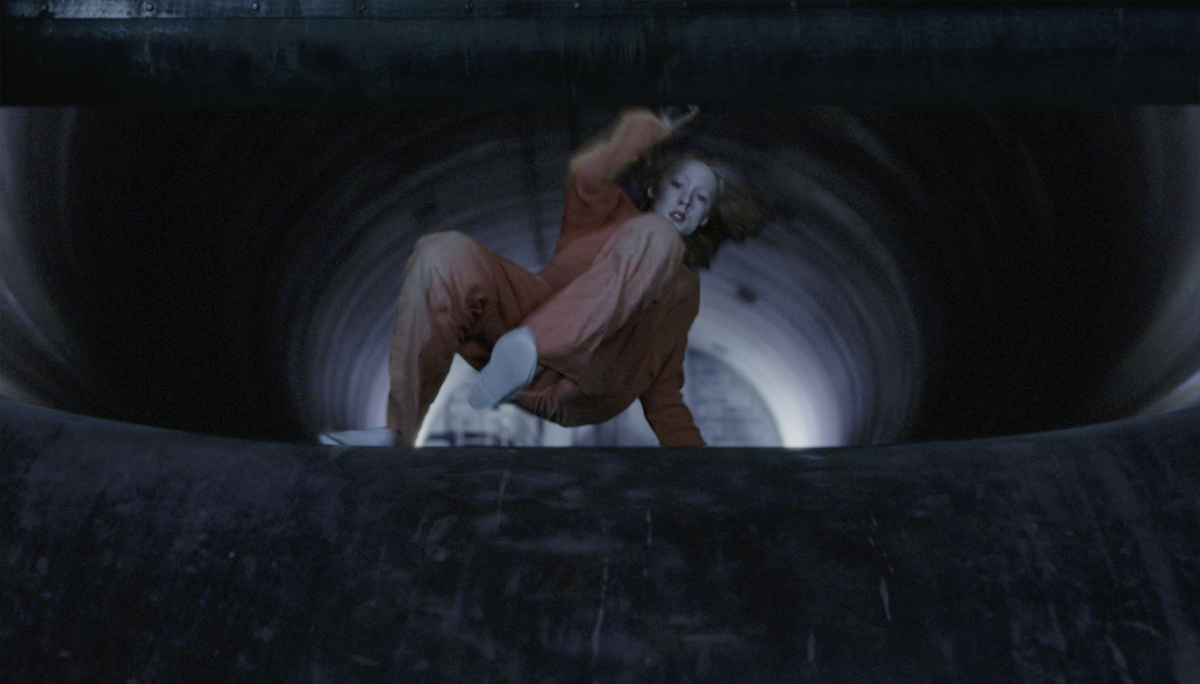
First thing was to figure out the type of shots and how to shoot them so we have what we need do create the finals in post. Because this show wasn’t being shot all on stage – in fact very little was actually shot on a GS stage – we couldn’t rely on motion capture due to the complexities of all the locations we were going to be shooting at.

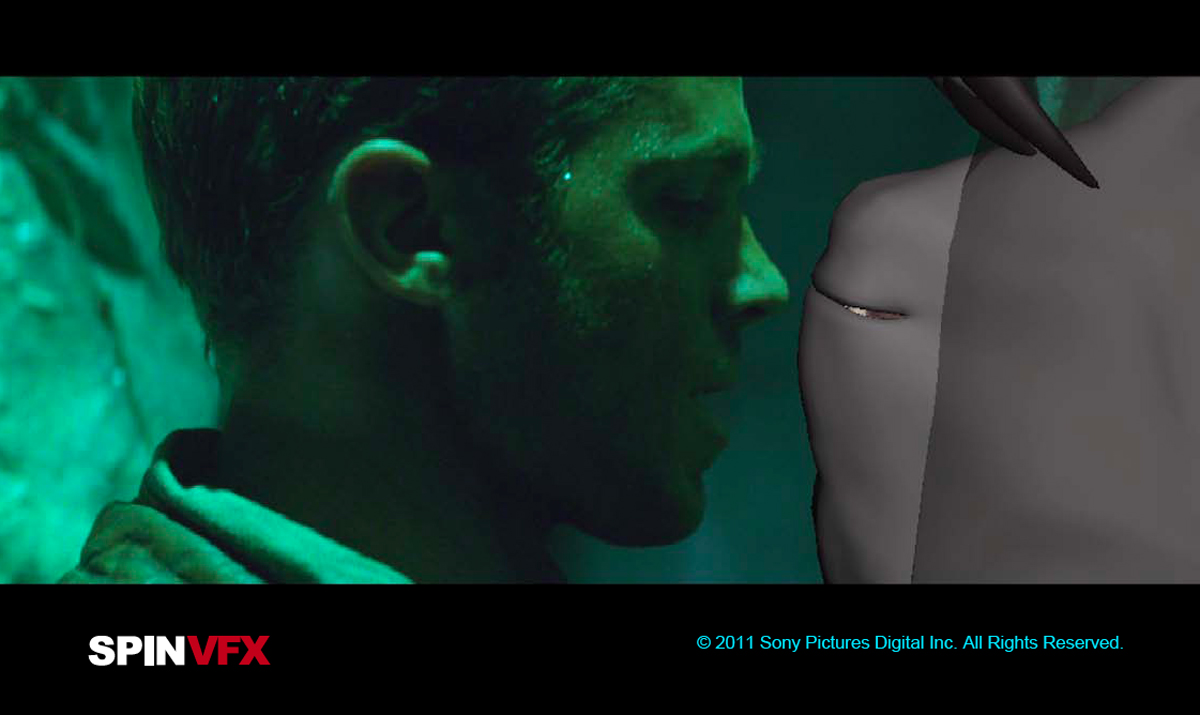
So, I went with witness cameras – by placing 2 additional cameras at 45 degree angles to the main camera, we can get the motion and camera info that we need. Because we were doing suit replacement, it was critical to have at least 3 views to be able to determine the characters position in 3D space which was needed to be able to line up the suit to the neck and add the mask. Along with a tracking suit we designed and lots of dots on the neck and face – we had the info we needed…

How did you make the choice of different vendors?
Well, because the main characters in the film involved either suit replacement, Hal, Sinestro and Abin Sur, or, they were full CG, Tomar-Re and Kilowog, we needed one facility that could do a large volume of animation and fx. There are only a handful out there that can take on that volume of work and deliver in high quality – so we felt very lucky to get Sony Imageworks on board to work with us.

How long was the previs period and how was the collaboration with artists of Pixel Liberation Front?
Previs started about 6 months before shooting and went on throughout the shoot. The PLF team was awesome and could turn around a lot of variety and iterations very quickly.

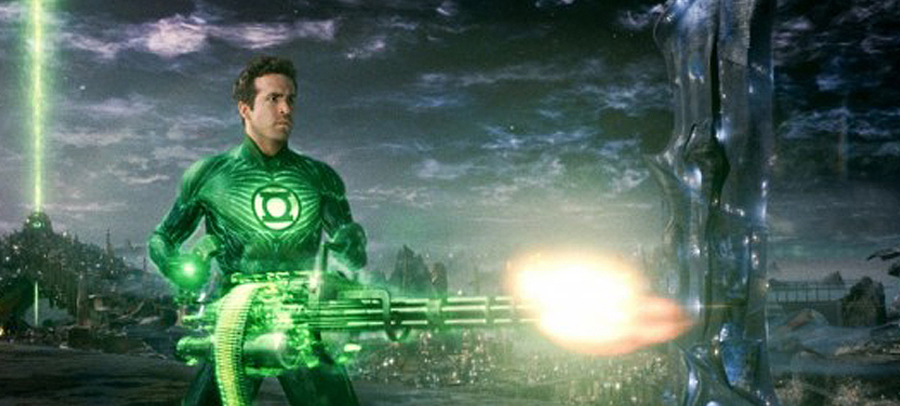
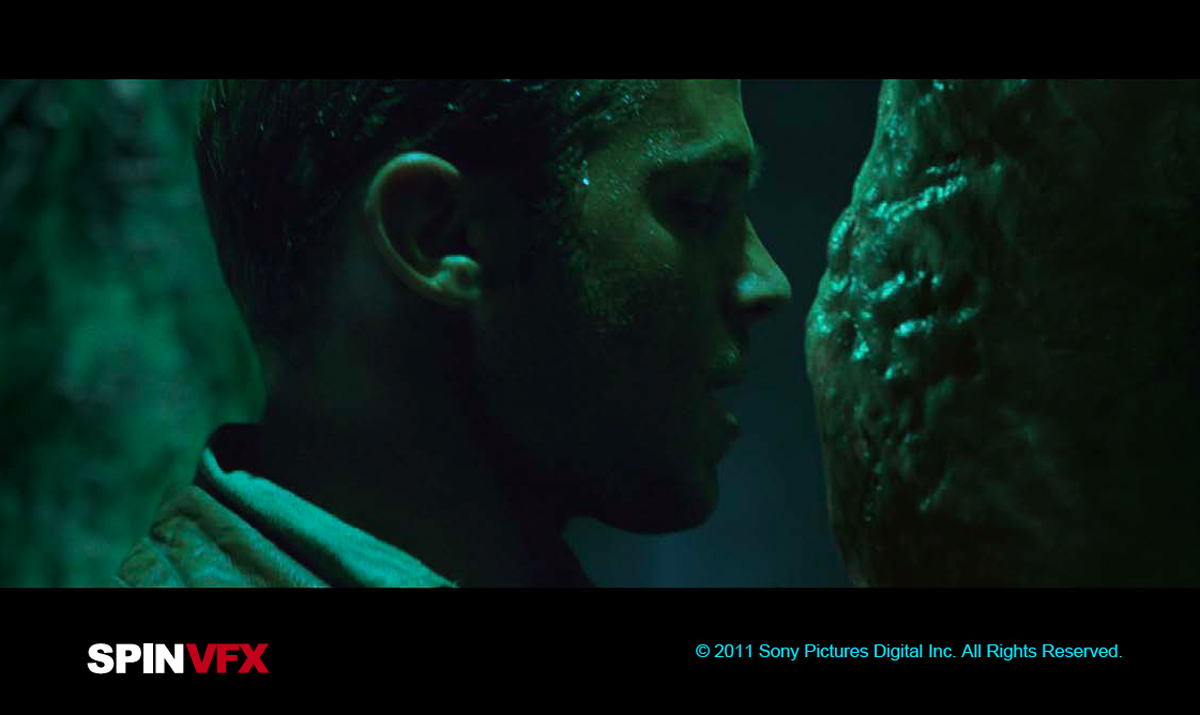
Can you explain the choice to have a CG suit and a CG Hal Jordan rather than a traditional suit?
The decision was made to go with a CG suit so it could look like part of their skin instead of a rubber suit. Gave a lot of flexibility to the design of it.

How did you capture the body and facial movements from Ryan Reynolds?
As noted above, we used witness cameras and had Ryan wear a tracking suit along with dots placed on his neck and also on his face for scenes in which he as to be wearing the mask.

Additionally, we captured his facial expressions and neck poses at MOVA which gave us additional information about how his faced moved. It was particularly helpful in the neck area as a means of getting the area where the suit ended and blended back into his neck to move seamlessly together.

I guess the design of objects from the ring and their green appearance had to be a long development period with the director. How did you come to this final result?
Yes – Long development period! Many, many iterations and lots of creative people and ideas involved. We had an amazing art dept which made it a very enjoyable process.

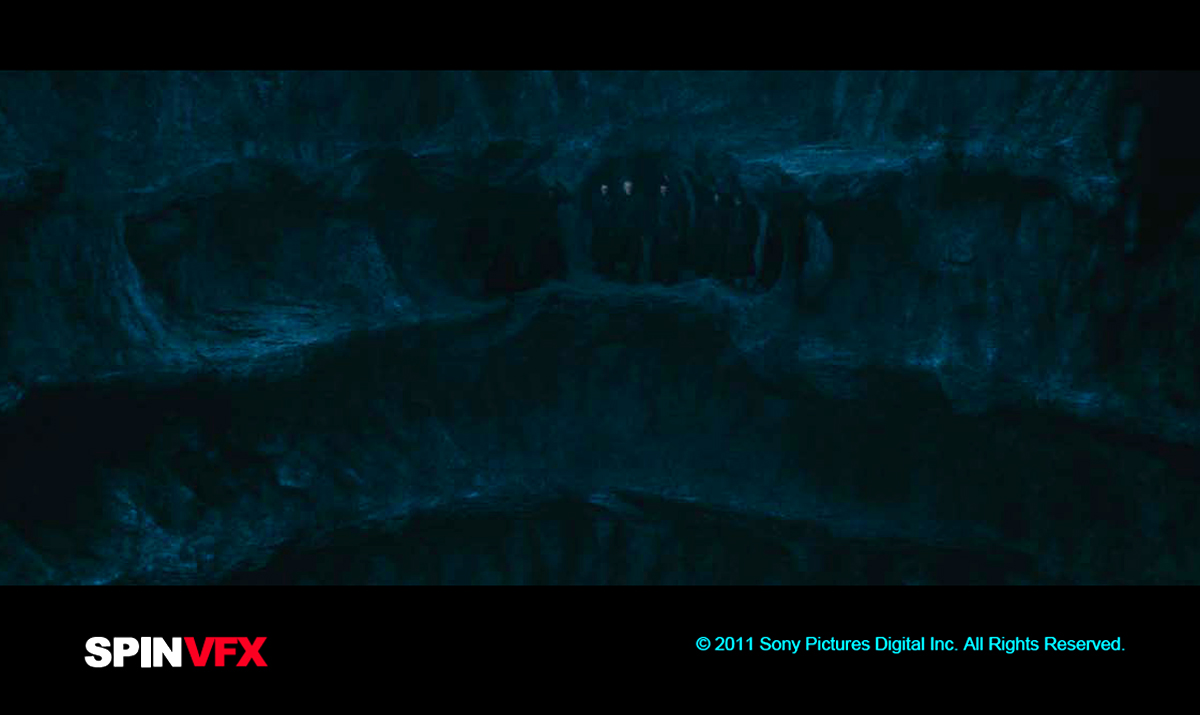
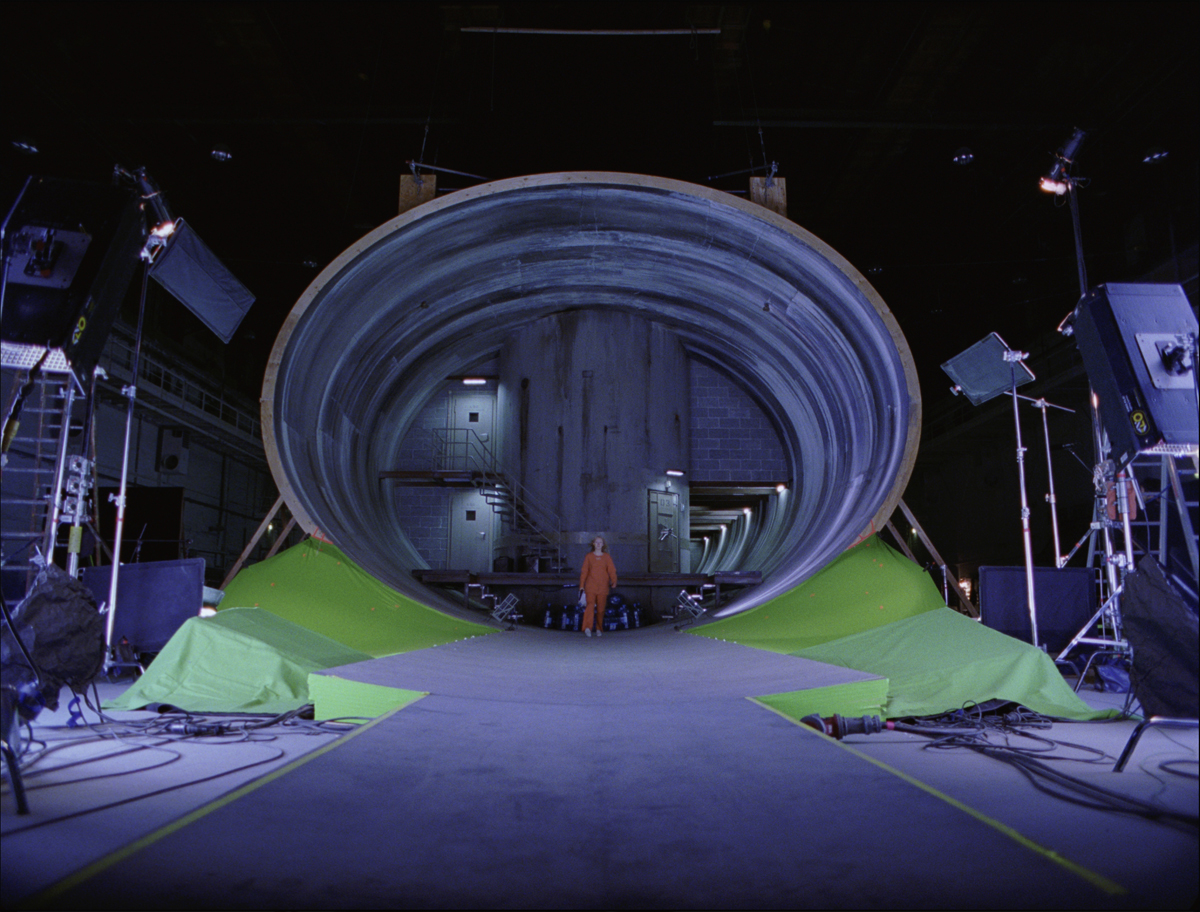
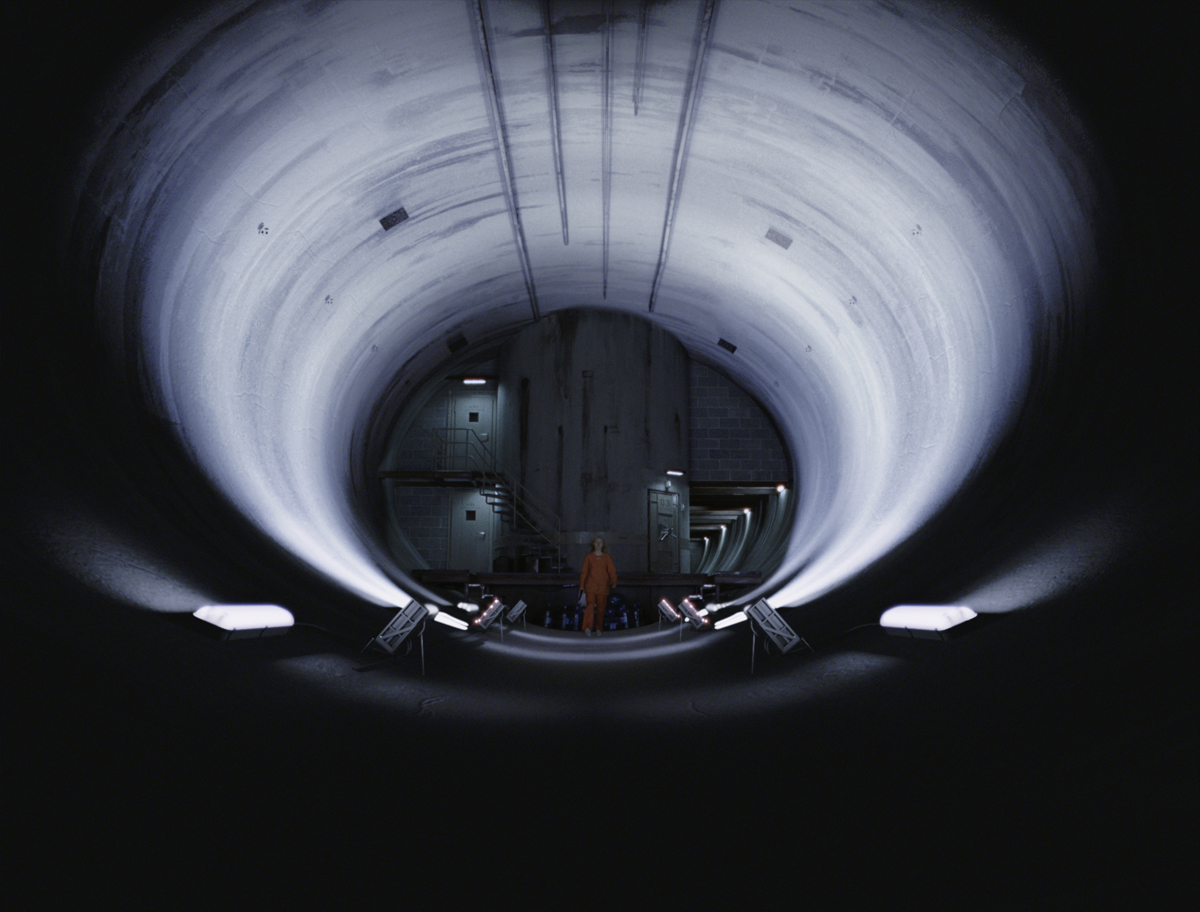
Can you explain the shooting of scenes taking place on Oa?
Green screen stage – shot with witness cameras, tracking suits and lots of dots on the actors neck and face dots for Hal’s mask!

How the presence of CG characters and CG creatures were simulated on the set?
We had stand in actors and stunts who wore platform shoes or stilts so they would be the right height to interact with the other actors so the eye lines would be correct.

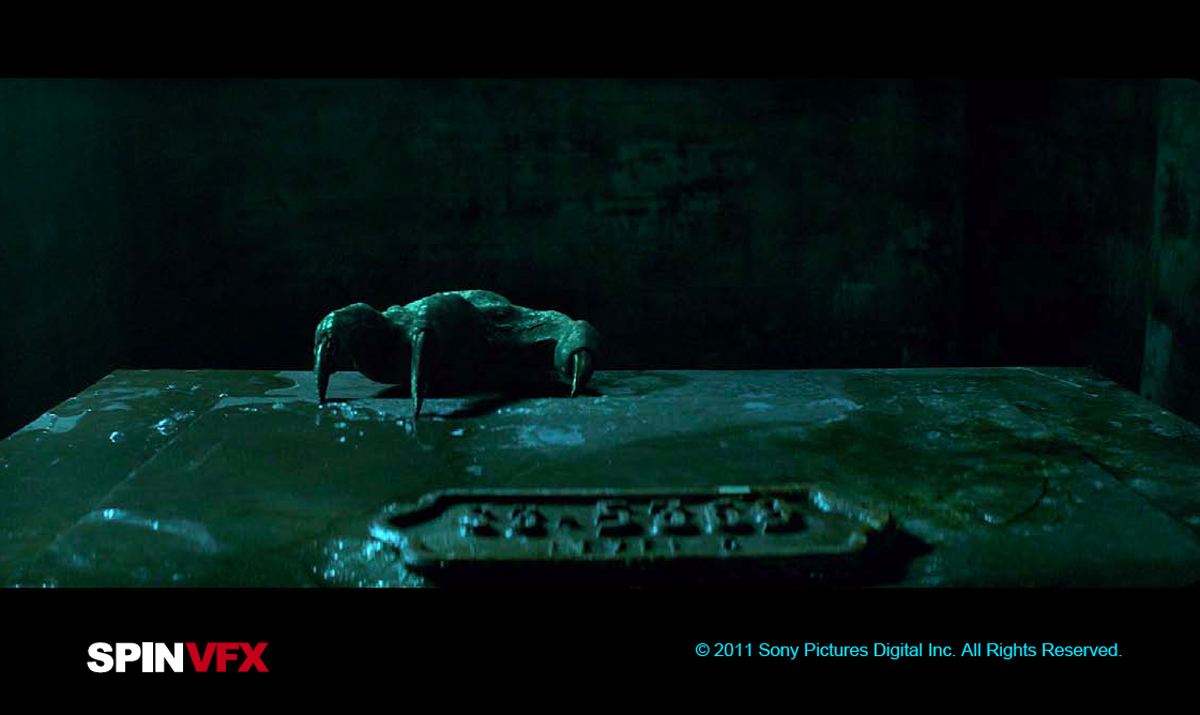
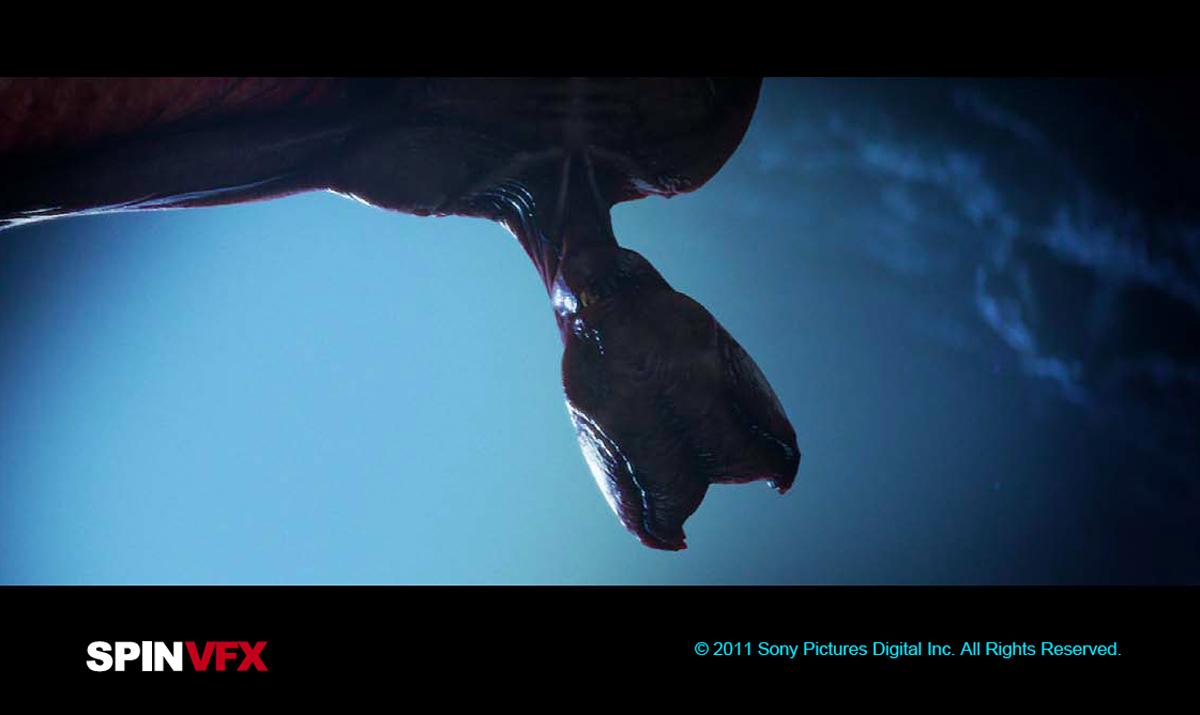
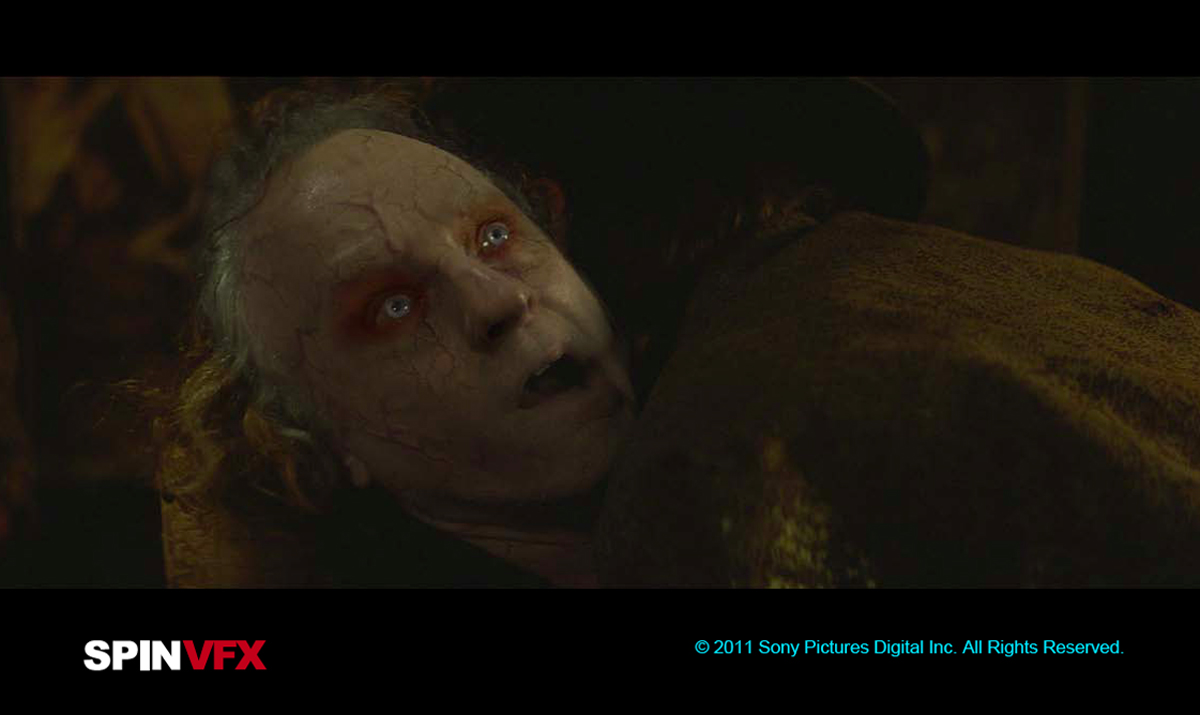
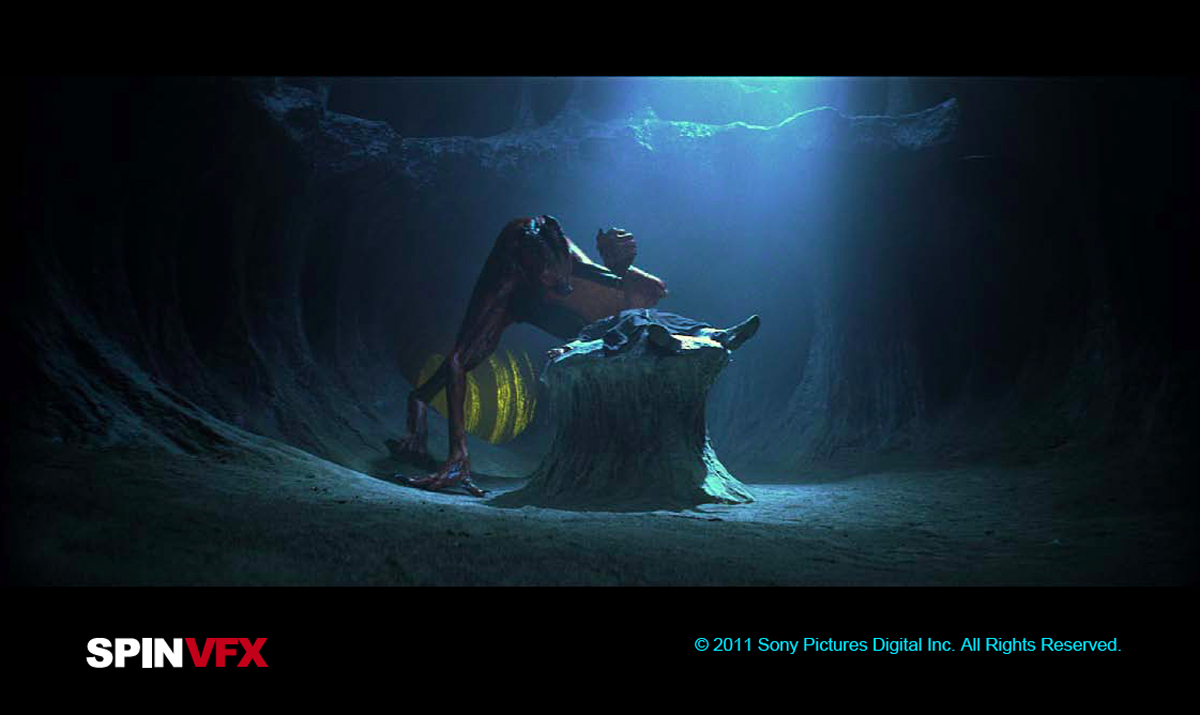
Can you explain the design of Parallax?
Yeah he’s cool. Meant to be made up of the hundreds of thousands of souls he has devoured. Very amorphous and scary – lots of development to be able to control the various ways he moved.

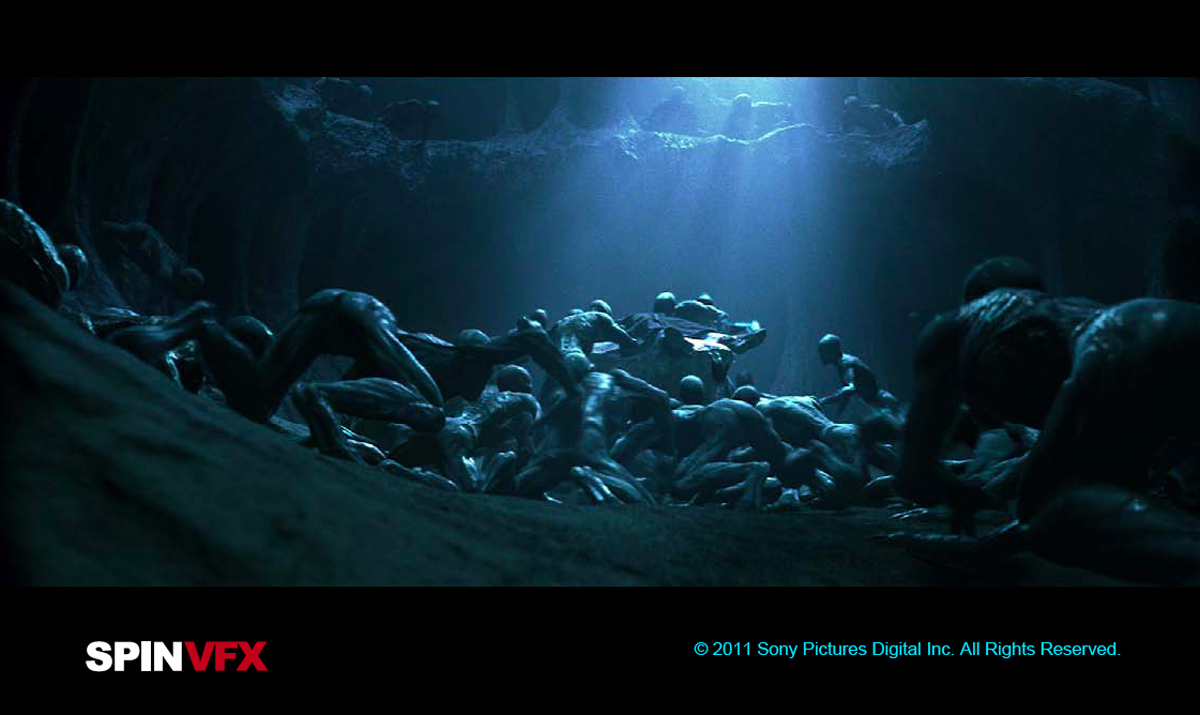
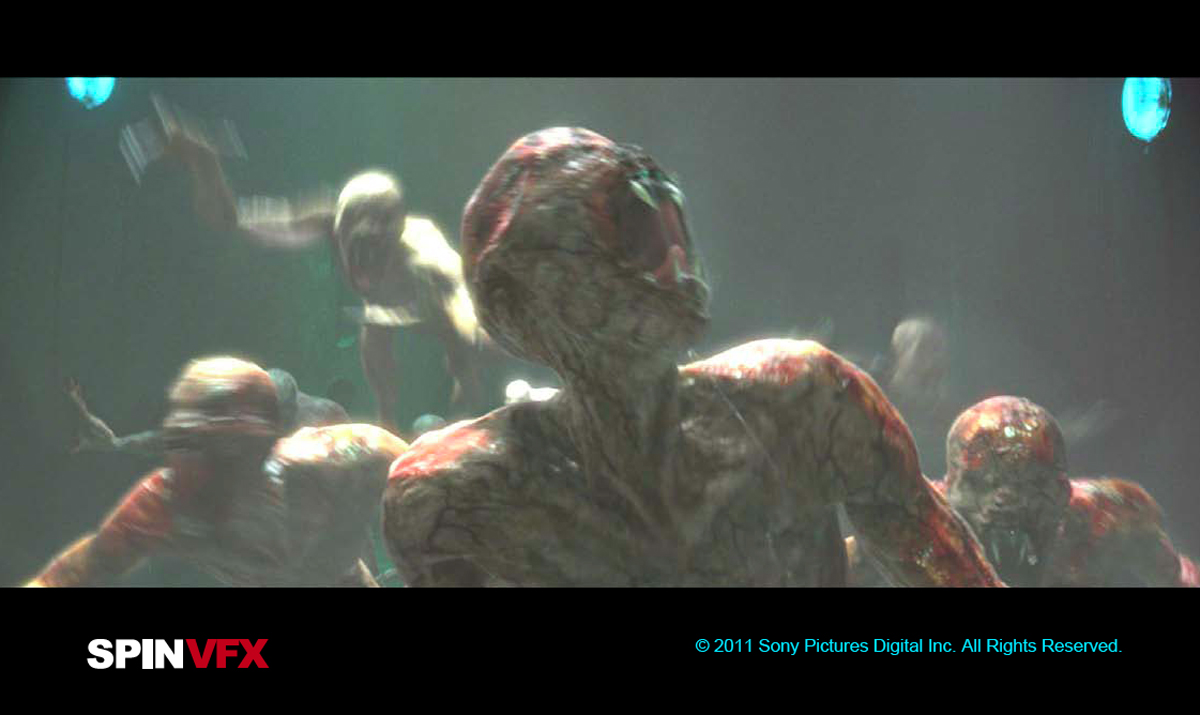
How did you manage so many CG characters especially on Oa?
Well the main characters who are close to camera, are, of course, a long development cycle. But the background characters don’t take nearly as long to develop – although there are some really cool character designs in there that I really wish we could have showcased more – maybe in the next one!

What was the biggest challenge on this film and how did you achieve it?
Definitely the tracking! Getting the hookup between the CG suit and the neck and the Hal’s mask involved a lot of vendors and in some cases, a whole lot of brute force tracking. If the cg wasn’t pixel accurate, it could ruin the shot if the audience was distracted by any sliding of the cg elements against the live actors. And then Parallax…he was a big development item!

What is your next project?
I am currently working on LOOPER which is a Bruce Willis and Joseph Gordon Levitt time travel film.

A big thanks for your time.

// WANT TO KNOW MORE ?

KEG F/X: Official website of Karen Goulekas.

© Vincent Frei – The Art of VFX – 2011

GREEN LANTERN: Raffael Dickreuter – Previs Artist – Pixel Liberation Front

After studying at the School of Art and Design of Zurich, Raffael Dickreuter joined the team of Pixel Liberation Front. He worked in many projects such as SUPERMAN RETURNS, TERMINATOR SALVATION, IRON MAN 2 or AVATAR. In 2002, he founded the reference site XSI Base.

What is your background?
I am originally from Switzerland and grew up there but have been living in LA for 6 years now mostly doing previs and vfx work.

How did you get involved on this project?
Pixel Liberation Front got hired early on in the process in pre production to help flesh out the large amount of visual effects sequences with previs, at the time no actors were cast yet and the look of the film was being developed. a team of artists under the supervision of Kyle Robinson moved to New Orleans where filming was happening and worked on location to plan lots of the action sequences. eventually production moved back to LA after half a year of filming and post production began at Warner Bros. the team deliverde large amount of Postvis shots to help edit the film and those shots then were sent of the vfx vendors such as Sony Imageworks and many others who would deliver the final shots for the film. I ended up animating shots as a previs designer as well as using the virtual camera system that I developed which would help the director, 2nd unit director and production designer scout sets. I also helped record action sequences using motion capture with stunt performers.

How was the collaboration with director Martin Campbell?
A veteran filmmaker with a great sense of humor made it a pleasure to work with Martin Campbell, he is married to a swiss woman and it was interesting to not just talk about movies but also Switzerland with him.

Did you received storyboards from the production or did you start from scratch?
Both cases happen. You often start with storyboards but some sequences you might start out with just some info or scribbles on paper and then get refined as the process moves on.

Can you explain the creation of a previs shot step by step?
Previs is meant to help plan action sequences before they are shot. at this time no set might exist or a real world location has to be worked into the process. You start with modeling some assets such as characters, spaceships and location and then you go on animating shots, composite in effects and they get edited together. Since it’s a much faster process than final shots which large companies will do with tons of departments and a slow way of delivering, the director can come by look at the edit and look over your shoulder and give straight feedback. So previs has a much faster turnaround which helps the creative planning. Previs is also based on real world measurements so the shots are not just to look at but also to measure distances, determine the costs of shots, which elements are practical, which are digital and also to simply try out sequences that might not get shot.

What was the most complex sequence to design and animate?
GREEN LANTERN was a very ambitious project with alien characters, artificial worlds which were all challenging, but the creation of Parallax was definitely a challenge as it was a difficult creature to handle. Artists Michael Grawert and Diana Velasquez did a great job tackling all the hard shots with that creature. The Ferris Party scene also went through many iterations which was a challenge to get it right in a short amount of time. We were able to go on set and see the helicopter crash and hundreds of extras run away, that was a great experience.

Did you use motion capture for your animations?
For the training platform between Hal Jordan and Kilowog and Sinestro we captued the performers and used that for previs. Most previs is still being done using keyframe animation.

You were on the set, can you explain how was one of your typical day?
The visits on set means usually a lot of waiting as the real sets needs tons of planning coordinating many people. Being able to see explosions going off or extras run around in masses is an experience but it can mean long waits. Working with stunt performers I found very interesting doing the fights as you see what effort goes into actually doing these kinds of actions.

When you look at the final result, is there a big difference between your previs and final shots?
It’s actually amazing how close the final film looks to the previs for most of the action sequences. It was such a technically challenging complex film which can serve as a good example how previs can help you plan sequences and save cost.

What was the biggest challenge on this film? How did you achieve it?
We faced many challenges such as the mentioned Parallax but also the insane number of shots that we had to do. For me personally was the development of the virtual camera system which I didn’t know if I could make it work in time. Knowing there was expectation to use it very soon was stressful but it worked out luckily.

Was there a shot or a sequence that prevented you from sleep?
hahah. there were some months were we had to work 7 days a week, at that point all you can dream of is sleep actually.

What do you keep from this experience?
It was great to see real set explosions and seeing my camera system being used by other artists on the movie. Seeing the final result on film is always a thrill. What is amazing tough sometimes is that you will see the result of something on screen that you might have worked a year or more before that and how long it takes a film to make of this size.

How long have you worked on this film?
I think it was about 14 months while 8 of them being on locaiton in new orleans.

What was the size of the team at Pixel Liberation Front?
The team changes in size, it usually goes from 4 up to maybe 10 or 12 depending on the production need.

What is your next project?
I just spent 7 months on the new Superman movie MAN OF STEEL, what’s next we will see.

What are the four films that gave you the passion of cinema?
BACK TO THE FUTURE, THE TERMINATOR, STAR WARS and INDIANA JONES.

A big thanks for your time.

// WANT TO KNOW MORE?

Pixel Liberation Front: Official website of Pixel Liberation Front.
Raffael Dickreuter: Official website of Raffael Dickreuter.

// VIRTUAL CAMERA

Click on the picture to know more about Virtual Camera:

© Vincent Frei – The Art of VFX – 2011

ASSASSIN’S CREED REVELATIONS – Digic Pictures

Digic Pictures became known by working on the effects of TERMINATOR 3: RISE OF THE MACHINES. They then conducted numerous cinematic games like ARMIES OF EXIGO, WARHAMMER or DRAGON AGE 2. And of course, the impressive cinematics for the last three ASSASSIN’S CREED.

What is your background?
The history of Digic Pictures goes back to 2001 when the first members of the later animation company joined a video game developer to produce game cinematics and intro movies for  computer games. Along the way the team grew and advanced. In 2003 a 3 minute full 3D film created by Digic was the first Hungarian project to ever make it to the prestigious Siggraph Electronic Theater screening in Los Angeles. Right after this success the team was given the opportunity to work along with major special effect studios and create 60 special effect shots for the theatrical blockbuster TERMINATOR 3: RISE OF THE MACHINES. By having done this test-like commission Digic has proved that it’s team of professionally devoted Hungarian talents do have the tools, the technical knowledge, the creativity and the courage to compete with the bests in the international CG world: upon success of the initial 2 SFX shots 58 more followed.
Since then Digic Pictures has grown into a full service studio specializing in 3D computer animation and special effects by the highest international standards. Digic’s highest priority in the making of films is to pay extra attention to finest details. This is reflected in the exceptionally detailed models with textures comprised of several gigabytes per character. In the making of films Digic is leveraging next generation technology to provide entirely new visual experiences for the CG audiences. In the past few years Digic team’s efforts to create outstanding game trailers and intro movies for its clients earned Digic Pictures critical acclaim. Since 2006 Digic has seen six of its submitted works making it into Siggraph Electronic Theater selections. Digic won Siggraph’s prestigious “Best Technical Award” two years in a row (2009-2010) and won Animago’s “Best Post-Production Award” in 2009.

How was the collaboration with Ubisoft?
The “Assassin’s Creed” is an acknowledged brand in the market with an extraordinary reputation worldwide, so it is indeed a well defined responsibility to not only meet but possibly exceed the expectations.
In the case of such a project we have to be extremely attentive to what the makers want to communicate to the gamers. It is not enough to only raise the interest for the game but to make the gamers want to play the game: each and every detail has to fit perfectly. We had been provided with a lot of background information by Ubisoft, and they had very precise expectations and ideas regarding the story and the design, but at the same time they expected us to give our creative input to the final product. Obviously planting the story into the film was completely our own job, just as well as the development of the more difficult and undecided / undefined parts. It is really inspiring and stirring to work together with such a creative and talented team like Ubisoft’s.

What is your approach for this new cinematic?
The fact that Ubisoft puts so much emphasis on the historical correctness of the « Assassin’s Creed » series is definitely a very admirable and also a very rare thing, that is on one hand very helpful to us with regards to the numerous references we receive for the set and asset creation. On the other hand it also complicates our situation because it imposes a “reality” we need to stick to. Obviously we have to consider and stick to not only the “reality” of the given references, but to the game’s virtual reality as well: the locations, the characters and their movements – especially in the making of the martial arts’ choreographies. For all of these we received a lot of first hand help from Ubisoft and last, but not least from the fans of the Assassin’s Creed series working at DIGIC, that you can find in large number of among us.

This cinematic contains many different environments. How did you created so many of them and especially those with the boat?
We combine matte painting backgrounds with 3D elements in the mid-ground and foreground.

In terms of clothing, can you explain their design and their impressive animation?
We use Syflex for clothes simulation. We do extensive historical research and also received references from our client, Ubisoft.

How did you choregraph the great fight between Ezio and the guards?
Digic Pictures’ own mocap studio, the Digic Motion employs professional martial artists for such scenes. Our director is always there during the rehearsals and the mocap shooting to supervise the choreography.

How many seconds do you produce animation about a week approximately?
We can only tell how many minutes we produce during a year. 15-20 minutes.

Can you explain in detail the creation of the magnificent shot of Ezio and his « double » on the wooden planks above the void?
The obvious “revelation” that Altair is just a ghost gets unrevealed only in the final scene as Altair walks out to the board parallel to Ezio. This was our creative input of note, something “extra” we added to the movie, something that was an untold expectation by UBISOFT from us.
In Altair’s visualization our initial concept was to not reveal he was a ghost until the very end, so he wouldn’t have appeared being so glorious and transparent in the movie. This concept was changed upon the conclusion of the feedback from the viewers of the test-screenings: many claimed that Altair’s invisible presence made the storytelling hazy and the flow of occurrences confusing, therefore the story needed to be more unambiguous. We understood Ubisoft’s concerns and changed the concept for the best.

What was your feeling about creating a character you know well but in a older version?
This is something pretty rare in video games. The fact that Ubisoft puts so much emphasis on the historical correctness of the Assassin’s Creed series is definitely a very admirable and also a very rare thing, that is on one hand very helpful to us with regards to the numerous references we receive for the set and asset creation. On the other hand it also complicates our situation because it imposes a “reality” we need to stick to. Obviously we have to consider and stick to not only the “reality” of the given references, but to the game’s virtual reality as well: the locations, the characters and their movements – especially in the making of the martial arts’ choreographies. Ezio does seem sometimes as if he had superpowers, but he is indeed just human, so he does get older too therefore he can’t avoid the unavoidable either.

Does the creation of this older Ezio caused you some problems?
Not really.

Did you develop specific softwares for this project?
Almost each new project brings us new challenges which we have to write tools for, or change the ones we already have. Even though spectacular novelties weren’t made, there were numerous smaller developments that made our pipeline more dynamic / fluent and effective.

Countless small changes are being constantly made in every segment of the pipeline to make the workflow more efficient. The most significant change was probably made in the technology of rendering by the introduction of Arnold. First we used it for the making of Assassin’s Creed Brotherhood (leaving a few Mental Ray scenes in it), but in our latest movie we succeeded to work with a more developed system that was already enriched with several new features that made not only our technical staff happy but the artists working with the shading and lighting as well.
The purchase of our Vicon T160 motion capture system (16 cameras, 2000 frame / second) and the setting-up of our own motion capture studio, Digic Motion, was a great improvement as well: for our first Assassin’s Creed movie (Assassin’s Creed 2) the mocap shots of the Venice scene back then had to be recorded outside of Hungary, but for the following Assassin’s movies’ pick-up sessions we only had to go to the building right next to ours. This beneficial circumstance allowed us to revise our original ideas and to make modifications and adjustments accordingly even later during the production.
Our information technological background has inevitably developed a lot as well: the perpetually growing needs (cumulating size of content, severe time constraints for production) require a massive hardware infrastructure as well.

What were your references for moods in terms of lighting?
As a reference for the theme, we were given THE NAME OF THE ROSE (1986) movie. Originally the intent was to end the story in an even darker mood by leaving more questions open and unanswered.

What was the biggest challenge on this project?
There are a lot of time-warps in the fighting scenes – at certain points with extremely slowed down motions – that posed a great technical challenge due to the large number of characters and numerous simulated elements. Also, the scene where we see Ezio on the sea made us face several problems, since our rendering pipeline went through a lot of changes lately and accordingly our previous tools that served us well before couldn’t be used anymore. And for new technical developments we only had relatively little time.

Was there a shot or a sequence that prevented you from sleep?
Not really. By the time we get home after long working hours nothing can prevent us from sleeping.

How long have you worked on this project?
The movie was completed in about 4 months. We have a structure were multiple movies can simultaneously be worked on, so the Assassin’s Creed Revelations movie was one of the few projects we were working on at the same time.

What are your softwares and your pipeline at Digic Pictures?
In asset creation we use Maya, 3DS Max, ZBrush, Bodypaint and Photoshop – the first two are supported by many in-house plugins. The scenes are assembled in Maya, the same software we use for animation. For rendering we use Arnold and the completed layers are “polished together” in Nuke. It is very useful that the features of Maya are adjustable, we can broaden the variety of functions by adding or replacing the existing plug-ins with our own solutions, so we can say that Maya serves mainly to provide the technical framework in our pipeline. When we chose the software for rendering and compositing, the final decision was based upon the software’s dependability and ability to perform robustly in a large-scale production environment.

How many shots have you made and what was the size of your team?
Many. We are 80 people working at Digic.

What is your next project?
Confidential information, we are not allowed to talk about current and future projects, sorry.

What are the four films that gave you the passion of cinema?
We are a team of 80 people, it would be hard to tell what films served as a source for passion, surely there have been many.

A big thanks for your time.

// WANT TO KNOW MORE?

Digic Pictures: Dedicated ASSASSIN’S CREED REVELATIONS page on Digic Pictures website.

// ASSASSIN’S CREED REVELATIONS – DIGIC PICTURES

© Vincent Frei – The Art of VFX – 2011

TRANSFORMERS: DARK OF THE MOON – Digital Domain

Little change of plans, Matthew Butler will finally not have time to answer my questions. Here is anyway a text about the impressive work of Matthew Butler and his team of Digital Domain on TRANSFORMERS: DARK OF THE MOON.

Who is Matthew Butler?
Matthew Butler, visual effects supervisor Matthew Butler has brought his technical and artistic expertise to seventeen feature films, including two of Michael Bay’s TRANSFORMERS movies. Matthew started his 17-year tenure at Digital Domain as an image data supervisor on APOLLO 13 and moved up the ranks to digital artist for T2 3-D: BATTLE ACROSS TIME, DANTE’s PEAK and TITANIC, held the role of CG supervisor on FIGHT CLUB, HOW THE GRINCH STOLE CHRISTMAS, and VANILLA SKY, and served as associate visual effects supervisor on XXX.

As visual effects supervisor on THE DAY AFTER TOMORROW, Matthew created photorealistic weather, tidal waves and twisters, work that earned him a VES award. Matthew earned a second VES award for his work on Clint Eastwood’s FLAGS OF OUR FATHERS. Matthew holds an undergraduate degree in Aeronautical Engineering from the University of Manchester UK and a master’s degree in Aeronautics and Astronautics from the Massachusetts Institute of Technology. He is a member of the Academy of Motion Picture Arts & Sciences.

Wheels, Brains and Laserbeak
Returning to the TRANSFORMERS franchise for a third time and completing 350 shots for Dark of the Moon, Digital Domain created and animated new characters including “Laserbeak,” “Brains” and an army of Decepticon soldiers called “protoforms” – as well as returning character “Wheels” – all under the guidance of visual effects supervisor Matthew Butler and animation supervisor David Andrews. “Each of these characters posed a unique challenge,” explained Butler, “because they have very different personalities. Wheels has been Sam’s sidekick since TF2, but now Wheels has a sidekick of his own in Brains and together they provide a bit of comic relief at key moments in the film. But Laserbeak is the exact opposite – he is an evil, sinister assassin and it was a lot of fun to play in that sandbox.” Working off original concept art from production designer Nigel Phelps and his team, Digital Domain modeled, rigged and animated Laserbeak to take full advantage of his serpentine characteristics. “Laserbeak’s long, snake-like neck is the most obvious manifestation of this,” explained Andrews, “but during flight he seems to slither through the air, which is achieved through a combination of wing movement and thrust from the jet turbines that are part of his design.” Wheels, Brains and Laserbeak also incorporate animation cues from the actors who provided dialogue for each character. “Michael coaxed very specific performances out of the actors for these roles,” added Butler, “so we wanted to preserve those artistic choices onscreen as much as possible.”

Bird Men
Digital Domain also completed several outstanding set pieces, such as the “Bird Men” sequence with skydiving soldiers who dodge Decepticon fighters as they fly through the Chicago skyline. “There were actual stunt men who flew through the city in wingsuits for many of those shots,” noted Butler, “and from there we created CG aircraft and digital environments showing the destruction throughout Chicago.

There are also digital Bird Men throughout, for anything that would have been too dangerous to actually shoot.” Perhaps the most challenging shot in the sequence is captured from the inside of a V-22 Osprey as it is about to go down. “Michael shot the plate at 120 frames per second, and everything that happens outside the Osprey is fully CG – the environment, the background skydivers, and especially the falling helicopter that drops through the shot in flames,” Butler indicates. “It all happens in extreme slow motion and right in the audience’s face, so we greatly improved our CG fire pipeline in order to make the falling Osprey as ominous as possible.”

Moon
Digital Domain also realized “Moon Portal” sequence, where we see Decepticon protoforms rise from the moon’s surface and race towards a portal that sends them to Earth for an assault on human civilization. “Naturally, all of these shots were CG since we couldn’t get any plates on the moon,” jokes Butler. “Computer graphics supervisor Mårten Larsson and his team studied the moon in thousands of reference photos, in order to accurately display the topography and its surface composition. Then when it came to animation, we had to consider the fact that gravity on the moon is one-sixth the gravity of Earth, so the protoforms had to move according to the laws of physics without appearing to run in slow motion. And of course there was the portal itself, which is a swirling mass of electricity, rocks and dust – overall a real triumph for Mårten and his fx artists.”

Stereo 3D Challenge
On top of all the challenges inherent with a film of this magnitude, stereo 3D added an additional level of difficulty to the work. “Michael called me early on and indicated that we would be doing this project in 3D, which was exciting and scary at the same time,” said Butler. “But we planned it from the very beginning and stereo 3D was an integrated part of the digital production process, thanks in part to our close working relationship with our sister company, In-Three, which handled some of the conversion. The end result is a more immersive audience experience, and kudos to Corey Turner on the production side and Thad Beier here at Digital Domain. As stereographers, their guidance was invaluable.”

// WANT TO KNOW MORE ?

Digital Domain: Official website of Digital Domain.

© Vincent Frei – The Art of VFX – 2011

Informations

Hello to all my readers

I wanted to thank you all for your fidelity and your interest for my work.

I’ll take few days off in Quebec, but still I would continue to offer interviews, at a rate of one interview per week.

Thank you for your understanding and best regards

Vincent

PRIEST: Robert Nederhorst – VFX Supervisor – Svengali FX

Robert Nederhorst worked since 10 years in the VFX. He has participated on projects like X-MEN, THE DAY AFTER TOMORROW or THE BOOK OF ELI. He joined Svengali FX in 2010 and oversees the effects of IRON MAN 2 and THE LAST AIRBENDER.

What is your background?
Initially I studied Architecture and Environmental Design at Texas A&M University

How was your collaboration with director Scott Stewart and Production VFX supervisor Jonathan Rothbart?
I think Jonathan and I got along well and saw eye to eye on many of the visual details that were required by Scott. The mission was to create a BLADE RUNNER style environment for establishing the world that the priests inhabit and we would reference similar parts of that film during the course of production. Jonathan Rothbart made solid decisions and understood when specific requests were too complicated for the time left. We then discussed alternative solutions. There is always a clever way to solve a problem.

How did Svengali FX got involved in this film?
Jamie Venable, Svengali FX‘s owner, was contacted by VFX Producer, Jenny Fulle, and VFX Supervisor, Jonathan Rothbart who introduced us to director Scott Stewart. We met and discussed his vision for the world he wanted to create and from there our focus turned to building the best team for the types of work they had in mind.

What are the sequences made by Svengali FX?
We worked on the City Five sequences and the Jericho sequence.


How did you proceed to create your matte painting?
We used Photoshop, 3DS Max and Cinema 4D. We did quite a bit of concept work and so it was a little bit more straightforward to create production assets from these.

Can you explain in detail the creation of the impressive City Five?
Early on we bid all this as matte paintings and projections. However, it became clear that we needed to change gears and turn this into a full 3d city, which is exactly what we did. We modeled a ton of buildings and even more bits and pieces that we could use to individualize buildings to make many unique looking structures. For the very expansive wide shot we had around 2 billion polys in the scene. It was pretty crazy but as we were using VRay for rendering it was not an issue.


What references have you received for City Five?
There was a lot of looking at BLADE RUNNER but we did look at other major metropolitan cities as well for guidance on how cities are built.

What was the main challenge for this city?
To get a photographic look for something that clearly is not real. Dealing with the scale required was also a challenge.

How did you create Jericho?
Similar to City 5 we built a kit of parts and did a ton of concept work. After the general building shapes were approved we just used the kit to outfit the larger shapes.


What references have you received for Jericho?
We did our own internal concept art as well as some from production.

Does the daylight caused you problems?
Actually no. It was not the biggest issue on the show. I am really happy with the daylight Jericho shots.

Were there a shot or a sequence that prevented you from sleeping?
Luckily I have never lost sleep due to a vfx show. We tried very hard to make the show manageable from the beginning and keep it that way throughout the production. Very meticulous tracking of all our shots and tasks made this possible. We also had an amazing crew of people that made it easy to do great work.


How long have you worked on this film?
We spent around 6 months doing the majority of the work.

What are your software and pipeline in Svengali FX?
Software was 3DS Max, VRay, and Nuke. I wrote the pipeline from scratch and based everything around Shotgun for project management. We used Qube for rendering management and RV as our flipbook of choice.

How many shots have you made and what was the size of your team?
We did around 80 shots with a team of around 15 people.

What did you keep from this experience?
I learned again that small teams are very powerful with the right people in place and the management that supports their efforts. Any project and how it gets done is only as good as the team members are. I said it before but once again, the quality of the team in all aspects allowed us to do great work without the pain that people usually associate with the vfx world. We did not do insane hours on this job. For 5 months we did 8 hour days. The last month had some 10 hour days and two Saturdays which were optional. Talented people, good management and careful execution create a great work environment where people can do excellent work and enjoy the job.


What are the four films that gave you the passion of cinema?
SCHINDLER’S LIST, BLADE RUNNER, TERMINATOR 2 and THE FIFTH ELEMENT.

A big thanks for your time.

// WANT TO KNOW MORE?

Svengali FX: Official website of Svengali FX.

© Vincent Frei – The Art of VFX – 2011

PRIEST: Jeff Campbell – VFX Supervisor – Spin VFX

Jeff Campbell and Spin VFX found again the director of LEGION, Scott Stewart, for a new adventure with PRIEST. In the following interview, Jeff talks about his work on this film.

How was your collaboration with director Scott Stewart and Production VFX supervisor Jonathan Rothbart?
Scott and Jonathan know exactly what they want and speak our language. We received concise answers and direction. This allowed our team to really focus without any guesswork.

What was your feeling to work again with Scott Stewart after your last collaboration on LEGION?
It felt great to know that Scott was happy with our work and wanted to work with us again. Scott’s VFX background makes for a totally open working relationship with no surprises.

What are the sequences made by SPIN VFX? Can you explain the creation of vampires?
Scott and Jonathan were very hands on during the creature development process. The creatures were developed in advance of any of the facilities getting the assets. Once we received the Drone and Queen assets with textures and look references our job was to build our own rigs and shaders for the creatures and integrate them into our pipeline.

Some shots contains an impressive number of vampires. How did you handle the animation of so many vampires in these shots?
We had our work cut out for us. We couldn’t use Massive because we wanted full creative control over all the individual actions. All the creatures were keyframed. Creative changes had a big domino effect since they were all climbing and fighting each other.

What were your references for the vampire animation?
The vampires had to predominantly be on all fours and move around in a spidery way. For any attacks and takedowns, we would reference cat, lion and football player footage. The facial animation was limited to a slight brow movement. The majority of the character emotions came from the teeth, lips and head positions. They also had a form of communication in which they would do a kind of quick motion with their mouths at each other.


How does the presence of vampires simulated on the set?
Gray suited actors were used as reference and for interaction but none of our shots had them. It was all good old-fashioned keyframing led by Peter Giliberti, our Animation Director to give them a truly non-human character.

How did you create the transformation of the pupil of Black Hat?
Using Inferno’s distort mesh, displacements and paint. I made the pupil dilate and then contract as all the veins and capillaries bugged out and turned red and sore.

Can you explain the creation of the Vampire pods on the train?
We were asked to replace the practical pods in 23 shots. They were challenging shots were we had to roto out the actors and replace the entire environment with CG animated pods. The pods had to receive the actors’ flashlight beam so we did volume light passes that were match moved to the original plate. Camera tracking was difficult because the only reference points we had were on pods that moved independently due to the rocking train motion. We accomplished the look using some pretty gross displaced veined textures, subsurface scattering and cloth sims. We animated the vampire model inside the pods which drove the cloth simulations.

We did develop and build the Vampire pods. Most of the tech development for animation was spent on the vampire drone crowd generation and of their squirming movements within the pods. The tech solution for the pod movements was very similar to bone and muscle simulations except that the skin membranes had more elasticity. For this solution we used a cloth envelope with rigid bodies that could be deformed with the vampire drone rigs. Then we would just simulate this solution over the animation of the rigs.

How did you create the sunburn on vampires?
We created a volumetric wall of light and as the vampires moved forward into the light their flesh burned and turned red. We based the look of the charred flesh on reference of actual burn victims. For the transition, from the volumetric lights above revealing the burnt areas over time, going from the pass of normal skin texture render to the pass of burnt texture render. Scott didn’t want the traditional Vampire turning into ashes effect; he just wanted them to get a really bad 3rd degree burn.

Can you explain the impressive shot in which Brad Dourif is bitten by Black Hat and transforms into a slave?
I do like to fit in some challenging shots while I’m supervising and this was one of them. The shot was completely done in Inferno. We had a head scan of Brad that I match moved and used to receive animated texture projections. The projected textures involved veins creeping around his face and eyes that were animated by paint reveals and bump mapped for depth. His pasty skin and dark sallow eyes were added using animated garbage masks over the duration of the shot. This reminded me of the beat up Angel face shots I did in FIGHT CLUB.

How did you create the huge hive?
The hive was derived from a Lidar scan of the real set that we extended and projected a huge hi res matte painting onto it.

What was the biggest challenge on this project?
Replacing all the Vampire pods. We were basically replacing everything in these shots except for the characters that had to be meticulously roto scoped.

Was there a shot or a sequence that prevented you from sleep?
No, I try not to worry too much about work to keep my sanity.

How long did you work on this film?
We worked on this film for about 3 months plus another month working on stereo versions of our shots.

How many shots have you made and what was the size of your team?
We had 97 shots with a team of 40. The shots assigned to SPIN mainly involved creature work, the Vampire Drones (exclusive to SPIN), the Queen Drone and Drone Pods.

What did you keep from this experience?
A great working relationship with Scott Stewart and Jonathan Rothbart, I look forward to collaborating on many more films with them in the future.

A big thanks for your time.

// WANT TO KNOW MORE?

Spin VFX: Dedicated PRIEST page on Spin VFX website.

// PRIEST – VFX BREAKDOWN – SPIN VFX

© Vincent Frei – The Art of VFX – 2011

HANNA: Brendan Taylor – VFX Supervisor – Mr. X

Brendan Taylor began his career as on-set assistant for the series HELEN OF TROY. In 2004, he joined Mr. X and participates in projects such as 16 BLOCKS and SILENT HILL as VFX coordinator. Thereafter, it continues to be present on set for movies like SHOOT ‘EM UP and WHITEOUT and VFX supervisor for LUST CAUTION or TAKING WOODSTOCK.

What is your background?
I started as an on-set assistant for a director on a TV mini-series called HELEN OF TROY. I met Sam Nicholson, the VFX supervisor and he took me under his wing and showed me the ropes. After the shoot in Malta, he invited me to come to LA and work for Stargate Los Angeles. I worked in the Los Angeles office, then the Vancouver office as a VFX coordinator. Shortly after, Dennis Berardi contacted me about working at Mr X. I’ve been there since 2004.

How did your collaboration with director Joe Wright?
Joe is a cinematic thinker. He thinks in terms of shots, lighting, music and mood. So he really has a clear vision of what he wants. That isn’t to say that there isn’t room for creativity. He sets the mood for the shot or the sequence and then turns it over to Alwin Kuchler (Directory of Photography), Sarah Greenwood (Production Designer) and myself to design something that fits within the specific parameters he has set out. He had never really done a visual effects film before, but in no means was he a novice. He was very adept at thinking in terms of what he wanted to see and we would discuss the best way of doing it. He also plays music on set which is really great for keeping spirits up, but more importantly its communicates the mood of the scene to everyone there.

What was his approach about visual effects?
He is very trusting. He just tells you what he wants and allows you the space you need to complete it. He hadn’t done many big VFX shots before, so if he was nervous or apprehensive, it didn’t show.

How did Mr. X got involved on this movie?
We have worked with Focus Features a lot. They asked us to come in and help problem solve with the team over what could be digital and what could be practical in an effort to bring the budget down.

What are the sequences made by Mr. X?
We did 192 shots throughout the entire film. The big sequences were the airplane, the tunnel escape and the container park.

About the hunting sequence of Hanna. How did you create the arrow that hits the deer?
Members of our tracking team at Mr X (Jason Edwardh and Matt Ralph) gave me a diagram of where to put the tracking markers on the reindeer. The tracking markers gave us position for the arrow and we could also derive muscle movement data. The tracking was pretty straight forward, but the animation took some fine tuning. Eventually we found some (horrible) video reference of a deer running with an arrow in its side. That really informed the animation.

Are you involved on the shots on the frozen lake?
Marginally. We had to clean up the snow on the ground because it got trampled after many takes and it needed to appear pristine.

Can you tell us about the C-130 aircraft? How have you created and integrated into the shots?
We modeled and textured it based on internet photographs, but also from texture photographs we had at Mr X. Chris MacLean oversaw the building and lighting of the shot. It was composited by Rob Greb. I shot an HDRI while out in Finland, but it was only used as a stepping off point. I could only get about 5 feet off the ground to take the HDRI (which I took with a Canon 5D, Sigma 8mm fish eye lens), which would give an inaccurate representation of the environment the plane was flying in. To get a truly accurate HDRI, I would have to be 30 up in the air above the green tree tops. We ended up using the HDRI for sun direction and sky tone and supplemented it with green tree tops in Photoshop. We also made CG smoke trails which really helped the integration.

How big was the real set of the huge ventilation ducts in the military base from which escapes Hanna? How did you create these set extensions?
The actual set was huge – built in Mitte Hall at Babelsberg studios in Berlin. The art department built the holding cells and a 30′ section of the tunnel which wasn’t long enough to stage the action that Joe wanted. As she’s running away, Hanna looks to see a giant steel door closing. She dives and slides under the door just in time. We initially we going to do a combination of practical, CG and projections. But, in the end, the team did such an amazing job of matching the look of the concrete and the practical lighting, that we did the shots full CG. It simply gave us more flexibility. That sequence was lit by Chris MacLean, and comped by Rob Greb and Greg Astles.

Have you created some matte-paintings for the many landscapes that we saw in the movie?
Yes, we had a number of matte paintings. In most cases we would shoot the FG plate, then I would go to various locations and shoot stills for our matte painters to work with – matching the lighting and perspective as closely as possible.
There’s a scene where we see the family driving through Spain, being tailed by « Razor » on a motorbike. The foreground plate was shot in Morocco. In post-production, I went to Spain and shot stills and HD video of a town called Segovia. Matte painter Matt Schofield then stitched the stills together and added some really beautiful lighting to the shot. I really credit him for the final look of that shot – his execution was very thoughtful and artistic.
We also had an exterior shot of the CIA facility. We shot the FG in Berlin at a Velodrome and were meant to extend the background to make it look like the facility was in a forest in Virginia. I never had an opportunity over the course of principal photography to shoot stills for the matte painters, so we would have to create it from scratch. Initially, we tried using various elements of high angle trees from our database, but that never works. If you do find one that matches in perspective, the lighting will not match and it’s useless to try and relight a tree. When you start putting all of the elements together, the cracks start to show very quickly. Joe and Paul Tothill, the editor, weren’t liking the shot; so, in a last ditch effort, I took my camera out to a local park in Toronto and photographed trees from a hilltop – matching the perspective and lens. In the end the shot went together quite well. It never fails… if you don’t prepare properly for a matte painting shot, they will be 10 times more difficult.

How were the interior shots of vehicles were prepared and created?
We shot the foreground greenscreen in a small stage in Morocco, but the BG plates were shot in Hamburg, 2 months previous. When in Hamburg, we got Joe into the van with a view finder and he showed us the angles and lenses he would shoot the greenscreen with. That night we went out and shot the background driving plates, with a stabilized head at the lenses he suggested, but also a bit wider. We wanted to be sure that we could incorporate any small camera movements that may come up when shooting the greenscreen portion.
When it came to shooting the greenscreen, Joe picked 2 background angles that he liked. We had the background plates on playback and Alwin Kuchler and his team synced their interactive lighting to that. When it came to post, we added a few flares of passing street lamps and a little high frequency buzz when the van goes over bumps.

Are you involved in the impressive continuous shot that follows Erik from a bus, crossing a railway station to finally have a fight underground?
Very minimally. We did an extension on the knife that Erik pulls out.

How was the shooting of the containers sequence? What was the actual size of the set and how did you create the extensions?
The containers were very difficult to shoot because it was cold, it was damp and it was 2 weeks of night shoots. The art department was able to get 200 containers to work with. The way that they postioned the containers was based in part on Joe and Jeff Imada’s choreography. Joe wanted to have certain cat and mouse beats, but also full out sprinting beats, so the angles and stacking of the containers had to accommodate both types of filming. What we were left with was a large 50m by 100m area to film in. The only time that you saw off this massive set was in 2 wide shots.

After the foreground plates were shot, I got into a lift and took as many photos from the correct perspective as possible. Hamburg at night is a very haunting place. It has these container parks that seem to extend off into infinity and there is a really nice contrast between the cool mercury vapour lights and the warm sodium vapour lights. These 2 matte paintings were done by Milan Schere, a German native who understood exactly what Hamburg looked like. The first shot is a crane down. Milan broke the matte painting into about 50 different layers and projected them on to cards that Rob Greb then comped. The second shot is a lock off that was also comped Rob Greb.

What was the biggest challenge on this project?
The shoot was grueling. We started in -30 in Northern Finland and ended up in 40 degrees in the Moroccan desert. It was quite difficult, as a VFX supervisor, to be that mobile all of the time. Most of the time, you have a lot of access to the cutting room and the production office and even to the VFX studio. In this case, we were all roughing it. I also had to make sure that I got everything I needed at every location, because there was no chance on going back. Ever.

Has there been a shot or a sequence that prevented you from sleeping?
Haha. The exterior CIA shot, the tunnel…umm….all of them.

How long have you worked on this film?
I started in January of 2010 and finished in December.

How many shots have you made and what was the size of your team?
192 shots. A team of roughly 50.

What do you keep from this experience?
I learned a lot from Joe Wright. He’s a real talent, but he also leads the team with a gentle hand. I learned a lot from him about thinking cinematically as opposed to just thinking visually.

What is your next project?
I’m just finishing up a film called THE VOW with Mr X.

What are the 4 movies that gave you the passion of cinema?
BUTCH CASSIDY AND THE SUNDACE KID, JAWS, 400 BLOWS and SEVEN SAMURAI.

A big thanks for your time.

// WANT TO KNOW MORE?

Mr. X: Official website of Mr.X.

// HANNA – VFX BREAKDOWN – MR. X

© Vincent Frei – The Art of VFX – 2011

X-MEN FIRST CLASS: Nicolas Aithadi – VFX Supervisor – MPC

Nicolas Aithadi is back on The Art of VFX. After spoken of HARRY POTTER AND THE HALF-BLOOD PRINCE, he talks now about his work on X-MEN FIRST CLASS.

How did your collaboration with director Matthew Vaughn and VFX designer John Dykstra?
I had a great relationship with John; he’s someone who is very knowledgeable and extremely precise. It was a real pleasure to work with one of my idols.

How did MPC get involved on this film?
MPC had a relationship with the VFX Producer for Fox, Denise Davies from working on PERCY JACKSON. Denise and John Dykstra came to MPC to see talk to us about the project and off we went.

What are the sequences made by MPC?
MPC was tasked with the Beast transformation, the Yacht destruction by Erik (Magneto), Riptide tornados and Cerebro destruction.

Can you tell us about the Beast’s feet? How have you created them and what worn the actor on set?
For the transformation, Nicholas Hoult wasn’t wearing anything on his feet so for the shots we had to remove them and replace with CG feet. For the rest of the film, when Nicholas Hoult is Hank (before he transforms into the Beast) we had to replace his feet with CG simian feet. After the transformation besides the two shots where we replaced his face, Nicholas was wearing a full body Beast suit.

How did you create the transformation shots including the impressive first-person view?
When we started working on the film the sequence was quite different, we were talking about a full body transformation, but quickly Matthew Vaughn decided against it and John briefed us on a new setup. Matthew didn’t want to reveal the Beast to the audience before the hangar sequence when he’s introduced to the rest of the X-Men. We sent a couple of animators to Pinewood studios to work on a previs with John and they came up with the sequence as it is in the movie. Once the sequence was prevised we realised how close to camera the whole action was taking place and we quickly decided that we had to up the ante in term of detailing. Caroline Delen our lead modeling and texturing artist on this project was tasked in building three different model of foot. The simian foot, Hank’s feet before they transformed looking very much like monkey feet, the human foot which would be used during transformation when Hank thinks that his serum actually worked and the Beast foot. The human feet were modeled from pictures of Nicholas Hoult’s own feet, the Simian and beast foot were modeled from production designs provided to us by the production. They all had to have the same topology to be able to blend shape from one to the other. We spent a lot of time looking at photo reference of feet gathered everywhere we could to see how they would move and how the skin and tendons and the veins were moving around and reacting to each over. We really wanted to get as much details as we could. The most important were the human feet, we really needed them to look as convincing as they could be so we could sell the idea of the transformation more easily and they were also the ones that could be compared to reality, everybody knows how a foot looks like. We had more freedom with the simian foot and the Beast’s. In additions to the models, a large variety of displacement maps were created from fat fold to minute wrinkles. Also a network of veins was painted from big artery to medium size veins to tiny capillaries. Ben Jones our lead rigger was charged to create a rig that could trigger all these maps dynamically when the feet were animated. We kept adding detail all along, every time we were looking at it we were thinking of something that could be added.

In the middle of the production, the decision was made that the original Hank’s feet had to be made even less human, so they were no mistake that they were a mutation. Caroline sculpted in Zbrush a fantastic new simian foot, which was approved by John and Matthew, so we integrated this new foot into our already started animation. Out of 4 shots of transformation the first two had only a CG foot comped in a live action plate, the last two had to be full CG. This brought another set of challenges, this time we had to do the whole leg and both arms and hands including CG cloth incredibly close to the camera. If it wasn’t hard enough the trousers had to split open during the transformation and at the same time blue fur had to grow through the splits. We used Furtility MPC’s proprietary hair grooming and and simulation software to control the growth of the fur. Occlusion maps were used to define where the hair could grow so to not intersect with the cloth simulation. For the colour change from skin tone to blue, the idea was that the serum was going through the veins changing their colour then the colour would sip out and propagate to the rest of the skin like bloating paper. This was done using a particle system, which generated a texture map that defined when the skin was changing colour. The skin shading was also a critical part of making these shot work, our lead lighting for this sequence Patrick Ledda did a great job trying to get as close as possible to real human skin.

Do you reuse techniques that you developed for THE WOLFMAN on The Beast?
We pretty much started from scratch, we wanted even more details in the way the skin, veins and tendons would react. We used a couple of things from THE WOLFMAN like using particles simulation to animate the colour change during the transformation, but it was pretty much a fresh start.

Can you tell us the creation of the anchor and the chain manipulated by Erik? How have you managed its great integration with the water?
We made the decision to replace the water with CG water, this made it easier to add splashes, spray and any interaction we would need.

Erik then uses the anchor to destroy Sebastian Shaw’s yacht. How did you create this sequence?
This was the hardest sequence we had to work on. The shear amount of work involved to accomplish that task was overwhelming. The first thing we had to do was to build the yacht. We shot this sequence in Georgia (USA) James Kelly our VFX photographer joined me on location and shot hundreds of photos of the boat, inside and out. Back at MPC Caroline and her team used those pictures and a Lidar scan that was provided by the production to model the yacht to the highest level of detail possible. We knew that it had to be extremely precise if it was going to stand up in close up. Everything was built meticulously right down to the door hinges. We had to make sure that we built it in a way it could be destroyed properly, planks and walls had to have the right structure, windows had to have a thickness… We also had to build a lower resolution interior so we could see through the window and see that there was something inside when we destroyed it. The same care was taken for the texturing, again inside and out.

Once it was built, we had to destroy it. We used MPC’s proprietary destruction tool called KALI, which was started at MPC Vancouver to be used on SUCKER PUNCH’s Samurai sequence. Benoit Dubuc our animation supervisor and his team animated the anchor going around and slicing through the boat and the animation was then passed onto the FX department where Joan Panis our FX Lead for the sequence then destroyed the boat in sync with the animation of the anchor. Specific plates were shot on location in Georgia for the four shots of destruction, but we realized very early that those shots had to be full CG.

We used a combination of Flowline water simulation and a displacement maps to create the water around the boat. Every debris falling from it had to splash into the CG water. Again on this sequence our aim was to incorporate as much details as possible to sim and render, from the big destruction to the glass window breaking to the furniture on the deck to light bulbs exploding.
A great deal of time was spent on shading and lighting. The main challenge was the fact that absolutely everything in those shots was reflective. We had to find ways of optimizing the rendering times without scarifying quality. Daniele Bigi was the Lead Lighting TD, he and his team spent time refining the shading and lighting to the point where the yacht was very close to photorealistic. It was a very intense but very interesting sequence to work on.

Did you develop a specific software for this sequence?
The main development on this project had to do with KALI our in-house destruction tool. Even though it was started on SUCKER PUNCH we had a couple of improvement to make it work on our sequences. KALI is a fantastic tool allowing us to create amazingly organic and realistic destruction on a whole range of material. We used it on the yacht and on the Cerebro destruction scene.

How did you create the shot in which the bottom of the ship opens to reveal a submarine?
As for the rest of our work on this film, our emphasize was on precision and detail. We wanted to give a richness to the image. We gathered lots of submarine and underwater reference and divided the work into elements. The boat and the submarine were two different assets and we had to find ways of integrating them together so you would feel like they were part of the same structure. Caroline Delen and her team of modelers adjusted the hull of the boat to fit the submarine and a complete release system was devised, modeled and animated. It was a pretty cool shot to work on and the team did an amazing job.

What references have you received to build this submarine?
We received the model with the textures, and a couple of images to show us the way it looked. Our shot had the submarine very close to camera, so we had to upgrade the textures and displacement maps to accommodate our shot and break up some of the edges on the model. We created the shader from scratch, making sure that it was close to the original.

Can you explain in more detail the creation of Riptide tornadoes?
Riptide tornadoes was a creative challenge. Tornados are pretty much made of what they suck in, in a sandy environment it would be made of sand etc… But Riptide can create tornadoes out of thin air, so we had to find a visual way of representing them without the help of the usual cues. Oliver Winwood our FX lead on the tornados created a system in Maya where the particles were spinning around a curve, you could define the radius of the base or the top of the tornado, it’s speed and movements, then those particles were used to control a simulation in Maya Fluid which would give us a more organic feel, then these fluid sims, were used to control particles, which were then lit and rendered in various layers and passes and passed to compositing where most of the look was established.
In one sequence Riptide create a giant tornado that destroys the Cerebro. For this we first established the size and speed of the tornado then our destruction team, destroyed Cerebro using the tornado as a guide.

How were simulated the interactions of tornadoes on the set?
On set production were using fans to simulate the wind created by the tornados.

What was the biggest challenge on this project?
The biggest challenge was definitely the yacht destruction, the amount of details required to achieve this sequence was insane.

Has there been a shot or a sequence that prevented you from sleeping?
Again the yacht destruction, we finished it just in time.

How long have you worked on this film?
We worked 8 months on X-MEN FIRST CLASS.

How many shots have you made and what was the size of your team?
125 shots and a team of around 115

What do you keep from this experience?
It was a very challenging project with very difficult VFX. We’re all very proud of the resulting images.

What is your next project?
47 RONIN, But I can’t say anything about it, yet.

A big thanks for your time.

// WANT TO KNOW MORE?

MPC: X-MEN FIRST CLASS page on MPC website.

// X-MEN FIRST CLASS – VFX BREAKDOWN – MPC

© Vincent Frei – The Art of VFX – 2011

SUCKER PUNCH: Thilo Ewers – Art Director & Environment Supervisor – Pixomondo

After several years of freelance, Thilo Ewers joined the team of Pixomondo in 2008. He has worked on films such as NINJA ASSASSIN, 2012 or THE LAST AIRBENDER.

What is your background?
After a classical art education I achieved my Diploma at the Institute of Animation and Visual Effects at the Filmakademie Baden-Wuerttemberg. After a lot of freelance I started working for Pixomondo in 2008.

How was your collaboration with director Zach Synder and VFX supervisor John Desjardins of production?
I must say pretty awesome. We had a lot of freedom in designing the sequence.

Can you tell us how Pixomondo got involved on this film?
I think Zack and DJ must have seen THE RED BARON (a picture Pixomondo worked back in Germany). It is set during World War 1 and has a lot of dogfights and battlefield scenes. The VFX Supervisor on that show was Rainer Gombos, who also was the VFX Supervisor on SUCKER PUNCH at Pixomondo.

What are the sequences made by Pixomondo on this film?
We worked on the complete World War sequence which is the second dream sequence.

Can you explain the creation of the shot when Baby Doll goes into the world of fantasy?
The shot of Babydoll entering her fantasy world was a challenge. We had 2 plates: the real world ballet room and the fantasy world cathedral ruin set in a greenscreen. Both plates had slightly different camera moves and lenses. Therefore we matchmoved the head and the bakground of both plates. In the meantime we finessed our digital double of Babydoll. In Nuke we aligned the plates with the geo of the head and reprojected the two plates over the whole shots. With a also projected mask we could blend the two together. With a geometry-based mask, we could blend certain areas of the two plates together.

How did you create this huge environment of war?
The World War 1 environment was a huge task in every aspect. First of all we made a map of the whole setting as it was layouted in the previs. We divided the whole sequence into subsequences/sets and began to define locations, ranges, angles, sun directions and distance. We ended up with a pretty good top map of the whole environment. This map was the base for our master scene in 3d and later in 2d too. As we got a lot of LIDAR scans of the sets, we could align all these in 3d to our map. We imported our matchmove camera as well and aligned everything perfectly. As the center of our map we chose the cathedral.
Then we started on building assets. Such as the cathedral, the gunners nest, the german headquarters with its industrial complex. As we had extreme camera moves in all these set we had to build them fully in 3d. We refined them later with paintovers or mattepaint extension. We also produce renders of all assets in different angles so that we could use them in matpaint and compositing as basis and cards for matte-extensions.

After this process we had a master scene with proxies of all-important features of our world. The cathedral, the German trenches, ruins and angels, the gunners’ nest, the German headquarters with the crash site of the hero zeppelin.
We evaluated in which scene we needed full 3d renders and where we could rely on a card based representation in Nuke. Mostly everything in certain distance is a card. We developed a way of paintings debris, stones and other small assets in the scenes such as the battlefield sequence. All the explosions, sky fires, smoke, dust, tracers were later done in nuke’s 3d space. For the matte generation we used deep compositing techniques. We also could use relighting techniques for interactive lighting. We tried to use as much real elements as we could. Cause they look the best. The production shots a lot of very nice fx elements. Furthermore we have quiet a nice library of motion elements in-house. But we still needed to produce a lot of 3d fx for the show: smokestacks, fires, tracers, spark, smoke tails. In fx heavy shots the animators put in placeholder fx elements to layout complicated scenes. That gave them and all other departments a very good impression of what we need to do. We used those layouts as a base for the timing position, look and feel.

How have you created and animated the mecha?
As we received a Marquette and a few concept and drawings from the art department we started on modeling the mecha. Its fully modeled and fully rigged with a lot of automated constrains for the legs and arms, the ammunition belt and the gun. We did the whole mecha inhouse. For its animation we looked at all the robot footage we could possibly find. It was always a challenge to animate this heavy, crazy comicy creature.

Can you explain the creation of the airplanes and the zeppelins?
The airplanes were a pretty normal task for us. As we worked on a lot of airplane heavy pictures, our 3d department already has a huge experience in building, shading and animating airplanes.
Our animation department looked at a practically every reference of airships we could find on the web, in movies and in the real world. The best reference for the crash was the real Hindenburg desaster. For the bg blimps they developed a procedural anim system with idle motions, turns, wobbles in the blimps etc. We also figured out that the holding cables of those blimps were a key to their floaty feeling.

How did you create the crash of the big zeppelin?
Shortly after we received the sequence we immediately started on that mini sequence. We figured that for postviz it would be the easiest to keep those shots together in one shot until the initial animation was done. After the postviz was done we divided the shots back and FX Department in Berlin startet the work. Under the supervision of our head of technology Mohsen Mousavi they had to build a lot of tools and techniques to burn the zeppelin and to collapse its skeleton and the cloth with it. Furthermore they had to take our fire system to the next level. There are a few shots where we enhanced the 3d generated fire with some fire elements.

The Berlin FX Department uses 3D Studio Max, Thinking Particles, Fume, Krakator and Afterburn. Most of them are cg some as I said earlier are enhanced with 2d practical elements.

How was the shooting of this sequence? What was the actual size of the set?
The set pieces for the sequence where pretty impressive. The Art Department builds trenches some interior of the cathedral and some battlefield patches. These pieces were all modular so they could connect them in multiple ways.

Is the extreme slow motions shots of Zach Snyder have caused you some troubles?
Yes. Mainly in the beginning and end shot of our sequence, where Babydolls gets in and out of the fantasy world. We worked on these shots in their original length and retimed them later to the designated speed.

Have you developed specific tools for this project?
We developed a lot of show specific tools which helped us to handle the sometime quiet challenging shots. We took our fire system to the next level and did a lot of RnD on deep compositing.

Pixomondo has many branches in Europe and worldwide. Which one worked on this show?
Under the guidance of the LA office every branch of Pixomondo worked on SUCKER PUNCH. (LA, BER, STR, FRA, SHA, PEK)

What was the biggest challenge on this project?
The Zeppelin Crash.

What are your softwares and your pipeline in Pixomondo?
Our main 3d software is 3D Studio Max. The Berlin FX Department uses 3D Studio Max, Thinking Particles, Fume, Krakator and Afterburn. Most of them are cg some as I said earlier are enhanced with 2d practical elements.
We used Photoshop for painting, Vue for some additional cloud creating and Nuke for the projection of the 360 environment.

How long have you worked on this film?
About 1 year

How many shots have you made and what was the size of your team?
220 shots, approx. 120 people globally.

What did you keep from this experience?
We really enjoyed working on such a creative show. Both Zack Snyder and DJ are incredible creative people. We also really loved the creative process and the creative freedom they gave us.

What is your next project?
I am currently working on the new George Lucas produced feature called RED TAILS and just finished up FAST FIVE.

// WANT TO KNOW MORE ?

Pixomondo: Official website of Pixomondo.
fxguide: fxpodcast about SUCKER PUNCH.

© Vincent Frei – The Art of VFX – 2011