RED RIDING HOOD: Derek Spears – VFX Supervisor – Rhythm & Hues

Derek Spears begins his career in 1994, the movie LITTLE NICKY marks his debut as VFX Supervisor at Rhythm & Hues, since then he has oversees the effects of films such as THE SUM OF ALL FEARS, DAREDEVIL, SUPERMAN RETURNS, or THE MUMMY 3.

What is your background?
I have a degree in Electrical Engineering and spent some time in software at SGI. I ended up in Visual Effects after working on the Cineon compositing system. Visual Effects was a huge draw for me because it combined technology and art. The ability to create any kind of image is and has always been fascinating.

What are the sequences made by Rhythm & Hues on this film?
We did the wolf. On a short schedule it’s nice to have focus and concentrate on doing one thing the best you can.

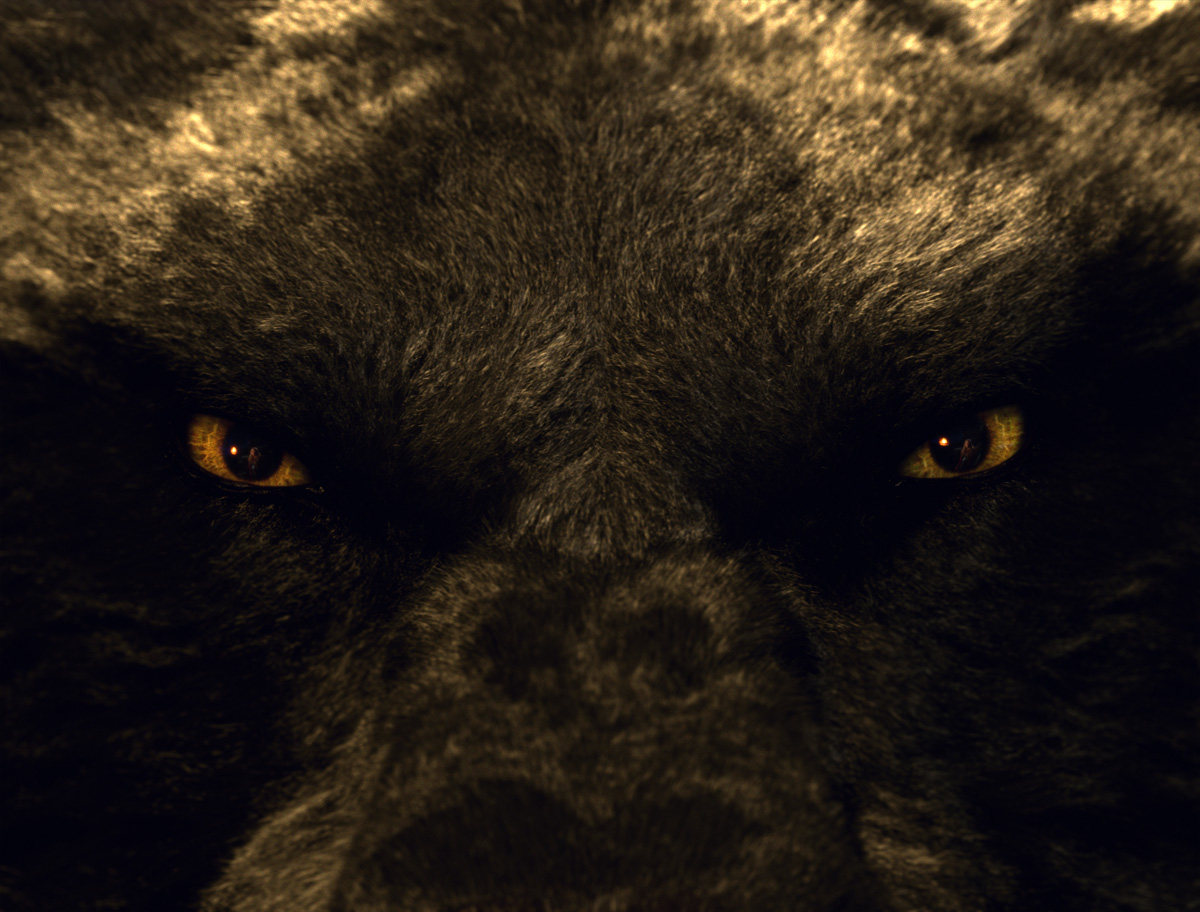
Can you explain in details the creation of the werewolf?
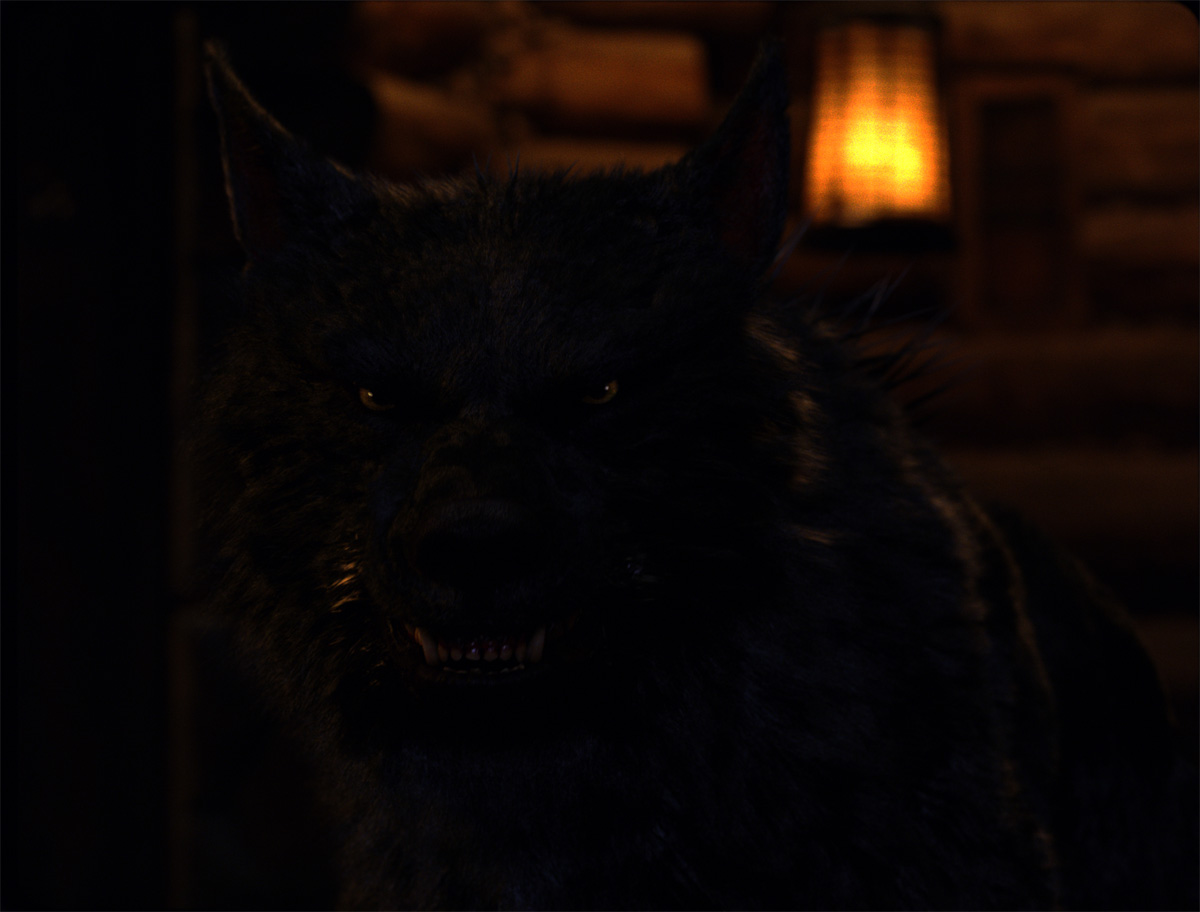
Catherine and Jeff Okun came to us with some previous concept work and a lot of reference that Catherine had collected. They wanted a wolf grounded in reality, but will a little something extra to take it outside the norm. We started doing a series of concept art pieces with our Art Director Chris Grun, paying attention to the characteristics Catherine and Jeff were after. That was balanced with what would make the creature animable in a physically believable way. For instance, we paid careful attention to the ratios of his front and rear leg lengths to make sure he could run as a quadraped realistically. After we got a base design, we iterated with Catherine and Jeff’s input to find the extra details to push the wolf into the world they wanted, like more sinister eyes and head shape, and spiky, quill-like fur on the back.

What references have you received?
Catherine provided us with both still photos and film of real wolves that she thought worked for what she was after.

How did you design the animation of the werewolf?
Craig Talmy, our animation supervisor, designed the animation. After the sequence was shot, Craig would rough block the sequence to show Catherine and Jeff what we were proposing. Once he got the beats right, the animation would get flushed out to refine the character of it and we go back to them with it. About the same time, we were starting to render the shots, and we could start to show it in a more realistic context after Catherine and Jeff had bought off on rough animation. There were a few spots where the action of the wolf was flexible, Craig proposed a few ideas that weren’t the original concept, but they were so dynamic Catherine really liked them. Both Catherine and Jeff were really open to new ideas, it made a lot more interesting to create the sequences.

Does the generous fur of the werewolf caused you some troubles?
Fur is always a trade off of how much can you render vs how much you need to make it work. To help sell the scale, we would turn the diameter of the fur down. In doing that, we would have to significantly up the fur density to fill the gaps. We kept doing this until it looked right and it was still renderable in closeups.

How did you create the fur?
We have a set of proprietary fur grooming tools based around setting guide hairs. It is an iterative process of setting guide hairs and checking renders in key poses in the environment. Our pre-light lead, Mike Sandrik, would then produce a turntable and some of those key poses in a render each night we would evaluate in dailies each morning and drive the grooming towards the artwork.

How have you prepared and managed the integration of the werewolf?
Integration was manged by our sequence lead Pauline Duvall. We had good data from the set Jeff’s team collected for us. We used the Lidar to track, and the HDRI was crucial in lighting. A lot of work goes into matching lighting, getting shadow, colors and black levels matched, and small integration details like kicked snow when the wolf moves. Some of that was comp elements and some were created FX elements.

What are your softwares and pipeline at Rhythm & Hues?
Most of our tools are proprietary, but we use Houdini for Effects. Snow interaction, footprints and water splashes in the Dye Pool were done in Houdini. Animation was done in our package called Voodoo, rendering in our rendere Wren and compisiting in our compositor Icy.

A big thanks for your time.

// WANT TO KNOW MORE ?

Rhythm & Hues: Official website of Rhythm & Hues.
fxguide: Article about RED RIDING HOOD on fxguide.

© Vincent Frei – The Art of VFX – 2011

SUCKER PUNCH ANIMATED SHORTS: Ben Hibon – Director & Animation Supervisor

Ben Hibon was born in Geneva, Switzerland. In 1996, he moved to London to study at Central Saint Matins College of Art and Design. He worked later as artistic director. In 2007, he directed a miniseries for Sony based on the game HEAVENLY SWORD. In 2010, he made for Warner a segment of 3 minutes for HARRY POTTER AND THE DEATHLY HALLOW PART 1. The animation is done at Framestore.

What is your background?
My background is a mixed bag of fine art, illustration, graphic design and animation. I’ve always been very interested in figuration and narration – creating characters and the worlds they inhabit. Filmmaking – in its various applications – has been a perfect vehicle for me to blend some of these disciplines together.

How was your collaboration with Zach Snyder and Warner Bros?
The production on SUCKER PUNCH was a very collaborative process – we had an on-going dialogue with Zack and the filmmakers throughout the production to make sure our vision for the shorts was in-line with the tone of the movie. Zack is well-known for creating visually striking worlds, so his creative input was key to keep a synergy between the shorts and the movie.

What was your freedom about the scripts creation?
Zack had a precise idea on what the shorts should be about, and how they would relate to the movie. He was interested to create an emotional connection with the movie’s antagonists – by giving each one of them his own back-story. We worked with screenwriters to flesh out each individual ‘prologue’ before submitting to the filmmakers. During that process we had a fair amount of freedom to implement Zack’s initial brief.

Which references have you received for the 4 shorts creation?
We had access to some of the production design from the movie. But the short stories are not all set directly in the realm of the movie, so we had to create a lot of new assets ourselves. It was great to have the opportunity to add some of our own ideas to the SUCKER PUNCH universe.
Visually we went for a very illustrative/drawn look. Opting for a more ‘stylised’ design gave us flexibility when it came down to integrate elements from the movie itself. It was important for the shorts not to replicate the look of the movie, but instead get influenced by its iconic imagery and re-invent its aesthetic.

How did you creates your animations?
We used a blend of 2D cut-out animation for the ‘action’ and simple parallax techniques for the cameras – not too dissimilar to making a paper-cut theater show or a moving story-book. We design each frame with multiple layers and animate each one of them separately. We then bring these layers in a 3D space where we can move a virtual camera in-between and around the layers. The success of the whole process relies heavily on using camera movements to tell the story – essentially through framing and lighting.

How much time did you need for a minute of animation?
The overall running time of the shorts is around ten plus minutes. The full production ran for two and a half months, from conception to delivering the finished films.

How was the collaboration with the artists of Axis Animation?
I already had the chance to work with the team at Axis Animation in the past; we did a short film called CODEHUNTERS and also a TV commercial for Renault. They are a very talented studio that’s capable of delivering an amazing range of styles and techniques – from hand-drawn frame-by-frame animation to high-end photo-real CG – which is precisely what you need when taking on such a hybrid project like SUCKER PUNCH.

What is your next project?
I’m back working on my own feature projects for now.

A big thanks for your time.

// WANT TO KNOW MORE?

Stateless Films: Official website of Ben Hibon.

SUCKER PUNCH – Feudal Warriors

SUCKER PUNCH – The Trenches

SUCKER PUNCH – Dragon

SUCKER PUNCH – Distant Planet

© Vincent Frei – The Art of VFX – 2011

THE PREY: Nicolas Bonnell & Laurens Ehrmann – VFX Producer & VFX Supervisor – Plug Effects

After working many years at BUF on projects such as ALEXANDER, MATRIX 3, HARRY POTTER 4, BATMAN BEGINS, or THE PRESTIGE, Nicolas Bonnell and Laurens Ehrmann founded in 2007 the VFX studio Plug Effects. They have since worked on films like THE DIVIDE and TWILIGHT ECLIPSE.

What is your background?
We Nicolas Bonnell and Laurens Ehrmann, respectively VFX Producer and VFX Supervisor.
We spent the first 10 years of our careers working on such films as ALEXANDER, MATRIX 3, HARRY POTTER 4, BATMAN BEGINS, THE PRESTIGE, SILENT HILL, BABYLON AD, SOLOMON KANE, KNOWING.

Can you tell us about the creation of Plug Effects?
Plug Effects was founded in 2007 to respond to a request. More and more movies rely on visual effects without having big budgets. The structure was originally thought to be a VFX supervision company in-house manufacturing. The idea was to offer optimized manufactured solutions depending on project needs. By being involved very early we started an advisory role for the producers and directors to make tradeoffs between in-camera and visual effects solutions. The goal was to fit in an envelope and schedules that we commit ourselves to respect. We then outsourced the images making through a network of providers and artists adapted to the kind of effects to achieve. We kept the supervision and responsibility of all, by offering our customers the guarantee for good end. From 2009, we expanded our offer by doing in-house all the effects that we were given.

How was the collaboration with director Eric Vallette?
Very good! We shared a lot with him before and during the shooting. Eric is a director who has the advantage of knowing exactly what he wants to still arguing for the sake of efficiency. Each effect should be part of a global dynamic.

What kinds of effects have you made on LA PROIE?
The effects were shared with vfx studio Piksel. Plug has been in charge of the sequence of the highway, the sequence of the train, as well as the cliff sequence at the end of the film.

Can you explain the shooting of the impressive chase sequence on the highway and tell us what you’ve done on these shots?
For the record, this sequence, like the train sequence, was shot in Prague for authorization concerns. The output portion of the used highway did not exceed 100 meters. We have « cleaned » the various signs that allow to locate the place as well as crew members that may appear on certain axis.
In this sequence, Albert Dupontel avoid a car that gets crashed in another, then he jumps onto a platform located below. For security reasons, the car impact was shot in 2 passes. We then erased the safety boxes for the jump.

What have you done on the train sequence?
We have cleared the security features of the shoot. Harness, carpet, safety boxes, nest, wires, etc..

Did you do face replacements for the stunts?
No, Albert Dupontel has achieved most of his stunts himself.

Have you developed a matte-paintings including the sequence of the train or that village?
No, except for accessories related to safety, these elements were shoot live.

Can you explain the shooting of the final sequence where we see Dupontel hanging from a tree above the empty space?
Albert was held by wires above a cliff. Eric wanted a river flowing down for reasons related to the story. We filmed separately footages of a river by helicopter near the main set. These elements were then composited in the background. We did not have a bluescreen to create this effect.

What was the biggest challenge on this project?
Difficult to answer this question. Each film represents a different challenge.

Was there been a shot or a sequence that prevented you from sleeping?
Absolutely not! A good sleep can solve many problems.

What are your software and your pipeline at Plug?
We primarily use Maya for 3D and Nuke for compositing.
We also developed a comprehensive system of « production workflow ».
Shaman provides shots management and monitoring throughout production, enabling to the different people to follow a project from pre-production to the final delivery.
Asstek is our asset management and scripts management system.
The two tools working of course together to ensure homogeneity of the pipeline on different projects.

How long have you worked on this film?
The production of images lasted about two months.

How many shots have you made and what was the size of your team?
We have managed around fifty shots with a team of 3 artists.

What do you keep from this experience?
To pleasure to have contributed to a dynamic and well put together movie, in the grand tradition of crime fiction.

What is your next project?
We are currently working on X-MEN FIRST CLASS as well as a French genre movie: LIVID.

What are the four movies that gave you the passion for cinema?
Nicolas:
Difficult to answer this question. It is very subjective and personal, it’s about movies that I see very young, but I would say:
THE MAGNIFICENT SEVEN of John Sturges for the state of mind that vehicle;
NORTH BY NORTHWEST of Hitchcock for the quality of its directing;
THE RETURN OF THE JEDI of Richard Marquand for the dreams and innovation that was at the time.
and may be ROPE of Hitchcock again for technical achievement represented in this movie done in a continuous shot.

Laurens:
It’s complicated, it is very hard to get out of 4 movies. Of course, movies like BLADE RUNNER and STAR WARS have impressed me. But I might as well have fun with a blockbuster, a genre film or a good French film.

A big thanks for your time.

// WANT TO KNOW MORE ?

Plug Effects: Official website of Plug Effects.
Piksel; Dedicated THE PREY page on Piksel website.

// THE PREY – TRAILER

© Vincent Frei – The Art of VFX – 2011

THE BURMA CONSPIRACY: Guillaume Pondard – VFX Supervisor – Mikros Image Liège

Guillaume Pondard joined Mikros Image in 1998. For almost 10 years he worked there as Flame artist and 2D supervisor on commercials and music videos. In 2009, he participated in the installation of Mikros Image Liege and worked on films such as COCO BEFORE CHANEL, DON’T LOOK BACK and THE OTHER WORLD.

What is your background?
I joined the Mikros Image Group in Paris in October 1998.
After a period as Flame assistant and then Flame artist in the group, I gradually started to supervise projects in 2D. My field of activity was then turned mainly to commercials and music videos. During this period and depending on projects, I sometimes join the VFX teams for movies as well as on Flame and Nuke.

In February 2009, under the direction of Maurice Prost, I went to Liege to develop and oversee the VFX department of the studio Mikros Image Liege (ex WFX). Assisted in this at the time by Nicolas Rey (3D and Pipeline), Malica Benjemia (VFX producer) and Alexis Perlot (Lead Tech).

How did Mikros Image Liege get involved on this show?
The more naturally possible. Pan Européenne has asked us to do the VFX in Liege: those one and the DI part had to be done in Belgium.

How was the collaboration with director Jerome Salle?
It was a real pleasure to work with Jerome Hall with the demanding nature sharpens the desire for excellence. Our collaboration was punctuated by regular meetings organized around two distinct modes to suit the dense schedule of anyone.
Almost every 2 days, our VFX shots were sent jointly to the edit and to Jerome Salle, so that he can follow in real time the progress of our work. Fast and accurate returns from Jerome Salle and the edit team (Stan Collet, Karine Prido), allowed us to adjust daily their intentions.
Finally, we find ourselves in projection to do the final adjustments.

Can you tell us what Mikros Image Liege did on this film?
We worked on 400 shots, it was a compositing work on a very differens kind of shots. This goes from different restore, retiming to small matte painting.
Multipass compositing (stunt). Adding gun shot, sparks, particles.

Greenscreen keying:
Car at night at the beginning of the film and yacht Interior (Sharon Stone, Tomer).
3D Matte Painting for the factory behind the glass in the conference sequence (at the beginning of the film).

Search Graphics:
All the ‘technical design’ computer screens. A « Winch Skype ». A player « Spectrum Sound Analyzer », etc..
Finally, a research was done with a few typographical with lots of back and forth with Jerome on all texts of location. The director wanted to have texts to locate very quickly the different places encountered for the viewer. We offered to work on both the presence of an iconographic and sober element, but major that allow an cultural identification with a continent and typography that installs the country immediately. It also creates a bridge with the comics universe.

Can you talk more about the car chase?
This was the first sequence worked at the studio because of the teaser that had to be released early.
Lot’s of retime and cropping among the shots.
The stunt shot consists of:
– Muti-pass including the shot where a car jumps over the truck,
– Cars and wires removal, addition of explosions on several shots or expanding the existing ones.

For additions of explosion and light interactions, we remodeled the scenes to project the interactive lights. During this sequence, we also worked on the presence of GPS.

What were your references for animations of TV screens?
It’s pure creation for most of them: the player spectrum analyzer, the geopolitics slide show.
For the Winch Skype, we started on the idea of a Linux-based Skype, which was developed by Winch Corporation. Finally, a purely Skype audio in Windows. We took the typical graphics of Windows (window, etc..) and followed our imagination.
All this should be interpreted and accepted by the viewer at the first frame.

When sequences in Burma, did you create the matte painting?
Only one was done. And I must say it is more compositing.
For the arrival of Simon in the village: the car was stopped. We redid the background and animated the car.

Are you involved on the sequence of the attack on the army camp?
Yes, we added more military guys (crowd multiplication) on a sequence of 6 shots. One where the car explodes. This shot is indeed a multipass shot with multiple takes.
After researching the extras dressed as soldiers shot into other takes (other axes, focal lengths and locations). We rotoscope and composite those that allowed us an optimal integration.

Have you created digital doubles for the free fall sequence?
No, there is no digital doubles.
But many shots were filmed in a wind tunnel on a green background. Footages of sky were shot with a 5D for our background. Our VFX shots are among live action shot into the sky by a team of experienced skydivers. So we had to try to find the light and ensure that our compositing fit with the real shots.
In the final sequence, the landing was shooted with the actors supported by wires… that we removed in post-prod.

How was done the shot of Young’s fall?
A stuntman / a wire: for the shooting.
Background alone, lot’s of restore and compositing.

What was the biggest challenge on this project?
Accept 400 VFX shots sounds like a good challenge in itself.

Was there been a shot or a sequence that prevented you from sleeping?
Not a shot or a specific sequence. But I admit I had some sleepless nights.

What are your pipeline and your software at Mikros Image Liege?
We are organized on a Linux platform, we use Maya for 3D.
For the 2D department, i’ll remember that Mikros Image is the first French studio and one of the first in Europe to have imposed Nuke as compositing software in his pipeline for over 8 years.
Around these basic tools we use internally developed asset management: Mikado for the VFX management (database and GUI allowing exchanges between all the teams) and Mikser for nodal management on render farm.

How long have you worked on this film?
A month of preparation and 3 ½ months of production.

How many shots have you made and what was the size of your team?
400 shots. 19 people. With a very efficient compositing supervisor: Lucie Bories.
And magical help of Hugues Namur.

What do you keep from this experience?
A rare team spirit, a wonderful team and an alter ego: Lucie Bories.

What is your next project?
VALPARAISO by Jean-Christophe Delpias.
THE CONGRESS by Ari Folman. (WALTZ WITH BASHIR).

What are the 4 movies that gave you the passion of cinema?
It’s always very simplistic to answer to this question, but those ones have contributed to the growth of that passion.
CHILDREN OF PARADISE, Marcel Carné.
WINGS OF DESIRE, Wim Wenders.
TIME OF THE GYPSIES, Emir Kusturica.
THE CITY OF LOST CHILDREN, Marc Caro and Jean-Pierre Jeunet.

A big thanks for your time.

// WANT TO KNOW MORE?

Mikros Image: Dedicated page about THE BURMA CONSPIRACY on Mikros Image website.

// THE BURMA CONSPIRACY – TRAILER

© Vincent Frei – The Art of VFX – 2011

ENTER THE VOID: Geoffrey Niquet – VFX Supervisor – BUF

Working since 1995 at BUF Company, Geoffrey Niquet has participated in projects such as BATMAN & ROBIN, FIGHT CLUB or THE CELL. It becomes VFX supervisor in 2004 on ATOMIK CIRCUS and has since overseen the effects of films such as SPEED RACER or THE EXTRAORDINARY ADVENTURES OF ADELE BLANC-SEC.

What is your background?
A graduate from Sup Info Com, I joined BUF Company in 1995 after a brief experience in video games.

What is the approach of Gaspar Noé with visual effects?
He has an experimental approach. Even though he had a pretty good idea of the effect he wanted, he always left space for interpretation in order to generate new ideas from the unsaid. It’s fun for the graphic artist who with this type of process has an opportunity to be creative. The downside is that an effect was never validated until all the opportunites were explored… This experimental approach was made possible due to BUF’s status as co-producer.

What references and explanations did he give you in order to create the shots in which Oscar uses drugs?
Gaspar began to explain each type of drug consumed by Oscar, the impressions they evoke, but did not associate them with specific visual effects. Then during a long research period we assembled a catalog of possible effects to illustrate these different moments. They had begun either from the proposals made for this purpose or from research done at the start of other effects. Gaspar had then only to choose.

How did you create the shot very dreamlike and hallucinatory in Oscar’s apartment?
For DMT hallucinations, the challenge was to visually recreate the feeling that this drug can generate. Theys images had to be beautiful, impressive, alarming, and organic. One of our references was the work of the botanist Édouard Marie Heckel.

Did you create previz before the shooting?
No, although the final film is very close to the script, it’s still an experimental project and the VFX work resulted in plenty of research up until the final delivery of the film. On the set, the team had a crane and the movements were improvised by Gaspar himself according to the acting and the topology of the locations. In preparation, we had nevertheless made a series of tests so that Gaspar had an idea of the effects while shooting. Some tests were used to consider the VFX in post, others had been abandoned in favor of new ideas.

How was the shooting in Tokyo? Did you use bluescreens or roto?
The device on the set was light. We just used some greenscreens behind the windows and sometimes we used some trackers markers in order to track the frames later. However, there was a lot of work taking pictures in parallel in order to create 3D movement of Oscar’s spirit through Tokyo.

The movie conitinually goes from a real plate to a full CG plate within the same shot. How did you manage these transitions?
In most cases we rotoscoped and re-projected the end of the real movement in order to re-edit in 3D. In this way we could ensure that the camera is perfectly fluid from one world to another. However, the border was actually not so straightforward. Shots that were exiting from live action often required a camera and 3D work in order to: smooth the motion, remove a shadow or reflection, make a set extension, add a piece of furniture, mix two takes, reduce the depth of the field…

How did you recreate the many sets of the film and the city of Tokyo?
For Oscar’s mind traveling from one place to another, a BUF supervisor took photos of different streets and apartments in Tokyo. The editor in Paris assembled them. We then modeled all the locations and the streets and placed them so that they were all connected and so that we could make camera movements. We finally added some CG crowds characters and CG cars to give life to the scenery. These connections involve 20 minutes of the film.

For the flight at high altitude that ends up in the plane, we begun by setting up the trajectory with images taken from a helicopter shot in video. We then modeled all the overflown areas and used the photos to recreate the texture. To give a dreamlike quality to these images, we increased the presence of colored neon lights, reflection of wet sidewalks, the darkness of the roofs compared to those in reality. It gave rise to a continuous shot of 5 minutes.

Can you explain in detail the creation of the shot when Oscar leaves his body after his death?
– The starting element is a 35mm plate. A subjective view of Oscar fallen in the toilet. We still see his hand in the foreground.
– We take advantage of his deteriorating eyesight (fuzzy pumping, degradation of the image, to connect to the 16mm used for the other part of the movie) to make a smooth transition with a set in 3D.
– The vision becomes, through a series of pulses, X-ray vision which allows us to go through Oscar’s head entering through his eyes to the back of his skull by guessing the organs. We can even guess the policemen growing restless behind the door.
– Once out of the skull, we connect to a 16mm plate where we see Oscar from behind.
– The camera is then drawn by the lamp on the ceiling, during this movement we go back to 3D.
– To emphasize that this light is a doorway to another world, we have largely augmented the reflection in this scene, creating a feeling of infinite space, tiled walls repeating each other as in a hall of mirrors at a fairground.
– The camera continues to climb towards the light to enter the first mandala.

Have you developed specific tools for this movie?
No, because we already had everything we needed. However we have written special lens shaders to calculate the spherization preceding the entries into colored lights.

What was the biggest challenge on this project?
Managing the amount of effects and images. Just one example: after the screening at Cannes, it was necessary to add an overlay of disturbances on the film. More than a hundred different effects had been proposed to the director, like mixing chromatic aberrations, blur changes, duplication… Gaspar choose three of them which we applied to the entire film. This enabled him to time, meter, and mix them during editing. We then made the conformation. In terms of logistics we quadrupled the weight of the DPX LOG images (more than 10 hours of footage).

Was there a shot or a sequence that prevented you from sleeping?
If you mean literally, they are all a little guilty. The amount of effects and images to manage often pushed us to stay in the office when it was time to sleep…

If you mean a more complicated sequence, it was probably the first mandala (the white light following Oscar’s death) which caused us the most trouble. From the beginning, Gaspar showed us the movie LAPIS directed by James Whitney, which he included in his cut while awaiting our proposals. He wanted something different, but as rich and hypnotic. We tried a lot of very different things for a long time without successfully convincing him. It was finally re-shot using an early principle (salt placed on a metal plate that vibrates with a bass). We recomposed these elements to attain a result that is quite close to the reference from which we were trying to distance ourselves.

What are your pipeline and your softwares at Buf?
BUF only uses in-house software.

– Complete 3D pipeline from modeling to rendering
– 2D/3D compositing and paint software
– Complete batch process manager
– Player with realtime 2K color management
– Production Management Tools

How long have you worked on this film?
The project lasted 2 years, including the shooting, but the huge part of the work was done during the six months before the Festival of Cannes.

How many shots have you made and what was the size of your team?
It’s difficult to talk about a number of shots, much of the film consisting of SEQUENCE SHOTS. The first part, for example where we share Oscar’s subjective vision, while he is still living, is a clip of more than 20 min … To give some numbers, our VFX cut included 390 shots, some lasting more than 5 min. There is more than half an hour of full CG. We treated the entire film, that represents 2 hours 40!

The team size has varied during production. The peak was reached before Cannes with about fifty artists.

What is your next project?
After ENTER THE VOID, I supervised the effects of ADELE BLANC SEC directed by Luc Besson (Europa). Then I had the chance to co-produce with Moebius, a animated short film adapted from one of his comics: LA PLANÈTE ENCORE (Angle & Fine Productions). Currently, I’m working on THOR directed by Kenneth Branagh (Marvel) as technical director.

A big thanks for your time.

// WANT TO KNOW MORE?

BUF: Dedicated page about ENTER THE VOID on BUF website.
fxguide: Interview of Geoffrey Niquet on fxguide.

// ENTER THE VOID – TRAILER

© Vincent Frei – The Art of VFX – 2011

Special week on The Art of VFX!

It’s the Made in France week with 3 interviews of difference VFX vendors and different sizes.

I hope that you will find them interesting.

Happy reading

Vincent Frei

I AM NUMBER FOUR: Mat Beck – VFX Supervisor – Entity FX

Mat Beck began his career over 30 years. He has worked for prestigious studios like Apogee, Boss Film or Dream Quest Images. His career includes numerous films such as STAR TREK, TRUE LIES, TITANIC or VOLCANO but he also worked on many TV shows like X-FILES or SMALLVILLE. At Entity FX, he oversaw projects like SPIDER-MAN 2, FINAL DESTINATION 4 and THE SPIRIT.

How was the collaboration with director DJ Caruso and production VFX Supervisor Greg McMurry?
We really enjoyed working on this project, and both DJ and Greg were great in terms of sharing their ideas and giving us leeway to develop and realize concepts and approaches for our shots. Greg was supervising about 800 shots split between several different companies.

How did Entity FX get involved on this show?
We got involved after the production shoot and actually had a very short time – about four months – in which to come up with some cool looks that were crucial to the show and then churn out all the shots that contained those looks in time for all the temp deadlines and the final delivery.

What are the sequences made by Entity FX?
We developed the “ashing” effect that is seen when alien characters in the movie are killed. This included transforming the Mogadorians – the bad guys in the film – into exploding ash, and dust and also creating similar but less violent and more lyrical “ashing” effects for the death’s of other non humans.
We also developed energy and teleportation effects for the Number Six character to show her super-power of disappearing and reappearing at will.
Our team created a variety of other effects such as CG animated bodies and body parts, digital blood, glowing swords, exploding crystals, windshields, face replacements, split screens, green screen composites, rig removals and makeup enhancements that added to the action at various points in the film.

Can you explain in detail the creation of the effect for the Mog death?
We approached the death effect in a couple of stages. In the first, we had the Mog turn gray by desaturating the body. We sometimes tracked and deformed a more complex gray texture onto it so that the transform would read well in darker scenes. In a second step, we transformed the Mog into a 3D statue version of himself, giving the surface a rough plaster-like surface. We wanted to be sure that the transition between smooth gray surface and rough plaster did not just look like a simple 2D « wipe, » so we created a fractal net of fibers that moved across the body, filling in to create the new surface. Once we were in pure 3D statue mode, that statue was broken into large chunks, which then broke into smaller pieces, with those pieces giving birth to smaller particles over and over until the bits simply turned into a gritty dust and dissipated. Of course, we put a lot of dynamics and turbulence on it so you could see the energy of effect as the dust particles dispersed. It was very important to balance the right amount of grit and energy. In a couple of shots we were asked to add one extra stage for additional oomph, so we transformed the statue version of the Mog’s face into a death’s head just before the explosion.

About Number Six, how did you design and create the effect when she disappears?
Number Six has the special ability to disappear in one place and reappear in another. She would sometimes disappear in one part of the frame and reappear in another part. Our task was to create an energy effect that accompanied her disappearance and reappearance. It was important to convey that her body became the energy and vice versa.

We used a combination of 2D and 3D particle animation to create the energy field – which revealed itself by glowing and distorting the environment. Some of the 3D particles were emitted from a 3D model which was tracked to the live actor. This allowed us to accurately track a variety of elements to her movement in the shot. In particular, the director was interested in seeing aspects specific to her look carry into and out of the energy effect, the colors of her hair, clothing, etc. So we had electric blues and golds in painterly streaks lingering or kind of advancing ahead of her next position in the effect so that you would see these traces in the energy field. We then used a combination of 3D, 2D and 2.5D techniques to integrate the effect into the live plates.

Did you create previz to help the the shooting and the choreography for the shots of disappearance and appearance of Number Six?
Shooting was largely completed when we began our work. We did some post-vis to ensure that the effects were going to work in terms of placement and integration with the action as filmed.

What references have you received from the director for these effects?
For the ashing effect, DJ and Greg wanted it to look gritty and definitely sell the idea that a 3D object – not just a 2D surface – was breaking up into particles. The effect also had to take place on the whole of the body simultaneously, not just starting in one place and progressing. For Number Six, the director wanted her disappearances to grab the viewers attention and be interesting on a visual level.

What software did you use to create your particles?
We used Maya from Autodesk for modeling our 3D characters along with our own in-house particle-generation system for the heavy-lifting of the particle effects.

What was the biggest challenge on this project?
For us it was the short time scale. Because we came in later, we were designing looks and refining pipeline while scrambling to get shots done for the various screenings that always come at the end of a film.

How was the collaboration between the different vendors?
It was good and good natured. Partial shots were flying around between facilities.

Was there a shot or a sequence that prevented you from sleeping?
Who sleeps anyway? The difficult thing was that, because of our late entry to the project, we were building the train while it was going down the track. Designing looks, writing code, tweaking pipeline, doing heavy tracking and rotomation, and delivering temp shots to meet a variety of screening deadlines.

In order for the alien ashing effect to succeed, we had to write custom code to get the controls that we needed to establish the look that the production wanted; at the same time that we were matching 3D models to all of the characters that would meet their demise in various shots. All that means that there was a period when there was a lot of work going on, but not a lot of shots being completed. We were confident it would be fine, and it turned out great, but there was a period where we had to ask people to just act on faith for a while.

What software and pipeline tools are used at Entity FX?
On the 3D side we use Maya along with proprietary particle software. For specific shots we used Fume FX. For 2D, After Effects, Nuke, and Discreet Flame all played significant roles.

How long did you work on this movie?
We had about four months from start to delivery of our shots.

How many shots did you do and what was the size of your team?
We completed about 60 shots for the movie. The total of people who worked on it was between 30 and 40.

What did you take away from this experience?
Tough jobs go better with good people. Greg McMurry and Lori Nelson are both experienced professionals who know their business and excel at serving the production while being fair to their vendors. D.J. is a collaborative director with a good eye. It made the work better and the long hours
worth it.

What is your next project?
In addition to I AM NUMBER FOUR, we recently did visual effects in stereoscopic 3D for the feature film YOGI BEAR (fireworks sequence ). We are involved in previsualizing a well-known motion picture sequel. And it’s pilot season, so we are cranking on a number of projects, including
the end of season effects for SMALLVILLE and THE VAMPIRE DIARIES.

What are the 4 movies that gave you the passion for cinema?
There’s a lot more than four. But STAR WARS, APOCALYPSE NOW, MANHATTAN, 2001, DANCES WITH WOLVES, NEW YORK NEW YORK, SILENCE OF THE LAMBS, THE GODFATHER I & II, and SHE WORE A YELLOW RIBBON come to mind.

A big thanks for your time.

// WANT TO KNOW MORE ?

Entity FX: Official website of Entity FX.
fxguide: Article about I AM NUMBER FOUR on fxguide.

© Vincent Frei – The Art of VFX – 2011

THE ADJUSTMENT BUREAU: Mark Russell – Production VFX Supervisor

Mark Russell began his career as a VFX producer. For several years he has produced the effects of many films like MINORITY REPORT, HELLBOY or THE ITALIAN JOB. He then became VFX supervisor for films such as SLEEP DEALER, DOUBT or CARRIERS.

What is your background?
I was an actor through college. From there I worked for a very hands on film producer for a number of years before managing visual effects. I produced VFX for a number of years, and then I began supervising.

How was the collaboration with director George Nolfi?
George is an excellent collaborator. He really listens to and appreciates input without lacking personal vision. There were some things that he was very specific about, but most often he was looking for the best way to get the result he wanted and was open to collaborative ideas.

This is the first movie of George Nolfi. What was his approach to visual effects?
George got very excited about VFX. He was very happy to learn what made visual effects more effective and the things to avoid.

Can you explain how you selected the various VFX vendors?
I had been working in NY for a number of years and had pretty good relationships with a number of vendors here. I really tried to identify and play to the strengths of each of the vendors used without relying too much on any one shop.

How have you managed the shots with static characters? Did the actors pretended to be fixed or is it more complex?
The frozen people from the scenes in the office were a combination of things. First, the production hired mimes for the BG parts, so we had a leg up from the get go. Even that wasn’t enough, so RhinoFX (now Gravity) rotoscoped and froze the actors who were not perfectly still. We had to remove an eye blink here, and a slight drift there, we added steam to a coffee cup, but all in, it worked out, in camera, far better than I had hoped.

Is the « men with hats » headquarter is a real building or is it a matte painting?
The Adjustment Bureau HQ is 11 Madison Avenue (The Metropolitan Life North Building), which is a real building built just before the depression, but, because of the economic conditions at the time, what was planned to be taller than the Empire State building was halted at the 29th floor. With the help of PhospheneFX and a matte painting we restored the building to its originally intended height of 100 stories.

Have you created some set extensions for the huge « men with hats » hangar?
Believe it or not, the scenes in the warehouses were mostly in camera. We did some 2D compositing in these scenes to accommodate new material, but the size and scale of the space remains unchanged. These scenes were shot in New York’s Javitz Center which as you can tell is vast.

Did you do something on the shots showing New York from the boat?
The shots during the boat scene were also in camera. The scene was shot over two different perfect New York days where the sky looked too real to be true. We did have to remove a boat or two from some of the shots, but mostly the scene was untouched.

How did you shoot the shots with the « magical » doors?
We tried to approach each of the shots with the doors differently, and George really wanted to take the audience through it as David’s character was experiencing it. To that end, we made them increasingly more complex as the film progressed, so that by the time you get back to the Adjustment Bureau you really feel like you’re doing something spectacular. Some of the earlier shots were simple greenscreen comps where we shot BG plates to match perspective. Then the later ones involved adding interactive lighting and color as the actors traveled from one location to another.

With the help of Jim Rider at RhinoFX, we were able to create a progression through the doors. They started to get complicated when David runs from the rainy alley into the « blue door » near the courthouse. The intention here was to travel with David through the door and show his disorientation as he crossed through. The foreground element was shot with a Steadi-cam rig and then we scanned the selected take and tracked it in 3D. The rest of the elements for the shot were captured using motion control and a number of different locations. All this was blended with a some 3D elements to tie the plates together and create the final shot.

My favorite of all these transitions is the Courthouse to Yankee Stadium to 6th Avenue sequence. In order to complete this moment, we built part of the bathroom set in the center field bullpen at Yankee Stadium, so when David walks Elise through the door from the courthouse we really felt Yankee Stadium. The transition from Yankee Stadium to 6th Avenue was a little more tricky, but here we got really luck in that the A and B sides of the transition were a pretty close match. Again, Jim at RhinoFX put this one together using some 2D tricks and finesse.

The final doorway transition from 6th Avenue to Yankee stadium was completed by Wildfire VFX in Los Angeles. Here we shot 3 plates from different locations (a blue screen set with a fence, 6th Avenue and the Statue of Liberty) using a combination of Steadi-cam and motion control to get near matching elements which were then fine tuned and composited into the final shot.

Did you use greenscreens or is it a heavy use of roto?
We used greenscreen wherever possible, which was most of the time. However there were a few places where greenscreen was not possible, so we rotoscoped those shots. The closet of the restaurant where Richardson and his aide run into the closet was an example of where we didn’t have the space to light a greenscreen, so we went without it.

How did you shoot the backgrounds for the final sequence on the roof?
The final scenes on the roof where shot on at the top of 30 Rockefellar Plaza on the real roof, so the bulk of our work there was cleaning up and removing the glass and enhancing the sky.

What was the biggest challenge on this project?
What was most challenging for me was the series of shots leading up to the roof in the stairway. We wanted to have a scene where we followed our actors up the stairs and out the door onto the roof, then back down the stairs through a door leading them impossibly to the same roof in one continuous shot. We pre-visualized the scene in order to better understand the problems, then we tested the shot with a 50 ft technocrane and an open stairwell to find out what could really be achieved.

Ultimately, we decided to build a half stairway leaving the top and side open in order to arm the camera into the set as well as light the set. We surrounded the set in greenscreen and shot the foreground plates. Then we tracked the shot in 3D, to generate matchmove data so that we could shoot background plates from the roof of 30 Rock using motion control. Once we had the BG plates for the rooftop, John Bair of PhospheneFX was able to create the remainder of the stairwell in 3D and composite the elements together.

How long have you worked on this film?
All in, it took about 16 months from start to finish.

How is the number of VFX shots?
We ended up with about 310 VFX shots in the film.

What do you keep from this experience?
It was a great experience for me to be a part of a film that really had fun highlighting so many great parts of New York. The cast and crew were wonderful to work with.

What is your next project?
I am currently starting post production on TOWER HEIST for Universal Studios with Brett Ratner directing. We had a grueling 76 day shoot, and now we’re just getting started with the visual effects.

What are the 4 movies that gave you the passion of cinema?
BRAZIL, JAWS, STAR WARS and LAWRENCE OF ARABIA.

A big thanks for your time.

// WANT TO KNOW MORE ?

Mark Russell: Website of Mark Russell.

© Vincent Frei – The Art of VFX – 2011

SUCKER PUNCH: Guillaume Rocheron – VFX Supervisor – MPC

Since his interview about PERCY JACKSON, Guillaume Rocheron worked on SUCKER PUNCH.

How was your collaboration with director Zach Synder and production VFX supervisor John “DJ” Desjardin?
It’s been a truly great collaboration. Zack and DJ always communicated to us very clear ideas of where they wanted to go regarding the action and the visuals and got us involved to help plan things out as well as possible right from pre-production. We worked on a daily basis with DJ to make sure we were all working towards Zack’s vision.There was a great level of trust from everybody on the project and having clear directions really helped us focusing on the final result.

Can you tell us how MPC has become involved on this film?
MPC already had a relationship with Zack and DJ from WATCHMEN. We got involved very early on SUCKER PUNCH to start discussing how we would achieve the Samurai sequence. The first idea was to find out how to capture stunts fights, retargeting those moves onto our giant samurais, with minimal footprint on set, so Zack and Damon Caro, the stunt coordinator, could design the fight and the moves without too many constrains. The second point was to explore different options to help the stunt team achieving some of the complex moves by doing CG takeovers to extend or piece together different moves. We ended up doing a mini 6 shots test sequence illustrating each scenario.

What are the sequences made by MPC on this film?
We’ve made Babydoll’s first fantasy, the Samurai Adventure which represented most of our shots. We’ve also done some work for the ending of the movie.

What references have you received for the establishment of the temple and samurai?
We received some original concept frames produced by the art department and Aaron Sims for the samurais. Those illustrations weren’t actual designs but more mood boards, showing the style and the atmosphere. We then internally worked on refining those concepts into detailed characters and environments.

How did you create the environment and the temple?
The art department provided us with blueprints, that would define the main layout of the temple. Using these and the moodboards, we started to block in more precisely how each features would look like, the architecture of the roof, ceiling, walls and columns, the look of the candle racks etc… Knowing we would have to destroy the temple during the sequence, everything had to make sense regarding how the temple was put together. Our lighting team worked out some pretty elaborated solutions for the complex illumination inside the temple. There are thousands of candles in there, all flickering, with different intensities.

Can you explain the creation of the samurai?
Using original illustrations as a base for how each samurai had to feel, we then fleshed out proportions of the underlying bodies and started to collect every single possible samurai armour references we could find. It was some sort of puzzle game, testing out combinations that would look visually interesting but making sure things were coherently put together. Traditional samurai armours are very cleverly designed, to be strong but very light and flexible at the same time. Since our samurais had to go through some pretty wide range of movements, we modelled and rigged every little ropes and strings that are keeping all the different panels together and that help to articulate the various pieces together. Because the samurais are so big compared to Babydoll, our texture team painted a huge amount of maps for each samurai so each body part could be seen very close up.

Did you create previz for the fight choreography and the shooting?
The test sequence we’ve done early on helped to validate how we would plan and capture the whole sequence. We just used 3 pro-consumer HD cameras and grey suits with tracking bands. The stunt team worked on the fight design ahead of principal photography and, as sections were blocked out, we would go there and capture the moves. Back at the studio, we would process them and roughly transfer the animation onto our giant samurais, so we could then work with Zack and DJ on framing, camera position and where the action was happening within the digital pagoda. That stage that we ended up calling “techvis”, helped to categorise how each shot would be approached. Some shots would be a Babydoll’s stunt double and we would replace her face in post, some shots could be performed by Emily Browning, some other shots would be digital takeovers to extend what was beyond possible to shoot and finally some shots would be entirely digital. It became a guide during principal photography for lighting, eyelines and continuity.

How did you create the digital double for Baby Doll?
We based her model and textures from cyberscans and high resolution photos. The skin gave us loads of problems to match since it had to look so clean and perfect. It was a fine balance in every shot to not have her looking plastic. The long hair groom and simulations were done with our fur software, Furtility.

Can you explain how was the shooting of this sequence? What was the real size of the set?
The shoot happened on a soundstage at the Vancouver Film Studios. There was a full 360 degrees greenscreen and a full tiled floor. As often as possible, Babydoll was shot against that tile floor so we would get good contacts but there are some shots where she is completely over green since the ground gets destroyed by impacts. The entrance stairs of the pagoda were a set piece as well as the altar where Babydoll talks to the Wiseman. The altar, as the rest of the pagoda, becomes all CG as soon as the fight starts since it gets completely atomised by the samurais.

How did you handle the destruction of the temple and its final collapse?
To deal with the details required for all the slow motion wood destruction shots, our R&D team developed a brand new toolkit called Kali. Unlike rock or concrete, wood is a malleable surface that bends, cracks and then shatter and rigid bodies solutions weren’t really adequate for this type of effect. We integrated in our pipeline a finite element solver called DMM from Pixelux to deal with bendable surfaces. It enabled our TDs to define precise properties to each material so they would be break in a very realistic way. Metal would shear and bend while wood planks would bend, crack and fracture in thousands of splinters. I really love in some shots, how you can see the cracks getting propagated through the surfaces before they start breaking.

Have you developed specific tools for the snow or fire?
Not really. We used our usual particle and fluid tools. The challenging thing was that we did all our animation and simulations in slow motion at 100fps instead of the usual 24fps. Our R&D team developed a full 3D retime pipeline so retime curves from editorial would be applied at render time. But that meant we had to rework all our existing techniques to work well in slow motion.

What was the biggest challenge on this project?
There were many but I would say keeping the look consistent with the amount and complexity of elements that went into every shot was the biggest one.

Was there a shot or a sequence that prevented you from sleeping?
No shots in particular prevented me from sleeping as we were well prepared. Some shots, of course, were harder to pull like the slow mo full screen takeover on Babydoll when she defeats the 2nd samurai or some of the big destruction shots but overall I think we approached the project in the right way.

How long have you worked on this film?
In total a little less than a year and a half but the actual production time was around 9 months.

How many shots have you made and what was the size of your team?
150 shots with 70 people.

What did you keep from this experience?
The great collaboration with Zack and DJ, the fantastic material we had to work on and all the hard work and dedication of the team at MPC

What is your next project?
I can’t really talk about it for now.

A big thanks for your time.

// WANT TO KNOW MORE ?

The Moving Picture Company: SUCKER PUNCH dedicated page on MPC website.
fxguide: fxpodcast about SUCKER PUNCH.

© Vincent Frei – The Art of VFX – 2011

SUCKER PUNCH: Bryan Hirota – VFX Supervisor – Prime Focus

Bryan Hirota worked for nearly 20 years in visual effects. He has worked at Rhythm and Hues, CIS Hollywood and recently at Prime Focus. His career includes numerous films such as DEMOLITION MAN, ARMAGEDDON or END OF DAYS. He oversaw films like MATRIX REVOLUTIONS, ERAGON or WATCHMEN.

What is your background?
I have a BS in Computer Science from UCSD, and have worked in the visual effects industry for a number of years. I started working for Video Image | VIFX, (a company that was merged with Rhythm and Hues in 1999/2000) at the end of 1992 and met John « DJ » DesJardin there.

How was your collaboration with director Zack Snyder and VFX supervisor John Desjardins of production?
You couldn’t ask for two better people to work for. Zack is an extremely creative guy, who is also very open to hearing and considering ideas as well. His ability to maintain his vision but also be collaborative in the process amazes me. John « DJ » DesJardin is similar as well. He brings a lot of creative enthusiasm to a project that helps drive it forward and also encourages collaboration – I can’t say enough about how enjoyable it is to work with the two of them.

Can you tell us how Prime Focus become involved on this movie?
Here is a quote that DJ gave about this project:
« I’ve been working on difficult projects with Bryan Hirota for nearly 20 years. As I started pre-production on SUCKER PUNCH, Bryan told me he was joining Mike Fink and Terry Clotiaux at Prime Focus. I knew Bryan’s creativity combined with Prime Focus’s powerful resources would be the formidable combination I’d need to execute Zack’s fantastic vision for the Bullet Train Sequence. « 

What are the sequences made by Prime Focus on this show?
Here’s a blurb I grabbed from Tony Bradley:
“Our talented guys and girls in Vancouver contributed some of the stunning VFX work on show in the movie – including the opening CG theatre shots, a dramatic scene that involved the camera traveling through a keyhole to arrive at a reflection in Babydoll’s eye, and the epic crane shot featuring the drive to Lennox House that includes a detailed CG environment. The bulk of the work however was done in the final, action-packed fantasy sequence on the train, which required the development of a CG helicopter and helipad, alien-like terrains, interior and exterior shots of the train, hoards of armed robots for the girls to destroy and the futuristic metropolis called “Bunny City”, which comes to a decidedly sticky end.”

Can you explain how you create the shot where the movie title appear on the car window?
The shot of Babydoll and her stepfather driving up to the Lennox House started out life as a shot of the two actors inside a car on a green screen stage with a crane move around the car. We took the footage and matchmoved the whole shot so we could replace the whole exterior of the car with our digital car. We initially considered just replacing the reflections on the live action car and adding water to it, but that turned out to be more difficult than render a whole wet car.

Once we had a good model of the car we matchmoved the car and started creating the environment around the car based on production artwork. The field of grass was created using Maya paint effect turned into geometry for rendering. The house was modeled based on a pre-production model which we then did conceptual stills of. Once they were happy with that we built the model and matte painted a sky dome to go with the 3d house, car, gate, and grass/trees.

The rain was done using Real Flow on the car and controlled to match up with production artwork for the logo and once we achieved the title shape it was released. We added rain/water splashing effects too as the car drove down the road. The model was created in maya. The car was animated in Maya. The various pieces were all rendered in v-ray.

What was your references for the environnement and the Lennox building?
Production supplied us with some artwork for their general concept of the Lennox House and we received a model from the art department as well. We took those assets and created additional artwork to present to DJ and Zack. Once we had something they liked in that form, we set about making the house/gate and hills. The hills were covered with grass created with Maya paint effect turned into geometry for rendering as curves. Some procedural trees were generated as well.

How did you create the shot in which we cross the door lock and goes to the eye of Baby Doll?
The keyhole shot was created by using reference footage of the door/keyhole and building a cg version of the door to fly a camera through. On the other side of the keyhole we had macro photography of Emily’s eye. We stabilized her in that plate and mapped that to a card on the other side of the keyhole. There was another plate of the camera pushing in on the stepfather so the trick was to match up the hallway lights to highlights on her eye and the speed of the last plate’s push in to the camera travel through the keyhole. We applied some spherical distortion to the stepfather plate to appear that it’s mapped on her eyeball and as we transitioned into the stepfather’s world we ramped off of the distortion.

How did you create this incredible shot which shows the girls, the helicopter, the train and the sky with planets?
The sky/ground and planets were generated with Terragen2. We explored the idea of modeling the geometry in a traditional sense versus creating a large procedural environment and felt that going procedural gave us the freedom to have a world really large in scope. Another benefit of Terragen for us was how well it integrated it’s own atmospherics within the hard surface geometry it made.

How did you create an environment so big?
We used the Terragen software system… and in fact we ended up employing the author of the system Matt Fairclough to work on creating the alien planet and moons/planets in the sky. This allowed us to have a very large scale environment but since it was procedural we were also able to have a lot of small scale detail too. This also allowed us to have real volumetric clouds/sky-system that casted shadows back onto the surfaces too.

What references have you received for robots, trains and the huge environment of this sequence?
Much like the Lennox House we received some production artwork for these items which was a great starting point. We then built models and renders to show to Zack and DJ. We made a few versions of the robots/joints to explore the differences in joint configurations and details with the face masks/etc.

Can you explain to us the fight between the girls and the robots?
For the large continuous shot of the girls fighting the robots, we shot it for seven days on two stages simultaneously. You can actually see Zack talk a bit about it here: http://www.mtv.com/news/articles/1660722/sucker-punch.jhtml

And DJ talk about it here: http://www.awn.com/articles/3d/stitching-together-sucker-punch

The action sequence was a big challenge to plan. The first step was that we received a verbal description from Zack what he thought the shot might be. Then it moved into previz to kind of plan it out. Meanwhile Zack and Damon Caro worked together to plan out the fight sequences using his stunt team. We then edited together footage of the stunt guys fighting with our previz for sections where we knew we needed cg girls. For the bits where the girls flew we had both girls on rigs/wires to pull them around but used digital girls also.

Their highly reflective surface had to be a nightmare. How have you managed them?
It was problematic because the robots needed to reflect everything around there. So we had to have girls/train interior placed in the shots even when they weren’t being rendered to see how they showed up in the reflections.

How did you created the digital doubles for girls?
We spent a couple months doing detailed work in modelling the girls in both max and Zbrush based on highly detailed photography of the characters. We shared the workload of building the characters with Animal Logic, MPC and Prime Focus exchanging digital assets based upon guidelines agreed upon at the start of the production.

Is the extreme slow motion shots of Zack Snyder have caused you some troubles?
Yes. In the robot battle specifically – the footage was all shot at 300fps or 150fps. And to provide Zack the control he wanted/needed to change speedramps/etc we worked on the shot at a high frame rate as well to block it out. This made our working version of the shot 18minutes long.

Have you developed specific tools for this project?
Prime Focus developed some very specific tools to help manage a shot of the length and complexity of the big robot battle. Attacking it with off the shelf tools just did not provide the data management.

What was the biggest challenge on this project?
Without question the big robot battle.

Was there a shot or a sequence that prevented you from sleeping?
The big robot battle.

How long have you worked on this film?
Worked on the film for about a year.

How many shots have you made?
I think we delivered about 180 shots VFX shots. We did another 200 or so « make up » type fixes.

What did you keep from this experience?
I really enjoyed the creative freedom offered by a movie full of such incredible ideas. Both Zack and DJ really pushed to develop the shots to be as remarkable as possible. The experience of doing the big continuous robot battle in the train is not one I will soon forget.

What is your next project?
I’m currently working on GREEN LANTERN at another facility (not Prime Focus).

A big thanks for your time.

// WANT TO KNOW MORE ?

Prime Focus: Official website of Prime Focus.
fxguide: fxpodcast about SUCKER PUNCH.
VFX World: Article about SUCKER PUNCH on VFX World.

© Vincent Frei – The Art of VFX – 2011