BATTLE LOS ANGELES: Ben Shepherd – VFX Supervisor – Cinesite

Ben Shepherd works for over 10 years in visual effects, he participated in many projects such as BIG FISH, HARRY POTTER AND THE GOBLET OF FIRE, and TIM BURTON’S CORPSE BRIDE at MPC. In 2006, he joined Cinesite teams where he oversaw films such as X-MEN: THE LAST STAND, THE DAY THE EARTH STOOD STILL or 2 episodes of the TV series THE PRISONER.

What is your background?
My background is in illustration and graphic designer. I have a degree in fine art from Newcastle University. I’ve worked on lots of feature films including ALIEN VS PREDATOR, UNDERDOG, HARRY POTTER AND THE GOBLET OF FIRE, TIM BURTON’S CORPSE BRIDE, to name a few.

How was the collaboration with director Jonathan Liebesman and production VFX supervisor Everett Burrell?
This was the first time we had worked with both Jonathan and Everett. On BATTLE: LOS ANGELES we mainly dealt with Everett, who communicated Jonathan’s feedback to us. This process worked smoothly and Jonathan always seemed very pleased with the work we created.

How did Cinesite get involved in this project?
Director, Jonathan Liebesman, had seen our Emmy award-winning work on GENERATION KILL and off the back of that work we were selected for the job.

What are the sequences made at Cinesite?
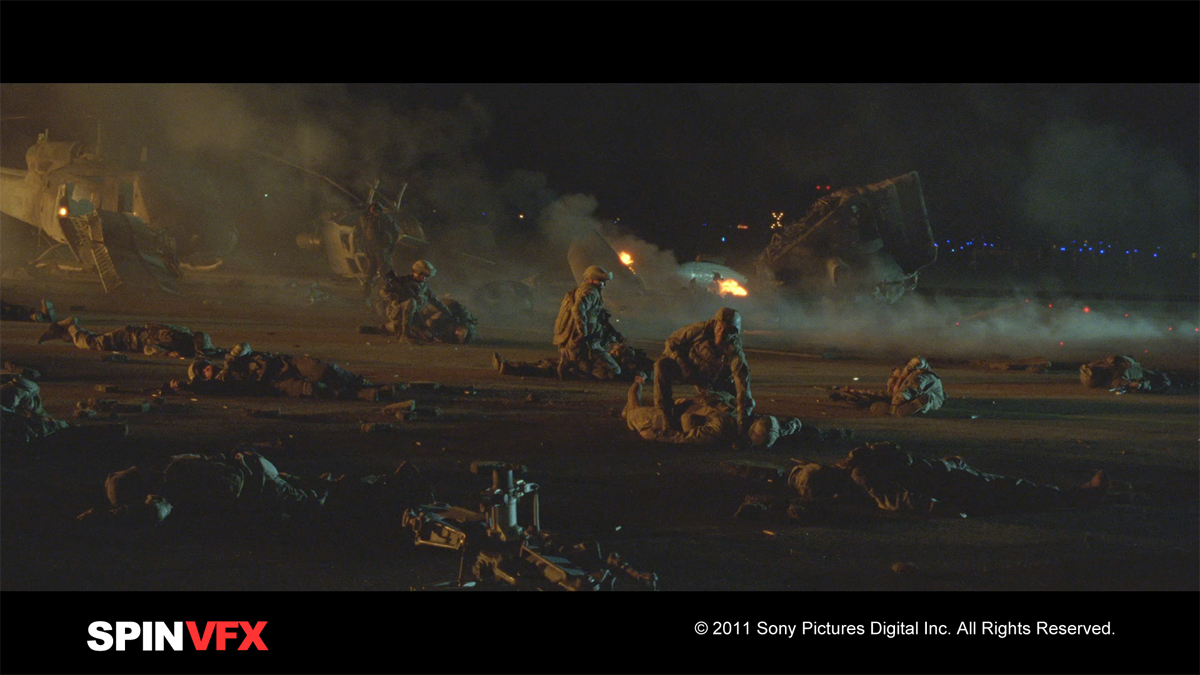
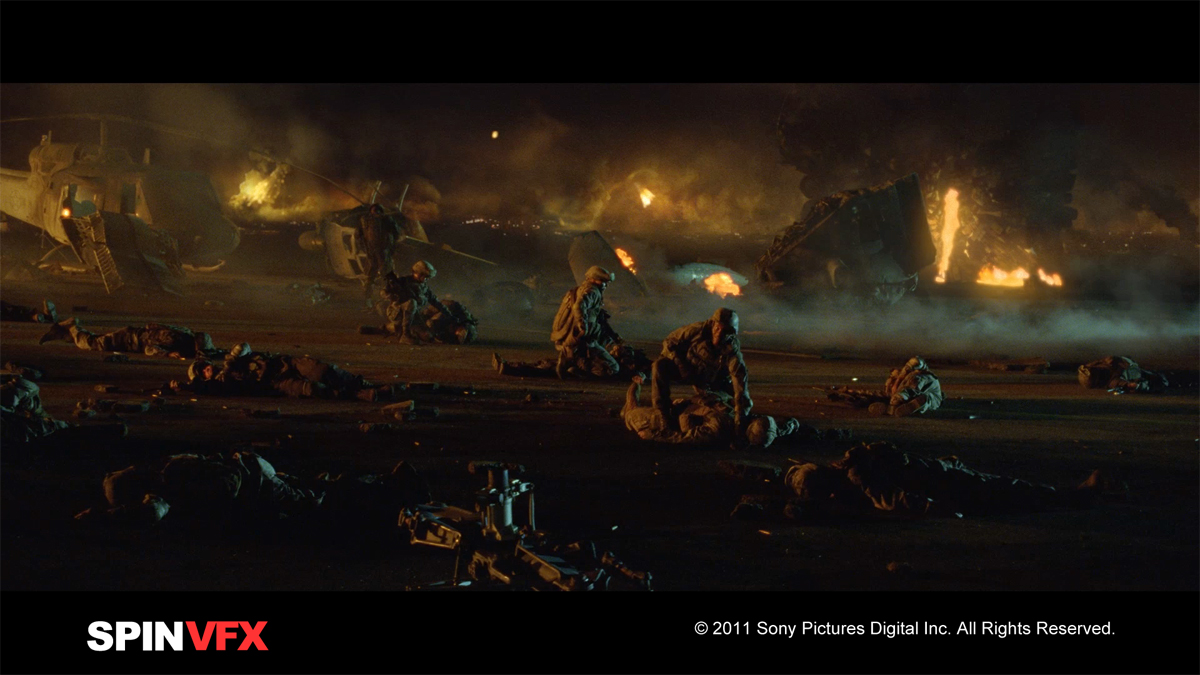
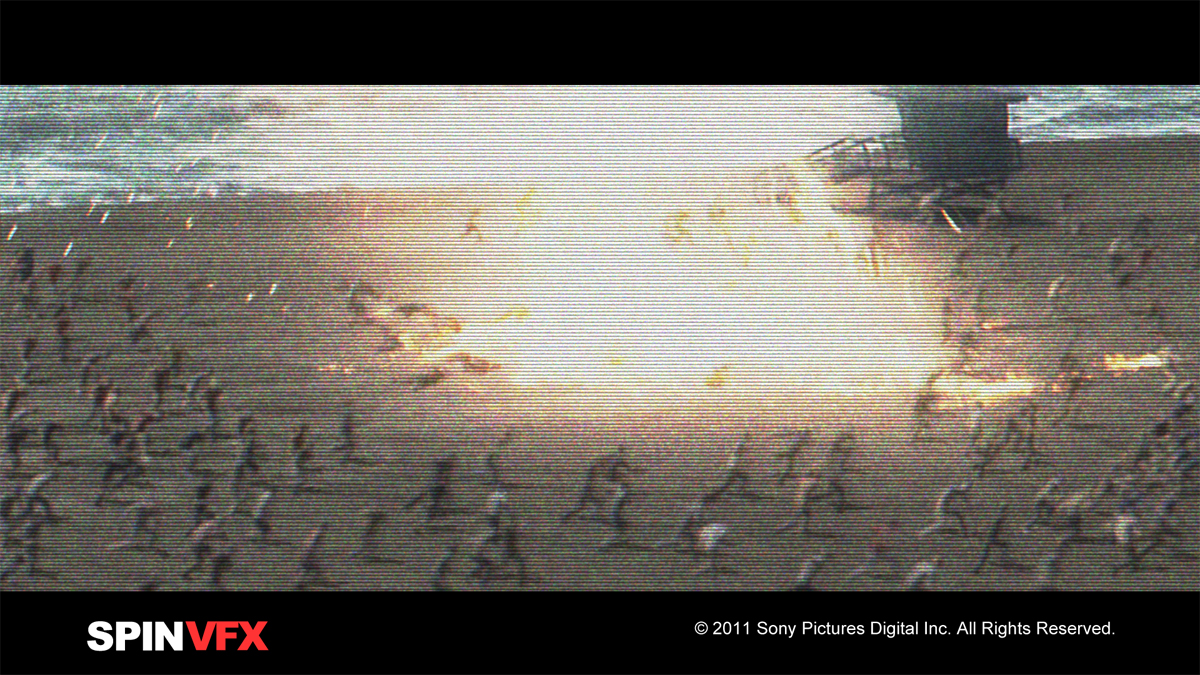
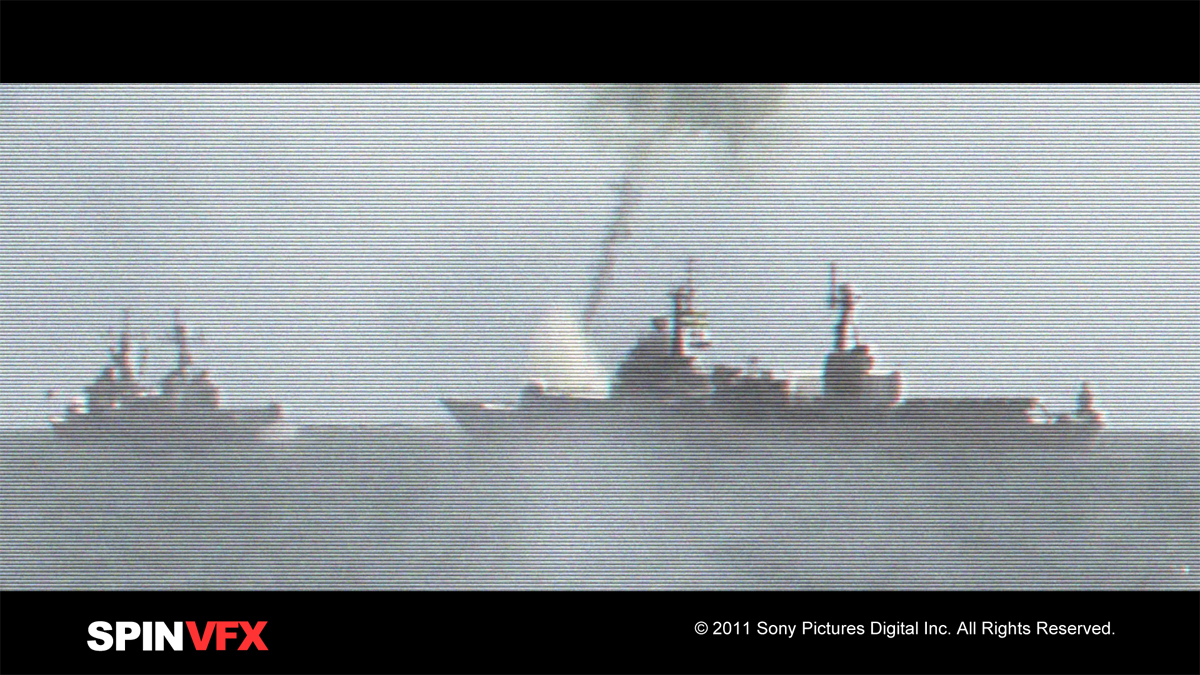
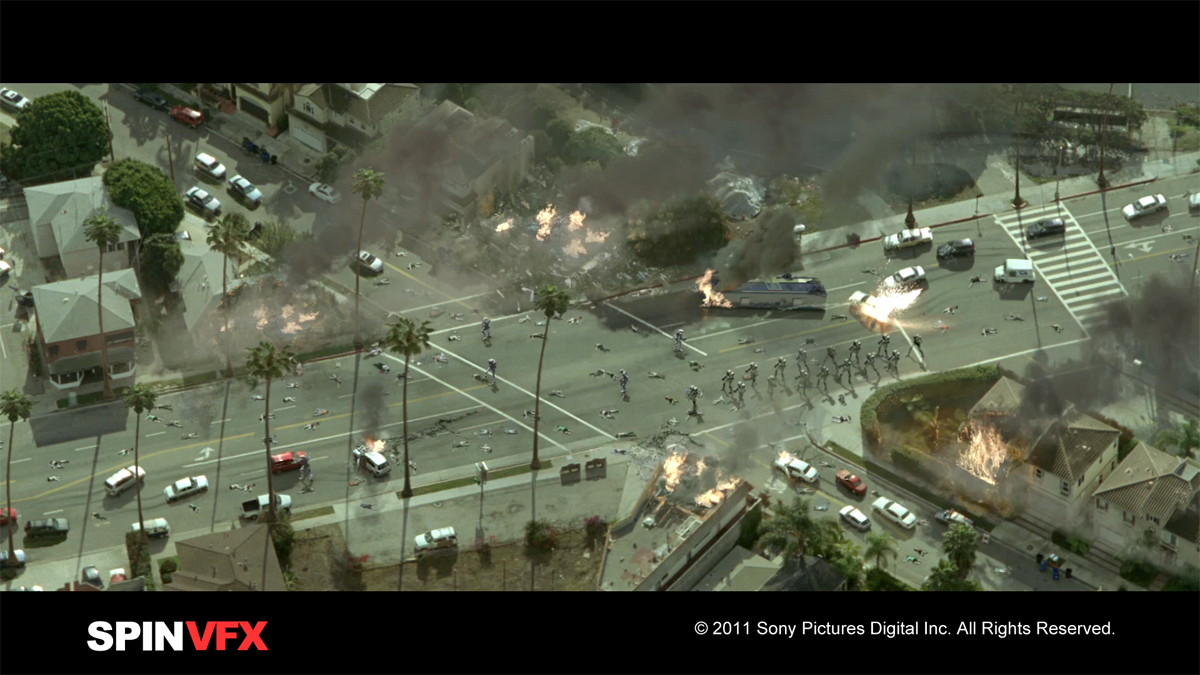
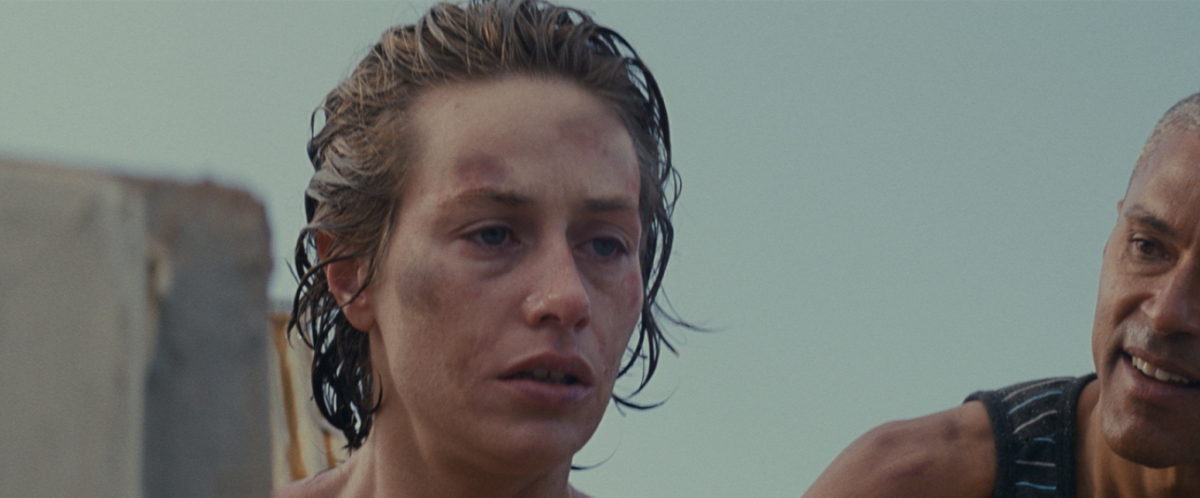
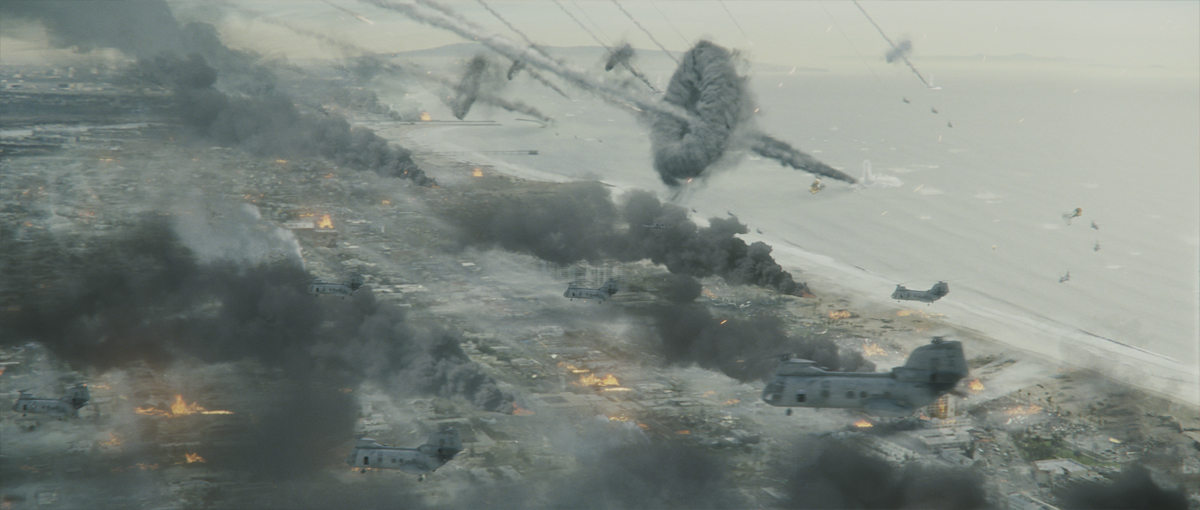
Our key sequences were those where the marines are transported between Camp Pendleton to the forward operating base at Santa Monica airport. The marines fly down the coast through the falling meteorites, witnessing the battle below them and coming under attack themselves. These sequences include CG water splashes, dead bodies, military hardware, meteorites, extensions, smoke plumes, explosions, water splashes – it’s major visual effects showing an epic wave of destruction.

The sequence culminates with the Marines landing at Santa Monica airport, a modern airport that we turned into a military base complete with military aircraft and soldiers, with smoke rings and falling meteorites in the background.

We did other intermediate shots like a big matte painting establisher where the Marines get back to Camp Pendleton to discover it has been destroyed by the aliens.

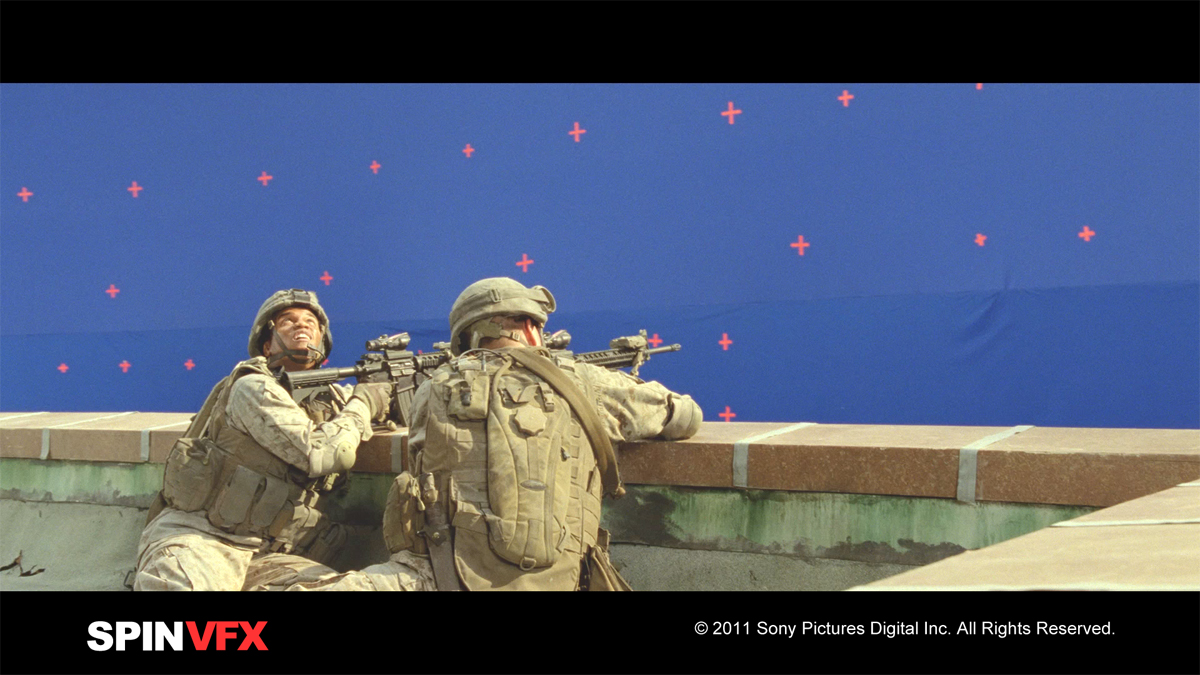
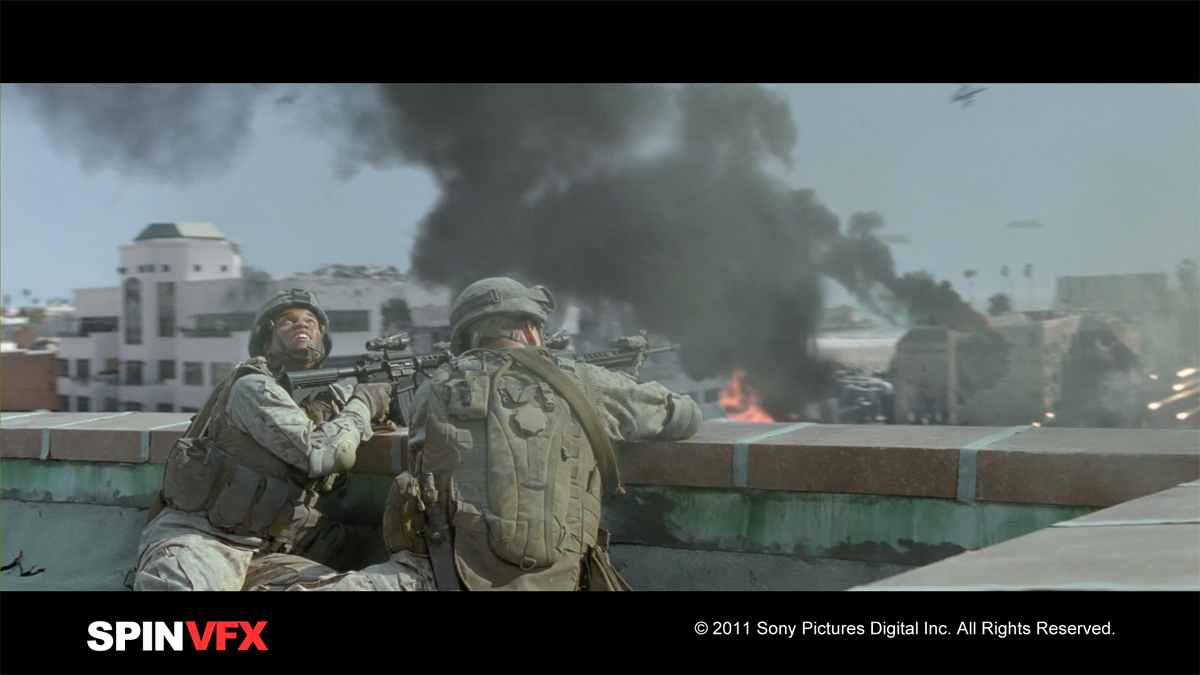
Also, a major section from where the marines enter the sewer right through to the destruction of the alien aerial was our work. This includes a close up fire fight between the marines and a troop of aliens.

How did you create the impressive smoke trails and their distinctive shape?
The smoke rings are an integral part of the meteor attack/landing at the beginning of the movie and they’ve featured heavily on the posters and publicity for the film.

Jonathan’s idea for incorporating the rings was that they were a retro-thruster mechanism that would activate in the meteors to slow them down before landing.

We had an extremely talented FX TD working on them, Claire Pegorier, and she used standard Maya fluids to build the effect. The initial explosion was created using fast moving particle fluids. The smoke was created using fluid emitting from a torus surface, driven by a torus volumeAxisField to force the fluid to rotate.

Various other processes were applied to give the rings an irregular and more natural look, to simulate the process of time on the rings and to collapse the rings.

How did you get the idea for this very iconic smoke ring?
The smoke rings themselves were the hardest thing to do. I was on set with Everett when they were filming some massive explosions. One of them resulted in a perfect smoke ring floating up into the sky. Everett turned to me and said, “If you made that in CG, no-one would believe it.” Then Jonathan came over and said excitedly: “I want that in my movie!” So we were challenged to replicate it.

The smoke ring effect simulations were created by Claire Pegorier and Michael Wortmann wrote the shader. Jonathan laid down a challenge that he could spot any CG smoke, but he never quibbled about any of our smoke, which I guess is a sign of his confidence in our work.

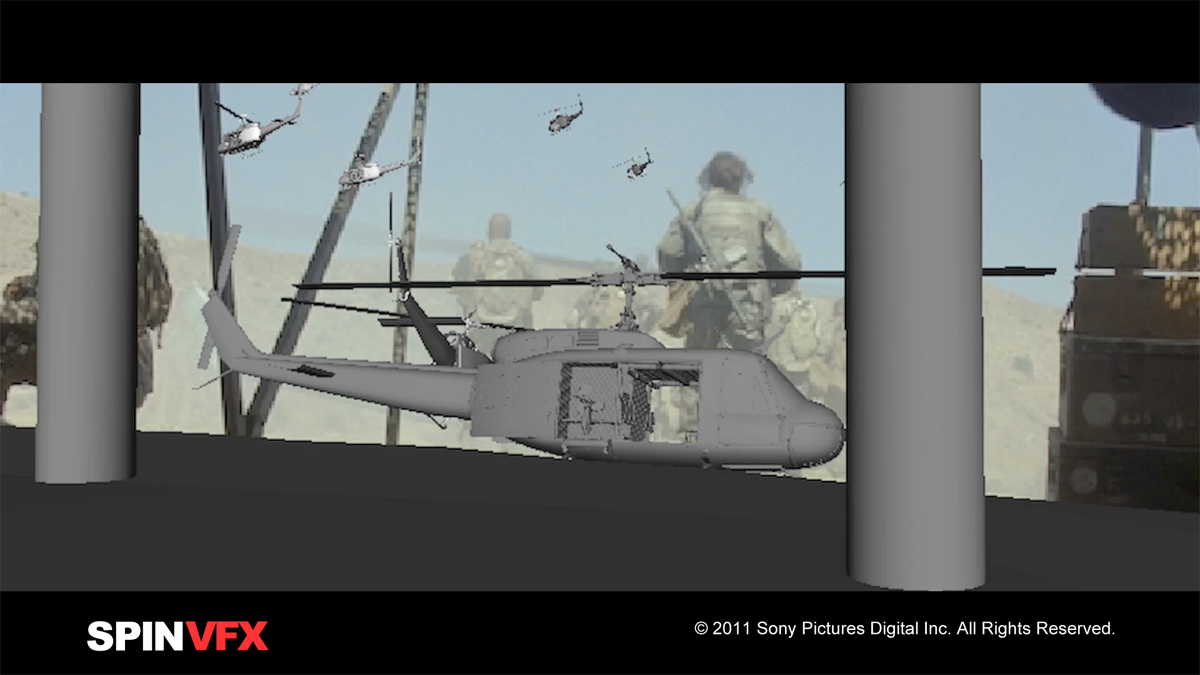
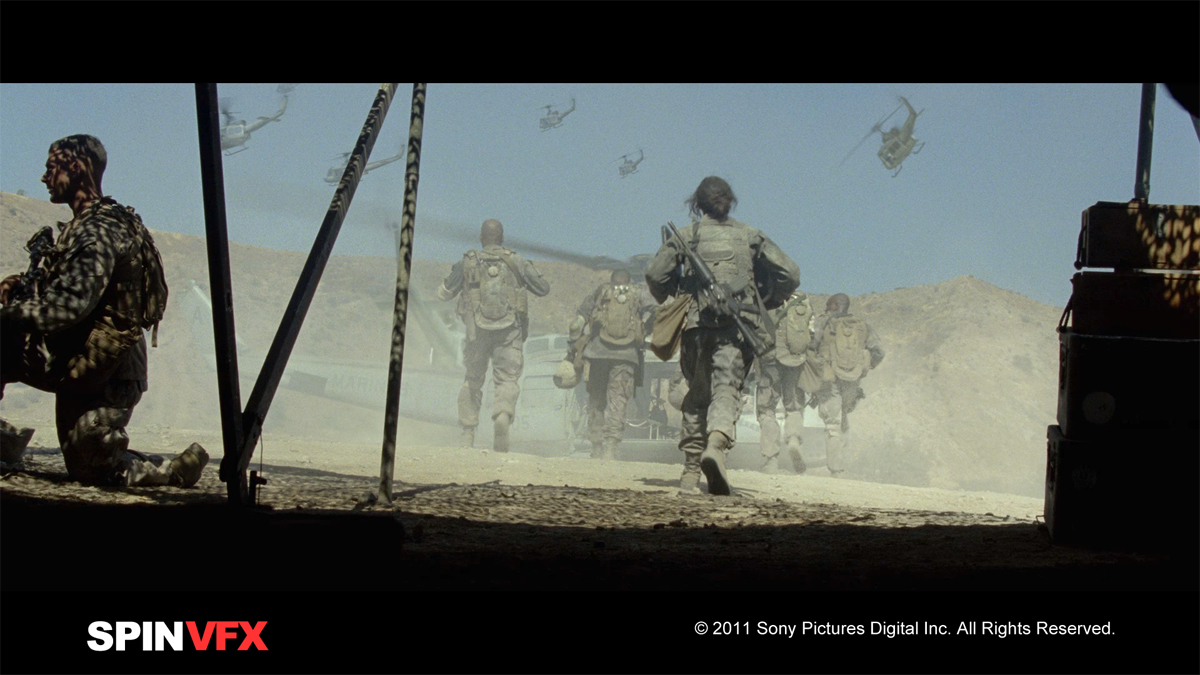
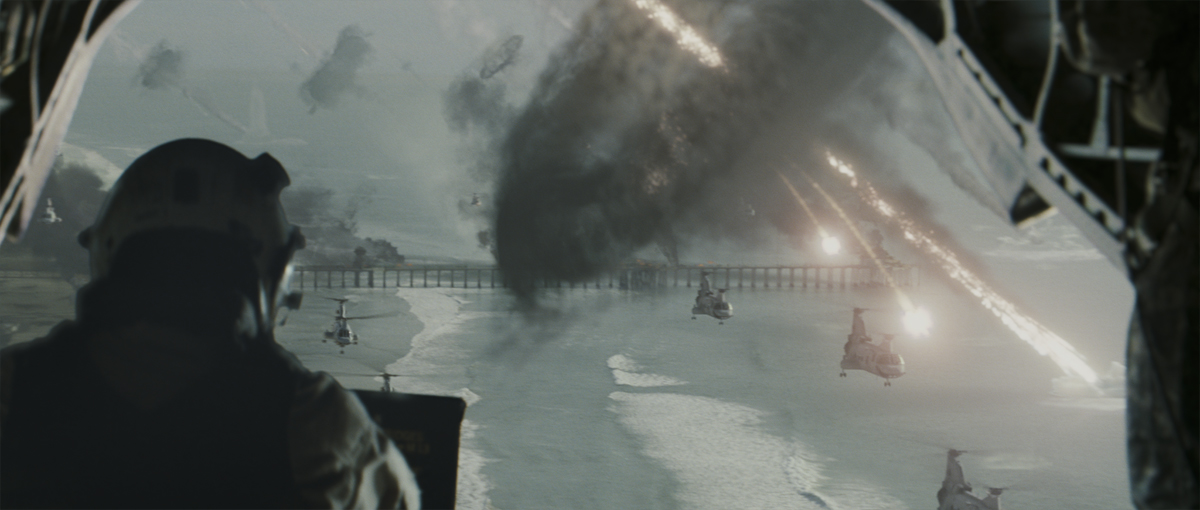
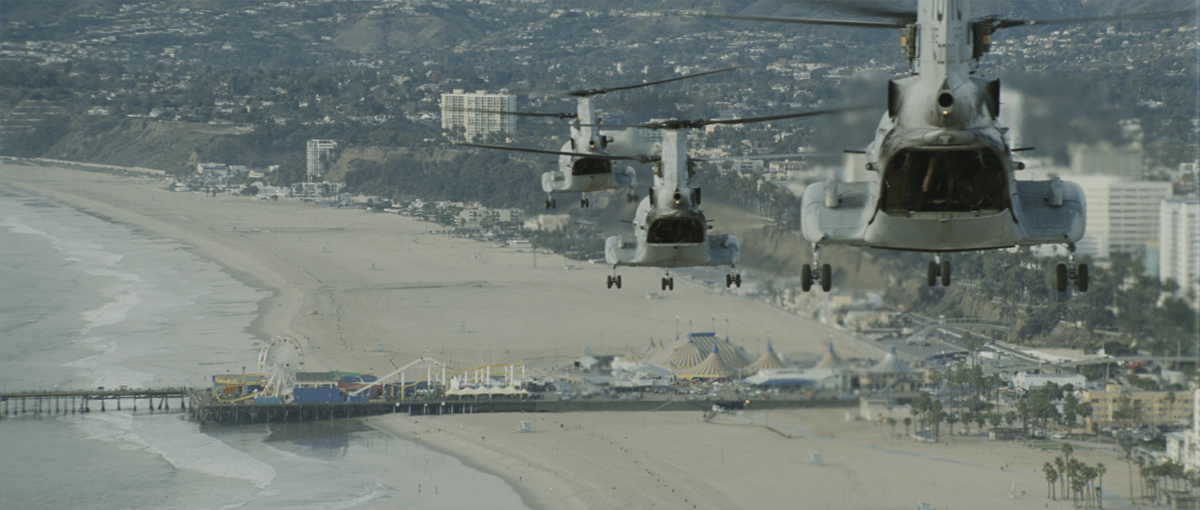
Can you tell us about the shooting of the helicopters sequence?
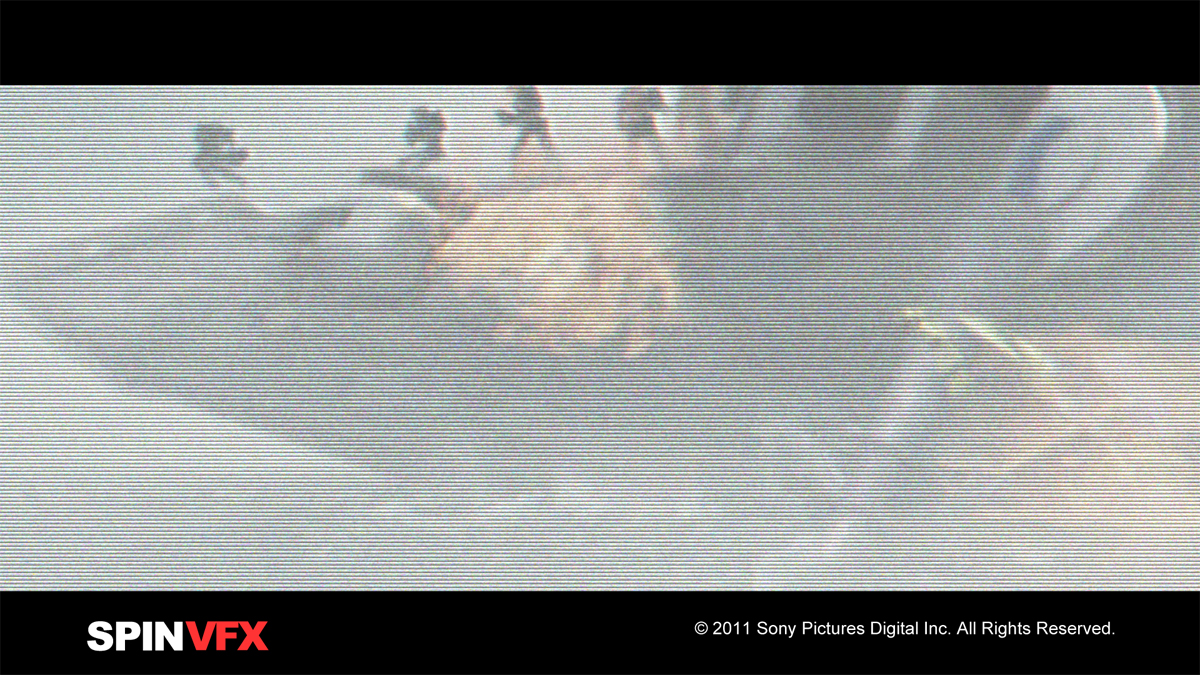
This was the sequence where the Marines leave Camp Pendleton to tackle the invasion of Santa Monica airport. The plate was shot with three helicopters which we enhanced using our stock of assets to a formation of 12 by adding CG ones. The airfield was further populated by tanks, light armoured vehicles and armour, as well as atmospherics such as smoke streams and distant smoke rings.

How did you create this armada of helicopters? Was there a real helicopter in those shots?
There were three real helicopters in almost every live action plate. We already had a CH46 model, which we had created for our work on GENERATION KILL; we customised this and referenced the live action plate to make sure they matched. It is always a blessing to have real vehicles in shot, as a reference for lighting etc.

Have you encountered any problems with the style of shooting especially for the tracking?
Not really. Much of the hand held camera shake was captured in principal photography, but we also added some in the compositing phase. It did cause some delays with tracking, but nothing insurmountable.

What were your references for creating this devastated Los Angeles?
We had matte paintings and digital stills which we composited into the shots, animated and added layers of smoke, fire and debris.

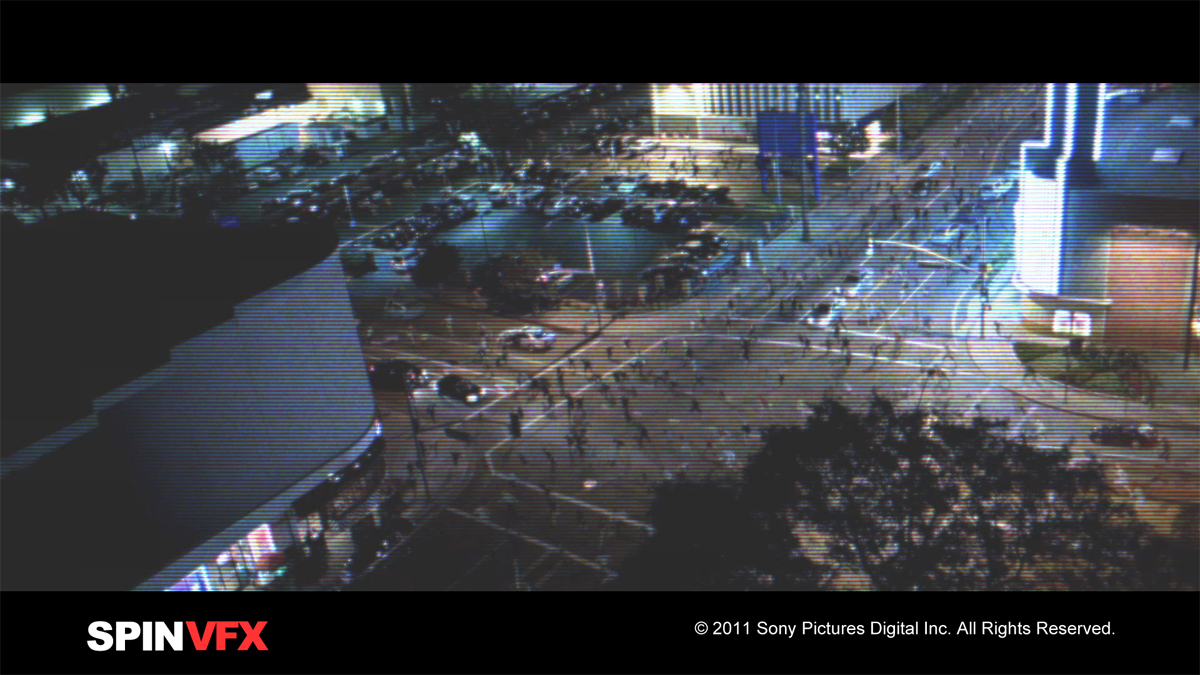
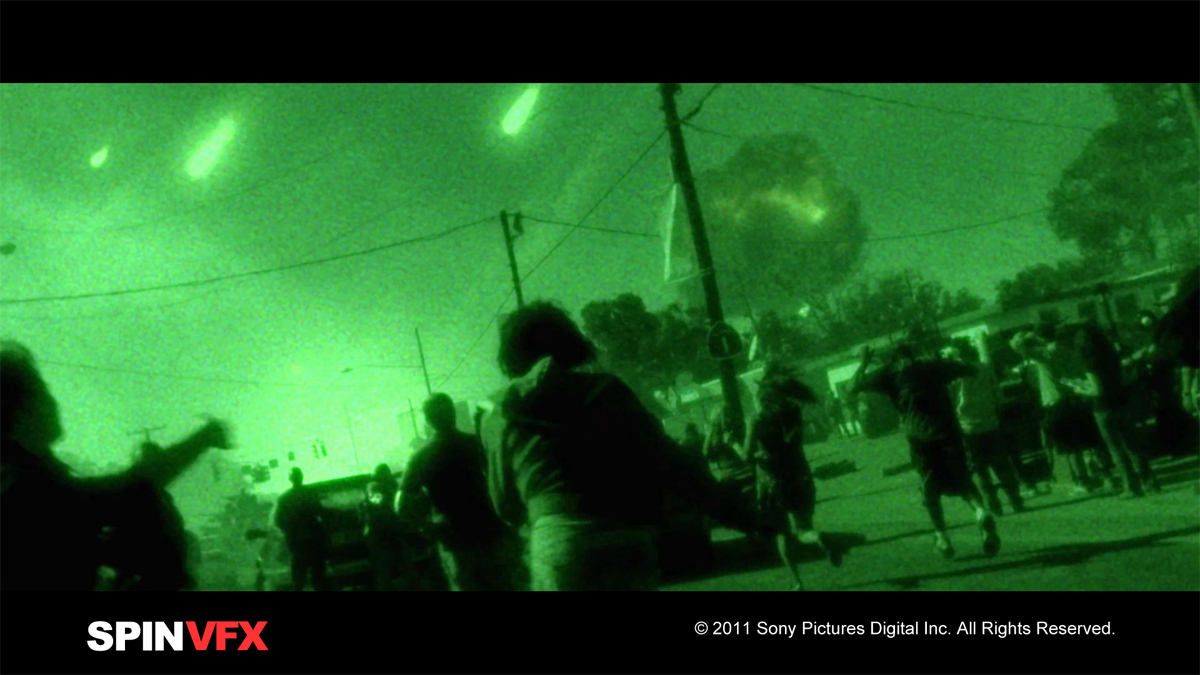
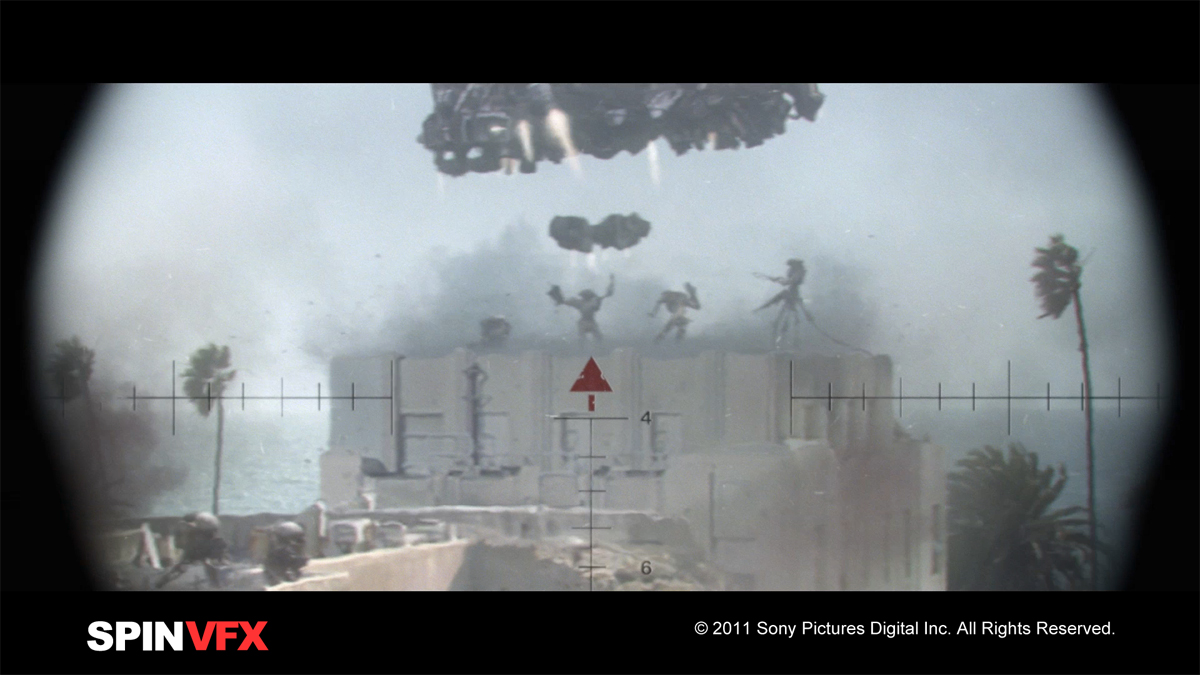
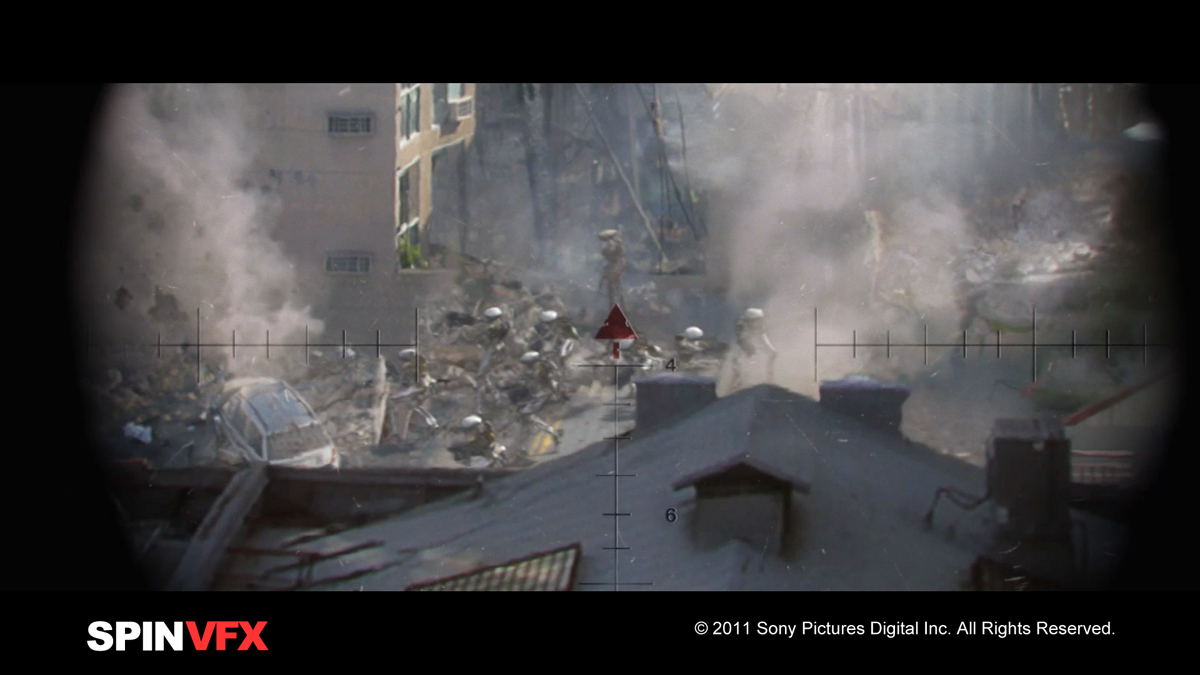
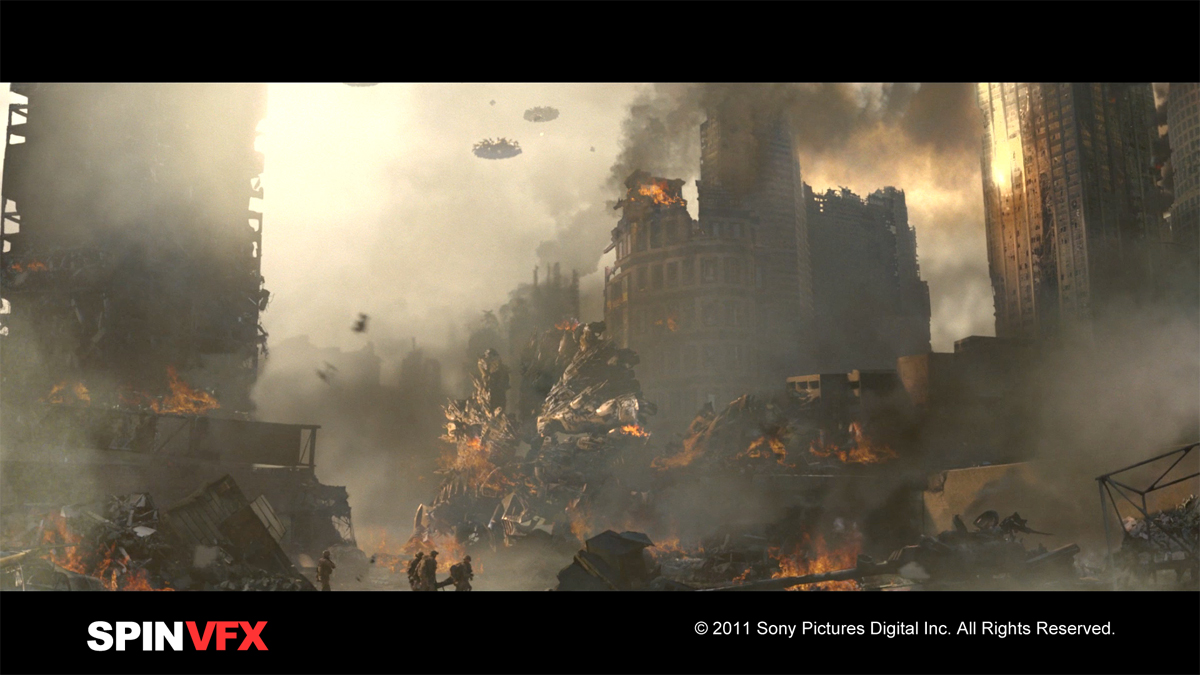
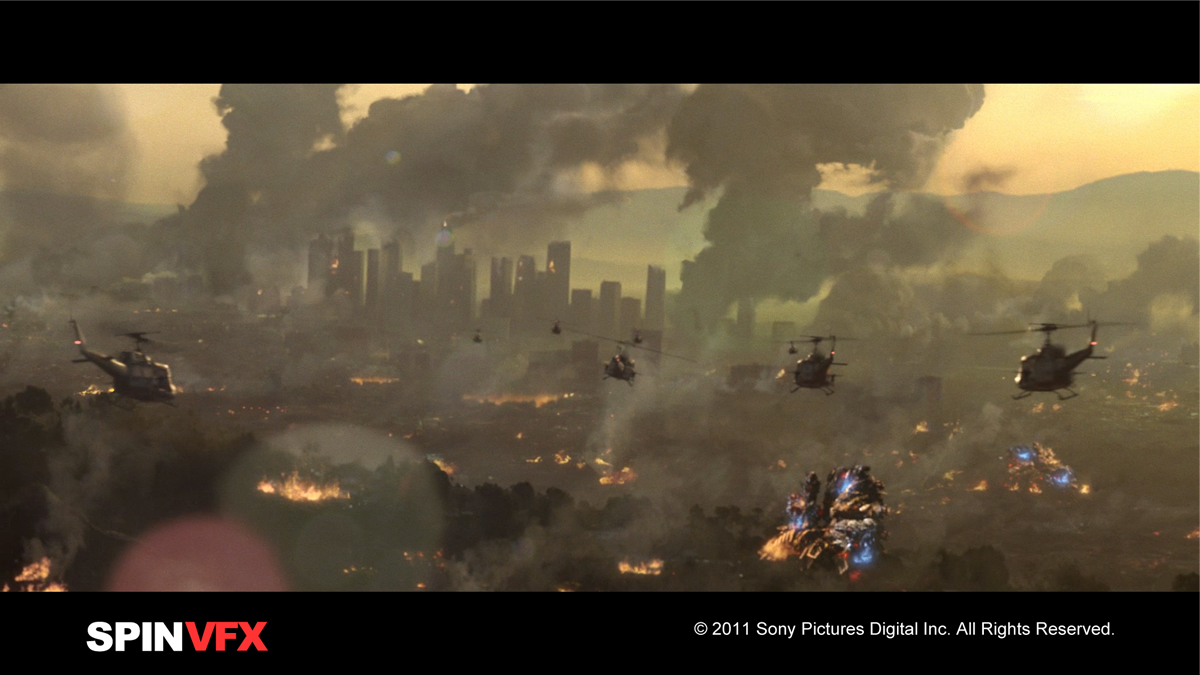
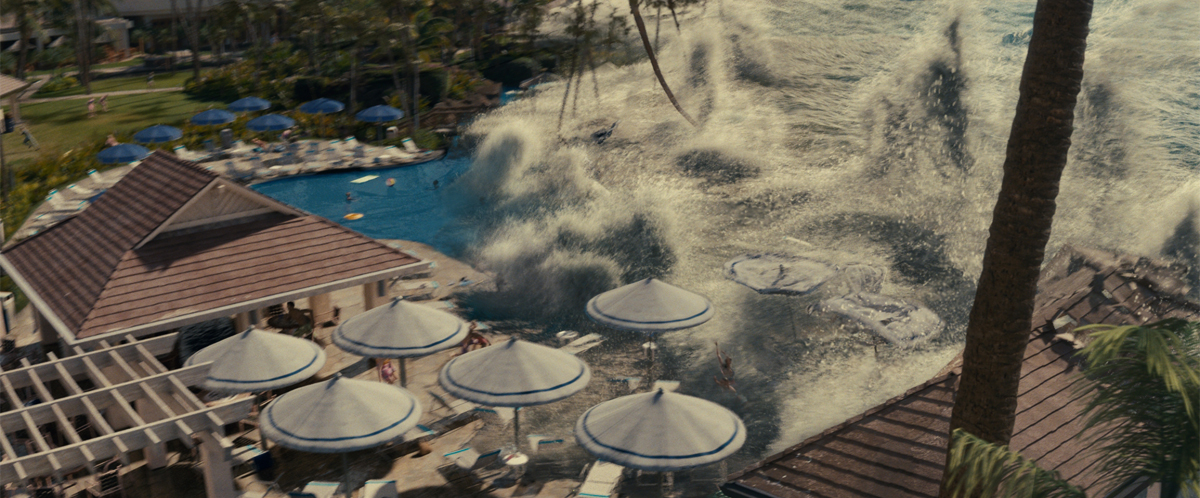
Can you explain in detail how you create those really impressive shots showing the mass destruction of Los Angeles and the beach?
Initially, we created a digital matte painting of the city, extending the damage into the distance, and adding smoke. The fog bank the aliens hide behind is a 3D effect in some of the close shots, and was created in the digital matte painting in some of the wider angles. We also added 3D meteorites, smoke ring elements and water splashes where necessary.

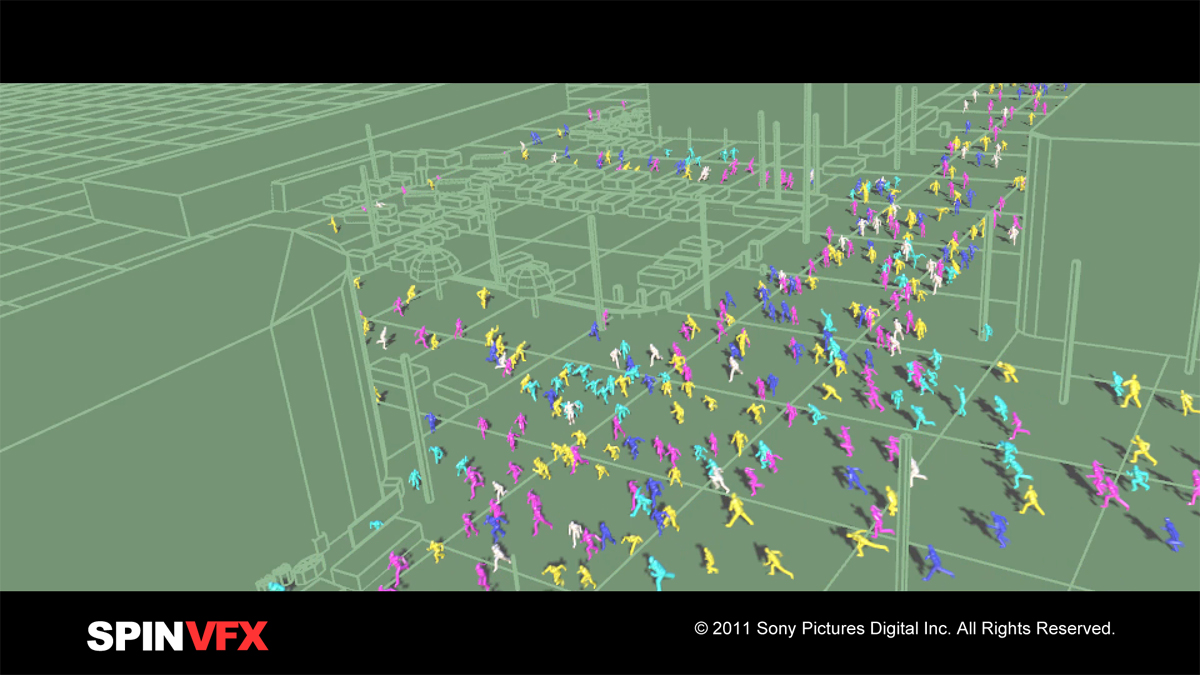
In addition to all of this, we added damaged & wrecked vehicles to the ground, crowds of bodies on the ground created in Massive, 2D and 3D explosions,2D flak bursts and tracer fire, 3D A10 ground attack aircraft, 3D police cars blocking roads, Cobras firing missiles, 3D CH46 helicopters and in some shots, even maneuvering troops created in Massive. Pretty much everything is in there; in some shots there are over fifty layers of effects elements!

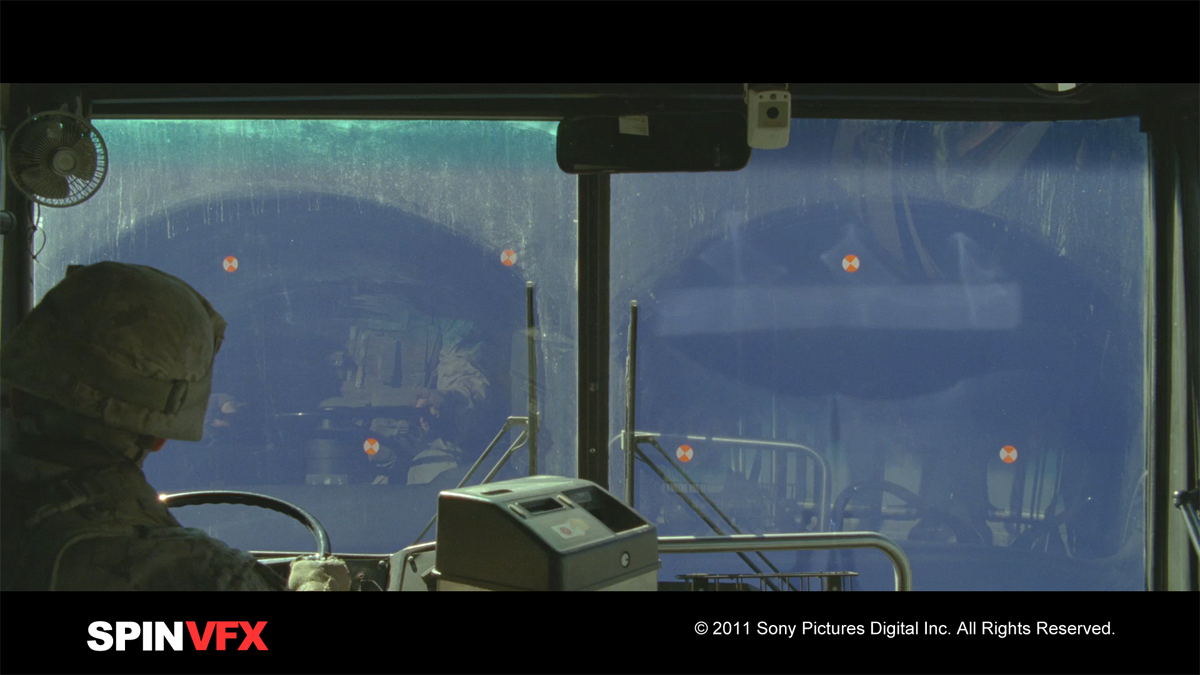
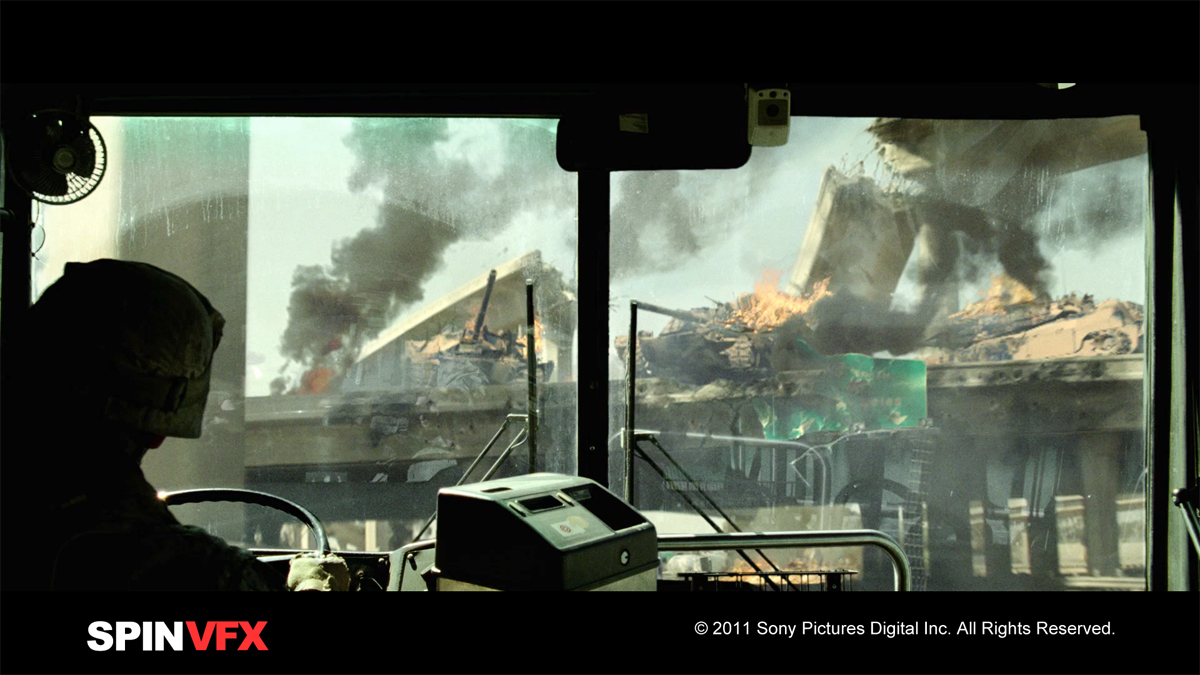
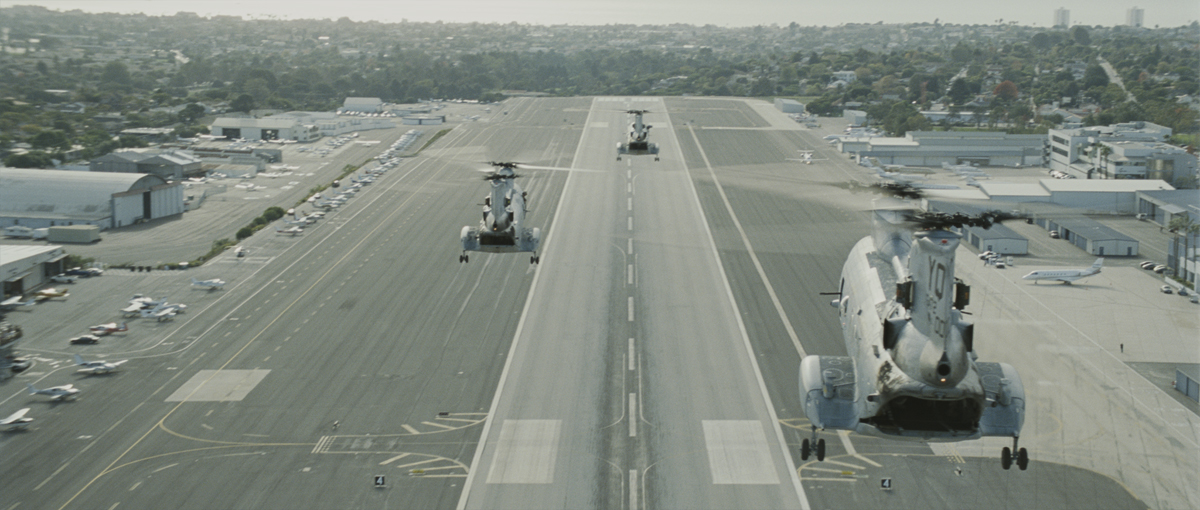
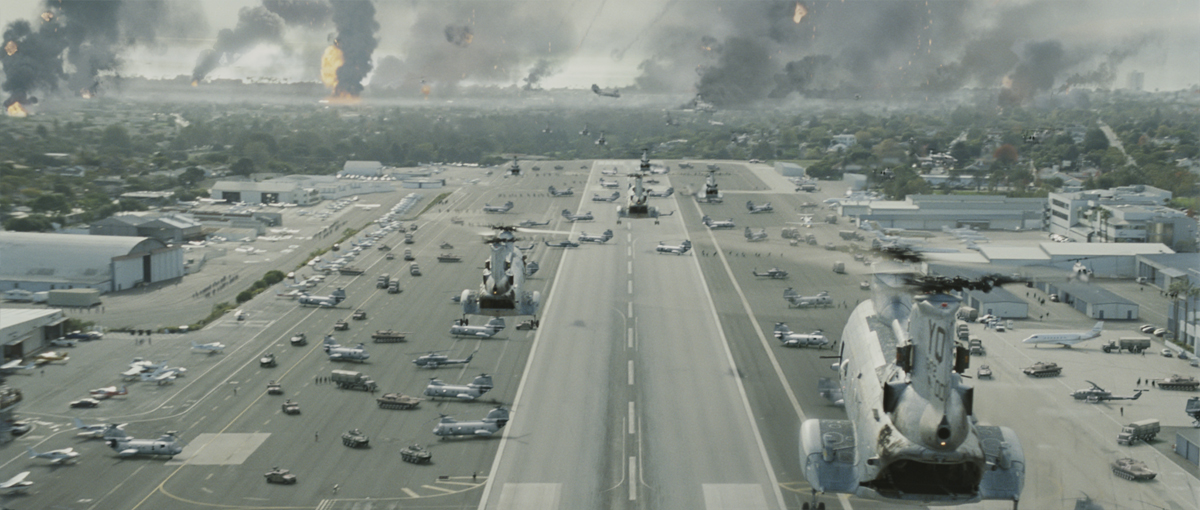
Is the airport in the forward base is real or is it a full CG shot?
When they land at the Forward Operating Base, that’s a live action shot of Santa Monica airport with live action helicopters. All the other 100 or so airplanes on the runway, troops, explosions in the distance etc. is all CG. When they return to the FOB later, the whole environment is CG, including all the vehicles.

What was your sense of participating in the destruction of a city like Los Angeles? Your artists had to love it.
We loved it – it’s not every day you get to blow up LA!

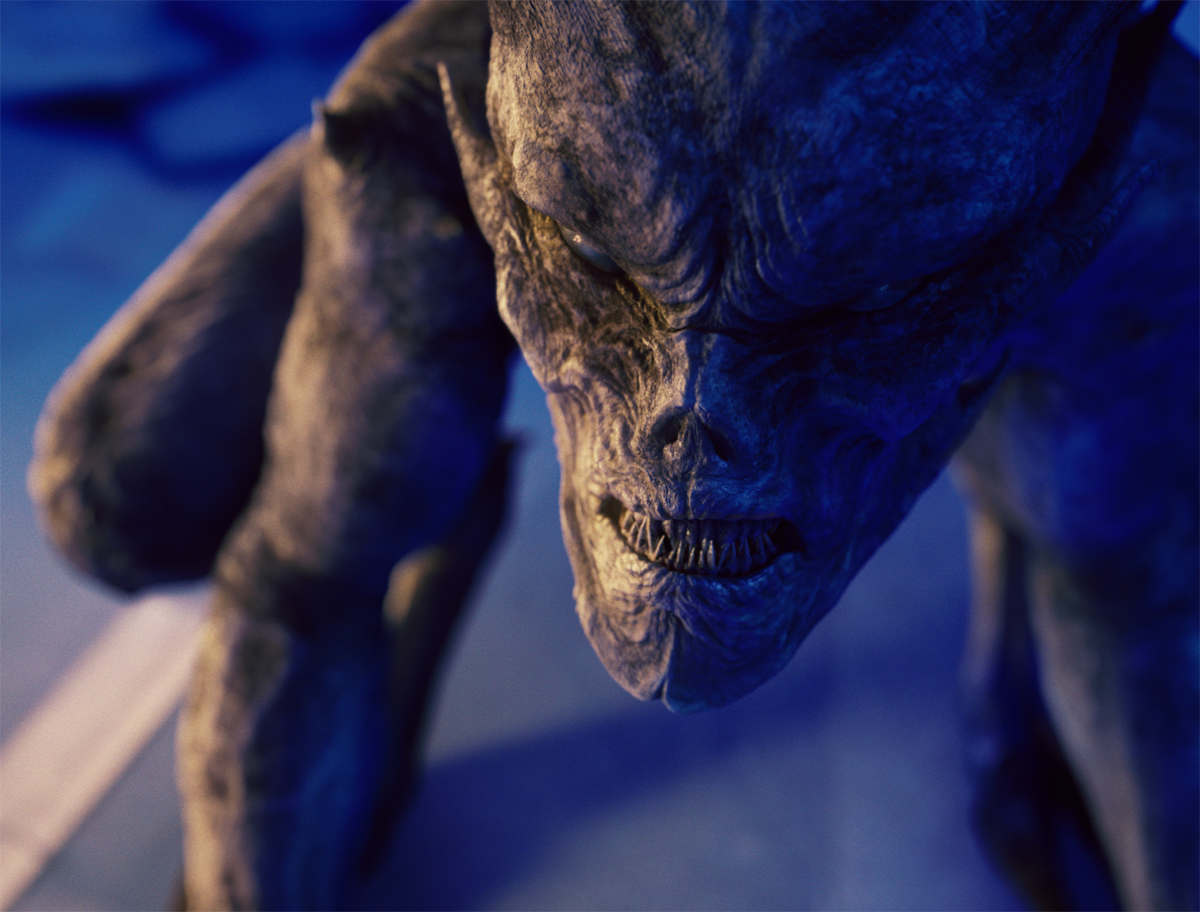
Tell us about the creatures and their ships. How do you create and animate them?
We were responsible for creating the Commander Alien which was designed to have human mannerisms so the audience wouldn’t at first identify the figure as an alien. The model was key frame animated and to make the Commander stand out from the other aliens, he was heavily textured and given a greasy, sweaty look and feel.

The alien hovercraft was another element which our team generated. Based on original designs by Paul Gerrard, it features in the film as a gun platform for the aliens to fire from.

How was the collaboration between the different VFX vendors?
We provided all the other facilities with full 360 degree panoramas of the destroyed Los Angeles. These were created in Photoshop as fairly traditional digital matte paintings, which were composited in Nuke as a 3D environment. We also shared our Commander Alien asset with Hydraulx. We were the only UK facility on the project and everything worked smoothly with the other facilities, who were all US-based

What was the biggest challenge on this project?
Probably the smoke rings

Was there a shot or a sequence that prevented you from sleeping?
Not really, to be honest. The whole production for us went very smoothly.

How long have you worked on this film?
The project took 10 months to work on, including six weeks spent on set in Baton Rouge, Louisiana.

How many shots have you made and what was the size of your team?
We completed around 110 shots and the team staffed up to about 34 at the peak of the project

What do you keep from this experience?
In the current project I’m working on, we return to reference our work on BATTLE: LOS ANGELES for the smoke and fire. We’re still using our proprietary in-house smoke tools on other shows.
We’re very proud of the work we did on Battle: Los Angeles and it has been received well by the visual effects community, which is always a bonus.

What is your next project?
I’m currently working on the Disney/Pixar film JOHN CARTER OF MARS, which is due for release in 2012.

What are the 4 movies that gave you the passion for cinema?
STAR TREK: THE WRATH OF KHAN, JAWS, BLADE RUNNER and TIME BANDITS.

A big thanks for your time.

// WANT TO KNOW MORE ?

Cinesite: Official website of Cinesite.
fxguide: Complete article about BATTLE LOS ANGELES on fxguide.

© Vincent Frei – The Art of VFX – 2011

BATTLE LOS ANGELES: Jeff Campbell – VFX Supervisor – Spin VFX

After a first interview for LEGION, Jeff Campbell is back on The Art of VFX with a new movie for Spin VFX. In the following interview, he talks about his work on BATTLE LOS ANGELES.

How was the collaboration with director Jonathan Liebesman and production VFX supervisor Everett Burrell?
I’ve worked with Everett on a couple on projects now and it has always been a pleasure. If we need anything he is always willing to help out. Jonathan’s VFX experience is a benefit in our working relationship, especially on a VFX heavy film. He works in After Effects, blocking out shots to give us some idea as to what he is looking for. He has a good eye for details so everything we did had to be absolutely realistic.

How did Spin VFX get involved in this project?
We actually got involved a year prior to production. Spin VFX was asked to help develop the creatures and to finish a few shots in a short film, which was intended to sell the style and dynamics of the project to the studio. I was asked on set along with Everett Burrell, Production VFX Supervisor, to supervise the test. I had the task of supervising a small SFX crew with a Red cam to shoot the VFX elements. The shoot was at the Sony lot, which already looked like it had been bombed out due to construction. Aaron Eckhart, the star of the film, acted in the test to demonstrate his dedication.
After the show was green lit we were invited to bid on a pretty big chunk of the movie which ended up being 200 shots. That made for a really busy summer as we had 3 studio features going on at the same time. Fun.

What are the sequences made at Spin?
Spin delivered 30 sequences with a variety of different challenges including, environments, creatures, alien ships, Huey helicopters, F18 jet fighters, a Coast Guard Cutter, and Massive crowd shots. Our biggest sequence was the Police Rooftop sequence, with 35 shots.

How was the development of the creatures?
We would receive detailed concept art from Paul Gerrard and then build from there. The textures and displacements were derived from the high res artwork. Maquettes were built for the various creature options and we were also provided turntable stills to reference. I think we built 3 different creatures; mainly the legs would be the most drastic difference. One version had five legs. We would animate the creatures doing various key frame motion tests and walk cycles. I like to assign tests to as many different animators as possible to see what kind of personality shines through in the creature. To get a better feel of scale and the emotion of combat, some of our tests were done using full CG environments of a city street with over turned cars and debris.
Early creature references were very “creature like” but eventually Jonathan referred to real army soldier’s performances. At that point we used motion capture data to drive their performances. In the end, Jonathan decided to go all motion capture for the animation.

How did you create the images that look like TV coverage?
I initially used a plugin called BadTV by GenArts on the Inferno. Once we got a creative signoff as to the look, we made a gizmo in Nuke to replicate this look so all our artist can apply it to their shots.
The TV distortion provided only subtle glimpses of the Aliens to create interest in the viewer to want to see more. The point was that the alien radioactivity interfered with the airwaves.

Can you explain the attack on the coastguard boat?
We were given WWII footage to match to for the sinking ship shot. The vintage footage was very soft and degraded which was kind of the look requested but we built the ship at a higher level of detail to hold up to any possible client requests. We even animated sailors on board being thrown into sea and hanging on to railings. Our first water sims for the meteor impact were too much as they covered too much of the ship in a huge title wave. We ended up pulling back on the water sim to look more like a heaving of the area from the water displacement of the meteor impact. We then added smaller fluid sims to wash over the deck and for the hull interaction. The elements were then composited in Nuke.

How did you create the snipers POV shots?
The story point here was the idea that the aliens had leadership in th form of an alien General. The General did not perform like the others. He would hover over the ground, move like a jellyfish with tentacle legs and do a lot of pointing as he gave orders. So there was some new ground in animation to be addressed. The aliens were motion captured and the General was key-framed because of his unique movement. We had a lot going on in those shots, like many of our shots. We had aliens, a general, a drone ship and lowering cargo, cg dust being kicked up from the roof top, smoke, fires, tracer fire from Soldiers and Aliens and Drone ships / F18 dogfights.
The background was a matte painting of the damaged buildings in which I added live action trees and a beach. I finished the shots in Inferno and added the scope gizmo, which was supplied by The Garage Band, in Nuke.

Is the style of shooting with the camera constantly moving caused you such troubles especially for tracking?
You said it brother! Tracking was a challenge. We often ended up guessing and manually setting keys by eye. Takes me back to the digital caveman days, before tracking, working on a Quantel Harry. Sometimes the motion blur you add back to the shot helps cover some nasty problem areas!

Can you explain in detail the sequence on the roof of the police?
The Rooftop Police sequence consisted of 35 shots. It was the largest sequence Spin delivered and mostly consisted of bluescreen plates of 2 soldiers getting a wider perspective as to what the Aliens were up to. We built a 280-degree multiplane cyclorama to cover all the angles. The multiplane was used to give a sense of parallax and to help integrate the live action elements like explosions, smoke, trees and ocean.
The set piece was probably 20’x 20’ and was used for the scouting point of the soldiers. The wider shots were real rooftop location plates shot in Baton Rouge. We had to create mattes to replace the environment with our destroyed LA matte painting. It was tough because there were so many wires on the real rooftop that we would either roto or replace with new ones.

Are you involved to help and increase the special makeup?
Yes, those are the alien autopsy shots. We were asked to bring them to life. It was a great opportunity to create the details of how these creatures work. It was an important story point as this is where they discover how to kill them.
We made a cg eye, which was a small tracking device that would scan randomly along a track. The ears, various gears and fan ports were built and tracked on. The mouth was like a vibrating bladder that was animated using a displacement map. The legs were also CG, which moved and twitched. The rest of the body movements came from mesh warps in comp. When Aaron Eckhart was stabbing the heart, the photographed plates were not in line with the directors’ vision. Jonathan wanted to clearly show that these creatures were fueled by seawater so we built a CG semi transparent heart filled with pumping seawater. The lower velocity fluid that interacted with the plate was created in Realflow. The higher velocity fluids, which included the sprays & bursts when the alien was stabbed, were live action elements that Everett shot for us.

How did you create the impressive shot of the Marines alone in the middle of a devastated neighborhood?
Jonathan had blocked this shot out in After Effects to give us a general idea of the look and timing of the shot. The only plate we were given was a green screen plate of the soldiers. We wanted to base the shot on an actual location so production shot an approved still to use as reference for the matte painting. To bring the shot to life, we added live action smoke elements and used Maya nCloth/dynamics to add blowing fabrics, blowing papers, and falling debris. We added a dogfight and flack bursts in the sky to tell the story that the Air force were being successful in hold off the Aliens.

How did you create the shots for the bus on the highway?
We didn’t do these shots for the film, however, I did do this shot in the concept short film that was used to get the show greenlit.

What did you do on the shot showing the Marines that goes in helicopters at the end of the film?
We added half a dozen additional Hueys going back into battle. The plate only had one live action helo in it, which wasn’t enough. The director wanted to show a stronger force going back into battle thus the reason why we were also given the final end shot.

Can you explain in detail the creation of the final shot?
That shot had already been completed by another vendor but failed to support the story so a whole new approach was conceived involving a new plate and a grander vision to convey.
The camera pans up over a ridge to a spectacular, wide shot with a dozen helicopters and two F18’s overtaking the camera, heading back into battle against a backdrop of the totally destroyed L.A.
We where supplied an aerial film plate of the Hollywood hills revealing downtown LA. Production supplied the Helicopter asset from another vendor in which we had to develop our own shaders and rigs. We built the F18’s. The matte painting was created in Photoshop and fed into Nuke as a multiplane card projection. A 3d camera was also used in Nuke to add additional live action fire and smoke elements.

What was your feeling of participating in the destruction of a city like Los Angeles? Your artists should love that.
Yeah – destruction work is always fun and makes for GREAT before and afters! The compositors really enjoyed it as well because they got to use really good large-scale explosion elements that Everett shot in Baton Rouge.

What was the biggest challenge on this project?
The biggest challenge was checking in all the assets from different vendors. Because shaders were held back, we had to rebalance and figure out the attribute maps and match established looks. New rigs were developed as the existing ones did not translate well from other software packages or because custom scripts were not provided. We also had 3 major features in house at the same time. With multiple productions including so many assets and sequences, the tool that really stands out to me is our production management software, SPINternal. Developed by Blair Tennessy, Spin’s TD, SPINternal is a python based server, which manages production, file system and user and group information. Its interface is web based. We couldn’t be nearly as efficient without it. It relieves the artist from repetitive tasks, which in turn improves productivity and quality.

How was the collaboration between the different VFX vendors?
Everett kept that process invisible to us. The assets would arrive through production. The Drone ship arrived as an XSI scene, was a bit of an unexpected task having to convert shaders to Maya. The Garage Band (Battle LA’s in-house VFX team) would provide us with their cool Nuke Gizmos.

Was there a shot or a sequence that prevented you from sleeping?
No. Our team is pretty flexible when it comes to even the most difficult challenges and you learn to put out fires before they happen. If you can’t sleep at night you will burn out fast in this business.

How long have you worked on this film?
July 2010 to September 2010.

How many shots have you made and what was the size of your team?
We finished 200 shots using around 50 artists and production staff.

What do you keep from this experience?
My virginity. Ha just joking, I lost it on MAX PAYNE.

What is your next project?
I’m currently involved in another studio development project shooting this summer. The facility is busy finishing Season 1 of THE BORGIAS for Showtime. We are also working on DREAMHOUSE (Morgan Creek) and PRIEST (Screen Gems).

A big thanks for your time.

// WANT TO KNOW MORE ?

SPIN VFX: Dedicated BATTLE LOS ANGELES page on Spin VFX website.
fxguide: Complete article about BATTLE LOS ANGELES on fxguide.

// BATTLE LOS ANGELES – SPIN VFX – VFX REEL

© Vincent Frei – The Art of VFX – 2011

PAUL: Anders Beer – Animation Supervisor – Double Negative

Anders Beer began his animator career in 1996 at Dreamworks SKG, he then worked in many studios like Banned from the Ranch, Digital Domain and Sony Imageworks. He has participated on movies such as SPAWN, LAKE PLACID, OPEN SEASON or REIGN OF FIRE. At Double Negative, he supervised the animation of the Tooth Fairies sequence on HELLBOY 2.

What is your background?
I studied for two years at the Boston School of the Museum of Fine Arts, and two years at California Institute of the Arts. I got my first job at the newly formed Dreamworks SKG in 1996 and worked on the early development of SHREK. Since then I have always worked with character based content, primarily as an animator or animation supervisor, but also as a rigger and modeler. Most of my work has been in feature animation and VFX at studio’s like Disney, Sony Imageworks, and Digital Domain, but I’ve also done commercials and spent a few years doing interactive work for Nvidia and Harmonix as well. I co-created two short films in the late 90’s called IL GRINGO and LOS GRINGOS.

How is the collaboration with the director?
Working with Greg Mottola was a great experience. His VFX exposure before this film was very limited, but he adapted quickly to the work flow and was very supportive. Greg really took advantage of what our artists, in particular our animators could do with regards to developing “Paul” as a character.
Greg presented every scene in the film to us with a turn over briefing in person or via cine-sync session. He would brief us on how he envisioned Paul’s performance and would point us to any reference he felt would steer us in the right direction. Greg is a great collaborator and was always open to our questions and idea’s.
I would expand on Greg’s briefing with the leads and animators to plan the best approach for each shot. The next time Greg saw the scene would be after we’d done a rough blocking pass to convey only the most essential information for any given shot (timing, geography, energy level of performance). Greg was able to look at very rough animation and understand our intentions pretty well, which made it that much quicker for us to tailor Paul’s performance to his needs.

What was the biggest challenge on this movie?
Paul is a 4ft tall classical style “Grey” alien. He has massive almond shaped eyes at opposing 45 degree angles, a huge bald head, no ears or nose, a small jaw, long thin neck and limbs. He is the exact physical opposite of 5’11” tall voice actor Seth Rogen. Creating a performance that captured all of Seth Rogens charisma and charm, but felt believable and appropriate for Paul was a challenge. Finding the right performance and keeping it consistent across nearly 300 shots performed by dozens of animators was not easy either.
And it wasn’t just the animation, the lighting plays a massive part in how Paul comes across on screen. It can really make or break the animation. The lighters and compositors have to make sure they match to the photography or else Paul stands out like a chrome teapot, yet matching perfectly to the plate often meant some subtle animation was lost in shadow or reflected light. We all had to work very closely together to ensure the lighting and animation supported one another.

How was the shooting of Paul’s interaction with the actors?
We did a dry run of most shots using various forms of stand in. The most common stand in was “Mr. Eyeballs”, an adjustable rod based stand with two ping-pong balls for the eye line. We also used a few puppets for stand ins. When Clive is grabbing Paul by the neck we covered Paul puppets head with green screen cloth to get a matte where his hands were, and to give Nick Frost something to hold on to.
Sometimes we would use a live stand in, like for the shots where Paul is wearing a cowboy outfit and walking with Clive and Graham. For those shots a young boy wore the costume and we replaced the head.
There are a few interaction shots where Paul’s hands are puppeteered, like when you see Paul’s hands on Zoil’s face at the farmhouse.

Did you block the acting of Paul in previz?
Only a few select sequences were ever prevized. They were shots that involved big camera moves. For example, the scenes where Paul is being chased to the RV by Moses and the UFO taking off at the end.

What are the proportion of motion capture and keyframing?
There are only 4 shots I would say actually used motion capture data in anything close to the conventional sense. One for example was Paul running out of the comic book store naked. For that shot animator Nathan McConnel put on the XSENSE MVN suit we have in house and ran across Romilly Street in Soho while Simon Kay our resident mocap tech recorded him on a laptop (there is a picture of him doing this). He then cleaned up the data, added hands and facial animation.
Motion capture of Seth Rogen was only recorded during an initial rehearsal before principle photography and was primarily to help develop our rig and animation pipeline. The data was too out of context for use in what was shot and edited later. For the facial animation, everything was keyframed. For lipsync we worked heavily from video reference.
Seth performed most of his lines in sound booths where we recorded his face to video using several witness cameras. This meant most of his lines were delivered while standing at a lectern, reading and watching a big screen projection of the edit and often some rough animation. Additionally, Paul’s proportions are so exaggerated, motion capturing even a very short actor and applying the data straight to Paul tended to look like someone wearing a “Paul suit” as opposed to something believable.
I encouraged animators to shoot their own video or motion capture reference for all of their work. The animation leads and I would often assist with this process and then I would sit with the animators and select a performance that best fit Gregs brief. This allowed us to get through blocking very quickly and provided a good physically plausible foundation for timing and movement.
With the moven suit, animators could set up capture time in a room on site and record as many takes as they could fit in their allotted time. It did not include any face or hand/finger data, but since it was on a simple Paul rig and editable, it made for great reference and could even be shown to the director in some cases as rough blocking.
With the video reference, since it is only two dimensional you needed to shoot using a similar camera angle, and could not really show the raw footage to the director in place of blocking: But, it was very easy for an animator to just sign out one of the shows “flipcam” video camera’s and record a dozen takes in private, or with other animators. Video does not exclude the face, hand, fingers, props or multiple actors. For short shots, it was often faster to shoot video and block in a performance from that than it was to use the moven suit.

Did you change a lot of things on the Seth Rogen acting once you put it on Paul?
It varied from shot to shot depending on what Greg was after. We always needed to keep the essence of Seth alive because he brings such charisma and charm. But, as I mentioned, for the majority of the shots Seth was recorded in a sound booth where he really was just reading in front of a big screen so the physical performance was down to us. In some cases, we really needed to create something from scratch because the lines had either not been recorded yet, or Greg was after slightly different context.

How did you approach the problems of interaction with the different environments?
We had Daniel Pastore and his match-move team that delivered tracked cameras, sets, props, and even actors. So when the animators or lighters started a shot, they would load up a tracked scene file in maya which had all the necessary elements they would need to calibrate Paul or any other element to the plate. And in the few cases where this needed to be adjusted due to last minute changes, animators, lighters and compositors worked together to keep the illusion intact.
We also had Julian Foddy an amazing CG supervisor who worked tirelessly to coordinate FX artists doing smoke, dust and debris, regularly building his own props and doing his own FX animation.
In the lighting stage, lighters and compositors worked with loads of HDRI photography we shot on set as well, and reference film of a puppet moving through the set lighting. All this was fine for getting the base lighting started, but to really make Paul sit in the plate, and look like he was lit by the DP, the lighters and compositors spent a lot of time tailoring the lighting for every shot in the film.

Have you improvised some Paul reactions according to the acting of the others characters?
We certainly did a lot of that. And in some cases, we had to adjust the eyes of the actors in compositing to accommodate where Paul needed to be for the edit to work.

What animation rig did you created especially for facial animation?
A majority of the face rig is done using blendshapes created by my self and a modeler named Markus Schmidt. Grant Laker tied it all together and also provided a robust eye rig using various standard and custom maya deformers he designed.
The body rig was based off of a custom rig designed for Paul by Theo Facey and further developed and maintained by Ramiro Gomez using standard and non- standard maya tools.
There are a variety of blendshapes used to aid in Paul’s physique as well as a muscle system used in some shots to help with volume preservation and definition. There is also some nice skin sliding going on around the chest and neck.
Animators and lighters could work with the rig in various levels of detail to help speed up interactivity.

Can you explain how you prepare your animation process?
After getting a shot turn over and briefing from Greg Mottola, I would go over the shots and create an animator casting list. I tried my best to cast shots in sequence. In some cases I could give an entire short sequence to one animator, but most scenes were large and had to be broken up between 2-4 different animators. I broke up the sequences where there were distinct changes in Paul’s tone or timing when possible as this would allow for better perceived consistency when a scene had shots that transitioned from animator to another.
I had two animation leads who I relied on to set the standard of animation on the show and provide regular support for the animators when I was not available. Dave Lowry and Scott Holmes. I would discuss my casting choices with them and get any feedback or concerns they might have specific to what the scene would require.
I would then have my own turn over meeting with the animators cast to a given sequence and would discuss Gregs briefing, outline my concerns, recommendations, then suggest reference and acting choices.
The animators would go off and shoot reference, either video or moven suit. Talk about it with their peers and the leads, then show me a selection of their top choices. The reference was shown cut into the scene using DNeg’s own editing software called “clip”. This would allow them to always work within the context of the latest edit. I would make my recommendation and they would block in a rough pass using the rig.
If the rough blocking pass conveyed the idea clearly and it worked in the edit, I would show it to Greg for approval to go on to animation. Animation is where the finer details were worked out, facial animation, and higher fidelity on the weight and timing of the performance. Blocking is where idea’s were explored in broad strokes. Once a shot was approved in animation, it meant the idea was working well and we would then dial in the lip sync, facial subtleties, add breathing, physique changes and physical contacts and make sure it all read clearly when lit.
I tried to have regular “weeklies” animation team meetings. I would cover developments on the show like changes to the edit, new lines of dialogue added, the best methods for keeping Paul “on model”, ensuring animation was working in lighting, and exemplifying where Paul’s performance was strongest or weakest. I would also have riggers walk through any rig updates or new animation tools and singled out certain animators with highly effective workflows to give presentations on how they worked.
The client played a big part in helping me keep the animators engaged and aware of how Paul’s performance was working in the film by allowing us regular attendance to screenings. This was also great for morale since everyone really enjoyed the film.

What are your inspirations and what references did the director gave to you?
I have been inspired by so much work over the years, it is hard to render it down to a simple answer. I am fortunate enough however to work for a very inspiring boss, head of animation Eamonn Butler. His creative opinion, experience and support were some of the most valuable resources on the show.
Greg Mottola, Simon Pegg and Nick Frost were very specific about choosing Paul’s design and voice talent. They empowered us to find the right balance between these two almost opposing forces. Despite Seth’s physical differences, he was still the primary point of reference.
They were also all very vocal about what they wanted Paul NOT to be. He was not to be a cartoony alien or a creepy or spectacular alien”. He needed to be Alien, but understated so he would quickly become “one of the guys”.

Can you tell us what was the hardest thing to animate on this project?
Paul was always a challenge. There probably isn’t one specific shot that was ‘the hardest’, but I would say the hardest thing was to keep Paul consistent, believable and appealing in almost 300 shots with dozens of animators.

Was there a shot or a sequence that prevented you from sleeping?
There isn’t one particular shot or scene, but it was very difficult calibrating how the animation performance looked in maya to how it looked lit and rendered. Paul was lit to match the plates we filmed, and his final look involved a lot of subsurface shading and shutter blur specific to the film and camera on set. At one point, a lot of Paul’s definition and range of expression was getting lost beneath the complexities of his final look.
Our crew worked together very well though and in the end we were able to get a very good calibration between animation, lighting and compositing.

How long have you worked on this film?
I actually helped out on the proof of concept for Paul back in early 2008 when the film had not yet been greenlit and DNeg was still bidding on it. I took an 8 month break from VFX and worked at a video game company in my home town of Boston before coming back to supervise the animation in May of 2009. So cumulatively I have been on the show for about 2 years.

How many shots have you made and what was the size of your team?
My team averaged about 24-26 animators. At one point we had 36, and during the last of production week I worked alone. I only have a hand-full of shots that I did my self, but I worked on lip sync, facial, finishing touches and changes for a little over 80 shots.

What did you keep from this experience?
This was a rare and wonderful challenge for an animation supervisor. A rated R live action comedy where you are responsible for the title character does not come along that often. Even better, it started as an idea I really liked and ended as a film I really enjoy.
Even the greatest VFX crew is only as strong as their relationship with their client. On Paul, we had a really great crew plus an incredibly supportive and enthusiastic client.

What is your next project?
A big vacation. I’ll be the first to sign up for Paul Two if they decide to make one (laugh).

What are the 4 movies that gave you the passion of cinema?
Ok, if it’s only 4… STAR WARS, RAIDERS OF THE LOST ARK, MIDNIGHT COWBOY and DELICATESSEN.

A big thanks for your time.

// WANT TO KNOW MORE ?

Double Negative: Dedicated PAUL page on Double Negative website.
fxguide: Article about PAUL on fxguide.

© Vincent Frei – The Art of VFX – 2011

TRON LEGACY: Chris Harvey – VFX Supervisor – Prime Focus

Having worked in all areas of visual effects at Prime Focus and Frantic Films, Chris Harvey become VFX supervisor and works on movies such as JOURNEY TO THE CENTER OF THE EARTH, GI JOE: RISE OF THE COBRA and THE A-TEAM. He also works as a stereo consultant for movies like AVATAR.

What is your background?
I am a VFX Supervisor and up until recently when I went freelance again, the facility supervisor in Vancouver for Frantic Films and Prime Focus. Years before I had sat in pretty much every role in CG both as an artist and technically as a TD, from modeling, LookDev, FX, animation, rigging, and compositing. I have also had the pleasure of being involved in a number of groundbreaking stereo projects, helping pioneer the tools and pipeline within Frantic Films and Prime Focus… and I guess in a small way the overall industry, in the terms of Stereo Visual Effects.

How was the collaboration with Joseph Kosinski and Eric Barba?
Great. Working with both Joe and more closely with Eric was a great experience. It was nice because they had a very clear vision for the film and the world of Tron, and yet at the same time were very collaborative and supportive of ideas we brought to the table. We would meet with Eric multiple times through the week via video conference where we could actually watch the large format screen they were reviewing on. Then during key full sequence reviews we would fly to L.A. and meet in person. But being such a big project and Eric having so much on his plate as both the Studio Supervisor as well as the DD facility supervisor, many vendors also got to work with an outsource supervisor from DD in order to help expedite answers to questions. We worked with Mark Rienzo and he and I have a similar approach to things so we had a lot of fun. I very much look forward to the next time I get to work with them all again.

How did Prime Focus get involved on this movie?
About a year ago we completed a test shot for the some of the outsource work Digital Domain was evaluating Prime Focus for. It was a test in both the art but also in the collaborative working experience between the facilities and the people who would be involved. It went well and we got the award.

Which sequences have you made?
The main sequence Prime Focus worked on was the Solar Sailer sequence, also known as the « train jumping » sequence, where the protagonists in the film (Sam, Quorra, and Flynn) escape by jumping aboard the large Solar Sailer (a sort of cargo train in the world of Tron). We were also given the bookend sequences to complete on either side of this main sequence which consisted of the Sublevel where they actually board the Solar Sailer, the elevator falling sequence, a number of exterior shots of the End Of the Line club (since we were handling them in our sequences it made sense to handle them in a handful of shots in some others as well).

Can you explain to us the creation of this magnificent aerial shot of the tower of End of Line club?
Hehehe, well lets say a lot of work went into that shot, by a lot of people. In fact we treated all of the exterior tower shots as more of a whole rather than single shots. I mean ultimately there were individual shots but our approach was more of a holistic approach. We received some initial geometry from DD as well as a DD internal lookdev shot for reference on style for the city exteriors. We then took this geometry and up-rezzed it, added detail to various areas and then created a series of very detailed and large projection paintings in the Matte Painting department led by Romain Bayle. These were rendered and re-projected in some cases in Nuke to add even more details and effects in comp. On top of that we added layer upon layer of intricate atmospheric simulations in packages such as a tricked out Terragen and the 3dMax plugin FumeFX. Being a stereo show everything had to be occupying actual 3D volumes, that meant all the matte paintings had to be re-projected onto actual geometry, all the atmospherics had to be true volumetric simulations… there was no cheating. After all that we looked for little extras we could put in, flying ships, pulsing lights, anything that could add a richness and life to the subtleness of the shot.

How did you create the sequence of falling elevator and in particular the impressive POV shot where we saw the different levels of the tower?
The falling elevator sequence really consisted of two types of shots, interior and exterior. The interior shots involved a live action plate of the actors and a practical elevator interior. Adding the digital tower and atmosphere was pretty standard. The only trick involved adding reflections to the glass. And the reason for that was of course the stereo nature of the film. By that I mean you couldn’t just paste on a reflection like you might normally do. The reflections themselves had to be reflective of a true stereo volume behind and around the camera. Otherwise they would just look like painted textures on the glass. The exteriors, including the POV shot were all CG and were essentially tackled in the same way, and in fact part of the holistic approach I mentioned in the previous question. The POV shot was the only one that was more or less a one-off in terms of painting re-projection and extra modeling as it covered an area of the tower not seen in any other shot in the film. And we actually got to have a fair bit of creative freedom in designing the shot and the look of it all and props to Susan Stewart who spent a lot of time painting on that one! Part of what really helped to sell the shot in the end was adding interactive atmosphere and lighting giving the sense that just behind the camera there was actually an elevator plummeting to its doom.

About the shot in which the elevator stops just in time. What is the share of real footages in the frame and how did you create this shot?
Oooh, that was a painful shot. The only thing that was real in that shot were the actors. And even they needed to have a lot of re-projection work done in Nuke in order to make the big transition from the extended digital camera move into the practical one. It would have been hard enough as a flat shot, but the stereo aspect really threw it for a loop trying to get the characters to not feel like flat cards inside the elevator. In terms of how we did this… heck we resorted to everything we could think of: redirecting the eye, heavy Nuke 3d tricks, lots and lots of matte painting and some pretty damn bit render times for the CG elevator. Because of course the next shot had a practical elevator that it cut to and they had to match.

How did you create the basement of the tower where the Solar Sailer is waiting?
This was a lot of fun actually. One of our modelers turned digital matte painters got to make designing this his baby. Jelmer Boskma spent a lot of time designing, painting style frames, modeling, and painting the environment. It was probably the least defined environment at the time of turnover; literally a single rough concept image that had more to do with color and emotion than details. It was a large build that consisted of models and paintings, atmosphere and lots and lots of comp love! Again Romain (matte painting sup) and Feli di Giorgio (2D Sup) did a great job with their teams as a lot of people sweated over these shots, trying to dial in the final results.

Have you created digital doubles?
Yes though they were usually pretty small in our shots, we did in fact have them in every digital shot. They included Flynn, Sam, Quorra, Rinzler, and the Siren… along with a whole crowd of frightened End of the Line Club patrons in the overhead tower shots.

About the Solar Sailer sequence, how did you create this ship and also the huge environment around it?
That’s a pretty big question since the sequence was almost 10 full minutes of the film. It required a lot of work. The ship we got as an initial 3D asset from the art department. We took that and basically rebuilt the entire thing, adding lots of little details to add scale, as it’s a pretty immense vehicle. Dimtry Vinnik our lighting lead spent probably 3 solid months on the build and look-development of it, and in some ways it never really ended, it just kept evolving as it was probably our most hero asset and the one that the majority of the sequence revolved around. It’s render times were almost as immense as the ship itself, even though we optimized the crap out of it, we needed it to maintain a realistic feeling, one with lots of subtleties and details to add scale. And the damn thing was reflective all over and often encompassed full frame coverage.

The environment was another huge challenge as over the course of the sequence we travel approximately 60 miles and often see out to the horizons; that’s a lot to build. So we had one of our TD’s (Bobo Petrov) write a procedural landscape generator that followed the specific « Tron » construction rules. This enabled us to build out vast areas of land very quickly, and then add in hero bits here and there for extra believability. And the large V canyon at the end of the sequence was entirely hand modeled by Jeff Tetzlaff. Then of course came the atmosphere in which we used Terragen and hired Matt Fairclough (the creator of the software) to write custom code in order for us to achieve the look and highly art directed look that we forced the artists to achieve. And again, since it was stereo all that volumetric atmosphere had to really be there in that volume. It consisted of layers and layers of rendered and simulated clouds. And for key shots we would run highly interactive FumeFX simulations to help integrate and sell that everything coexisted. One very important aspect of both the environment and the vehicle was in how we rendered it. We rendered specially created utility passes that allowed a lot of lighting adjustment and manipulation in comp to significantly reduce the need for re-render. It made the shader set-ups and render passes pretty elaborate but it really helped save us painful re-renders. And when you are rendering 13 minutes of a film in stereo (26 minutes) and some of those render times are 20 hours long… you really can’t afford to render it over and over again.

What references did you received for this environment?
We received a few great pieces of concept art from Digital Domain. To that we added some of our own to really help nail down the look and feel that Joe and Eric were after. And finally we completed a few keystone shots throughout the sequence and then just filled in the gaps.

What were the challenges with the Solar Sailer particularly for its sails?
Many of the challenges I already talked about. But in regards to the sails themselves, that was actually a lot of fun. The look and effect of the sails was something that wasn’t really covered in the concept package we received from Digital Domain, but we knew that they needed to « look cool and energized ». Anytime you get to put in your own creative ideas into a film its fun…and this was certainly one of those times. We rendered out a lot of various passes for comp and then just threw it at them with a bunch of ideas we had. Charles Lai was the compositor who really set the look for the fabulous pulsing effect that you see on screen.

What was the size of the actual set for the different sequences?
Elevator sequence: in some cases the interior of the elevator… in others nothing but he actors. The Solar Sailer sequence: only a partial set of the very top catwalk that the actors were standing or sitting on.

Have you received any assets from Digital Domain?
Yes, we received a lot from them. In fact the overall project was a very collaborative process with all the vendors. For the assets that were primarily seen only in our sequence we usually received art department models that we then remodeled…and which once complete would be handed back to Digital Domain for them and other vendors to use in their sequences (the Solar Sailer was such an asset). Other assets like the Recognizer we simply had to ingest and « reconnect » to work in our pipeline but it remained essentially untouched the way Digital Domain delivered it to us.

How was the collaboration with teams of Digital Domain?
Like I mentioned there was a lot of collaboration, and while there are always difficulties in working and sharing assets and techniques across multiple facilities I think it was a pretty successful process on this film… certainly one that everyone was very mindful of and tried to make as smooth as possible… right down to the standardization of software, set-ups and some proprietary tools that were shared.

Did the stereo aspect caused you some troubles?
Not in the sense that it caused any unexpected trouble. I had already been involved in a number of stereo shows and we had built a pretty solid stereo pipeline already so we knew what was coming and so were not caught unaware. And we also had a set of tricks up our sleeves to deal with various stereo issues that did inevitably crop up. One issue we ran into relatively often was where on-set you simply do not know what you are going to see with so much of the shot being digital that the divergence and interocular are set in such a way that it appears fine when looking at the photography, but when you get the background or foreground in there things just become way too diverged…and in those cases we just resorted so some clever multi-camera solutions to reduce potential eyestrain and the inability to resolve a shot. The one issue that was unexpected was how significant the difference in the viewing environments was. We had a Dolby set-up at Prime Focus and Digital Domain was using RealD… and its amazing the differences in what you see and how you look at things is… and that definitely caused some issues, but at that stage its nothing that relatively minor tweaks can’t fix, you just need to be able to sort out what one group is seeing versus the other… so you know what you need to fix and when it is fixed.

What was the biggest challenge on this project?
Scale and the legacy it had to live up to. The original Tron has a legacy to it that few films have. It’s a pretty daunting process to attempt to try and create something in that world for a new generation that still lives up to and fits with the original. That definitely adds a lot of pressure, but also a lot of inspiration and excitement. And with scale, well any stereo film carries with it a different level of scale. Everything is doubled, you have double the source, double the tracking, double the roto, double the rendering, and quite frankly more than double the number of technical things to worry about. And on our sequence, even though it was only approximately 120+ shots it also equated to 13 minutes of the total film…those are long shots! And also the scale of the shots like the huge environments reaching to the horizon, large scale atmospherics etc… It was just a lot a data and artistic detail to wrangle. I gotta give serious cred to Jon Cowely (DFX supervisor), David Fox (PF Production Coordinator) and Laszlo Sebo (Lead TD) for helping control the madness.

Prime Focus has several branches around the world, which ones have worked on this show?
This show was handled almost entirely at the Vancouver facility, with a few extra people that couldn’t relocate in L.A.

Was there a shot or a sequence that prevented you from sleeping?
Hahahaha…yes, wait no I don’t remember having time to sleep, so I guess all of it. Actually I never have trouble sleeping, but that might have something to do with the fact that by the time I finally lay down I am exhausted (laughs).

What is your pipeline and software at Prime Focus?
Obviously there is a lot of custom code in the pipeline, but the commercial tools are: 3dsMax, Maya, Nuke, FumeFX, Krakatoa, Deadline, Terragen, and even some XSI in the matte painting department.

How long have you worked on this film?
If you counted the test almost a year…if you count only the actual production time then closer to 8-9 months.

How many shots have you done and what was the size of your team?
We completed approximately 120+ shots that equated to about 13 minutes of screen time with a team of about 60.

What did you keep from this experience?
I am pretty proud of the work that we did on TRON, and excuse the pun it was a legacy to work on. But you know what I keep most from this…and this might sound corny, but it’s the memories and friendships of the team. Regardless of how proud I am of the work, I am far more proud of the effort the men and women, and spouses and children went through on this project. Everyone without fail worked their asses off on this one. Lots of times it the supervisors or higher ups that get to have a lot of the spotlight. I tried to mention as many people as I could but obviously was not able to find a place for everyone’s name in this interview… and to all those whose name I did not mention, thank you!

What is your next project?
Unfortunately I cannot say yet, but I am pretty excited about it.

What are the 4 movies that gave you the passion of cinema?
The passion of cinema…there are more than 4 and it would likely change from day to day…but today: STAR WARS (the original), THE BLACK HOLE, FX, and CHARIOTS OF FIRE. But like I said, that could change from day to day (laughs).

A big thanks for your time.

// WANT TO KNOW MORE ?

Prime Focus: TRON LEGACY dedicated page on Prime Focus website.
fxguide: TRON LEGACY article on fxguide.

© Vincent Frei – The Art of VFX – 2011

SEASON OF THE WITCH: Blair Clark – VFX Supervisor – Tippett Studio

Blair Clark began his career on the film GREMLINS, then joined ILM, where he met Phil Tippett. He will work especially YOUNG SHERLOCK HOLMES, WILLOW or INDIANA JONES AND THE LAST CRUSADE. For nearly 25 years he worked at Tippett Studio, he oversees the effects of such films as BLADE 2, HELLBOY or SPIDERWICK CHRONICLES.

What is your background?
Blair Clark (Visual Effects Supervisor) // Attended school at California College of Arts and Crafts (now CCA) in Oakland CA, I was hired by Chris Walas to join crew working on the first GREMLINS film. From there went to ILM, where I met Phil Tippett and began to learn the process of machining Stop Motion armatures from Tom St.Amand, who is still the undisputed master of the craft. I continued to work for Phil, creating armatures for several films at Tippett Studio, then went to Skellington Productions for NIGHTMARE BEFORE CHRISTMAS after which I returned to Tippett Studio in 1994 and have remained here since.

What are the sequences made by Tippett Studio?
Blair Clark (Visual Effects Supervisor) // We were contacted by VFX Producer, Nancy St.John and VFX Supervisor, Adam Howard to assist in supplying Visual Effects for the portion of the third act, involving the girl (played by Claire Foy) transforming into the Demon and engaging Nicolas Cage, and Ron Perlman’s characters in a battle to the death.

How was the collaboration with the director Dominic Sena?
Blair Clark (Visual Effects Supervisor) // The film was well in post production by the time we became involved, and we worked exclusively with Mark Helfrich (2nd Unit Director / Editor).

What references did he give you for the winged demon?
Nate Fredenburg (Art Director) // There had been no design work done on the demon when we became involved with the film so there was no reference. When we asked what kind of demon they were looking for, we were told, « you know, a demon. » So it was an open playing field. The demon is identified as Baal in the script, so we started there. We looked at both old engravings of Baal and more contemporary renditions to familiarize ourselves with the range of interpretations. We decided this demon needed to be a demon of old manuscripts to best support the story so we leaned toward a classic representation.

Can you explain how you transform the girl in the demon in particular in the closeup on her face?
Aharon Bourland (CG Supervisor) // The close up was actually the test bed for working out our technique. The first step is to build an accurate model of the subjects face. Once you have that you can get camera and facial match move solves. This has to be really accurate because we will be using this mesh to generate pRef data. pRef (position reference or texture reference) is used in a projection shader to stick a projection onto a deforming surface. We now take the girls face and build a set of blind shapes that will transform it into the demon face. Then the plate is reprojected back onto the newly transforming face and since we use pRef instead of P in the projection shader the plate is warped into the shape of the demon. Were about half way there now. we need to get the color and skin texture changes in. A procedural shader that used coordinate systems from maya to wipe on passes of veins skin erosion masks and other textures was used to animate and render these passes. And finally we have a light pass of a face painted like the demon but morphing from human to demon. All of these passes were then comped together to achieve the final effect.

How did you create the cart taking fire and starting to melt?
Blair Clark (Visual Effects Supervisor) // Those were shots that we shared with UPP (Prague), who had the lion’s share of shots in the film and in these shots, they did all of the fire and melting cage work, and we did the integration and augmentation to the girl turning into the demon.

Can you explain the shooting of the final sequence? Did you use a stunt double dressed in blue to simulate the presence of the demon?
Blair Clark (Visual Effects Supervisor) // The final sequence was shot in Shreveport, LA. Our VFX Supervisor, Eric Leven and Location Data Supervisor Eric Marko worked with the Director and the Stunt team to choreograph the fight between the actors and the Demon. There was a stunt double (dressed in gray tights) used for interactivity (eyelines, choking and grabbing actors, etc.) and was covered with the CG Demon. There were also a few shots that had been previously shot in principal photography with the girl (Claire Foy) acting as the Demon in which we covered here with the CG Demon, but closely followed her performance.

Have you encountered some problems with the wings of the demon? And how did you create them?
Nate Fredenburg (Art Director) // Wings are always tricky. Since we didn’t have much time to build the demon, we went with as simple a rig as we could, which really put it in the hands of the animators to make look good. When designing the demon, we decided to give it an extra wing membrane that was reminiscent of a collar. We thought it would help give the demon added visual interest and presence. The animators hated it and spent most of their time trying to find poses that just got it out of their way. Even when we work hard to design with performance in mind, we can’t anticipate everything.

What were your references for the animation of the demon?
Jim Brown (Animation Supervisor) // We shot a lot of reference of ourselves acting as a demon. There were many takes to figure out how this demon would walk, move, and fight. We started with a more feminine movement, but shifted to a more classic demon character with powerful masculine poses and actions. The wings were a big challenge because of the amount of physical weight they would put on a demon’s back. We had to ask ourselves how much of that weight would we see in the demon’s movement. We looked at bird reference as well as bat reference for poses and postures. In the end having the wings affect the demon’s walk and movement too much took away from the performance of the character. However, they were great for a number of shots when we needed some exciting action. Overall the demon was a mixture of a birds, bats, and animators jumping around like they were possessed.

How did you create the death of Felson (Ron Perlman) who falls in ashes?
David Schnee (Compositing Supervisor) // The idea behind Felson’s death brought to screen over the course of just a few shots was that once he was wrapped up by the demons wings, a spark would ignite sort of furnace that would quickly warm up moving into a super heated blast furnace by the end, engulfing Felson in heat, flame, and fire. The demons big reveal left Felson in a momentary statue like state of ash. Once she drew her wings back disrupting the air, Felson’s remains came toppling down the heap of ash with bursts of ember, smoke, and flame. We actually referenced some of our previous work from the burning vampire deaths from BLADE II, and Samuel’s death in HELLBOY.

We needed many elements to pull this off, and we did so using a combination of elements from the FX department as well a slew of practical elements shot on stage. We shot a variety of flame elements (think a propane burner cranked up way over high) that we made dance around using flags to fan air at them. This gave us more interesting performances from the standard horizontal flame in a calm environment. These elements worked out well when licks of flames spilled out from the edges of the demons wings and arms. Senior Compositor Satish Ratakonda used these elements along with creative 2d distortions in Nuke to sell this wrapping around for the close up shot. We shot burning twisted up newspaper that we physically beat against a household fan giving us rising embers, which was a lot of fun. Padding the CG with the right practical elements seems to alwasy give you a truer sense of reality, so one of the elements we shot that really worked out for us was burning steel wool. Another of our Compositing Supervisors, Chris Morley mocked up a sculpt Felson in his final pose built entirely of steel wool. When he light this on fire, it gave us a great organic burning look that we were able to composite to some degree in all 3 shots, but primarily used across the entire shape of FX driven ash at the beginning of the reveal. Articulate hand animated regions of burning Felson steel wool was achieved in the composite matching timings from the FX ash toppling down, but offset for a more organic feel. The FX department provided us with great elements for the ash and embers that had an almost Brownian motion quality to them, the rising and swirling, caught up in the pull of air from the animation of the demons wings, it was great. The lighting department also provided us with great interactive lighting across the shots, along with a vital SSS (sub surface scattering) AOV, that we used in the comp to achieve the look of internal lighting inside the membranes of the wings. Again we padded all of this with 2d smoke, dust, fire, embers, and heat distortion elements making it as interesting and real as possible.

Can you explain how you create the impressive death of the demon?
David Schnee (Compositing Supervisor) // The death of the demon starts subtly over the course of a few shots as the reading of the passage in the book begins to inflict pain and damage to her, for the earlier shots leading up to the death, we used Color Codes painted up from our Art department as well as some AOV’s for the wing membranes used to create levels of a leading edge burning quality (think burning paper) the look created in the composite. We would animate intensities across the panels of wings driven to flare up more intense when the demons wings moved more (as if the moving air fueled it with more oxygen), and then become more tame when they didn’t move as much, all the while trying to ramp up the intensity over the series of shots. The compositors tracked in 2d smoke elements that we turned black as sort of an negative ‘evil’ smoke element that burned from markings inflamed by the reading, padded with some heat distortion.

By the time we get to her death, the atmosphere in the room was full of 2d smoke which gave us something to light up when we needed to support the internal forces that broke out in intense beams of light from her body, or ‘God Rays’ as we call them. Often times this is a cheesy 2d effect only, but due to the need for interaction with all the moving parts we were provided a few volumetric lighting passes from our CG Supervisor Aharon Bourland to achieve the look. We continued the same 2d burning wing effect into this shot, but was taken over by an FX Simulation that eroded and dissolved away her wings, arms, and legs using a similar leading edge burn effect. The FX guys orchestrated a series of cracked panels on the demons chest and torso that for a moment tries to hold it all in, but ultimately breaks apart opening up to release our seasoned witch in a burst of light and energy. In the comp we used some 2d distortion techniques making a concussive wave that helped sell the energy during that moment. We padded the naked witch (which was shot as a green screen element) with 2d Schwap! or blood elements made to look like a gooey glistening slime.

After this event, more violent demon animation ensues as we are left with a eroding shell of the demon and a soul like energy getting ripped apart from it’s shell. There is now a slew of swirling debris, ash, bits of demon from FX, as well as this animated ball of particles that tears off and shoots up out of the Scriptorium. It’s here that things started to become a bit abstract in the composite. Using the raw FX passes we created a series of interesting throbbing, swirling, and orbiting passes as pre-composites,and then heavily processed them together animating fits of distortion and bursts of light and energy in 2d using Nuke and Shake.

The original idea for very end of the shot was that the ball of energy was to exit through the oculus at the top of the Scriptorium, and up until the eve of delivering this shot for final, the client changed their mind… why would it know to just leave through the hole they asked? So the new plan was to have the ball of demonic energy miss and smash into a blast of chaos at the top of the celling. This turned into a very fast paced science experiment on how the hell are we going to do this and what exactly this should look like. In less than a day and a half, we took a number of quickly generated FX passes from our Lead FX Animator Joseph Hamdorf, and using Nuke heavily processed the exploding particle simulation renders that blasted across the curvature of the ceiling. Using time offset and re-timing tools on the raw FX elements helped us quickly generate a much more complex looking array of elements. Using every trick we had in the book we built on this using tons of layers with glows, distortions, displacements, ripples, 3d projections for concussive shock waves, 2d smoke and dust for atmosphere, and in the end trying to make a few frames look that of distant galaxy with veins of antimatter shot from the Hubble helped get the job done. It was a very collaborative effort in the end, multiple compositors joined in to help generate bits a pieces, pulling off the finale conclusion to the demons death together in pretty much one day. I have to also mention that this would never had come together so quickly with out the compositing speed and strength of Nuke.

Was there a shot or a sequence that prevented you from sleeping?
Blair Clark (Visual Effects Supervisor) // There were several shots, but the death of the demon section was a pretty challenging one.

What is your pipeline and your software from Tippett Studio?
Aharon Bourland (CG Supervisor) // Our primary 3D packages are Maya, Mudbox, and Houdini. For 3D paint we use photoshop, and our in house tool shallowPaint. We do a mixture of geometry caching to gto files and translating maya scenes to ribs, so we can render them in Renderman. For Comp we use a mixture of Nuke and Shake. Nuke was used on the transformation shots in SEASON OF THE WITCH.

How long have you worked on this film?
Blair Clark (Visual Effects Supervisor) // After the Demon design was approved and ready for production, we started working on shots in early September and finished mid-November 2010.

How many shots have you done and what was the size of your team?
Lee Hahn (Visual Effects Producer) // 60 people, 75 shots, 80 days

What do you keep from this experience?
Blair Clark (Visual Effects Supervisor) // What’s not to love about a show with a Demon in it?!?

What is your next project?
Tippett Studio is currently in production on PRIEST (Screen Gems), THE SMURFS (Columbia Pictures), THE TWILIGHT SAGA: BREAKING DAWN (Summit Entertainment), IMMORTALS (Relativity), HEMINGWAY & GELLHORN (HBO Films), as well as a commercial for Busch Gardens. In our spare time some of our employees, under the guidance of Phil Tippett, are working on a stop motion project called MAD GOD. You can see a trailer for it on our YouTube page : www.youtube.com/PhilsAttic

What are the 4 movies that gave you the passion of cinema?
Blair Clark (Visual Effects Supervisor) // Just 4? That’s a tough one. I grew up on a steady diet of Universal and Hammer Horror films, and those gave me a combination of being a creepy little kid, and a desire to be involved in film making. I know as soon as I answer this, I will remember 30 other films that were just as influential, but BRIDE OF FRANKENSTEIN, SEVENTH VOYAGE OF SINBAD, STAR WARS and GOLDFINGER.

A big thanks for your time.

// WANT TO KNOW MORE ?

Tippett Studio: Official website of Tippett Studio.

© Vincent Frei – The Art of VFX – 2011

THE GREEN HORNET: Greg Oehler – VFX Supervisor – CIS Hollywood

Greg Oehler worked at CIS Hollywood for over 15 years and has participated in many projects such as TITANIC, THE BOURNE ULTIMATUM, WATCHMEN or INVICTUS.

What is your background?
I studied Mass Communications at University of Denver and went through the film program at University of Colorado. I finished my formal schooling in the Motion Picture/Television program at UCLA in. After graduation, I began working art department on features, television and commercials. I was art director and production designer on low to moderate size projects, set decorator and leadman on medium to large. In 1995, I turned my attention to the digital revolution as it was taking the movie industry by storm. Largely self taught, I started by doing roto and paint work, but soon got involved in compositing, effects, and design on the Inferno platform. Much of this work has been at CIS Hollywood where I have been a vfx supervisor for the last few years.

How was the collaboration with director Michel Gondry and production visual effects supervisor Jamie Dixon?
I very much enjoyed this collaboration. Anyone who is familiar with Michel Gondry’s work knows that his visual footprint is very distinct. He is always searching for creative and original ways to tell his stories with imagery. He is quite savvy around platforms such as the Flame. During design sessions, he is able to see beyond rough composites and color in order to communicate his vision to artists so they understand the larger framework of his intentions. I cannot say enough about Jamie Dixon. His creative, articulate and calm demeanor made my job much easier and enjoyable than I could have imagined.

How did CIS Hollywood got involved in this project?
In the Autumn of 2009, Jamie Dixon brought some test footage Michel Gondry had shot. The footage was of two men, shot against black, in various fighting modes. Some test vfx were applied that experimented with speed, motion blur and warping. Armed with updated footage, Jamie had asked if we could augment some of the concepts in the tests and bring them to the next level in accordance to the directors vision.

What are the sequences made by CIS Hollywood?
Our sequences included the « time bending » and « Kato vision » fight sequences seen just after Brit and Kato cut the head off the statue of Brit’s father, the South Central fight when Brit and Kato take on several gang members, and the sequence in the newspaper bullpen as Brit discovers his own « Brit vision » and helps rescue Kato from Chudnofsky. We also did an elaborate split screen sequence where Chudnofsky launches an offensive against anyone wearing green. We rounded up our work with several speed augmentation shots, various composites and stereo 3D enhancements.

With what camera did you shoot the scenes of slow motion?
The scenes involving slow motion effects were shot on a Phantom camera.

What are the advantages and disadvantages shooting with a Phantom camera?
The chief advantage of the Phantom camera is it’s small size and amazing high speed capability. The only, and minor, disadvantage I saw was the introduction of very subtle artifacts at higher speeds.

Can you explain how you created the slow motion shots?
For the « time bending » fight sequences, all footage was shot between 150 and 300 fps. This helped our retiming efforts greatly by providing us with lots of frames to build timing curves.
All shots were shot on location, without the use of a blue screen and shot in their entirety and without solo performances. This was done to preserve as much of the original fight choreography and performances as possible. Doing this did create a big challenge for us to separate characters from each other, fill in their bodies where occluded and patch together backgrounds. Through lots of roto, warping and morphing, we made individual plates of each character separated from their background.

Choreography was achieved through a series of Flame sessions with the director.
Because Kato had to be the driving force, his timing was most aggressive and had to dictate the flow of the fights. His re-timing had everything to do with generating and transferring energy for each fight event, so his timing ramped in accordance to the number of contact points with each villain. Once a fluid re-time was established on Kato, all the other villain characters needed contrasting timings. These timings would answer each punch with the energy delivered, making the few frames f contact the only time Kato and his opponents shared the same timing. We prolonged  the recoil from each blow to allow the villains to linger in space while Kato rushes off to dispatch with another foe. We used Flame’s Timewarper to rough out character timings and Furnace’s Kronos re-timer and motion blur to finesse the results. Once all characters were properly timed, they had to be tracked and animated into new locations so their new timings would integrate back into the scene.

How did you proceed with the shots where things are getting longer and echoing?
The echoing shots were ideas that Michel wanted to include to emphasize Kato’s amazing fighting abilities but without suggesting Kato had any sort of super powers. For the shot where Kato runs across several expanding cars, Michel had lined up two identical parked cars for the actor to run across. This was to provide a base for the shot. During the editing and fx process, a different concept emerged: Kato was to jump on a single parked car which would then multiply and echo toward camera as he ran across them toward the villains. The cars would then snap back the moment before the fight commences. A new background, new cars and a new Kato had to be built. Kato had to be re-timed and looped so that the original three steps he took across the car became twelve. An oversized matte painting was made to accommodate the needed depth and several cars were created and animated for the echoing. The final step was adding light cues, reflections and shadows. 2D solutions were used and also executed on Flame.

Can you tell us about the design and the creation for the Kato vision?
Again, the director wanted to convey Kato’s ability to foresee the fight he was about to engage in, but stop short of the super human realm. Michel wanted to get inside of Kato’s head, literally, for these moments. Stylized painted elements were created of Kato’s eye and retina for the camera to fly around in order to literally see through Kato’s eyes. Many ideas were considered to demonstrate Kato’s focus on the weapon threats, however, simple red streaks that shot from behind Kato’s eyes and wrapped around the weapons or persons that threatened Kato was employed as a visual device to map out Kato’s plan of attack. The director liked their simplicity and they gave the scene a graphic feel.

Do you use digital doubles for those sequences?
The only sequence where digital doubles were used was during the South Central fight sequence. As Kato again dispatches with multiple villains, he leaps up onto Black Beauty and the camera spins around 180 degrees to show Kato flipping through the air to take out the last thug. Because this was a digital spin, digital doubles were employed for all characters except Kato. This was a creative device that stitched together two separate shots that were oriented 180 degrees from each other.

What was the biggest challenge on this project?
One of the bigger challenges was to produce work consistent with expectations of a Michel Gondry project. He has so many ideas and lyrical visual concepts, that I really wanted to provide him with what he wanted. Additionally, Michel was very trusting. Once a basic look and choreography was established, he did not micro manage the work. I think this trust motivated and pushed myself and our artists to raise the challenge and work harder to insure his confidence was warranted.

Was there a shot or a sequence that prevented you from sleeping?
I generally sleep fairly well, but the closest sequence to have that effect would have been the split screen sequence in which the action within the shots divides as the frame splits allowing the camera to follow the diverging paths. This continues until there are fifteen or sixteen separate cells, each peeling off a bit of the narrative. This was such a fun sequence to do, but there was a lot of room for error. The individual sequences were shot quite well but required anywhere from 2 to 13 separate plates to produce a seamless split. Additionally, there were re-edits, and growing time constraints so every element needed to be refashioned, re-timed and re-married together.

What is your pipeline and software at CIS Hollywood?
We chiefly use Nuke for our compositing needs, though, most of THE GREEN HORNET was done on the Flame. Maya and Houdini round out our CG department.

How long have you worked on this film?
The first I saw of THE GREEN HORNET was in October of 2009. I did some preliminary testing, then the film was shot. Elements began filtering into our facility around February of 2010 and we finished our last shot in early November of 2010.

What was the size of your team?
Our core team was intimate in size. The lions share of the fight sequences and split screens was divided between myself and Tom Daws, another Flame artist. About ten additional artists rounded out the remainder of the work.

What did you keep from this experience?
I think what I liked most about this project is that it employed a very standard, non-fussy set of effects tools in a creative fashion. This project was really about problem solving and devising creative ways to implement the visions of the director, while utilizing and honoring the footage he shot.

What is your next project?
I am supervising a very small crop of shots for PIRATES OF THE CARIBBEAN 4. Next up, I am co-supervising THE ODD LIFE OF TIMOTHY GREEN.

What are the 4 movies that gave you the passion of cinema?
That is a hard question. In fact, almost impossible…
I think my list, while greater than four, would have to include, Stanley Kubrik’s 2001, A SPACE ODYSSEY, Martin Scorsese’s RAGING BULL, William Friedkin’s SORCERER, and Hal Ashby’s BEING THERE.

A big thanks for your time.

// WANT TO KNOW MORE ?

CIS Hollywood: Official website of CIS Hollywood.
fxguide: THE GREEN HORNET article on fxguide.

© Vincent Frei – The Art of VFX – 2011

TRUE GRIT: Vincent Cirelli – VFX Supervisor – Luma Pictures

After talking about THE GREEN HORNET, Vincent Cirelli and his team are back. This time, they talk about their invisible work on the western TRUE GRIT.

How was your collaboration with directors Ethan and Joel Coen?
Payam Shohadai (Executive Visual Effect Supervisor) // True Grit marked our fourth collaboration with the Coen Brothers and our largest shot count- so in that sense our largest collaboration with probably the shortest schedule to boot. We completed the work in about four months. As far as working with them, it’s a pleasure. They bring us on board as early as script/storyboard phase to discuss the most cost effective approach e.g. “should we build a set or can we create a matte painting instead.” It’s really refreshing to be so welcomed and engaged in the filmmaking process, and see the bigger context in which our efforts will work with the narrative.

What is their approach to visual effects?
Steven Swanson (Senior Visual Effects Producer) // Joel and Ethan are eager to learn. They want to understand how things work, how they can make our lives easier and vice versa, what’s possible, and whether in camera or in post will yield the better quality result. They’re gracious and conscious of our time, giving us their thoughts and asking for ours. That collaborative spirit with all departments gives everyone a vested interest in the film’s success and makes the process truly a pleasure.

What have you done on this film?
Vincent Cirelli (Visual Effects Supervisor) // The bulk of the work in this film was « invisible », meaning if the audience was surprised to learn there were any visual effects in the film, then we’ve done our job well. There was a wide range of different effects including adding snow, enhancing a prosthetic horse in a river to give it life, animating believable rattlesnakes, creating severed fingers and wounds.

How did you recreate the city?
Richard Sutherland (CG Supervisor) // We researched photographs of desert towns from the old West circa late 1800’s to give us an idea of what the Coen brothers were looking for in the town. We created a ‘toolkit’ of buildings from the period to replace modern structures and extend city streets. We developed a hero and modeling asset system that works within Maya and fine tuned models and textures for authenticity to make the actual location of Granger, Texas look and feel like turn-of-the-century Fort Smith, Arkansas.

Were there many bluescreens or did you have to make extensive use of rotoscoping?
Justin Johnson (Digital FX Supervisor) // We relied heavily on rotoscoping as blue/green screens would had to have been enormous to canvas wide streets.

What references have you received from the Coen brothers for the city?
Vincent Cirelli (Visual Effects Supervisor) // Production designer Jess Gonchor provided concept art of what the town should look like extended which we coupled with our own research. Buildings close to camera were dressed for the era but several had 20th century architecture and which were replaced in 2D or sometimes 3D.

What was involved in the river sequence?
Richard Sutherland (CG Supervisor) // The Coens felt the river was not enough of a threat when Maddie crossed on the horse. We made the calm current subtlety more menacing by blending CG fluid and particle sims with re-timed water elements. We even created special interactive sims to integrate the water with Maddie and her horse, Blackie. In this sequence and others we enhanced or replaced elements of the horse head for dramatic effect: twitching ears, breath, sweat and saliva.

The movie is quite violent. Tell us about the scene where a character is cut off fingers and his assailant took a bullet in the head. How did you make these shots?
Vincent Cirelli (Visual Effects Supervisor) // There was a good amount of effort put into making the severed fingers look totally photo-real. Realistic skin needs details like subsurface scattering or the light that enters into the depths of the flesh, dirt under the fingernails to go with the era, and a wet/bloody texture to sell the violence of it. The fingers were individually modeled and textured went into the comp at an early stage so we could find how to progress their sense of reality. The lighting was based on the image used for the plate and then embellished.

For the gun shot, we used a practical element of blood hitting a wall behind the victim. We did a roto of him so we could place it behind. Then we painted frames of a gory gun blast onto his face and body as the violence happens.

Have you created matte paintings for the sequences outside the cities or is it all natural landscapes?
Vincent Cirelli (Visual Effects Supervisor) // The Coens’ choice of location was brilliantly done. They were all a beautiful addition to the film. Other than the shots in the town, a handful of matte paintings for the looking-glass shots and painting out a few roads that have been formed since the period in which the film was set, the landscapes were totally untouched and natural.

What is the invisible effect that you’re most proud of?
Steve Griffith (Visual Effects Producer) // One of the most challenging effects was the cluster of snakes. The digital animals needed to blend perfectly into the 4K plates, hold up close to camera, and integrate into a wide variety of environments. It was a very big challenge and one that I feel our artists executed with great expertise. As part of our research, we brought in a snake handler and real snakes so that the animators could observe how they move and strike—from a safe distance, of course. And that was a lot of fun.

How did you create the snow?
Richard Sutherland (CG Supervisor) // Some of the snow was practically shot and applied to 3D planes within Nuke. That way it could be composited and tweaked right in the comp while still having the 3D tracked camera move through it in 3D space. For other shots an in-house developed snow setup was used to create falling snow that not only fell and moved at a rate our mind is used to seeing, but also moved realistically with gusts of wind and even landed on the actors hair and coats.

How long have you worked on this film?
Steven Swanson (Senior Visual Effects Producer) // Four months for shot execution. It actually started in the spring of 2010 when they brought us in to consult with us on the number of shots they were going to have, what would be possible through CG, etc. There were snakes that they wanted to try practically at first, but they knew inevitably that they would have to have CG snakes for performance and safety reasons. It ended up being around 9 months total.

How many shots have you made and what was the size of your team?
Vincent Cirelli (Visual Effects Supervisor) // 350+ shots, 45-50 team members including 35 artists, coordinators, and supervisors. The shot count started at an assumed 80, but when they started handing over shots, they had 120 or so to start us with and as the editing process started moving further along, more and more shots emerged that needed work. They were creating the film as we were creating the CG elements.

What did you keep from this experience?
Payam Shohadai (Executive Visual Effect Supervisor) // That for a team like the Coen’s, who are more often thought to be “traditional film makers”, to need so much collaboration from us to bring their film together is a testament to how integral (invisible) VFX have become. All the work we completed did service to the narrative story, which is a great satisfaction to us.”

A big thanks for your time.

// WANT TO KNOW MORE ?

Luma Pictures: Official website of Luma Pictures.
fxguide: TRUE GRIT article on fxguide.

© Vincent Frei – The Art of VFX – 2011

THE GREEN HORNET: Vincent Cirelli – VFX Supervisor – Luma Pictures

Before joining Luma Pictures in 2003, Vincent Cirelli worked at Stan Winston Studios as technical director. At Luma, he oversaw movies such as NO COUNTRY FOR OLD MEN, HANCOCK, HARRY POTTER AND THE HALF-BLOOD PRINCE or WOLVERINE.

How was the collaboration with director Michel Gondry and production visual effects supervisor Jamie Dixon?
Payam Shohadai (Executive Visual Effects Supervisor) // Michel Gondry is an incredibly creative director that we were very excited to work with, especially on this genre of movie. Trying to make the impossible possible was a fun challenge that we all accepted with open arms. Jamie Dixon was creative and flexible and because of his facility side experience, we felt like he was very accommodating to our needs.

What are the sequences made by Luma Pictures?
Steven Swanson (Senior Visual Effects Producer) // Luma worked on a variety of shots, many centered around Black Beauty as a CG replacement. Given it’s an action film, this is a car that needed to do things a typical car would never do, so they enlisted our help for these sequences. Black Beauty needed to crash through plate glass out of the top of a 20 story building while the camera follows the people in the car on the way down. The actors were then ejected from the car with parachutes, all shot on green screen. This meant background had to be replaced as the camera follows them float to the ground with various coverage and angles of building and debris behind them. There were many shots of damage, Black Beauty also drives through an office space, knocking things over and crashing through walls, with people diving out of the way. This also required wire removal for the stunt men. We also added numerous muzzle flashes, smoke screens, explosions and heavy compositing. There is an action sequence where Kato is fighting some hooligans, and shatters a car windshield with a pipe. The glass coming out was in two or three shots were in stereo, where the glass actually appeared to be coming out of the screen and onto the audience. Pretty good shock factor.

Can you explain how you’ve recreated the Black Beauty in CG?
Vincent Cirelli (Visual Effects Supervisor) // We used a Lidar scan of one of the many practical Black Beauties used for the film as a starting point for scale and part placement reference. Then the car was completely recreated in Maya starting from a cube and ending with a super cool muscle car, souped up with everything from giant gatling guns that pop out of the hood, to rockets that shoot out from behind the headlights, and for some of the later versions, riddled with bullet holes and even cut in half.

Are you involved on the great shot where an old car turns on itself to be replaced by the Black Beauty?
Richard Sutherland (CG Supervisor) // That shot was one of the most challenging of the film because not only did we have to replace one car, but two, very close to camera. The length of the shot also played a role because the audience had plenty of time to observe and dissect the realism of the cars. And not only that, but at the end of the shot, Brit and Kato had to look at it, interact with it, open the doors, and get into the fully CG car all while it completely reflected the onset lighting and pushed complete realism.

Can you tell us about the shooting of the sequence when the Black Beauty is falling on the printing press? How did you create these shots?
Justin Johnson (Digital FX Supervisor) // They shot the car on green screen. It was rigged and flying through the air above the printing press to have it lined up to look as though it was about to land on it. At this point, we took over and recreated the car digitally; recreating all the damage, smoke, and sparks. It then blended it in with the live action shot of the car hitting the ground. All the texture and lighting also had to match up with the live action plates that were shot at the printing press in downtown LA.
We ended up building out the entire room digitally, each section was duplicated down the length of the room and lit based on reference of the printing press at the LA Times. We actually took several trips to LA Times and shot reference there and used it to match the digital version.

How did you recreate the environment of the printing press?
Vincent Cirelli (Visual Effects Supervisor) // At first we were going to use texture stills for reference and build it out using low-res geometry, but it ended up being easier to build it out completely because we had already built out one section for the close up shots. So we simply took that high-res close up and duplicated it for the rest of the scene, then lit it properly for camera.”

Can you explain to us how you create the shots when the heroes throw the Black Beauty into the void and escape with ejection seats? Were there full CG shots?
Richard Sutherland (CG Supervisor) // Some shots were full CG, others were plates that were shot on set projected onto geometry and either rendered or brought into Nuke. Part of the challenge was keeping the continuity of how far up in the air the characters were and what direction they were facing at any given time. Once that was broken down, we could then proceed to place the backgrounds behind the green screen footage of the actors that was shot knowing full what part of the digital set would be placed in each of the shots.

To get full resolution imagery for that section of the city, a couple of us actually went to the location that this sequence was shot long after the shooting was over to take photographs from the top floor. Then we stitched together these photos and used in them in the composites as backgrounds.

Did you use digital doubles for your sequences?
Vincent Cirelli (Visual Effects Supervisor) // Yes, there were a few shots in this and other sequences that required us to build photo real digital doubles of the actors.

Did you developed specific tools for this movie?
Vincent Cirelli (Visual Effects Supervisor) // Some new methods were used. A brand new car paint shader was developed to get a realistic deep sheen on the Black Beauty that would totally match the reference that we had of the car in the environment.

What is your pipeline and your software at Luma Pictures?
Vincent Cirelli (Visual Effects Supervisor) // We’ve got a number of integrated tools:
« The Nexus » – breaks CG renders into multiple layers so that the compositors have more control
we have tools integrated in Nuke that bring in these multiple layers and parse them out in a manageable way.
« Big Brother » – is our tracking software created in-house and enables our supervisors and coordinators keep track of artists tasks and adjust the schedule for any given show on the fly.
For the most part we use Maya and Nuke, with a few other sets of proprietary tools built with Python and other specialized off the shelf software.”

What was the size of your team?
Steve Griffith (Visual Effects Producer) // It took about 70 artists, supervisors, and coordinators over the course of 8 months.

What is your next project?
Luma is currently in production on THOR, X-MEN: FIRST CLASS, FRIGHT NIGHT and NOW.

A big thanks for your time.

// WANT TO KNOW MORE ?

Luma Pictures: Official website of Luma Pictures.
fxguide: THE GREEN HORNET article on fxguide.

© Vincent Frei – The Art of VFX – 2011

HEREAFTER: Bryan Grill – VFX Supervisor – Scanline VFX

Bryan Grill evolves in visual effects for over 20 years. After working for 14 years at Digital Domain starting as Flame operator to finish as a VFX supervisor, he oversaw such projects as THE GOLDEN COMPASS, PIRATES OF THE CARIBBEAN 3 or G.I. JOE. He joined the teams of Scanline VFX in 2010.

Scanline VFX has received the Outstanding Supporting Visual Effects in a feature motion picture presented by the Visual Effects Society for this movie!

What is your background?
I started in visual effects in 1986 as nighttime receptionist at The Post Group in Hollywood. No formal film school just on the job training on my own time learning to be a tape operator and then editor. I left The Post Group after 6 years to go work at Digital Magic in which I worked on STAR TREK GENERATIONS and DEEP SPACE NINE. I was than fortunate enough to gain employment at Digital Domain where I worked on my first film APOLLO 13 as a Flame compositor working my way up to visual effects supervisor when I left. After a very enjoyable 14 year career at DD I found my new home at the LA offices of Scanline.

How was your collaboration with Clint Eastwood?
Michael Owens a long time collaborator with Clint on over 7 movies was there to guide us through the creative process between him and Clint. Our team at Scanline worked very closely with Michael on achieving the desired look and feel of the visual effects to tell the story the way Clint wanted them to. Clint was very impressed with the work we were creating but not one to get into all the details of how it is done but collaborative none the less when it comes to what he wants to see.

What is the approach of Clint Eastwood about the visual effects?
Clint’s approach to visual effects is realism and a tool to tell the story of the film. Clint’s shooting style doesn’t change just because there are visual effects in the movie. The visual effects team must have a very robust plan of how to achieve the desired effect without overstating our presence while on set. He is aware when there is something crucial we need for any particular effect but likes to keep the film rolling in the cameras knowing he has the confidence in us to make it work in the end.

How did you recreated the tsunami?
By looking at as much reference material as possible was the first thing. Once we saw the horror and devastation of the what a tsunami could do we than had to art direct those moments to best fit the storytelling of the film. Once we knew what our environments were going to be we started the simulation of the waves speeding down the streets. From there we established the amount of destruction that was going to occur. Plotting out when the buildings would collapse or when people would get eaten up by the massive wave was essential to the storytelling.

Can you explain to us the creation of the shots where Cecile de France carried away by the wave? How did you shoot her?
Originally there was a tank shoot at Pinewood studios. They shot Cecile both under and on top of the water in a controlled environment. These dailies became extremely useful when post vising the actual shots. But because it was a controlled environment Clint felt as if the could use a little more urgency and helplessness. In search of additional dramatic opportunities, plates were shot of Marie and the little island girl struggling to survive in the open ocean water off of Lahaina. While the actors performances were a wonderful addition, the look and feel of the ocean water added a great deal of realism.

Tell us about how did you rebuilt the city and the wave passing through it and causing so much damages?
Comprehensive 3d LIDAR scans were taken of the principal photography location sets. With the help of our on set crew, we were able to get HDR photography for recreating the lighting for our CG environments. Over 50 separate buildings had to be photographed with bracketed textures to build not only the one block set we shot in, but also to build the rest of the mile long stretch of road that would ultimately need to be created for the sequence. For interaction between the CG environment and the wave, we ran rigid body dynamics simulations in conjunction with water simulation. We built buildings in CG much as a construction crew would build a physical structure: first erecting the skeletal understructure and then building out from there. By building it that way, the simulation would break the structure in the weaker areas when it was subjected to the pressure of the wave.

How did you create the shot in which Cecile de France is sinking into the water?
I think the shot you are talking about is when Marie is just coming from under the balcony and her foot gets stuck on a cart. As the cart starts to sink so does Marie with it and than we cut to her underwater struggling to untie her foot from the cart material. The full cg shot when she first starts to get sucked under was a combination of everything we had been doing for most of the work in the tsunami sequence. We mo caped and animated Marie trying to stay afloat. Once the cg water flow was bought off on we showed the animators water flow markers so that they could match her movement to the flows of the water correctly. Than it was additional work to add all the debris floating and interacting with and destroying buildings.
The following shot was a plate of Marie and the cart under water at the tank at Pinewood studios. We tracked the plate and rotoed her out. Than we did a full water simulation with all the debris and environment floating under the water. After integrating Marie back into water we added more bubbles and debris on top to completely immerse her under the flowing torrents of the tsunami wave. Than there was the shot of Marie sinking into the water after being hit by the car bumper. This was a full cg shot including full cg Marie. This shot ended up being a hybrid of motion capture and hand animation. The hair and cloth simulations were painstakingly iterated to match the surrounding live action underwater tank footage of Marie, which directly cut with the shot.

Have you used digital doubles?
Yes digital doubles played a very large roll in the film. All people caught up in the Tsunami water were motion captured digital doubles animated in Massive and Motion Builder. Capturing motions of people being swept away by a river of water proved challenging. Our motion capture shoot relied heavily on actor equipped with zero-gravity traveling wire rigs attached to a gyro waist rig enabling 360 degree movement. This enabled them to perform floating,swimming and thrashing movements of characters in rushing water.

About the sequences of the afterlife. What were your references and how did you created those shots?
Joe Farrell our compositing supervisor worked very closely with Michael on creating the look of the afterlife. There were lines in the script which outlined the perception from hundreds of life after death accounts so those parameters of a bright light feeling of weightlessness and being able to see a 360 degree view was the bases of the effect. We than started to find reference material to help plot out the length and visuals of the shots. Close Encounters Of The Third Kind became our visual inspiration. The end scene when the ship lands and we see all the people leaving the ship who had been abducted struck a cord. The bright light and changing silhouetted images gave a sense of the unknown without being to scary. A green screen shoot allowed Michael to art direct the amount and type of people were needed for the scene. Using the same type of technique of using a very bright 20k light back lighting everyone became the new base. Joe using nuke created an 3D environment and added some very traditional optical effects thus giving a very surreal and haunting moment in the film.

What other kind of effects have you made?
The Visual Effects requirements in the remainder of Hereafter covered a spectrum. The team recreated the 2005 London Underground bombing we also added tears and facial performance enhancements to increase the dramatic effect of the character Jason as well as a host of other Visual Effects techniques to bring Hereafter to a non-visual effects oriented dramatic film.

Is there a particular shot that prevented you from sleeping?
There were a few shots that kept me awake at night. The shot of Marie and the little girl being swallowed up from the oncoming wave in the middle of the marketplace. Also the first time the tsunami crashes onto shore overtaking and destroying the hotel pool area and lower level. Both of these shots had some minor art direction tweaks very close to the end of the production so it was a race to the finish to get all the elements to integrate and work with each other harmoniously.

What was the size of your team?
Our team size ramped up to between 50 – 60 people at its largest.

How long have you worked on this project and how many shots have you made?
The project was awarded to us in November of 2009 and we finished in August of 2010. We were the sole visual effects vendor on the film responsible for 169 shots 86 of those in the tsunami sequence.

What did you keep from this experience?
My experience on Hereafter continues today our team along with overall VFX supervisor Michael Owens are nominated for an Academy Award for best visual effects. So the whole experience of creating,finishing and than ultimately being recognized by your peers is something very very special to me.

What is your next project?
Scanline is happy to be working on Tarsem Singh’s IMMORTALS. And I will be supervising a few sequences on New Line’s JOURNEY 2: MYSTERIOUS ISLAND.

What are the 4 movies that gave you the passion of cinema?
THE WIZARD OF OZ, JAWS, THE GODFATHER and THE FIFTH ELEMENT.

A big thanks for your time.

// WANT TO KNOW MORE ?

Scanline VFX: Dedicated HEREAFTER page on Scanline VFX website.
fxguide: Article about HEREAFTER on fxguide.

// HEREAFTER – SCANLINE VFX – VFX BREAKDOWN

© Vincent Frei – The Art of VFX – 2011

BLACK SWAN: Dan Schrecker – VFX Supervisor – Look Effects

Dan Schrecker has worked on all the movies of Darren Aronofsky’s from PI to BLACK SWAN. He also worked on films such as THE DARJEELING LIMITED, ACROSS THE UNIVERSE or LAW ABIDING CITIZEN and the TV serie THE SOPRANOS. In 2008, he joined the staff of Look Effects.

What is your background?
I started out doing non-digital animation. From there I went to graduate school to study interactive telecommunications. This got me into the digital world and I started my own business doing interactive design. After a few years of this, my old college roommate made a film and needed some help with some graphics so I teamed up with another old college friend and did the work. That film was ?. From there I started to do title design and got into visual effects that way, starting a new company called Amoeba Proteus with my friend Jeremy Dawson.

How do Look Effects got involved in this project?
I had worked with Darren Aronofsky on all of his films and, since I had taken a staff position at LOOK in 2008, it made sense for us to do the work on BLACK SWAN. In addition, LOOK had done work for Darren on FOUNTAIN and THE WRESTLER, so he was familiar with the company as a whole.

What have you made on this show?
We completed over 200 visual effects shots for the film. This included complex CG work, such as the swan transformation, as well as, production fixes, such as lots of crew removal in the mirrored rehearsal rooms.

How was your collaboration with Darren Aronofsky?
It was good. Like I said, we have been friends since college, so we have a very good working relationship and a shared history which allows us to communicate fairly easily.

How did you create the wings in the dance sequence?
The swan transformation
With Nina’s triumphant performance as the Black Swan, her transformation reaches completion in this sequence. The practical chicken skin on her back spreads across her chest as a 3D effect. It travels down her arms and CG feathers begin to emerge. The Black Swan makeup travels up her arms as a 2D effect. When she begins the final coda, the feathers being to form full swan wings and torso.

Dance Motion Capture
On set, we shot the professional dancer using a motion-capture setup provided by Curious Pictures. There were 18 cameras which captured the dancer’s motion. Because the dance double could only do this most difficult ballet sequence from stage left and Ms. Portman could only do it from the right side, we were forced to flop the shot. Throughout the film, we were very impressed with Natalie’s dancing skills, as she performed much more of the ballet than initially anticipated. In this case, she performed the final coda, providing us with a high-quality element for the face replacement in the few shots where we used the dancer.

Wing Layout and Rig:
The wings were built based on a compromise between the concept drawings and the dancer rig (3D set-up). The dancer rig was built-in with the arms divided into multiple joints to allow for greater tracking flexibility. To match the rig, the wing model has the same number of joints and is constrained to follow the dancer’s arm movement and twist at each extra joint location. The rig also contains extra controls to allow for additional twists and offsets. This was critical because what worked best for the track did not necessarily appear natural for the wing. Twisting was especially an issue that resulted in a lot of additional animation on the wing rig.

The joints of the wing rig were skinned to a NURBS foil shape that was more bird-like in proportion than arm-like. The larger feathers, the primaries and secondaries, were hand-positioned on this NURBS model surface. The smaller feathers that fill in the wings were placed by MEL scripts (specially-written programs) which LOOK wrote to instance (multiply) based on texture maps. Additional MEL scripts constrained the feathers to the NURBS geometry (3D model) using Maya’s follicle nodes. The body feathers were also entirely positioned and scaled based on texture maps and the MEL instancing scripts. The total feather count was around 11,000 and LOOK’s technical director wrote around 1500 lines of MEL code for rigging and scene management.

All of this coding allowed the wing rig, when fully-built and attached to the dancer rig, to use the dancer in the master file as reference and simply swap with the most recent wing version.

Lighting/Rendering/Passes:
Lighting was done entirely with conventional Autodesk Maya area and spot lights. We had enough images to generate HDRIs (high dynamic range imaging), but the lighting changes and large camera movement made it impossible for one or two HDRIs to cover the wild shifts in luminance. Computer graphics lights were “built” based on the film footage, with numerous stage lights above and to the sides of Natalie, six large chandeliers were approximated, several bright footlights near the orchestra were added and three very bright spot lights casting rim light were critical. Even with all these lights, the black levels in the plate the smoke in the theater made matching the actual lighting tricky. A lot of color correction in compositing had to be done as a result to make the wing feel integrated.

The shot was rendered in mental ray using the Rasterizer because of the huge amount of motion blur. Most of the wing is captured in one big beauty pass with an additional shadow pass and numerous mattes for the compositor.

Can you talk more in details about the feathers creation?
Feathers:
For the transformation, we needed to create, animate and composite in the black swan feathers. Great care was taken to make the look and behavior of the feathers as realistic as possible, thus helping to make the transformation believable.

The wing feathers (Primaries, Secondaries) are simple 3D models: curved planes for the barbs and cylindrical geometry from extruded curves for the rachises. Each feather has a deformer rig (animation control structure) to add bend in two directions and also to allow growth from the rachis outward. The body feathers were simplified and usually did not contain rigs or separate rachis geometry. Feather silhouettes were created with a cutout map from scans of actual Swan Tundra feathers (a white swan). Those same scans were darkened in Photoshop and painted over to produce a more plausible black swan feather. Normal maps (textures) were generated through ShaderMap to add barb roughness. There were ten primaries, eight secondaries, and five generic body feathers in total. Each set was mirrored producing 46 feather textures.

The look of the feathers comes from an anisotropic shader, which gives the smooth geometry the sort of directional sheen one would expect from a real feather composed of thousands of individual barbs. The shader was slightly translucent to allow light through when the wings crossed in front of stage lights. Special care was given to reflection falloff, as there is essentially no diffuse lighting on the feathers due to the dark plate and the dark texture maps being multiplied against the diffuse lighting values.

Feather Growth:
Feather growth was one of the more challenging aspects of the visual effects in Black Swan. LOOK animated black and white maps in Adobe After Effects and generated some low-resolution image sequences. Those growth images were read into the 3D software, Autodesk Maya, and determined the feather scale and other properties, such as rotation for feather ruffling. Each feather had extra data associated with it, such as UV position, which had been stored previously when rigged by the instancing MEL scripts. It was a crude, but effective, feather system.

Animation:
The primary and secondary feathers were grown “by hand” by hand animating scale attributes and keyframing the deformers of each individual feather’s rigs that allow outward growth (the barbs pop out of the rachises). Additionally, keyframes were set by hand every couple of frames to keep the wing from twisting (often around the elbows) and to minimize feathers penetrating each other. As the shot progressed, the matchmove often had to be tightened up with additional keyframes.

How did you create the tattoo on the back of Natalie Portman?
During the sex scene, the lily tattoo on Lily’s back, which we’ve seen throughout the earlier part of the film, transforms, from Nina’s point of view, into swan wings. Is this a hallucination brought on by Nina’s drug intake or a manifestation of Nina’s paranoia that Lily will take over the role of the Swan Queen?

LOOK started the transformation effect with an image of the practical tattoo. We had our concept illustrator design a final swan wing element in the same color and style as the tattoo. He then drew in-between frames, « mapping » each petal and leaf of the lilies to the wing feathers. An animator then used these elements to create the final 2D animation. Simultaneously, the painstaking 3D matchmove of Lily’s back and movement was ongoing. This was a particularly difficult track due to subtle muscle movements in the actress’ back. The 2D animation was then applied to Lily’s back, creating the transformation.

Is the handheld style of Darren Aronofsky gives you some troubles?
It did make things more difficult to track, but we got it done. In a few cases we insisted that Darren shoot with a locked off camera and we added digital camera shake in post.

Have you done any face replacements?
A few, but not many. Natalie did almost all of her own dancing. Though there were shots when we mapped Natalie’s face on to drive the storytelling, such as Lily’s face in the dressing room confrontation and the corps de ballet backstage.

How did you design and create the paintings that speak to Natalie Portman?
The art department created the actual paintings. As the scene progressed during editing, Darren wanted it to be more extreme, so we did a number of variations of the faces until we found the right balance. Because they were so childish in style, we had to be careful not to make it too goofy.

How many shots have you made and what was the size of your team?
I believe it was 210 shots and about 25 artists.

Is there a shot or sequence that prevented you from sleeping?
Many.

What did you keep from this movie?
It was a very satisfying project to work on, but very difficult.

What is your next project?
Right now we are finishing work on LIMITLESS for Relativity Media, Neil Berger director, with Bradley Cooper and Robert DeNiro. We are also starting work on THE SITTER for Fox, starring Jonah Hill and directed by David Gordon Green

What are the 4 movies that gave you the passion of cinema?
JAWS, DR. STRANGELOVE, SUPERMAN 2 and APOCALYPSE NOW

A big thanks for your time.

// WANT TO KNOW MORE ?

Look Effects: Official website of Look Effects.
fxguide: Article about BLACK SWAN on fxguide.

// BLACK SWAN – LOOK EFFECTS – VFX BREAKDOWN

© Vincent Frei – The Art of VFX – 2011