Video interview of Michael Fink, Senior VFX Supervisor

I take advantage of this special day, my birthday, to offer you the last part of my interview videos filmed during the conferences at Imaging the Future held last July in Neuchatel, Switzerland.

I am pleased to have been able to interview one of the VFX masters in the person of Michael Fink, Senior VFX Supervisor with an impressive career that includes films such as BLADE RUNNER, BATMAN RETURNS, THE HUNT OF RED OCTOBER and more recently THE GOLDEN COMPASS, SUCKER PUNCH or AVATAR. He received the Best Visual Effect Academy Award for THE GOLDEN COMPASS.

I hope to purpose to you new video interviews soon.

Thank you to comment and share if you like this video.

Good viewing.

Vincent

// SPECIALS THANKS

Rémy Dewarrat – Camera & Sound – clap.ch
Vincent Gillioz – Original music – vincentgillioz.com
David Francois – Main title – duckydave.net

And of course a special thanks to Michael Fink.


© Vincent Frei – The Art of VFX – 2012

TOTAL RECALL: Sean Farrow – VFX Supervisor – Lipsync Post

Sean Farrow worked for over 10 years in VFX. He participated in many movie projects as BATMAN BEGINS, ANGELS & DEMONS, JANE EYRE or IRONCLAD and also on TV shows like BAND OF BROTHERS, ROME or MISFITS.

What is your background?
Long, winding and interesting. I’ve been creating visual effects for just over 13 years covering pretty much every aspect of visual effects. I’ve created film title sequences, both 3D and 2D, spent many years as a compositor, animator, concept artist, designer, and gradually moved onto more supervisory roles, such as sequence lead, sequence designer, sequence supervisor, assistant supervisor to visual effect supervising for facilities. I’ve worked as an on-set supervisor and production supervisor for a handful of Films and tv shows as well as associate and consulting supervisor on other projects. Essentially I thrive on interesting “problems”.

How did Lip Sync Post get involved on this show?
Lipsync has worked with Peter Chiang on a number of projects over the years (STARDUST, GREEN ZONE & UNITED 93). We have a great working relationship with him and he knows which areas of VFX we are particularly strong in. He approached us in October 2011 asking if we were available for a number of key sequences in TOTAL RECALL. Obviously we jumped at the chance to work with Peter again on such a high profile feature. He had such confidence in us that we were the first additional facility to come on board the project and were offered as many shots as we felt we would be able to deliver. It’s great to have that kind of belief shown in you as a facility by one of the world’s top VFX Supervisors.


How was the collaboration with director Len Wiseman and Production VFX Supervisor Peter Chiang?
It was a genuine pleasure to work with Peter and Len; they were both extremely articulate and both picked up pens to sketch out the principles what they were looking for. We would meet with Peter on a regular basis to talk through the more complex and creative briefs. Peter was great at getting to the nub of what each and every shot needed to achieve, which left us to work out all of the practical aspects as well as do a great deal of our own design and development. We’d also attend the more detailed briefings and feedback sessions with Len Wiseman so ourselves and Peter would go through our shots and get feedback all in one go.

What have you done on this show?
We were awarded 5 sequences in which to work on TOTAL RECALL. The first was the Dream sequence at the start of the show where Melina and Quaid are escaping from the bad guys. This sequence has significant clean up work, some set extensions and the Bolo Weapon at it’s most visceral.
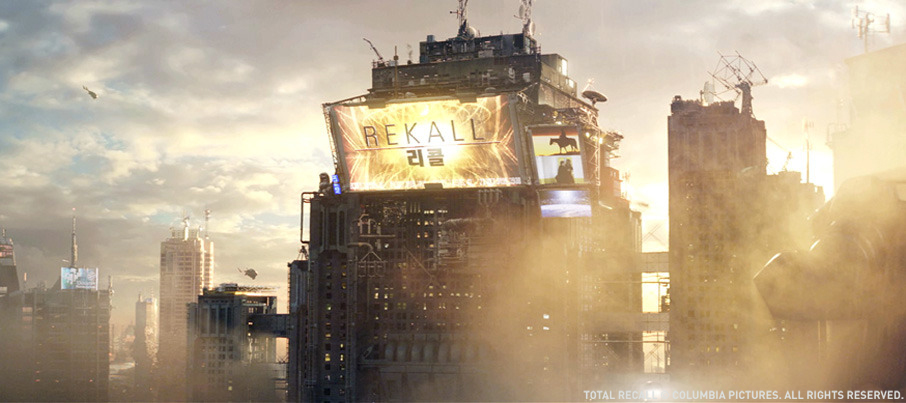
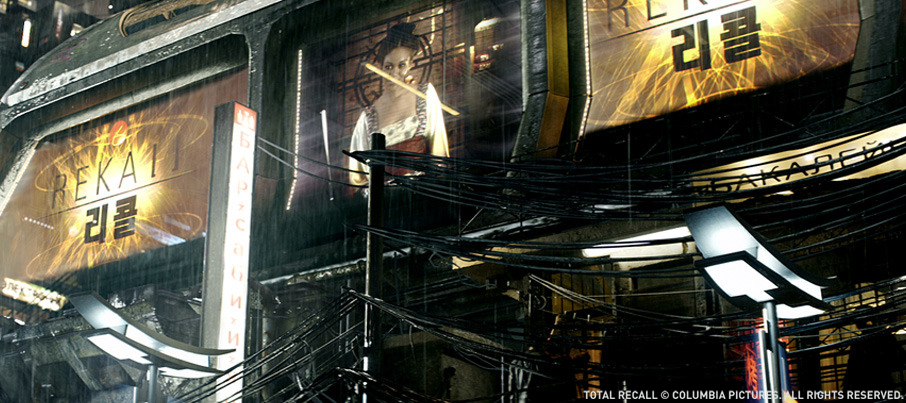
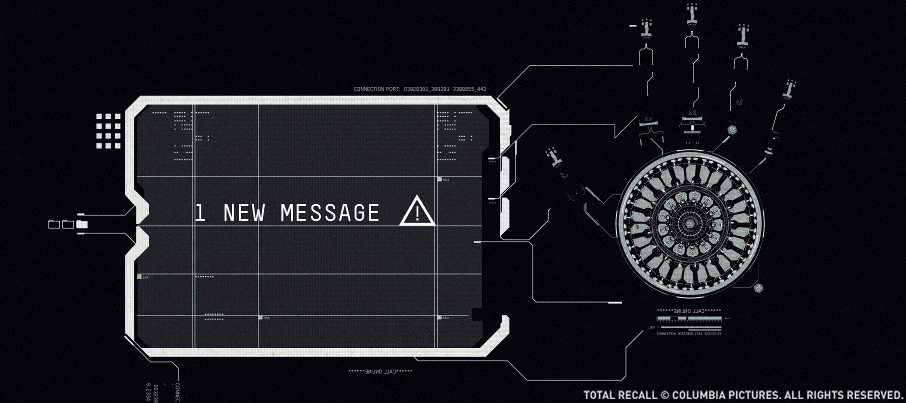
The largest sequence in terms of shot count was the Tripping Den, which is the Rekall centre where Quaid goes to have memories implanted. Here we did some holographic screen work, an illuminated and animated tattoo and a whole host of military assault gadgets such as the Door Ram, ShrapCam and the ShrapCam Missile. There was also the design and creation of an interactive holographic display hanging off a Soldiers back-pack.
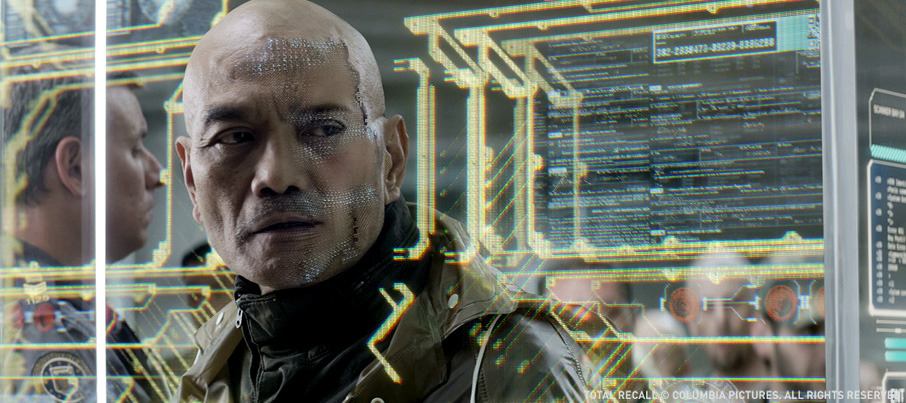
The third sequence was inside a terminal building where we designed the look of the infamous security scanners and some set extensions and crowd composites.
The fourth sequence was the first half of Mathias’ Lair, another tripping chair sequence where we did an extensive number of holographic screens and design work.
The final sequence we contributed to was the Melina Rescue sequence where Quaid gets to use the Bolo Weapon on the guards, with some help from our VFX bolo coils and fx.


Can you tell us more about the design and creation of the Bolo Weapons?
The Bolo Weapon was the most challenging aspect of our work on TOTAL RECALL. The principle of it had been worked out prior to shooting, however none of the dynamics had been realized. The weapon was based on a real ancient weapon, the bolo, which has three ropes with weights at the ends and is used a little like a lasso. However, TOTAL RECALL’s weapon was shot from a small assault gun, where a projectile is fired and upon impact breaks out into extremely fast, light enveloped, highly energetic, metallic tipped and restrictive coils. There was a practical prop made to wrap actors up, which was essentially many very bright white LEDs strung onto a solid metallic backing. This allowed production to shoot with a practical light effect in all shots where the coils were not animating into position. The production also developed a technique for shooting the very bright coils on “flare lenses”, which were essentially specially prepared anamorphic lenses with the coatings stripped off them. This gave a truly unique photographic, reflective and heavily flared effect in camera. Our challenge was to tell the very brief visual story of how the weapon was deployed and how the characters could swiftly become constricted by the coils.


We knew we had two very different remits; the animation of something with a plethora of physical liberties, and the live action photography which was very unusual to match to, but essential to make a believable weapon. The animation was achieved in a traditional staged process working with Peter and Len to get a sense of speed, an exaggerated sense of three-dimensionality and a physical presence enough to tie someone up in a moment. There was no procedural system in place which could do this since the physical space that the coils needed to travel was unreal. After body-tracking the characters and building a specially designed rig to allow the pulling out, the restrictive arcing, and the correct weighting of the coils, we animated each one individually to camera in pre-vis mode in order to get the pacing and scale feel right for Len. We would then apply our highly complex, multi-layered motion blur lighting passes to the coils and re-present. Since the look had such a dramatic effect on the feel of the animation we would need to go back and reanimate specific frames of certain coils to have more attractive individual frames in the sequence. The motion and lighting was a special challenge since Len really wanted to see more than just light. He was very keen to see a metallic element to the coils, which when surrounded by that much light, meant we had to do a lot of compositing trickery to get the darker, shinier metallic touches to be seen through massive motion blur and very bright lights.


Did Colin Farrell wears something for the interactive lights?
Colin wore a full practical set of coils in shots where there was no work required other than rig removal and clean-up. However there are two shots in the first sequence where he did not wear any practical coil lighting at all. We had to ensure our body-track was good enough to allow us to re-light his clothing underneath the bright and shiny coils. We achieved this in two shots which had to cut directly with the live action lighting and coils.

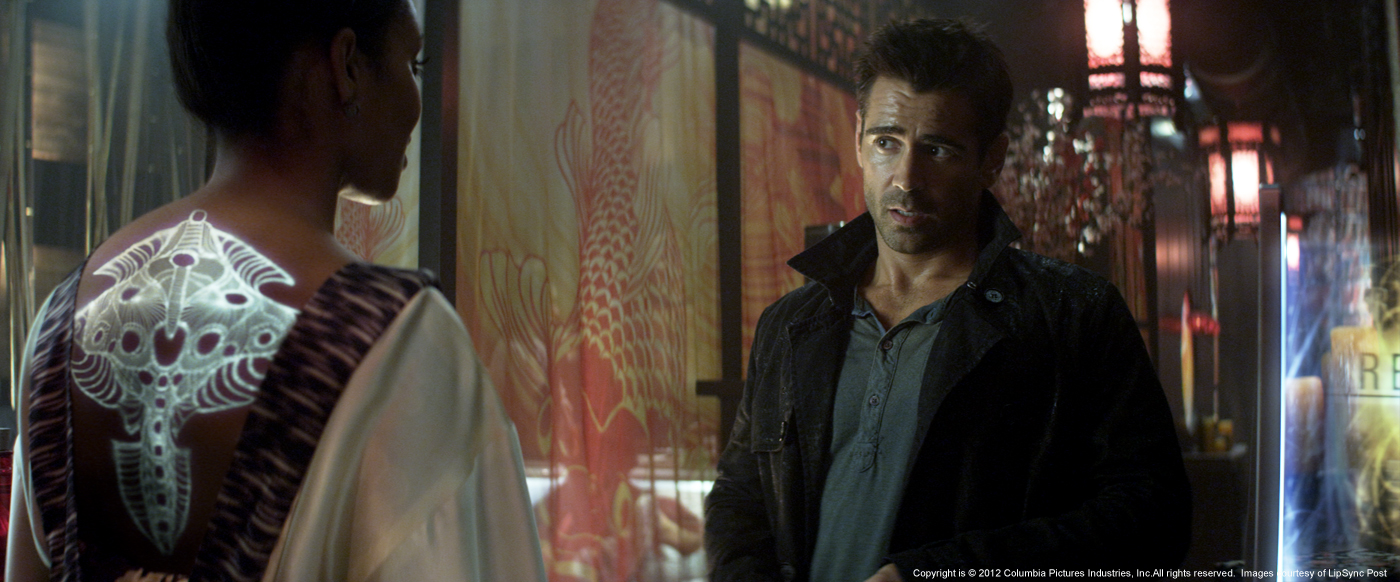
How did you create the illuminated Tattoo?
The creation of the Tattoo on the Rekall receptionist was a really interesting process. The production had a number of practical illuminating tattoos in the show, which was great reference for us in this scene. However the animation was something we developed with Len to avoid it looking like illuminated paint. The real challenge was making it look like self-illumination but not have the tattoo “lift” off her back. We used the live action shadows and blended through the tattoo. The trickier part of the shot was that the receptionist had a traditional full back tattoo which needed to be removed completely before applying our illuminated version. This was partly because the design was different but also because it was black and would have been seen through the gaps. These shots were challenging due to the precision with which we needed to track the tattoo onto her back when she didn’t have any tracking markers.


At a moment, Federal police use a lot of gadgets to catch Doug Quaid. Can you tell us more about these tools?
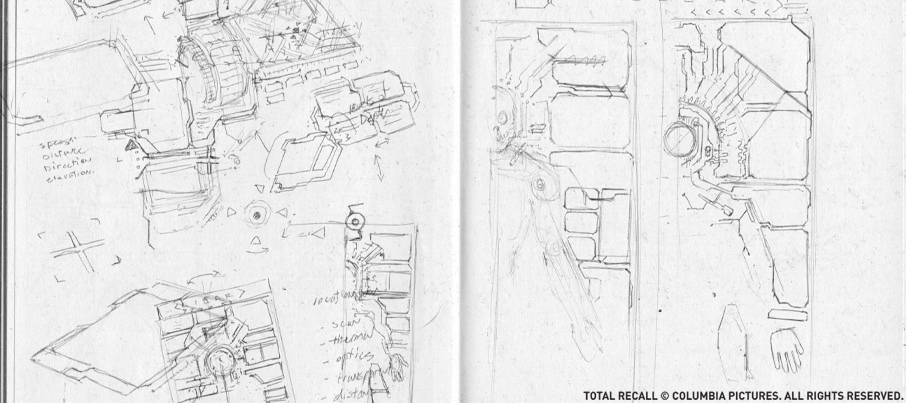
The gadgets in the Tripping Den were really fun to develop. We had a physical prop base for the DoorRam to start from, which was about an inch depth. We handed this over to our concept artist to sketch up a whole host of ideas of how it might look when it was fully extended and punched through. We drew a great deal of our ideas from practical rams and drills as well as military gun muzzles. We then future-ised them by combining those ideas with more interesting devices and materials. Once we got a feel for which concepts were working for Len, we moved onto the CG build and animation, which was important as this device needed to extend to about 5 times its depth and still look dangerous and solid enough to bust through a steel cased door. The interior of the ram, which features a drilling mechanism, was actually inspired by the drill machine vehicle in the original TOTAL RECALL, with the spinning drill bits and blades.


The ShrapCam missile, which is fired through the door into the room, already had a shape and scale in the practical prop. We designed the spikes, which extrude as it is placed into the gun, and developed the expulsion mechanism after it sticks into the wall and spits out hundreds of tiny ShrapCams. For this device we pretty much went straight to animation since so much of the physical design was dependent on how it dispensed the cameras. We also built a small version of the tiny flying cameras, both to fly around the room and also to replace an oversize prop on Quaids arm and under his foot with a CG version.


Can you explain to us more in detail the Backpack holographic?
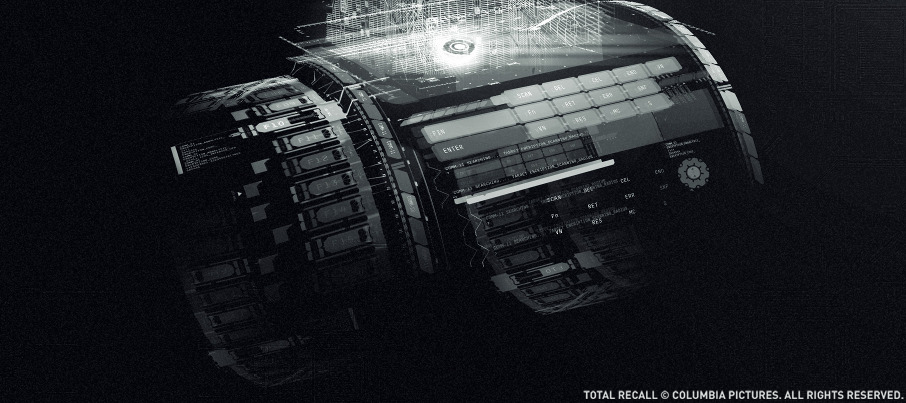
There were two looks involved in the Backpack holographic sequence, both of which we developed and designed from scratch. The first was the POV view of one of the tiny cameras, technically named a ShrapCam. We design the graphical content, combined it with live action film footage, and applied a “scanning” and digital screen look to it to give the sense that you were inside the ShrapCam gathering information and surveying the room. Ultimately the information from these ShrapCams was broadcast back to the Soldiers Backpack.

The back pack display was a physical screen and base strapped to a Soldiers back which flipped down, enabling another soldier to access the broadcast images and information from the ShrapCams. We created the interface of the backpack screens, to enable interaction, and also to show just what was going on. Production had placed dozens of GoPro HD cameras in and around the Tripping Den set and shot everything on extremely wide lenses. We took this massive amount of digital footage and converted them into what the tiny ShrapCams were seeing. Over a hundred of these were then treated and comped into the back pack holographic interface to show what the ShrapCams were seeing throughout the room. The soldier “activates” the holographic function of the back pack, which then builds a 3-Dimensional sphere with all the key angles taken from the room. This moment also tied in with the CG camera we placed onto Quaids arm as he peels it off. The look and feel of this holographic was not reliant on anything else in the film, so we had free reign to develop a look which was cool, three dimensional, and was able to show what was going on inside the Tripping Den. Upon command the 3-Dimensional sphere of images translates into a holographic projection of the room, in which Quaid can be seen moving around. The look of the holographic room was a creative challenge, again to combine what looks cool and communicate clearly what the soldiers are able to see. We built the room based on Lidar scans of the set, which was then taken into Nuke. This enabled us to animate the room, globe and even Quaid within Nuke allowing us to keep a consistency of look and ensure we could tweak very specific moments and areas of the shot to suit the feedback. This whole process meant we could turn around fully fleshed out 3-dimensional versions quickly without having to go through the 3D pipeline.


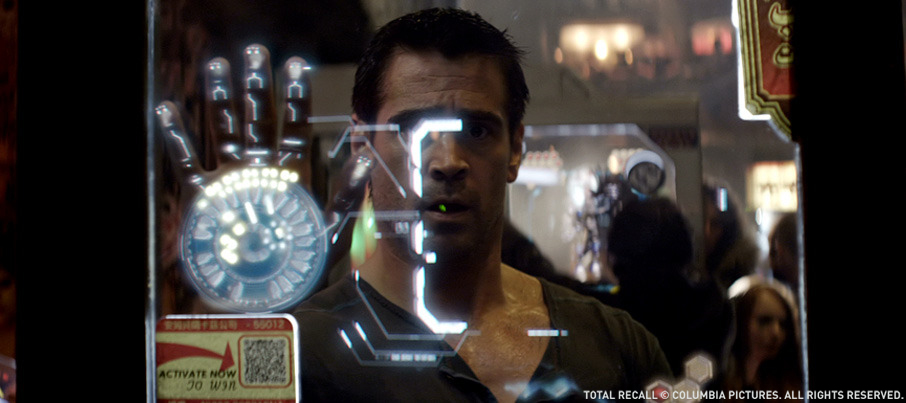
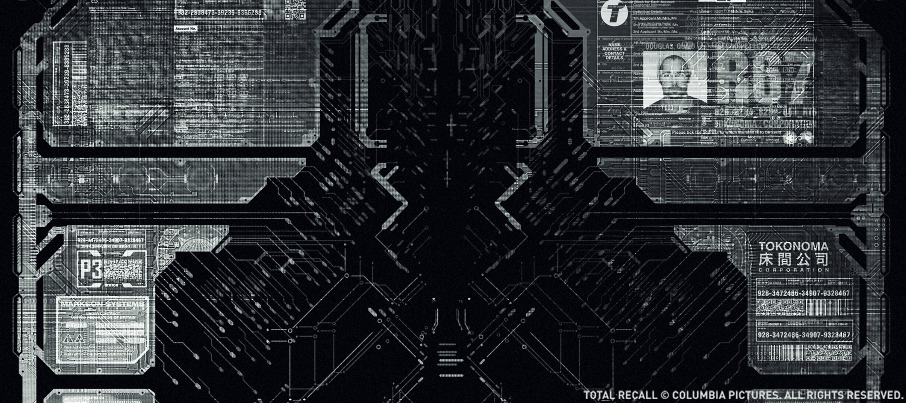
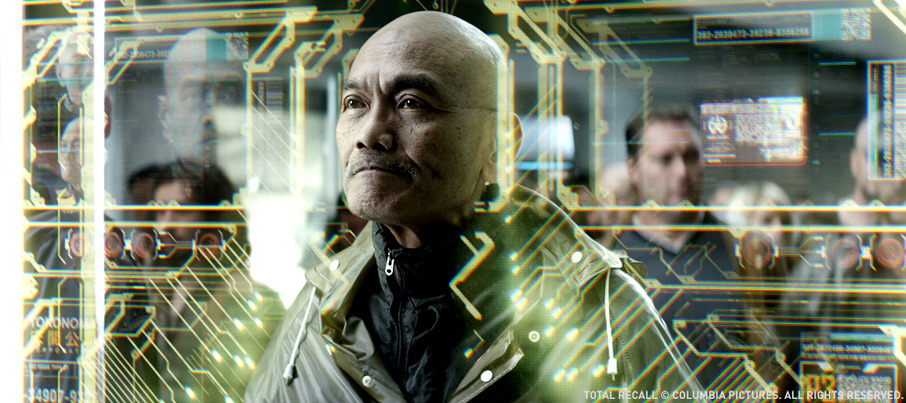
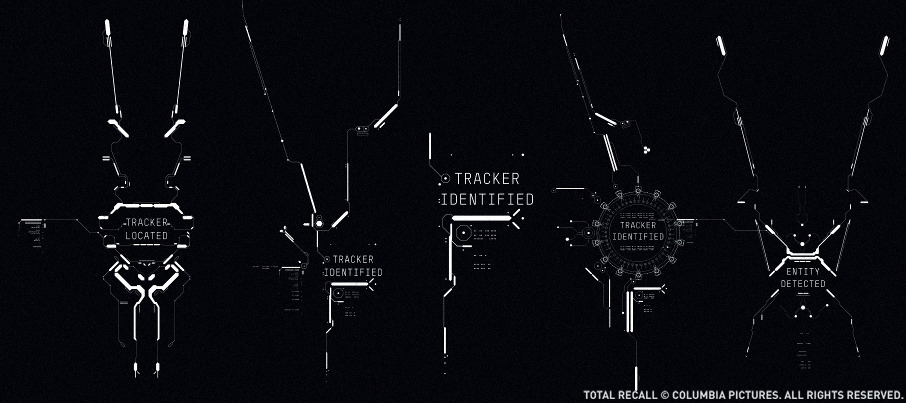
Can you tell us more about the Terminal Scanner sequence?
We were very excited to develop the security scanner in the “Terminal” building due to its reference to an iconic scene to the original TOTAL RECALL. We were supplied a set of 2D motion graphics as a foundation template, which we took into Nuke and developed into a full 3D interactive holographic mini-environment with all the alternative scans for each individual passenger. We had numerous shots in the scene which had to have a continuous look as well changing when the action kicks off. This meant we needed to develop a look and a set of techniques which could be easily transferred to many other shots as well as other vendors who needed to follow the look of the scanner as we progressed. The scanner appears in other portions of the film. We additionally designed and animated the guard’s interactive graphics to follow the action precisely from shot to shot, again using similar “look” techniques that we’d developed for the main scanner. Also in this sequence we designed and animated holo-arrows traveling along passenger barriers as well holographic advertising boards near the ceiling. On top of that there were ATM graphics, boarding info panels, info holo-posters and animated glass holograms which Quaid eventually smashes though. There were a lot of visuals in these shots!


What was the real size of the set and how did you extend it?
Our set extensions were all incidental in the Terminal scene. Through the ceiling in a number of shots we would see the exterior of the cityscape, which was a supplied CG element comped and tracked in, in 3D space. The very end of the terminal was not as long as Len would have liked, so we created a digital matte painting projected onto cards in Nuke, along with green screen crowd elements and extended the Terminal to be four times longer than the location.

How did you create the crowd for the Terminal Scanner sequence?
Crowd replication is all about good lighting and realistic action by the performers. Some of the elements we used were taken from out-takes from the main film drama, but others were Green Screen elements shot specifically for our shots. Both methods worked out very well. The hardest part of this sequence was our head replacement shots. While in disguise, Quaids body has a different head. There’s no perfect technique to do a head replacement shot, and we used a range of number-crunching and hard work techniques to get ours just right. However, production had done a fine job shooting elements in the same lighting conditions but the principle of matching one persons moving head onto another required a great deal of re-timing, paint work, scaling and hand tracking.


Can you tell us more about the CG chair in Matthias lair?
This was a one off shot. 90% of the chair was a practical prop, with extending arm upon which holograms are projected. At the very start of the sequence when Quaid sits down, the arms move down and lock into place. We detailed a 3D model up from lidar scans and animated the arms along with some dynamic wires hanging off and reacting to the motion of the arms.


How did you design and create the various holographics in this sequence?
The kill-code sequence was a real storytelling challenge. The sequence in Matthias’ Lair had been in flux in the cut and really only settled with about 4 weeks before delivery. It was a complex set of story beats describing a specific set of actions, past and present, all played out of Quaid’s mind, and all of which needed to be communicated on the yet-to-be designed screens. Len described what he was after in very broad conceptual strokes and tasked us to come back with an animated sequence roughed into a near locked cut. We knew we had to get it close on the first pass otherwise we’d all be facing an even steeper challenge with the finish line approaching. We essentially did several processes in tandem. We designed the content graphics at the same time as designing the story reveal, developing a look for the holographics and prepping all of the shots for compositing. Normally we’d be waiting for graphic and then comp them in, but in this case, with so little time we needed to design and create everything in one timeline. The presentation of the first pass to Len went well enough for us to progress further with the sequence, and to know we were in the right area. We continued to develop all of the graphics, animations and the look of the composited screens as we got closer with the storytelling aspect. All completed in a little under those 4 weeks, which when you are starting from zero, is pretty good.


Were there any interactive lights on set to simulate the holo screens?
In most of our shots, no, and in fact it isn’t missed that much. That’s largely to do with the photography and also the absolute bombardment of holographic and screen images throughout the film, which tend to feel “in” the spaces but not overpowering and need a massive amount of interactive light.

What was the biggest challenge on this project and how did you achieve it?
This was the Bolo Weapon. Additionally to the flying and whipping coils, we also had the “connection” effect. This was the “invisible” connection between the gun and the wrapped coils. The idea of the weapon was that once a person was constricted you could whip the gun round, flinging your captive along with it. There was a strong creative movement to avoid anything too literal for this effect and to also make it look like nothing seen before. We developed over a dozen fully animated alternatives to the connection effect, which, after many iterations was narrowed down to one. The final effect was actually hand animated, frame by frame, much like cell animation. We had a 3D space built for each shot, and guides for perspective, but after that it was all paint work on a frame by frame basis. Essentially the connection effect only works on the move, and no single frame would sell it. This was then composited into the scene and further worked on to make the effect more photographic and enhance the visibility of each part depending on the cuts from shot to shot.

Was there a shot or a sequence that prevented you from sleep?
The Dream sequence Bolo shots. They were trailer shots and no one really knew what the final look was going to be… until we got it.


How long have you worked on this film?
We started in October 2011 and we finished the last “BluRay” shot in July 2012.

How many shots have you done?
198 shots were finalled for TOTAL RECALL.

What was the size of your team?
At the height we had around 40 people, but we were also doing two other shows at the same time.

What is your next project?
We’re currently starting up on a really fun creature show, a Nigerian film drama and a feature documentary.

What are the four movies that gave you the passion for cinema?
BEN HUR, INDIANA JONES, BACK TO THE FUTURE and 2001:A SPACE ODYSSEY

A big thanks for your time.

// WANT TO KNOW MORE?

Lipsync Post: Official website of Lipsync Post.

// CREDITS

Visual Effects Supervisor: Sean H. Farrow
Digital Effects Supervisor: Glen Pratt
Visual Effects Producer: Stefan Drury
Visual Effects Snr Co-Ordinator: Katie Roehrick
Visual Effects Production Manager: Andy Burrow
Visual Effects Co-Ordinator: Laura Millward
Lead Compositor: Luke Butler
Lead Compositor: Adrian Banton
Lead Compositor: Neil Cully
Compositor: Naomi Butler
Compositor: Antonio Rodriguez Diaz
Compositor: James Elster
Compositor: Andy Quinn
Compositor: Ruggero Tomasino
Compositor: Jane Paton
Compositor: Philippe Ludvig
Compositor: Ant Web
Compositor: Ivan Lima
Compositor: Michael Harrison
Compositor: Guy Elson
Compositor: Ales Gargulak
Lead CG Artist: Ben Sharp
CG Lighting Artist: Alex Betancourt
CG Artist: Sam Cox
CG Artist: Emma Braney
CG Artist: Lenka Zuckova
CG Animator: Ben Mars
Match Move Artist: Saqib Ashraf
Match Move Artist: Eliot Staker
Digital Matte Painter: Harry Wormald
Head Of Systems Admin: David Lloyd
Systems Admin: Dan Spain
Systems Admin: Alexander Phoenix


© Vincent Frei – The Art of VFX – 2012

Video interview of Kevin T. Hahn, CG Supervisor at MPC

Here is the second part of my video interviews:

Kevin T. Hahn (JOHN CARTER, QUANTUM OF SOLACE), CG supervisor at MPC, gives me some of his time during the conferences at Imaging the Future held last July in Neuchatel, Switzerland.

Thank you to comment and share if you like this video.

Good viewing.

Vincent

// WANT TO KNOW MORE?

MPC: Official website of MPC.

// SPECIALS THANKS

Rémy Dewarrat – Camera & Sound – clap.ch
Vincent Gillioz – Original music – vincentgillioz.com
David Francois – Main title – duckydave.net

And of course a special thanks to Kevin T. Hahn and MPC.


© Vincent Frei – The Art of VFX – 2012

TOTAL RECALL: Rudi Holzapfel – VFX Supervisor – Baseblack

For over 14 years, Rudi Holzapfel worked in many studios such as Framestore, Double Negative, MPC, Rising Sun Pictures and recently Baseblack. He has participated in numerous projects such as PITCH BLACK, TROY, BATMAN BEGINS, AVATAR, or CLASH OF THE TITANS.

What is your background?
While I was studying engineering and later art I started working for a small production house in Germany learning video camera work, editing etc. I went on working for bigger post houses in Germany as editor and senior editor for commercials and promos before I moved to London. I worked as a freelancer for a good while and eventually moved into film in 1997 at various houses in London and around the world. After a Sloan Fellowship I am currently working as managing supervisor at Baseblack.

How did Baseblack got involved on this show?
We got approached by Peter Chiang to help out on several small, some self-contained, sequences.

How was the collaboration with director Len Wiseman and Production VFX Supervisor Peter Chiang?
I have known Peter Chiang since my days at DNEG and the work with Peter is always very pleasant and straight forward. He is very creative and has a wonderful eye for the necessary effects for a scene. We hadn’t worked with Len before. The communication was solely through video conference calls with LA, Len explaining what he wanted, often supported by him drawing on the screen for reference that could be taken away. DNEG also filmed all the sessions for good measure so that all of us could always make sure that we had hit the mark before the next submission for feedback.

What have you done on this show?
I was overall vfx supervisor for Baseblack looking after the tube-journey sequence and various shots from other sequences generally involving dilapidated London exteriors.

What was the real size for the underground station?
The station was a real station that Len and Peter had filmed in Toronto.

How did you extend and degraded the underground station?
We built a simple 3D model based on a LIDAR scan, then added matte-paintings to walls and roofs with cracks, flaking paint, graffiti and eventually we added the poisonous smog.

What references and indications did you received for the dilapidated London shots?
We had several pieces of concept art, some from production, some from DNEG that they had done to drive decisions forward.


Can you explain to us in details the creation of these matte-paintings?
Initially our head of matte-painting and our 2D supervisor went out and took lots of reference pictures around London, all sorts of buildings, tube stations, cityscapes etc. We also filmed a lot of reference, simply pointing an HD camera out of the window of the traveling tube. We used all these to create more specific concepts for Len and Peter. The next stage was usually building simple geometry that could be textured with more high-res images we retook of the elements that had gotten approved. Eventually these projections where either lit and rendered in Maya, or graded and used in NUKE’s 3D environment for the finished comp.


Can you tell us more about the advantages of the use of 2.5D matte-paintings?
2.5D matte-paintings can be very powerful when building backgrounds with not too much of a perspective change and depth within themselves with regard to camera. The speed of the NUKE render and the possibility to relight through simple grades, rotos etc. makes for very fast turnarounds when doing changes. It does make for new ways of working, the borders between matte-painting, 3D and compositing are becoming blurred. The closer you get to camera though, the more parallax you have within an element, the less feasible those projections become and you end up going the traditional route of textured and lit 3D.

How did you create the subway in CG?
The train for the subway sequence was Len’s plate photography.

How did you manage the green screen composites and the interactive lights?
The quality of the green screens of the RED camera was very good with usually very little noise and edge artifacts. The only restriction was often the interactive light on the screens or very soft (out-of-focus) edges which required a more hands-on approach. In order to incorporate the interactive lights into the backgrounds Peter and Len came up with the idea of holes in the tunnel wall or lights of slightly different colours on the walls as we travel by.


At the end, a Harrier is leaving the Matthias lair. Can you explain to us more in details about it?
We had two scenes with harriers leaving Matthias’ lair, Cohagen’s and then Quade’s. Cohagen’s harrier takes of very close to camera which is perched on top of the wall of the courtyard. For this shot we rendered the background and some set extensions for the cloister and church walls and finally two harriers, the one taking off and Quade’s which is still on the ground. Because of all the ash fallout in dilapidated London, the turbines of the harrier kick off a dust storm which surrounds the harriers and obscures the background.


When Quade takes off, the camera is behind the outside wall, looking through a cloister. For these shots we rebuilt a good part of the courtyard walls and the cloister in 3D in order to provide geometry for the dust storm and depth within these elements. We started using NUKE and Mari, the front wall closest to camera ended up being rebuild in Maya, because it had too much detail and depth which we didn’t want to lose. The particle storm went through several iterations from “take it to 11!” to eventually a more moderate approach. Len and Peter thought that after several harriers landing and taking off the dust would be somewhat reduced. For this shot, some of the mid-ground buildings were also 3D models, as there was too much change in them over the length of the camera move.


How did you collaborates with Double Negative teams for the Harrier?
DNEG had developed the harrier in all its detail. We took their model and textures and subsequent updates and put them into our pipeline in order to match a turntable render that DNEG also provided for the overall look of the shaders. Once a common base was established, we could light the harrier in our scenes matching the look of the DNEG harriers.

What was the biggest challenge on this project and how did you achieve it?
The biggest challenge was probably the limited time between arrival of the plates and delivery of the finished shots. It also meant that the production was very much in flux until quite late in the project with changes being made that would usually affect a whole set of shots.


Was there a shot or a sequence that prevented you from sleep?
No, not really. Although it was probably the hardest CG that Baseblack has done to date, working with the people we have at Baseblack, we always knew we could do it.

What do you keep from this experience?
The trust in each other at Baseblack when it comes to delivering good work in a very team-oriented atmosphere.

How long have you worked on this film?
We worked on it for just over 6 months.

How many shots have you done?
In the end we did about 60 shots for TOTAL RECALL.

What was the size of your team?
We had about 35 people working on the project.?

What is your next project?
The next big thing for us is THE 47 RONIN.

What are the four movies that gave you the passion for cinema?
I am not sure if I can point to only 4 films, but here are 4 nevertheless: OUT OF AFRICA, DIVA, STAR TREK – THE WRATH OF KHAN and ANY GIVEN SUNDAY.

A big thanks for your time.

// WANT TO KNOW MORE?

Baseblack: Official website of Baseblack.


© Vincent Frei – The Art of VFX – 2012

TOTAL RECALL: Richard Higham – VFX Supervisor – The Senate

Richard Higham worked at The Senate for many years. He has participated in projects like BATMAN BEGINS, THE DA VINCI CODE or STARDUST. As VFX supervisor, he take care of the effects for films like KICK-ASS, PRIEST or DARK SHADOWS.

What is your background?
I previously worked at a Media Production company during which time I developed skills using tools such as Discreet Logic’s Combustion and Adobe After Effects. I continued to develop these skills as a rotoscope and prep artist on several feature films. Working at The Senate gave me the opportunity to learn from senior digital artists and compositors with a wide range of backgrounds in 2D, 3D and photography. I worked as a compositor at The Senate and over time began to look after some projects as a facility VFX Supervisor. Throughout this experience, I’ve continued to learn new software and have been fortunate enough to also gain on set experience along the way.


What have you done on this show?
The Senate had three main sequences with differing aspects on each one.The major sequence was in Reed’s apartment where Quaid unlocks an interactive hologram sequence. Here we created the look and feel of the 3D hologram head of Hauser. The New Asia Streets sequence was a mixture of greenscreen comps, adding background DMPs, as well as a stylish video graphic display on a glass panel that Quaid interacts with. We also did prosthetic cleanup on his hand and arm. The New Asia Bank sequence featured more graphical displays on glass windows and panels, as well as a graphical display in the bank vault where Quaid is looking for clues to his memory.


Can you tell us more about the device in Quaid’s hand?
The hand was an on set special effects prosthetic concealed on Colin Farrell’s person. The display was always visible on his palm and when switched on, it illuminated. The idea was that we should not see anything until the device activates and lights up which meant the wiring and display had to be painted out.


How was the interactive light for this device simulated?
This was actually a part of the special effects device that was real, no additional lighting was required in visual effects.

Can you explain to us more about the video display on the glass?
The idea is that Quaid has an Agent telecom device within his hand which has extra technical abilities. One of these is that it can transmit video on any panel of glass if he presses his hand against it. Our aim was to show this, so that you really felt as if it had been transmitted to the glass and was displaying through and within the glass pane itself. We used a mixture of screening over the images, 2D and 3D tracking and then double layering so that the depth of the glass could be emulated, offsetting the tracking as the perspective shifted.


Quaid goes to a bank and watches another video. Can you tell us more about it?
Similar techniques were used on this sequence, adding additional scanlines and video noise to give it a sophisticated yet realistic look.


What indications and references did you receive from production for the video and graphic look?
We were provided an animated graphics image sequence as well as a single jpeg as a rough guide. The graphics themselves had to be broken up to make further animation possible based on Len Wiseman’s (the director) preference. For example, the hand did not always move as a single solid piece, so we tracked individual parts of the graphic to match his movements.


In Reed’s apartment, Quaid activates an interactive hologram. What did you receive from the production?
We received a cyberscan model of Colin’s head. The shape was slightly different to the greenscreen photography, so we had to rework the mesh to be more accurate and we created his shoulder and jacket collars by using the greenscreen plates. We also received all the different camera takes of the 180 degree array (featuring the Red Epic as the main front facing camera and then 18 5D Canon cameras to cover the range of angles).

How did you find this beautiful design?
Using the greenscreen takes of Colin Farrell, we began developing a look in 2D and 3D, differing the tonality and trying to find a level of transparency so that it would feel dimensional as well as video-like. We began to show examples to Len so he could have something visual to react to. He liked the idea that the image would not be perfect, that it would be a little noisy but most importantly, he wanted to really feel dimension. By diffusing and reducing the opacity of the edges slightly (though not losing detail) the hologram begins to feel dimensional depending on what viewpoint you are looking at — the central part feels like it comes out towards camera and recedes away at the sides. By object tracking the head from the greenscreen takes, we could then start experimenting with additional textures and FX in 3D. Eventually we opted for a spherical projection system. A simple animating scanlines image sequence was created and projected through the sphere and onto the 3D head so that the lines would contour over his nose, his cheeks, any features that would show off dimension. These were then rendered along with UV maps and delivered to the compositors.


Can you explain to us more about the activation / deactivation of the hologram?
The actual activation was quite challenging in terms of how this hologram would flicker into life. Our direction led us to once again the mixing of 2D and 3D disciplines. Len liked the idea of having a geometric style to it, so we created simple 2D animated quadrants that flickered on and off and applied them to a black and white shader in 3D. Using this shader on the head, we could then ramp up from the base with some randomization and give a progression of revealing through mattes that were informed by the geometric sections. The greenscreen head was then revealed using these mattes. Additional fractions of distortion were added with a random yet tech-like animation. As the hologram finally takes shape, the effects are dialed back until you see the final fully formed head.


Can you tell us more about your work on the final fight sequence on China Fall?
We had a mixture of work on this sequence. Production would provide fully rendered 3D environments as image sequences which would be the backgrounds for any greenscreen comps. In some instances, we were supplied the geometry and textures of these backgrounds and would re-shade and light them for other shots. We also received rendered CG elements of the Synth to comp over the actor. The Synths themselves needed to have moving parts and components so you could see though the exoskeleton gaps and therefore we had to paint in a continuation of background. Some of this was also supplied to us as precomps. As there was lots of CG going into these shots it was important to get a balance of contrast and brightness that would match the live action photography.


How did you work with other vendors?
Our main collaboration was to maintain consistency, especially when working on the same scenes.

What was the biggest challenge on this project and how did you achieve it?
Probably on the hologram head sequence. When the live action camera tracked around the location of where the hologram should be, we needed to somehow transition from one camera angle to another of the greenscreen takes to keep the dimensional aspect correct. Different techniques worked on different shots — in some cases, we could project the actual greenscreen take onto the object tracked geometry head, but in other instances, we would morph through 4 or 5 different camera angles while carefully maintaining features in the correct place.

Was there a shot or a sequence that prevented you from sleep?
The hologram head sequence was very challenging from getting the right look and believability to the technical aspects such as accurate object tracking. There was not a high level of tolerance, if any, in terms of accuracy and this could lead to many hours of fixing until it would look right.

What do you keep from this experience?
How you approach a sequence or style of effect can make a huge difference to its success from the very start. When developing a look, it is worth doing on more than just one shot — for example if there is a difference of angle, this can have an impact on the techniques. What works with one angle may not with another so working on both simultaneously can ensure consistency in terms of look as well methodology. Its also vital to maintain a constant dialogue with the director so work can be kept on the right path.


How long have you worked on this film?
We began working on some of the sequences toward the end of 2011 developing looks and 3D, etc, and we worked on the post through to the end.

How many shots have you done?
The Senate worked on approx 250 shots.

What was the size of your team?
We had a very talented team of approx 35-40 people working on it at various points throughout the show.

What are the four movies that gave you the passion for cinema?
I was always a big Sci-fi fan and grew up watching STAR WARS movies and I loved their invention as well as stunning special effects. BLADE RUNNER also had an impact with a dark vision of the future yet so beautifully lit. I was also stunned by the work of Ray Harryhausen on films like THE CLASH OF THE TITANS — you could literally lose yourself in another world. ALIENS also has a strong influence with incredible blend of tension and special effects.

A big thanks for your time.

// WANT TO KNOW MORE?

The Senate: Dedicated page about TOTAL RECALL on The Senate website.


© Vincent Frei – The Art of VFX – 2012

Video interview of Sue Rowe, VFX Supervisor at Cinesite

After more than 150 written interviews, I am really happy to finally offer to you my first video interview!

These three videos were filmed on the sidelines of the Imaging the Future conferences in Neuchatel, Switzerland.

Woman first to start this first series with my interview of Sue Rowe, one of the few women VFX Supervisor.

Thank you to comment and share if you like this video.

Good viewing.

Vincent

// WANT TO KNOW MORE?

Cinesite: Official website of Cinesite.
Prince of Persia: My interview with Sue Rowe for Prince of Persia.
John Carter: My interview with Sue Rowe for John Carter.

// SPECIALS THANKS

Rémy Dewarrat – Camera & Sound – clap.ch
Vincent Gillioz – Original music – vincentgillioz.com
David Francois – Main title – duckydave.net

And of course a special thanks to Sue Rowe and Cinesite.


© Vincent Frei – The Art of VFX – 2012

TOTAL RECALL: Ash Thorp – Creative Director / Designer

Ash Thorp worked as art director and designer for many years. He has participated on films like THE TOURIST, X-MEN: FIRST CLASS, THOR, PROMETHEUS or THE AMAZING SPIDER-MAN. In the following interview, he explains the many challenges on TOTAL RECALL.

What is your background?
I come from a more traditional illustration/fine art background with a little bit of design education.

How did you get involved on this show?
While working as a lead designer on another feature film, I was contacted by a mutual friend, Michael Meyers, who knows Patrick Tatopoulos. Patrick was in search of a designer that could help build out UI and design Elements for TOTAL RECALL, and so we set up a meeting at his Los Angeles office. He showed me the pre-vis of what they had been creating for TOTAL RECALL, and from that moment I was extremely excited to jump in and join the team.

What have you done on this show?
On TOTAL RECALL, I created interactive design interface for around 200 final shots in the movie, which included everything from robotic helmet displays to street advertisements. It was a wide-scale of different needs that filled up the world they had created.

How was the collaboration with director Len Wiseman and production designer Patrick Tatopoulos?
It was a great experience. I met with Patrick a few times in person when we first started up the job together, and then I began to also have regular video conferences with Len as he would make notes and express his thoughts on the shots they chose for the edit. Thankfully through the use of modern day communications, we were able to get our thoughts and designs worked out quickly and things continued to move along at a very fast pace.

What references and indications did you receive from them?
This is a very broad question given the amount of work provided for the movie. When Ryan Cashman (who animated all my designs) and I had our initial meeting with Patrick, he explained roughly what he wanted for some of the particular shots that him and Len decided needed work. From that initial brief, I started to build a massive list of what needed to be accomplished on this project. Then as I would build the designs and assets, they would be passed on to Len so that he could provide his notes on what he thought was working and what still needed adjustments. Once we established trust and things began to progress, Ryan and I became more responsible for developing ideas, trying to bring new concepts to the table, or possibly solving issues to further help the team with their project.

How did you approach this project?
This was a massive project for just a two person team, so staying organized was key. It’s very easy for things to get mixed up or confused when you’re dealing with so many tasks, but I made sure to try to keep things organized and make concise lists to help keep on the right track.

What are your first steps of work on a project like this?
With TOTAL RECALL, I tried many different techniques and even developed a few new methods to help get the work out to the client even faster. Before I start designing, I like to mentally visualize what it will look like and function before I even start. I want to dig deeper into the concept and really understand what is actually happening in the shot before I start to build out the assets. I fill my world with questions about the scene and aim to answer them with my designs. Most importantly, I always have my sketchbook close to me because I pull inspiration from the world around me, and it also helps get my thoughts and energy out as fast and honest as possible. I would start sketching out ideas on what I think might work for a scene, and from there, decide on which of those sketch designs were the best for that shot. From that point, I go into Adobe Illustrator and build out vector assets and design compositions that I feel capture that original idea I have from my mind/sketchbook. Once I am satisfied with the assets I have built, I take those elements into Photoshop and build upon those even further to achieve a result acceptable for presentation to the client for review. On some other shots, I might take another approach and draw directly onto the film plate using my Cintiq or Wacom tablet; this process helps me see how the composition is working immediately and helps me understand sizing, framing, everything. I must emphasize that the idea is king and building out the assets to support that is my main goal.


How did you choose the fonts used in the show?
Fonts can be a bit tricky. I have a pretty large asset folder that I go through before I start a project. With TOTAL RECALL, I wanted to try and stay away from the stereotypical sci-fi fonts, and I leaned more towards fonts that would be used in the real world but with a subtle twist, something a bit classic and functional. Picking font families can be difficult and so I base my final decision more on emotion and what the font reads back to me visually. Again, I try to support each shot of the story as I build out the assets, and this can be as simple as picking a font that is more legible between size increments, for example.


The movie features an impressive amount of screens and holograms. Can you tell us more about their design and creation?
Agreed! There is one particular sequence that sticks out to me, and it was a scene in the film that involved a security screening the colony citizens had to walk through. In the original film, Arnold walks through and we can see an X-ray skeleton of his body revealing his fire arm. For the new concept, Patrick and I sent designs and ideas back and forth a few times before we were finally able to nail this design down. Patrick had this great idea that all their information would project out and be visible all around them; it would be a visual passport of some sorts. I really loved that idea and built upon it to form a design language that I felt would fit their world. From there, I sent these design concepts out to Len for his feedback, and once Len was sold on the idea, I handed it off to Ryan for him to animate it with that vision in mind. For me, this scene was a very memorable moment from the original film and I really aimed to build out something that was special for Len’s adaptation of Philip K. Dick’s story.


How did you design the Synth screen face?
These where some of the designs I enjoyed the most. I wasn’t given a brief on this other then the fact that they needed to have a visible read-out of data, such as “entity detected” or “tracker identified”, etc. Before I jumped onto the computer, I began quickly sketching out the concepts from my mind. As I mentioned earlier, I use my sketchbook quite a bit at first before then moving on to Illustrator where I can further play around with shapes, forms, compositions, and ideas. I really wanted it to feel special, unique, and unlike anything I had seen. The role of the synthetic robots in the film is menacing and dominating, so I wanted to give their screen a similar feel. I looked towards nature’s design and movement for a bit for inspiration here. I love nature’s engineering of the mouths of spiders and praying mantis’, because there is something disturbing about how they consume things. Therefore, I wanted to try and take that same feel but give it a digital aesthetic. This design is something that I really enjoyed building and that I hope others enjoyed seeing as well.


Can you tell us more about your collaboration with the different VFX vendors?
This was more for the final output stage, as many of the designs I built for this project were sent directly to Ryan Cashman. And then from Ryan, it was shipped to various vendors, such as Double Negative, BUF, and MPC. When I first started on this project, we had a few conference calls with Double Negative to make sure we were all on the same page and basic file output needs in order to make sure we didn’t hold up anyone’s workflow. The crews were great and did some truly amazing work. While watching the final film, I was excited at how well they were able to track the original designs. Great work guys!

What was your feeling to work on a new version of TOTAL RECALL?
When I met up with Patrick and he showed me the new world they had created for this film, I was extremely excited to see more and be a part of this film.

Which softwares did you use for the graphics creation and animation?
For the design portion of this project, I used Adobe photoshop, Illustrator, Bridge, and Indesign CS5

Have you created procedural animation or everything is keyframed?
I know enough to get around in After Effects, but not nearly as good as Ryan; he is really amazing with that program. For TOTAL RECALL, I tried to mainly focus on design and concept, as that alone was enough work for a team in itself.

What was the biggest challenge on this project and how did you achieve it?
The biggest challenge for this project would have to be the overall scale of shots we needed to deliver. It was a massive list for just two people to accomplish from the original manifestation of design to its final animation output. Honestly, just sheer will power and hard work got us through to the end of the project. There were so many long, late nights, weeks, and months, and I am really proud that we finished this project strong.


Was there a shot or a sequence that prevented you from sleep?
All of them, really…hahaha! I was working on this film while juggling other projects as well, so everything was built through long nights and weekend hours, while also managing to try and fit in some time with my family too.

What do you keep from this experience?
I am very thankful to have been able to work with such an amazing director and crew, especially Patrick; he is so wonderfully talented in the film world, and I was honored to have been given a lot of design freedom on a film of this magnitude. Personally, this project helped push and show me what I am capable of, and how much I really can take on as one person. The biggest lesson I think I learned from this project was to understand and control every minute of my day, respect my time, and honor it with the best work I could make at the time I created it.

How long have you worked on this film?
The total amount of time was about 4.5 – 5 months roughly.

What is your next project?
I am currently a lead designer for ENDER’S GAME which I also greatly love… another amazing team/project. In addition, I am also assisting on a few other features but I can’t speak of them in detail at the moment due to my contracts. I am looking forward to showing these future projects as I feel it reflects my continuing development as a creative mind.

What are the four movies that gave you the passion for cinema?
This is a very difficult question! I love cinema and have so many movies that inspire me in so many different ways. I supposed that the movies that really pushed my passion for film were AKIRA, THE ABYSS, AMERICAN BEAUTY, and of course, STAR WARS – THE EMPIRE STRIKES BACK… that movie changed my childhood.

A big thanks for your time.

// WANT TO KNOW MORE?

Ash Thorp: Dedicated page about TOTAL RECALL on Ash Thorp website.

// TOTAL RECALL – ASH THORP REEL


© Vincent Frei – The Art of VFX – 2012

ABRAHAM LINCOLN VAMPIRE HUNTER: Benoit Pelchat – VFX Art Director – Rodeo FX

Benoît Pelchat has over 12 years experience in the VFX, he has worked at Animal Logic, Industrial Light et Magic or The Orphanage. He has participated in projects such as STAR WARS EPISODE III, IRON MAN, PIRATES OF THE CARIBBEAN: AT WORLD’S END or THE SPIRIT.

What is your background?
I studied Fine Arts, Industrial Design and Architecture. I practiced as an architect for a few years before I discovered a passion for creating environments and special effects that you could see in the movies. So I followed a program in visual effects at the Centre NAD in Montreal. I then worked in Australia at Photon Fx, Animal Logic and in the United States at Industrial Light and Magic and The Orphanage.

How did Rodeo FX got involved on this film?
We were approached by the film production end of term to help finish the project on time.

How was the collaboration with director Timur Bekmambetov and Production VFX supervisor Michael Owens?
Fantastic. Michael Owens is a person with whom we had worked in the past at ILM in California. He had a clear idea of what Timur was looking for. We interact frequently with the director who was present in Cinesync, which helped greatly to guide the project and speed up production.

What did Rodeo FX made on this film?
We worked on an “establishing shot” of the White House by night and an aerial view of a middle class residential area of Washington DC.

Can you explain to us the creation of the White House?
The White House model and some reference period were provided by the production. However, we had to adapt the model to bring it to the time of Abraham Lincoln. We generated passes to build the matte painting: occlusion, key light, shadows, z-depth and a additional lighting pass for volumetric light. Texture passes would be supported in the matte painting itself. Regarding the environment and vegetation, it is a photomontage.

Did you use real elements in this shot or is it full CG?
This is a combination of both. The production filmed a diligence in a park in Louisiana on a green screen on daylight. Since this was a night scene, we had to add strong highlights on the White House to simulated the moon light in order to justify the strong lighting of the live action. We used photographic elements for the sky and vegetation.

The lighting in this shot is beautiful. Can you tell us more about this aspect?
We used a mix of photographic, painting and volumetric lights passes rendered in Arnold. As for the interior lighting of the White House, we have integrated real footage taken inside the White House as we know it now that we have modified to simulate a light period.

What indications and references have you received from production?
Several historical references in the point of view of architectural and urbanism. Regarding the White House, there was a desire to bring out a rural area and surrounded by vegetation. At the time, the sides were not yet built. So we replaced these sections with a path and vegetation to give a more rustic look. We see still in the background a “hint” brighter including other homes to remind the proximity of the city.

For the aerial view, we also received a lot of documentation about the period when Washington has grown but because the photos were mostly black and white and with a average graphic quality, we had to make some interpretation. The director wanted to meet both rural and urban aspects. Our configuration of the islands of the city respects the urban fabric very special from Washington DC, to which we added vegetation, sidewalks and dirt streets, as they existed at the time.

Can you tell us more about the impressive shot of Washington DC seen from the sky?
The director had two important things he wanted to convey in the camera movement: Firstly he wanted to give the impression that the scene was filmed from a balloon to give more realism of this period and secondly the most important, the sequence needed to show the collection of silverware by Union soldiers in a bourgeois neighborhood of DC. The latter amassed silverware to help made ammunition for hunting vampires. It was important for the director to make the audience feel the “glint” of light in soldiers trucks. We accentuated this effect in the compositing to make it more noticeable.

What is your work methodology on a shot like this?
The first step was to validate our ‘layout’ and the camera movement by the director. To do this, we used maps of the time to create a 3D scene with blocks representing very basic urban fabric of Washington DC. We also proposed several camera movement that were in the spirit and rhythm of the sequence. Once these two elements have been approved, we chose a frame projection, and created such passes to help us build our matte painting, ie key light, occlusion, shadow, and a rough diffuse texture. Meanwhile, our simulation artist took care to animate the streets with 3 distinct groups of characters: the soldiers, the civilians and carriage-horses. Then in compositing, we added the clouds, smoke stacks and the “glint” of silverware.

How did you create the crowd for this shot?
The shot called for the interaction of several distinct types of characters, so we created a crowd system using Softimage ICE and given the appropriate behavior for each group. Each character had a specific goal to achieve, but should also take care of other characters, horses and surrounding scenery to avoid collisions. Once the simulation finished, we assigned an animated and textured model for each character and have render the whole thing with Arnold, still in Softimage.

How did you handle the stereo aspect?
We approached it as a mono project. The stereo aspect was supported via post-processing by another studio. We only had to deliver all our elements in separate layers once the work was approved.

What was the biggest challenge on this project?
Up-to-hand the tight schedule, the biggest challenge was to respect the desire of the director to bring out the details of what is happening at street level (ie distinction between civilians and soldiers, glints in the visibility of trucks , etc.) despite the fact that the camera covers much ground and is at a respectable height. It was therefore necessary to choose an angle and a favorable light to put these details in value. Fortunately, this scene had to fit into a sequence filmed in the late afternoon. We have therefore qualified for a lighting type “low angle” with “long shadows” allowing us a favorable reading forms the ground.

Were there been a shot or a sequence that has prevented you from sleeping?
No, my little baby is doing this part!

What do you keep from this experience?
Everything happened very quickly and this, with a small team. We have been effective in our approach to the time allowed. The production team seemed happy with the result.

How long have you worked on this project and what was the size of your team?
As I mentioned, it was relatively a small team, almost one person per specialty. The turn-overs were very short and the information conveyed rather quickly between production and our studio.

What is your next project?
We are currently working on THE TWILIGHT SAGA, THE HOST and NOW YOU SEE ME and a major project with ILM that unfortunately I can not mention.

What are the four films that gave you the passion for cinema?
Probably the same as several artists who work in the world of visual effects:
STARWARS – A NEW HOPE
ALIEN
BLADE RUNNER
THE FIFTH ELEMENT

A big thanks for your time.

// WANT TO KNOW MORE?

Rodeo FX: Dedicated page about ABRAHAM LINCOLN VAMPIRE HUNTER on Rodeo FX website.


© Vincent Frei – The Art of VFX – 2012

BRAVE: Claudia Chung – Simulation Supervisor – Pixar

Claudia Chung joined Pixar in 2003 to work on FINDING NEMO. She then worked on THE INCREDIBLES, RATATOUILLE and UP. In the following interview, Claudia talks about the many challenges on BRAVE and especially the hair.

What is your background?
I have a Computer Science degree from University of California Berkeley. I came to Pixar as a Render TD, transitioned to Simulation on THE INCREDIBLES. On RATATOUILLE, I started tailoring and taking on more artistic aspects of Simulation. Initially I was terrible at tailoring so my lead at the time put me in a sewing class. I was Cloth Lead on Up and finally Simulation Supervisor on BRAVE.

How did you collaborates with the directors?
As the supervisor, I’m constantly working with the directors, art and animation departments to figure out what the creative hope and direction is. I can then translate this to the team and work with individual artists in hitting the goals of the director. When a story element is introduced to the film before the shots enter our department, for example Merida falling into the river, we’ll work with the director to understand his vision of what Merida looks like wet and how her hair and clothes should behave. We have 2-3 reviews with the director every week, showing models or shot work.

Merida hair are just amazing. Can you explain to us in detail how did you create these?
The groomer, Lena Petrovic, and the art director, Steve Pilcher, worked closely together to give Merida’s hair the personality it has. As Lena was grooming, she realized she needed a faster way to create curls. Thinking how she would do this in real life, Lena created essentially a curling iron in the computer so she could quickly create uniform curls. That would leave time for the more important aspect of hand sculpting these uniform curls to what Art and the director wanted.

How did you manage so many hairs and curls?
A new simulator, called Taz, was created. Taz was powerful in two key ways. It could handle hair-to-hair collisions in an intelligent, multi-threaded way. This gave Merida’s hair the volume that’s characteristic of curly hair. The second feature was it’s ability to solve the paradox of curly hair. Curly hair is stiff in the way that it never loses the curl or spiral, but yet in overall movement, it’s actually quite soft and light. Taz computed essentially two curves per hair curl, one that represented the curls and another that represented the overall wave and movement along the length of the curl.

How long did you work on the R&D for this hair system?
It took 3 years, from start to the day we declared we were successful in finally hitting the look of Merida’s hair. Many many smart minds contributed to the final result. To be clear, it wasn’t just the look and movement that took so long, but stability was a huge part of its success as well. We had to make sure the simulator could actually finish the film without artists having to constantly clean up and hand-tweak results. In the end, Merida’s hair was one of the easiest models we had to simulate.

Merida and her mother wears various long dress. Can you explain to us step by step their creation?
At Pixar, we model all our costumes in 3D. We model them as quads and then in the “sewing” process the meshes are tessellated into triangle meshes which are better suited for simulation. During this sewing process, we create the gathers and seams that you see in Merida’s dress. The mesh is then “relaxed” or fitted onto the character who is standing in an awkward neutral pose. It’s an iterative process until the garments fit the character whether she’s just standing there or animated. It mimics what you would do in real life. All of our dresses can be flattened into a pattern that could be conceivably printed out and sewn together in real life. This is important because this pattern is the foundation that gives the costumes the realistic motion and dynamics that our human eyes are sensitive to.

What was the biggest challenge on this project and how did you achieve it?
There were so many challenges. The biggest were Merida’s Hair, Angus’s groom (8 separate types of fur that each had to have unique dynamics, yet look graphically appealing) and Fergus’s costume (8 layers of cloth and the kilt itself is layered 8 times). Any of these challenges required a lot of patience and research.

Was there a shot or a sequence that prevented you from sleep?
Not really. I was lucky to have an amazing team of tailors, groomers, and simulation artists. They were always eager and willing to take on more and more challenges and convince me that anything thrown at them was possible. Whether they lost sleep over what they agreed to, however, you’d have to ask them.

What do you keep from this experience?
So many things. The top is how amazing the people I had the pleasure of working with here at Pixar were — from the directors to the individual artists on the team. These are the people who inspired me to come into work everyday. From a simulation point of view, I’m excited to see our very technical discipline carry into the artistic and creative realm. Discussions were no longer about what is technically possible but about communicating what is artistically sought after. It really rewards both sides of the brain.

What are the four movies that gave you the passion for cinema?
TERMINATOR 2, THE MATRIX, BEAUTY AND THE BEAST, and INDEPENDENCE DAY

A big thanks for your time.

// WANT TO KNOW MORE?

Pixar: Dedicated page about BRAVE on Pixar website.


© Vincent Frei – The Art of VFX – 2012

SNOW WHITE AND THE HUNTSMAN: John Moffatt – VFX Supervisor – Double Negative

John Moffat joined Double Negative in 1998 and participated on most projects of the studio such as PITCH BLACK, ENEMY AT THE GATES, THE CHRONICLES OF RIDDICK or ATONEMENT. He also participated on several HARRY POTTER which he oversaw the effects of the last 3 episodes.

What is your background?
I started work as a projectionist in a cinema. I went to University and studied photography.
I started working at DNeg in 1998 as a junior compositor and roto artist. I worked my way up through the 2d department and started supervising vfx in 2005.

How did Double Negative got involved on this show?
We were approached by Universal to work on the show in February 2011. We did some concept work for the show and were awarded some of the work.

How was the collaboration with director Rupert Sanders?
We had a meeting with Rupert early on before the production started shooting in which we discussed Rupert’s overview and style of film making. And what he wanted to achieve. Most of the discussions that we had were with Cedric until the final weeks of the show when we spoke with Rupert in twice weekly cinesync sessions.

How was his approach about VFX?
Rupert is very used to working with VFX from his commercials background. Again, most of the discussions I had regarding the work for the show were with Cedric.

Can you tell us more about your collaboration with Production VFX Supervisor Cedric Nicolas-Troyan?
Cedric and myself discussed various aspects of the visual effects before DNeg were awarded the work on the show, Cedric was keen for us to work on the Dark Fairies and the Dark forest based on work that he had seen DNeg had completed on other productions. We had a great working relationship and he trusted us to develop the tools and techniques required to bring his visions to the screen. We would frequently send work in progress to Cedric, he would then give us notes.

What Double Negative have done on the show?
Two sequences, the Dark Forest and the Dark Fairies.

Can you tell us more about the filming of the Dark Forest sequence?
The production built a set in Black Park forest next to Pinewood Studios in England. The set backed onto a real forest so that there was no need for green-screen set extension. They shot all of the action on the set and we added our work to that material.

How did you design the Dark Forest?
We let the dark forest evolve really. At the outset Tania Richards, our concept artist and VFX art director, worked up literally hundreds of paintings that illustrated ideas for populating the forest. We showed this work to Rupert and Cedric. It was a process of evolution, but nothing was really concrete until we started working on the cut sequence. We continued adding and adjusting right up till the final deadline.

Can you explain to us how did you extend the set?
We didn’t really extend the set, there was one shot at the climax of sequence that we created a large top down wide shot that was populated with hundreds of cg trees. The set was built in a real forest so apart from shot mentioned above there was no real need to extend the set. We did however add branches to the onset trees so that we were able to animated them reaching out to grab Snow White as she ran through the Dark Forest. It was a job that involved adding material to the existing set, rather than extending the set.

The Dark Forest contains many various creatures. Can you tell us more about them?
We created a number of different creatures for the forest, there were : Snakes, that we hand animated, Beetles that were in the main procedural with a few hero animated beetles. Smoky Figures that were all driven by work from FX department. We had oozing muscles, Mushrooms that expelled hallucinogenic spores. All of the different creatures were built individually and only ever seen in a handful of shots.

How did you manage so many creatures?
We approached each asset as a separate build, Each creature had its own look-development person to ensure that even though the creatures were only ever in a few shots they all a high level of finish.

Can you tell us more about the Bat Fairy?
The Bat Fairy was a creature that was designed and built for a trailer shot. Rupert liked the creature and asked if we could use it in a few shots on the actual film. It was essentially a fully cg animated creature that was taken from concept to final shot for the trailer in 3 weeks. It was pleasing that it ended up being seen a few more times in the finished film.

At the end Ravenna summons the Dark Fairies. How did you design it?
We started off with a discussion about the sequence with Cedric, We then got four concept images from production. Our initial work involved sculpting a 3d maquette of the creature. We showed this as a 3d turntable to Rupert to get sign off on the design and form of the creature. Once we had reached an agreed 3d concept we then had an object that we able to have rigged so we could start animation tests. It also enabled us to have a model that we could ‘goal’ our fx work towards. The nature of the creature is that the fx flock together to form the creature, then shatter and reform when the creature has been struck or is required to move quickly.
There was a period of around 3 months in which the team led by Fx Supervisor Alexander Seaman and CG Supervisor Dan Neal worked with Pablo Giminez and Pete Kyme to develop a system and set of tools that robust and flexible enough to hit the ground running when it came to actual shot production.
Before we shot the live action for the sequence we created a sequence of 3 shots that we fully rendered lit and composited that clearly illustrated what the creature would look like and the way it would move.

The Dark Fairies are composed of thousands of glass pieces. Can you tell us in details how you create those elements and manage the simulations?
We modeled a group of different shards that were signed off by the client. The shards were all given a goal of the model of the fairy that we created. The simulations were driven by the movement created by the animation, and the fx flocked the shards towards or away from the creatures depending on the action required.

Have you collaborates with Pixomondo team about the shattering effect?
We didn’t.

What was the biggest challenge on this project and how did you achieve it?
The Fairies.

Was there a shot or a sequence that prevented you from sleep?
No.

What do you keep from this experience?
It was a real pleasure to work with such a wonderful creative team of artists and producers. We were in a position where we were aware that there was a short period of actual shot production. In order to get the work to the standard that is in the final film we did a lot of R&D work in advance of shot production, that work enabled us to cross the finish line with work that I hope everyone involved in creating it can be very proud. I am most proud of the way that the individuals in the crew came together as a team to create such a wonderful creative team atmosphere.

How long have you worked on this film?
I started in February last year and finished in April this year. But most of the crew worked from September through till April this year.

How many shots have you done?
100.

What was the size of your team?
150.

What is your next project?
Can’t really say at the moment….

What are the four movies that gives you the passion for cinema?
THELMA AND LOUISE, STRANGERS ON A TRAIN, THE AVENGERS ASSEMBLE and INDIANA JONES.

A big thanks for your time.

// WANT TO KNOW MORE?

Double Negative: Official website of Double Negative.


© Vincent Frei – The Art of VFX – 2012